
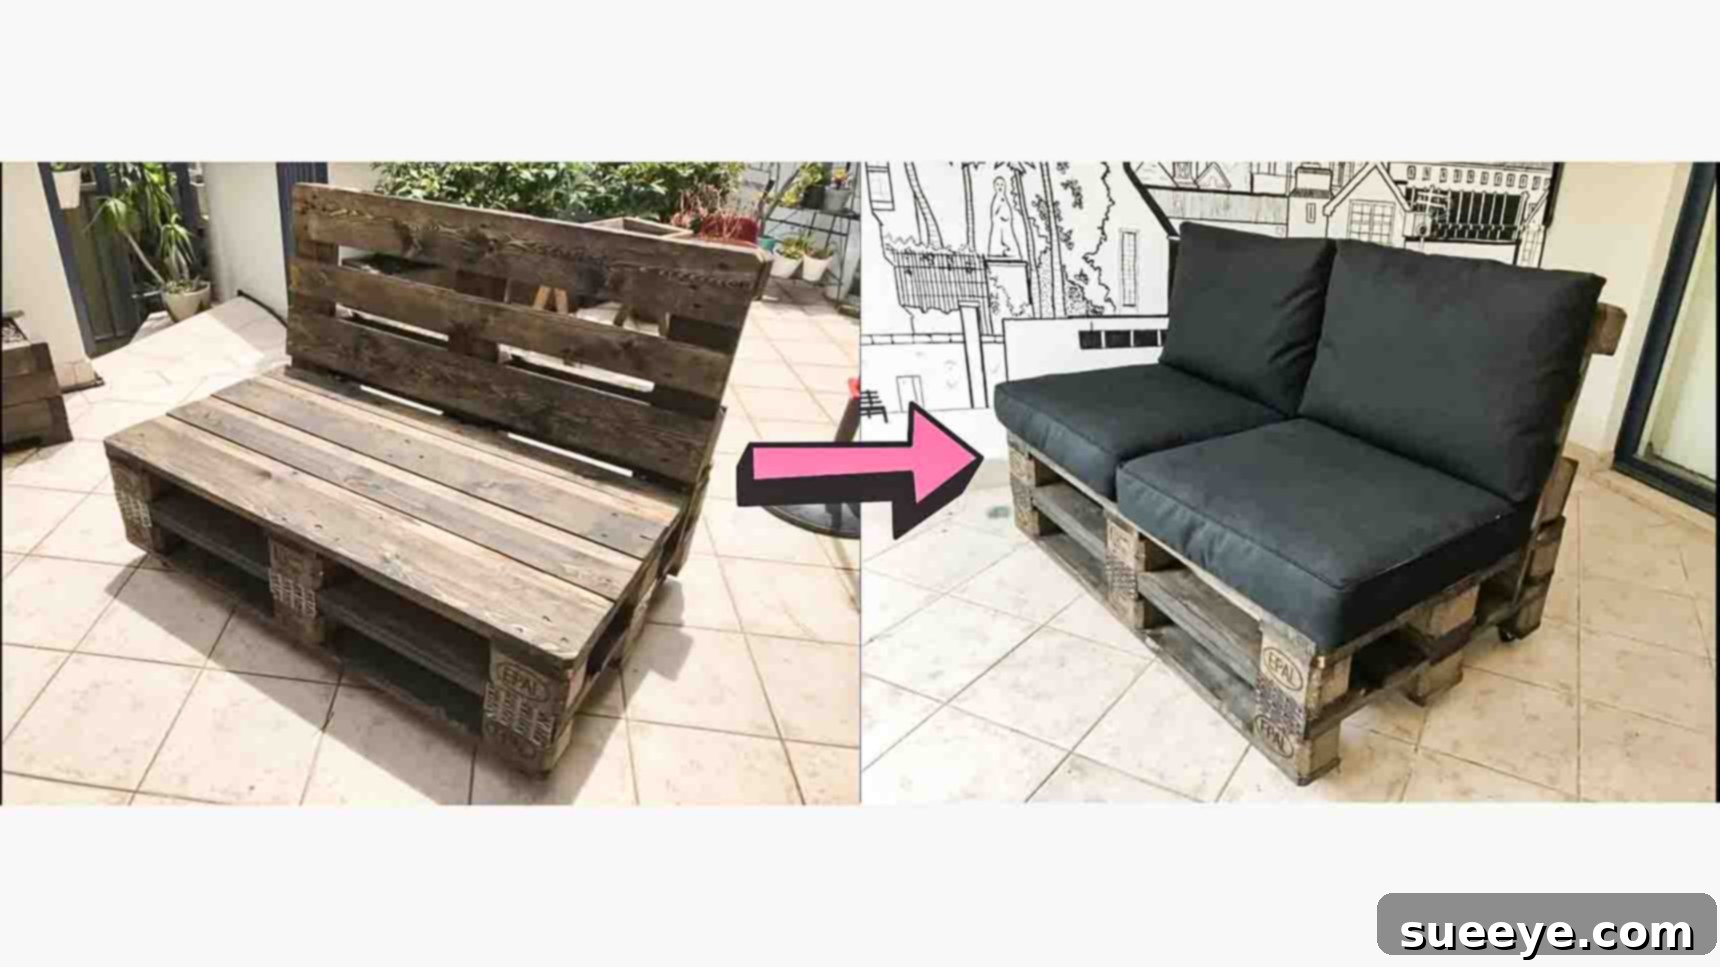
Build Your Own Stylish & Affordable Pallet Couch: A Comprehensive DIY Guide
Dreaming of a chic new sofa but wincing at the price tags in furniture stores like IKEA or local boutiques? You’re not alone! High-quality, aesthetically pleasing furniture can often come with a hefty cost, making home decor upgrades seem out of reach for many. However, there’s a fantastic, budget-friendly, and incredibly rewarding solution: building your own furniture from repurposed materials. And when it comes to creating a stylish yet economical seating solution, a DIY pallet couch stands out as a brilliant choice.
We’ve scoured the best DIY resources and found an exceptional pallet couch tutorial that transforms simple, readily available materials into a stunning piece perfect for any living room, patio, or studio apartment. Inspired by the ingenious work of Mikey2hands on YouTube, this project demonstrates how to construct a gorgeous and sturdy sofa using little more than wooden pallets and a few timbers. Not only will you save a significant amount of money, but you’ll also gain the satisfaction of crafting a unique piece tailored to your taste. Dive into this guide and learn how to create your very own custom pallet couch today!
Why Choose a DIY Pallet Couch?
Opting for a DIY pallet couch offers a multitude of benefits beyond just cost savings. It’s a choice that reflects smart budgeting, environmental consciousness, and a desire for personalized home decor. Here’s why this project is a true game-changer for your living space:
- Unbeatable Affordability: The primary advantage is undoubtedly the cost. Pallets are often available for free or at a very low cost, significantly reducing the expense compared to purchasing a new sofa. You’ll primarily invest in tools, fasteners, and finishing materials, making this an incredibly economical furniture solution.
- Sustainable and Eco-Friendly: By repurposing wooden pallets, you contribute to reducing waste and promoting sustainable living. You’re giving discarded materials a new life, diverting them from landfills and lessening the demand for new timber production.
- Endless Customization Potential: Unlike off-the-shelf furniture, a DIY pallet couch is a blank canvas. You have complete control over its design, dimensions, color, and comfort level. Paint it any color, add unique finishes, choose your ideal cushions, or even incorporate storage – the possibilities are truly limitless.
- A Sense of Accomplishment: There’s immense satisfaction in building something with your own hands. Completing a project like a pallet couch not only provides you with a functional piece of furniture but also boosts your confidence and practical skills.
- Unique and Personal Style: Your pallet couch will be a one-of-a-kind piece that reflects your personal style and creativity. It’s a conversation starter and a testament to your DIY prowess, adding character and warmth that mass-produced items simply can’t match.
- Durability and Versatility: When constructed correctly, pallet furniture can be surprisingly sturdy and durable. It’s also incredibly versatile, suitable for indoor living rooms, outdoor patios, balconies, or even as seating in a creative studio space.
Prepping Your Pallets for Success
Before you even think about cutting or joining, proper pallet selection and preparation are crucial for the success, safety, and longevity of your DIY couch. Don’t skip these important steps:
- Sourcing Pallets: Look for “HT” (Heat Treated) stamped pallets. These have been heat-treated to kill pests and are safer for indoor use than “MB” (Methyl Bromide) stamped pallets, which are chemically treated and should be avoided for furniture. Good places to check are local businesses, construction sites (ask permission!), or sometimes even free listings online. Aim for pallets that are relatively clean and intact.
- Inspection and Cleaning: Once you have your pallets, thoroughly inspect each one for damage, loose boards, splinters, and protruding nails. Remove any staples or old nails. Give them a good cleaning with a stiff brush, soap, and water to remove dirt, grime, or any potential contaminants. Let them dry completely in the sun.
- Sanding is Key: This is arguably the most important preparation step. Pallets can be rough, so thorough sanding is essential for both safety (to prevent splinters) and aesthetics (to create a smooth, paintable, or stainable surface). Start with coarse-grit sandpaper (e.g., 60-80 grit) to smooth out rough areas, then move to medium-grit (e.g., 120-150 grit), and finish with fine-grit (e.g., 180-220 grit) for a beautifully smooth finish. A power sander will make this process much faster and easier.
Materials: What You’ll Need
Gathering all your materials beforehand will ensure a smooth and uninterrupted building process. Here’s a detailed list of what you’ll need for this specific pallet couch design:
- 3 pcs. 47.25″ x 31.5″ pallets: These form the core structure of your couch – two for the seat and one for the backrest. Standard EUR pallets are roughly 47.2″ x 31.5″, making them ideal for this project.
- 3 pcs. 47″ long x 1.5″ x 0.75″ wide timber: These smaller pieces of timber are crucial for filling the gaps in one of your pallets, creating a solid and comfortable surface for the seat. Their dimensions are designed to fit perfectly within the pallet’s structure.
- Saw (or circular saw): Essential for precise cuts on both the pallets and the timber pieces. A circular saw will offer more speed and precision for larger cuts, while a hand saw can be used for smaller, more intricate adjustments. Always prioritize safety when using cutting tools.
- Sandpaper: As mentioned in the preparation, a range of grits (coarse, medium, fine) will be necessary to achieve a smooth, splinter-free finish. Alternatively, an orbital sander with various sanding discs will expedite this process significantly.
- Hammer: For adjusting pieces, persuading stubborn boards, and potentially driving or removing nails.
- Chisel (or screwdriver): Useful for prying apart boards, removing old nails, or creating small recesses if needed. A sturdy flathead screwdriver can often serve a similar purpose in a pinch.
- Drill (with 35mm screws and some 60mm screws): Your primary tool for securely fastening the different pallet components. The 35mm screws are ideal for attaching the timber infills and joining pallet layers, while the longer 60mm screws are vital for the robust attachment of the backrest to the seat, ensuring stability. Don’t forget appropriate drill bits.
- Instant nails adhesive: A strong construction adhesive designed to provide an immediate, powerful bond, supplementing the screws for enhanced structural integrity when joining pallet layers.
- Nail plates: While not explicitly detailed in the original brief, these can be incredibly useful for reinforcing joints, especially if you want extra stability or if any wood seems weakened. Consider them an optional but recommended addition for a truly robust couch.
- Brown spray paint: For a quick and even base color. This can be substituted with wood stain, primer, or any other color paint based on your desired aesthetic.
- Deck stain: A fantastic option for protecting the wood, especially if your couch will be exposed to the elements outdoors. Deck stain offers weather resistance and brings out the natural beauty of the wood grain, or can add a rich, consistent color.
Step-by-Step Instructions: Building Your Pallet Couch
Follow these detailed steps carefully to construct your sturdy and stylish DIY pallet couch. Remember to always prioritize safety and take your time with each stage.
Step 1: Constructing the Sturdy Seat Base
The foundation of your pallet couch begins with assembling the seat. This step focuses on creating a solid, comfortable surface and joining the main pallet sections.
- Fill the Gaps: Take one of your 47.25″ x 31.5″ pallets. This will be the top layer of your couch seat. Using the three pieces of 47″ long x 1.5″ x 0.75″ wide timber, carefully fill the wider gaps between the existing boards on this pallet. These timbers should fit snugly. The purpose of this step is to eliminate uncomfortable gaps, creating a more uniform and supportive surface for cushions and seating.
- Secure the Infill Timbers: Once the timber pieces are in place, secure them firmly from the underside using your drill and 35mm screws. Drive a couple of screws through the pallet’s existing framework into each of the new timber infills to prevent any movement.
- Smooth the Surface: With the infill timbers securely in place, take your sander (or sandpaper) and thoroughly sand down the entire top surface of this modified pallet. Pay close attention to the new timber pieces and ensure they are flush with the original pallet boards. The goal is a smooth, splinter-free surface for comfortable seating.
- Prepare the Second Pallet: Take your second 47.25″ x 31.5″ pallet. This will form the bottom layer of your couch seat. Ensure it is clean and sanded as well.
- Apply Adhesive: Apply a generous amount of instant nails adhesive to the top surface of the second pallet (the one *without* the added timber infills). Focus on the two end boards and the middle support beam of the pallet, ensuring good coverage for strong adhesion.
- Join the Pallets: Carefully place the first pallet (the one with the timber infills and sanded surface) directly on top of the second pallet, aligning all edges and corners precisely. This creates a double-layered, robust seat base.
- Apply Pressure: To ensure the adhesive creates a strong bond, place some heavy weights (e.g., bags of sand, concrete blocks, or even just stand on it) evenly across the top surface of the joined pallets for at least an hour, or as recommended by the adhesive manufacturer. This pressure helps the adhesive cure effectively and firmly joins the two layers.
- Cut for Backrest Integration: Once the adhesive has cured and the seat base is stable, it’s time to prepare for the backrest. Identify the “back” of your couch seat. Using your saw, carefully cut down the *end* sections of the joined pallets from the back, leaving the middle support section intact. This means you will make two vertical cuts, one on each side of the middle support, creating two gaps where the backrest will eventually slide in. Ensure your cuts are straight and precise, as this will affect how well the backrest fits. The middle section that remains will provide crucial support for the backrest.
Step 2: Crafting the Comfortable Backrest and Finishing Touches
Now that your seat is complete, it’s time to create and attach the backrest, and then add the all-important finishing touches that will transform your pallets into a comfortable and attractive couch.
- Prepare the Backrest Pallet: Take your third 47.25″ x 31.5″ pallet. This will become your backrest. Lay it flat. You will need to modify its structure to allow it to be inserted into the gaps you created in the seat base.
- Precise Backrest Cuts: Using your saw, make strategic cuts. First, cut along the bottom line of the pallet’s existing boards from one side, and then do the same on the other side. These are horizontal cuts that will define the bottom edge of your backrest. Next, identify the middle support beam of this pallet. You will need to cut halfway through the two outermost boards that run perpendicular to the main support beams, creating a ‘U’ shape from the bottom. (Refer to the image below for visual clarity on these cuts.) The aim is to remove sections of the lower boards so that the main support beams of the backrest can slide into the gaps of the seat base.
- Detaching Unnecessary Boards: Once your cuts are complete, use your hammer to carefully knock down and detach the bottom and second boards from the areas you just cut. Repeat this on the other side. This will leave the central support beams of the pallet exposed at the bottom, ready to be inserted into the seat. As you detach boards, be sure to pull out any protruding nails completely with a hammer or pry bar to ensure safety and a clean finish.
- Insert the Backrest: Carefully lift the prepared backrest pallet and slide the exposed central support beams into the gaps you cut through in the seat base. The backrest should sit flush and upright against the back of the seat. Adjust as necessary to ensure it’s centered and straight.
- Secure the Backrest: To ensure the backrest is firmly in position and won’t wobble, you’ll need to create strong anchor points. Using your drill, create a pilot hole through both sides of the couch seat, ensuring the hole passes directly into the corresponding central support beam of the backrest. Once the pilot holes are drilled, drive a 60mm screw through each hole and into the backrest. These longer screws provide a robust connection, making your couch sturdy and safe. Add extra screws as needed for maximum stability.
- Final Sanding (Optional but Recommended): Give the entire assembled couch a final light sanding to catch any missed rough spots and prepare it for finishing.
- Apply Your Desired Finish: Now for the creative part! You can stain, paint, or varnish your pallet couch.
- Stain: A deck stain (like the brown spray paint mentioned in materials, or a traditional wood stain) will protect the wood and enhance its natural grain, giving it a rich, warm look. Apply according to product instructions, usually in multiple thin coats.
- Paint: For a bold, modern, or shabby-chic look, prime the wood first, then apply several coats of your chosen color paint. Spray paint can offer an even finish, while brush paint allows for more control.
- Sealant: If the couch will be outdoors, a good quality outdoor sealant or varnish applied over paint or stain is crucial for weather protection.
- Add Cushions and Personalize: Once the finish is dry, it’s time to add comfort and style. Place suitable cushions (either custom-made, outdoor patio cushions, or even DIY foam cushions wrapped in fabric) onto the seat and against the backrest. Arrange throw pillows and blankets to truly customize the look and feel to your liking.
Customization Ideas for Your Pallet Couch
The beauty of a DIY project lies in its adaptability. Don’t stop at the basic build; let your creativity flow and customize your pallet couch to perfectly match your home and needs:
- Color and Finish: Beyond brown stain, consider vibrant colors like turquoise for a coastal feel, charcoal grey for a modern minimalist look, or a distressed white for farmhouse charm. You can even use different colors for the base and backrest.
- Cushions and Upholstery: This is where comfort meets style. Invest in good quality outdoor cushions for durability, or sew your own covers from sturdy fabrics that complement your decor. Foam mattresses cut to size can also make incredibly comfortable seats.
- Mobility: Add heavy-duty caster wheels to the bottom of your couch for easy rearrangement, especially if it’s for an outdoor space or a flexible living area. Ensure the wheels are lockable for stability.
- Integrated Storage: Some pallet designs allow for open cubbies beneath the seat. You could add small baskets or drawers for extra storage space for magazines, remotes, or blankets.
- Armrests and Side Tables: Build simple armrests using additional pallet wood, or integrate small side tables at either end by attaching extra wood planks or smaller pallet sections.
- Lighting: For a cozy ambiance, consider attaching LED strip lights underneath the seat or along the backrest. Solar-powered LED strips are perfect for outdoor pallet couches.
- Sectional Design: Build multiple single units and arrange them as a sectional or L-shaped couch for larger spaces, providing ample seating for guests.
- Weatherproofing for Outdoor Use: If your couch is intended for outdoors, rigorous sanding, sealing, and waterproof cushions are essential to withstand the elements. Reapply sealant annually.
Safety First! Important Considerations for DIY Projects
Working with power tools and raw wood requires caution. Always keep safety at the forefront of your project:
- Personal Protective Equipment (PPE): Always wear safety glasses to protect your eyes from sawdust and flying debris. Gloves will protect your hands from splinters and chemicals. A dust mask or respirator is crucial when sanding to avoid inhaling wood dust.
- Tool Safety: Read and understand the manuals for all your power tools (saws, drills, sanders). Ensure blades are sharp and guards are in place. Always unplug tools when changing blades or bits, and keep your work area clear and well-lit.
- Ventilation: When painting, staining, or using adhesives, ensure you are working in a well-ventilated area to avoid inhaling fumes. Work outdoors if possible.
- Secure Workpiece: Always clamp or secure your pallets and timber pieces firmly before cutting or drilling to prevent movement and potential accidents.
- Check Pallet Origin: Reiterate checking for “HT” (Heat Treated) stamps on pallets. Avoid “MB” (Methyl Bromide) pallets as they contain chemicals harmful for indoor use.
Maintenance Tips for Your Pallet Couch
To keep your DIY pallet couch looking great and lasting for years, a little maintenance goes a long way:
- Regular Cleaning: Dust and wipe down your couch regularly. For deeper cleaning, a damp cloth with mild soap can be used.
- Protect from Elements: If outdoors, cover your pallet couch with a waterproof cover when not in use, especially during harsh weather. Store cushions indoors when not in use.
- Re-staining/Repainting: Depending on wear and tear, and whether the couch is indoors or outdoors, you may need to reapply stain, paint, or sealant every 1-3 years to refresh its look and maintain protection.
- Check Fasteners: Periodically inspect all screws and joints to ensure they are still tight. Tighten any loose screws to maintain the structural integrity of your couch.
- Splinter Patrol: Even after initial sanding, new splinters can sometimes emerge. Do a quick check now and then and sand down any new rough spots.
Conclusion: Your New Favorite DIY Project
Building your own pallet couch is more than just a woodworking project; it’s an opportunity to create a functional, beautiful, and personalized piece of furniture that truly reflects your style. By following this comprehensive guide, you can transform humble wooden pallets into a comfortable and chic sofa that will be the envy of your friends and family. Not only will you save money and contribute to a more sustainable lifestyle, but you’ll also gain immense satisfaction from showcasing your DIY skills.
So, gather your materials, clear your workspace, and get ready to embark on a rewarding journey of creation. Your new, custom-built pallet couch awaits, ready to add charm and comfort to your home. Don’t forget to share your amazing creations with the DIY community!