
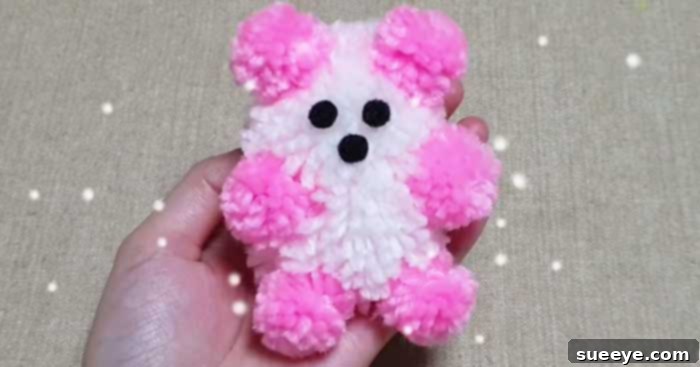
There’s something truly special about a handmade gift, and this adorable DIY yarn teddy bear craft truly embodies that sentiment. Imagine the delight on a child’s face as they receive a unique, cuddly companion crafted with love, or the satisfaction of creating a charming decoration for your home. This fantastic project, inspired by the creative minds at Merry Craft, offers a delightful way to engage your creativity with minimal supplies and effort. It’s not just for kids; adults will find this a relaxing and rewarding craft. Its simplicity also makes it an ideal activity for children’s birthday parties or classroom projects, allowing little ones to create their very own personalized bears with ease. While Merry Craft showcased their bears using classic white and pink yarn, the beauty of this DIY lies in its versatility—you can choose any two colors that spark your imagination, making each bear truly one-of-a-kind. Get ready to transform everyday materials into an enchanting keepsake!
Why Craft Your Own Yarn Teddy Bear? The Joy of DIY!
In a world full of mass-produced items, a handcrafted yarn teddy bear stands out. It’s more than just a toy or a decoration; it’s a testament to creativity, patience, and personal touch. This DIY project offers numerous benefits beyond just a cute end product:
- Perfect Handmade Gifts: Whether it’s for birthdays, holidays, baby showers, or just because, a custom-made yarn bear is a thoughtful and cherished present that shows you care.
- Engaging Kids’ Craft: Its straightforward steps make it accessible for children, helping them develop fine motor skills, follow instructions, and express their creativity. It’s a wonderful screen-free activity!
- Budget-Friendly Fun: Utilizing readily available and inexpensive materials like yarn and toilet paper rolls, this craft proves that you don’t need to spend a lot to have a lot of fun.
- Customization Galore: From vibrant color combinations to unique accessories, each bear can be a reflection of its creator’s personality or the recipient’s preferences.
- Mindful & Relaxing Activity: The repetitive motion of wrapping yarn can be incredibly therapeutic and meditative, offering a calming escape from daily stresses.
Essential Materials Needed For Your DIY Yarn Bear Craft:
One of the best aspects of this charming craft is its minimalist material list. You likely have most of these items lying around your home already, making it an excellent spontaneous project. Here’s what you’ll need to gather to bring your fluffy friend to life:
- Yarn In Two Complementary Colors: This is the star of our show! Choose colors that you love or that complement each other well. Think about the personality you want your bear to have. A fluffy acrylic yarn works wonderfully, but you can experiment with different textures for unique results. One color will be for the main body/head, and the second for the ears, arms, legs, and tail. Consider soft pastels for a baby bear, bright primaries for a playful look, or earthy tones for a rustic appeal. The thickness of your yarn will also influence the final size and fluffiness of your bear.
- Standard Toilet Paper Roll: This humble household item forms the crucial template for creating your yarn pom-pom-like pieces. Ensure it’s empty and clean. If you don’t have a toilet paper roll, a paper towel roll cut in half, or even a sturdy piece of cardboard rolled into a cylinder, can serve as an alternative. The diameter of the roll determines the initial size of your yarn sections, so a wider roll will yield a larger, chunkier bear.
- Hot Glue Gun and Glue Sticks: A hot glue gun is recommended for its quick drying time and strong hold, ensuring your bear’s parts stay securely attached. Always exercise caution when using a hot glue gun, especially if crafting with children; adult supervision is essential. For younger crafters, craft glue or fabric glue can be used, though drying times will be significantly longer and may require temporary clips to hold pieces in place while they bond.
- Sharp Scissors: You’ll need a good pair of scissors specifically for cutting yarn. This will ensure clean cuts and prevent fraying, making the tying and trimming steps much easier. Dull scissors can lead to frustration and uneven edges, so a sharp pair is a small but important investment in your crafting success.
- Optional Embellishments: Small black cotton balls (or beads, felt, buttons) for eyes and a nose, ribbons, small fabric scraps, felt pieces, or tiny charms for accessorizing your bear. These additions are what truly give your bear its unique personality.
That’s it! With these simple items, you’re ready to embark on your creative journey.
Step-by-Step Directions to Create Your Adorable Yarn Teddy Bear:
Step One: Crafting the Main Body & Head Base
Begin by taking your chosen main color of yarn (this will be the primary color of your bear’s body and head) and your empty toilet paper roll. The key here is consistency. Start wrapping the yarn around the toilet paper roll approximately 50 times. It’s crucial to wrap the yarn around itself, rather than stretching it across the entire width of the roll. This technique ensures that the bundle of yarn maintains a relatively compact diameter, creating a dense, uniform loop that will form the core of your bear’s main sections. Keep the tension consistent as you wrap; too loose, and your yarn bundle might be flimsy; too tight, and it could be difficult to remove from the roll. The number 50 is a guideline; you can adjust this slightly based on the thickness of your yarn and how dense you want your bear’s ‘fur’ to be. Thicker yarn might require fewer wraps, while thinner yarn might benefit from more. The goal is to create a thick, plush loop that is easy to manage in the next step. Ensure your wraps are snug against each other but not overlapping excessively, creating a neat cylinder of yarn.
Image by. Merry Craft via YouTube video.
Step Two: Securing the Main Yarn Bundles
Once you’ve completed wrapping, carefully slide the entire yarn bundle off the toilet paper roll. This step requires a gentle touch to prevent the loops from separating or becoming tangled. Hold the bundle together firmly but not too tightly to maintain its shape. Now, take a separate piece of yarn, approximately 6-8 inches long. This piece will be used to tie off your bundle. Position this short piece of yarn underneath the exact center of your wrapped bundle. Bring the ends up and over the top, then tie a tight double knot. This knot should cinch the middle of your bundle, effectively creating two distinct, fluffy sections, similar to a figure-eight or two connected pom-poms. The tighter the knot, the more defined your bear’s head and body will be. It is recommended to make two of these main yarn bundles. One will serve as the bear’s head, and the other as its body. After tying, use your sharp scissors to trim any excess yarn from the tying string, ensuring that all the yarn loops are roughly equal in length and no stray strings are poking out. This creates a neat and spherical appearance for both the head and body components.
Step Three: Crafting the Smaller Bear Components
Now it’s time to create the smaller, accent pieces for your bear using the second color of yarn. These will become the bear’s ears, arms, legs, and tail. Instead of using the toilet paper roll, you’ll use two of your fingers (your index and middle finger held together) as the wrapping guide. Hold these two fingers together and tightly wrap the second color of yarn around them. The number of wraps here will be less than the main body, perhaps 20-30 times, depending on how large you want these smaller parts to be relative to the head and body. Experiment with a test wrap to find the right proportion that looks pleasing. Just as in Step One, ensure the wrapping is consistent and taut; too loose, and they won’t hold their shape well. Once wrapped, carefully slide the yarn off your fingers. Take another separate, short piece of yarn and tie it securely around the center of this smaller bundle, similar to how you tied the larger bundles in Step Two. Again, trim any excess tying yarn to maintain a tidy appearance. For a complete teddy bear, you will need to make a total of seven of these smaller yarn balls: two for the ears, two for the arms, two for the legs, and one for the tail. Ensuring they are all roughly the same size will contribute to a well-proportioned bear.
Step Four: Assembling Your Adorable Yarn Bear
With all your yarn components ready, it’s time to bring your teddy bear to life through assembly. This is where the hot glue gun comes in handy. Remember, precision and a steady hand are key here. Take one of your larger yarn bundles (from Step Two) and designate it as the body, and the other as the head. Begin by attaching the smaller pieces. Place two of the smaller yarn balls on top of the ‘head’ piece, positioned slightly apart to form the ears. Apply a small dab of hot glue to the bottom of each ‘ear’ piece and press firmly onto the ‘head’ for a few seconds until secure. Next, attach the head to the body. Apply glue to one side of the ‘body’ and press the ‘head’ firmly onto it, ensuring it’s centered and upright. This joint is crucial for the bear’s overall stability. Then, position two more small yarn balls on the sides of the ‘body’ for the arms, ensuring they are placed symmetrically. Attach another two towards the bottom for the legs, making sure the bear can ‘sit’ or stand evenly. Finally, attach the last small yarn ball to the back of the ‘body’, slightly lower down, as the tail. Take your time during this step to ensure all limbs and features are symmetrical and securely attached. Hold each piece in place for a few moments as the glue sets. This careful assembly will give your yarn bear its characteristic teddy bear shape and ensure it’s sturdy enough for play or display.
Image by. Merry Craft via YouTube video.
Step Five: Adding Personality: Face and Accessories
Your yarn bear is almost complete, but it needs a face to truly come alive! For the eyes and nose, small black cotton balls are a simple and effective choice, as demonstrated by Merry Craft. Apply tiny dots of hot glue to the face of your bear where you want the eyes and nose to be, then gently press the cotton balls into place. Alternatively, you could use small black beads (ensure they are securely glued if for young children), felt circles, small buttons, or even embroider features with black yarn for a more whimsical look. Get creative! Think about the expression you want your bear to have – happy, sleepy, curious. Once the basic features are in place, the real fun begins: accessorizing! This is your chance to infuse your bear with unique charm. Consider tying a colorful ribbon around its neck for a bow tie or a sweet scarf. You could add tiny felt hearts, sequins, miniature fabric flowers, or even a tiny felt patch on its belly. Think about themes: a tiny graduation cap, a mini superhero cape, or a festive Santa hat for holiday bears. The possibilities are endless, allowing you to personalize each bear for a specific person, occasion, or even to match a room’s decor. And just like that, your charming, handmade yarn teddy bear is complete, ready to bring smiles and warmth!
Expert Tips for Crafting a Perfect Yarn Teddy Bear:
To ensure your yarn teddy bear turns out as adorable and durable as possible, keep these expert tips in mind:
- Yarn Choice Matters: While most yarns will work, fluffy acrylic yarns tend to be forgiving and come in a vast array of colors, making them excellent for beginners. Experiment with different weights and textures; bulkier yarn will yield a larger, fluffier bear with fewer wraps, while finer yarn will create a denser, more delicate bear. Consider using a slightly textured yarn for an extra cozy feel.
- Consistent Tension: Maintaining even tension when wrapping yarn is crucial for uniform and aesthetically pleasing “pom-poms.” Practice a few wraps to get a feel for it before committing to the full count. Inconsistent tension can lead to lopsided or less dense yarn bundles.
- Secure Knots: Ensure your tying knots are very tight. A loose knot can cause the yarn bundle to unravel, especially over time or with handling. Double-knotting is always a good idea for added security.
- Safety First with Hot Glue: If children are participating, an adult should always handle the hot glue gun to prevent burns. For younger kids, pre-apply glue, or use craft glue and allow ample drying time, possibly using clothespins to hold pieces while they bond.
- Trim with Care: After tying, trim the loose ends of the tying yarn neatly. You can also gently ‘fluff’ your yarn balls and trim any unruly loops to create a more spherical and tidy shape, just like trimming a real pom-pom. This gives your bear a polished, finished look.
- Proportion Play: Pay attention to the proportions of the head, body, and limbs during assembly. A slightly larger head can give a more ‘baby’ bear look, while more uniform sizes can create a mature or stylized bear. Hold pieces up before gluing to eyeball their placement.
Creative Variations and Customization Ideas:
Once you master the basic yarn teddy bear, the possibilities for customization are endless. Don’t limit yourself to just bears – this technique is a foundation for boundless creativity!
- Different Animals: By changing the ear shape and color, you can easily transform your bear into other adorable creatures. Pointy ears could make a fox, longer ears a bunny, or rounded, flatter ears a mouse. Imagine a whole zoo of yarn animals!
- Size Matters: Use wider cardboard tubes for larger, huggable bears, or wrap yarn around a single finger for tiny, charm-sized bears perfect for keychains or ornaments. Create a whole family of yarn bears in different sizes!
- Multicolor Magic: Instead of two solid colors, try wrapping yarn in stripes on your toilet paper roll for a variegated look. You can also combine multiple colors within a single yarn ball for a truly unique, speckled effect, or even use gradient yarns.
- Themed Bears: Create bears for specific holidays (e.g., red and green for Christmas, orange and black for Halloween) or seasons. Add tiny accessories like miniature scarves, hats, or even tiny gifts to hold for a festive touch. These make fantastic seasonal decorations or gifts.
- Personalized Touches: Embroider initials onto a small felt belly patch, or attach a tiny name tag with the recipient’s name. These small details elevate a gift from lovely to truly unforgettable and personal.
- Functional Crafts: Add a loop of sturdy yarn to the top of your bear’s head before gluing on the ears, and you’ve got an instant ornament for a Christmas tree or a charming keychain! These also make great bag charms.
Final Thoughts on Your Yarn Teddy Bear Adventure
Crafting these delightful yarn teddy bears is more than just a pastime; it’s an opportunity to create something truly heartwarming and personal. Each bear you make will carry a piece of your creativity and effort, making it a cherished item for anyone who receives it, or a beloved addition to your own collection of handmade treasures. From a simple birthday party activity to a meaningful holiday gift, the DIY yarn teddy bear project offers endless possibilities for fun and expression. It’s a wonderful way to unwind, tap into your artistic side, and produce something tangible and adorable. So, gather your materials, let your imagination lead the way, and enjoy the satisfying process of bringing these fuzzy friends to life. Don’t forget to share your creations online and inspire others to embark on their own yarn crafting adventures! Happy crafting!