
DIY Desk For Less Than $100: Build a Modern Recording Studio or Home Office Desk
The journey of transforming a passion into a profession often begins with creating the right environment. For my husband, a seasoned musician who has dedicated years to various bands, the dream of building his own recording studio was a natural progression. This wasn’t a sudden whim; it was a long-held ambition that, with the enthusiastic support of our family, we decided to bring to life. As we embarked on this exciting venture, one critical element for his new workspace quickly became apparent: a functional, stylish, and budget-friendly desk.
Setting up a new music business, especially from a humble backroom office, meant every decision had to be both practical and inspiring. We wanted the decor for his recording studio office to embody a modern, sleek aesthetic – something that would not only look professional but also foster creativity. That’s when I stumbled upon an incredible DIY wooden desk video tutorial by Wood.Work.LIFE. on Youtube. This modern desk design, with its clean lines and robust construction, was absolutely perfect. It struck a chord with his vision, offering the ideal blend of form and function while allowing us to maintain a tight budget.
This project isn’t just for aspiring music producers; it’s an excellent solution for anyone looking to furnish a home office, create a spacious crafting table, or build a unique gaming setup. The beauty of DIY lies in its customizability and the immense satisfaction of crafting something with your own hands. Join us as we explore how to construct a beautiful, mid-century modern-inspired desk that promises to elevate any workspace without breaking the bank.
Why Choose a DIY Desk for Your Studio or Home Office?
Opting for a DIY desk offers numerous advantages over purchasing a pre-made one, especially when you have specific needs like those for a recording studio or a personalized home office. Here’s why this project stands out:
- Cost-Effectiveness: As the title suggests, this desk can be built for less than $100, a fraction of the cost of comparable retail options. This is crucial for new businesses or those furnishing on a budget.
- Customization: You have complete control over dimensions, wood type, stain color, and leg style, ensuring the desk perfectly fits your space and aesthetic preferences. Need more depth for a mixer? Easy. Want it longer for multiple monitors? No problem.
- Quality and Durability: By selecting quality construction-grade lumber, you can build a desk that is far sturdier and more durable than many mass-produced alternatives.
- Personal Satisfaction: There’s a unique sense of accomplishment in building your own furniture. It adds a personal touch and a story to your workspace.
- Aesthetic Appeal: The mid-century modern design with hairpin legs offers a timeless, sophisticated look that blends seamlessly with various interior styles, from contemporary to industrial.
Materials You’ll Need for Your DIY Modern Desk Project
Before you dive into the build, gathering all your materials and tools is essential for a smooth and efficient process. Here’s a comprehensive list of what you’ll need, along with some considerations for selection:
Essential Tools:
- A Drill: A standard cordless drill is sufficient for most screw applications. Ensure it’s fully charged.
- Impact Drill Bit Set: An impact driver (if you have one) and its compatible bit set will make driving screws much easier, especially into dense wood, and will help prevent stripping screw heads.
- Measuring Tape and Pencil: For accurate measurements and marking cuts.
- Wood Clamps: Essential for holding wood pieces together during glue-up and dowel insertion. At least 4-6 clamps are recommended.
- Orbital Sander & Sandpaper (various grits): For achieving a smooth, professional finish. Start with 80-120 grit for initial shaping, then progress to 180-220 grit for fine finishing.
- Safety Glasses: Always protect your eyes when drilling, sanding, or cutting.
- Dust Mask/Respirator: To avoid inhaling sawdust.
- Saw (Circular Saw or Miter Saw): For cutting lumber to size. A circular saw with a straight edge guide works well for large panels.
- Dowel Jig (Optional but Recommended): This tool greatly simplifies the process of drilling accurate holes for dowel joinery, ensuring perfect alignment.
- Applicator Rags or Brushes: For applying stain or finish.
Key Materials:
- Construction Grade Lumber (e.g., 2x8s or 2x10s): The backbone of your desktop. Select straight, knot-free boards. Pine is an excellent budget-friendly choice that stains beautifully, but oak or maple offer more durability if your budget allows. Consider the final dimensions of your desk when purchasing. For a desktop approximately 24-30 inches deep and 60-72 inches long, you’ll likely need 3-4 boards of appropriate length.
- Wood Glue: High-quality wood glue is crucial for strong dowel joints and a durable desktop.
- Dowel Pins (e.g., 3/8 inch or 1/2 inch): These wooden rods connect the individual lumber pieces to form the desktop. Ensure they are the correct diameter for your drill bits.
- Wood Stain (Minwax is a popular and reliable brand): Choose a color that complements your space. Consider a rich walnut, a classic oak, or a modern grey stain.
- Wood Sealer/Topcoat (e.g., Polyurethane): A protective topcoat is vital for durability, especially for a heavily used desk. Choose between matte, satin, or gloss finish based on your preference.
- A Set of Four Hairpin Legs: These provide the distinctive mid-century modern look. They come in various heights (typically 28 inches for a standard desk) and finishes (black, raw steel, chrome). Source them from online retailers like Amazon, Etsy, or specialized hardware stores.
- Screws: Appropriate length screws to attach the hairpin legs to the underside of the desktop. Ensure they are long enough to penetrate the desktop sufficiently without poking through the top.
- Firm Grip Cut Resistant Gloves: An excellent safety addition, especially when handling lumber and tools. While not strictly necessary for this specific project (as most cutting will be done by saw), general safety gear is always a good idea.
Step-by-Step Directions: Building Your Modern Wooden Desk
This project is surprisingly straightforward, thanks to the clear guidance available. While this written guide provides a detailed overview, we highly recommend following along with the comprehensive DIY wooden desk video tutorial by Wood.Work.LIFE. on Youtube, which walks you through every step visually.
1. Planning and Lumber Preparation
First, determine the ideal dimensions for your desk. Consider the equipment you’ll place on it (monitors, audio interface, keyboard, mixer) and the available space in your room. Once you have your desired length and depth, calculate how many lumber pieces you’ll need. For instance, if you’re using 2x8s (which are actually about 1.5 inches thick and 7.25 inches wide) and want a desk about 29 inches deep, you’d need four 2x8s side-by-side (4 x 7.25 = 29 inches).
Carefully select your construction-grade lumber. Look for boards that are as straight as possible, with minimal knots or warping. These imperfections can make joinery difficult and affect the final appearance. Cut your lumber to the desired length for the desktop. If you don’t have a saw, many hardware stores offer cutting services.
2. Assembling the Desktop with Dowel Joinery
This is where the magic of a solid desktop comes together. Dowel joinery is a strong and relatively simple method for edge-gluing boards. Lay your cut lumber pieces side-by-side on a flat surface in the orientation you want for your desktop. Mark evenly spaced points along the edges where the dowel pins will go. Typically, dowels every 8-12 inches provide sufficient strength.
Using your drill and a drill bit matching the diameter of your dowel pins, drill holes at each marked point. Consistency is key here: ensure the holes are centered on the edge of the board and drilled to a consistent depth (often half the length of your dowel pin). A dowel jig can be incredibly helpful for maintaining accuracy. Once all holes are drilled, apply a generous amount of wood glue into each hole and along the entire edge of one board. Insert the dowel pins into the holes of the first board, then carefully align and press the next board onto the exposed dowel pins, ensuring glue is also on its edge. Repeat this process for all boards.
Once all boards are joined, use several wood clamps to apply firm, even pressure across the entire width of the desktop. This ensures a tight bond and a flat surface. Wipe away any excess glue that squeezes out immediately with a damp cloth. Let the glue cure completely according to the manufacturer’s instructions, typically 24 hours, before proceeding.
3. Sanding for a Smooth Finish
After the glue has dried and the clamps are removed, the desktop will likely have some unevenness or glue residue. This is where sanding comes in. Start with a coarser grit sandpaper (80-120 grit) on your orbital sander to flatten any high spots and remove major imperfections. Work your way up through finer grits (180-220 grit) until the entire surface is smooth to the touch. Pay extra attention to the edges and corners, softening them slightly to prevent sharp points. A perfectly sanded surface is crucial for a professional-looking finish.
4. Staining and Sealing
With the desktop meticulously sanded, it’s time to apply your chosen stain. Ensure the surface is free of all dust and debris before staining. Apply the stain evenly with a brush or rag, working in the direction of the wood grain. Allow the stain to penetrate for the recommended time (check the product label), then wipe off any excess with a clean rag. For a deeper color, apply a second coat after the first has dried. Always allow adequate drying time between coats.
Once the stain is completely dry, apply a protective topcoat, such as polyurethane. This will protect the wood from spills, scratches, and daily wear and tear. Apply thin, even coats, sanding lightly with a very fine grit sandpaper (e.g., 220-320 grit) between coats for maximum smoothness and adhesion. Typically, 2-3 coats are sufficient for a durable finish. Allow the topcoat to cure fully, which can take several days, especially for heavy use.
5. Attaching the Mid-Century Modern Hairpin Legs
The final step brings the desk to life: attaching the hairpin legs. Carefully flip the desktop over, taking care not to scratch the finished surface. Position the hairpin legs about 1-2 inches in from each corner, ensuring they are square and aesthetically pleasing. Mark the screw holes with a pencil. It’s a good practice to drill small pilot holes before driving the screws; this prevents the wood from splitting and makes driving the screws much easier. Securely attach each leg with the appropriate screws using your drill or impact driver.
The Finished Product: A Studio-Ready Masterpiece
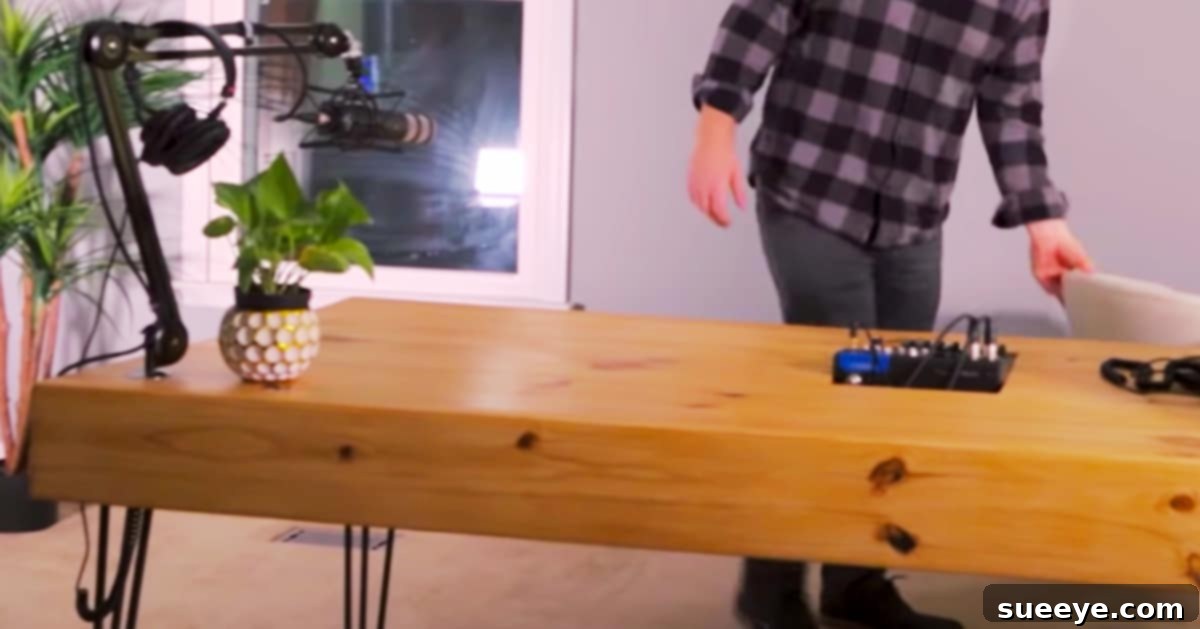
After all the hard work, the finished product is nothing short of impressive. This large, spacious desk provides ample surface area for multiple monitors, audio interfaces, MIDI controllers, and even a small mixer – perfect for a burgeoning recording studio. My husband absolutely loves it, and frankly, so do I. The combination of the sturdy wooden top and the elegant hairpin legs evokes a strong sense of the early Fifties rock and roll era, a stylistic choice that feels incredibly appropriate for his new music venture. It’s more than just a desk; it’s a statement piece that blends vintage charm with modern utility.
Beyond its aesthetic appeal, the functionality of this DIY desk is outstanding. The generous workspace promotes an organized and efficient workflow, which is crucial in a creative environment like a recording studio. Furthermore, the robust construction ensures it can handle the weight and demands of various audio equipment for years to come. This project truly demonstrates that you don’t need to spend a fortune to achieve a high-quality, custom, and stylish piece of furniture for your home or business.
Whether you’re building a new recording studio, setting up a productive home office, or simply looking for a meaningful DIY project, this modern wooden desk with hairpin legs offers an unbeatable combination of affordability, style, and personal satisfaction. Give it a try, and transform your space with a custom piece that perfectly reflects your vision!