
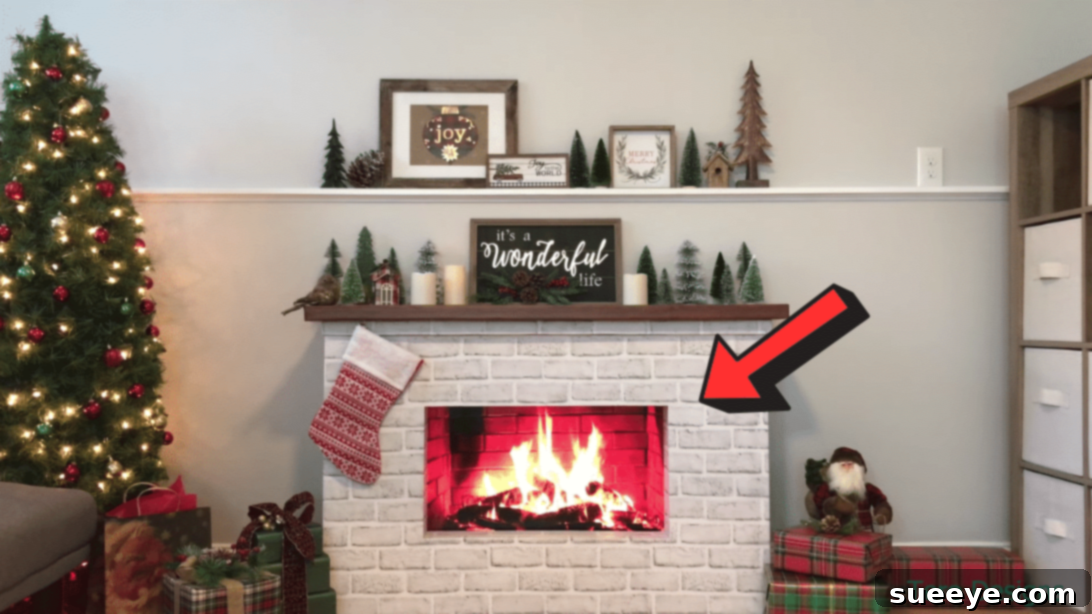
There’s an undeniable allure to a crackling fireplace – the inviting warmth, the mesmerizing dance of flames, and the instant coziness it adds to any living space. For many, a fireplace represents the heart of a home, a cherished spot for gathering with loved ones, or simply unwinding after a long day. It also serves as a beautiful focal point, especially when adorned with festive decorations during the holiday season. However, the dream of a traditional built-in fireplace often comes with a hefty price tag, complex installation, and ongoing maintenance. From sourcing materials and professional labor to ensuring proper ventilation and regular chimney cleaning, the reality can be far from simple.
Fortunately, the world of DIY offers ingenious alternatives that capture the charm and aesthetic appeal of a fireplace without the practical drawbacks. These creative solutions allow homeowners and renters alike to transform their living areas into warm, inviting havens on a budget. If you’ve ever yearned for that quintessential fireplace ambiance but felt deterred by the complexities, you’re in for a treat. We’re about to explore a brilliant, highly customizable, and surprisingly realistic DIY faux fireplace project that uses everyday materials and the magic of your own television to create an stunning centerpiece for your home.
RELATED: How to Make a Realistic DIY Faux Fireplace
This fantastic concept, brought to life by Tero Designs on YouTube, demonstrates how to construct an elegant faux fireplace using readily available foam boards and your existing TV. The brilliance lies in using your television screen to display realistic fire visuals, creating an incredibly convincing illusion of a working fireplace. This video tutorial provides a clear, step-by-step guide that will allow you to craft a sophisticated and cozy focal point. Imagine your living room instantly elevated, radiating warmth and charm – we bet your family and guests will be utterly captivated! Ready to embark on this transformative home decor project? Let’s dive in and learn how to build your very own.
Why Choose a Foam Board Faux Fireplace?
The appeal of a faux fireplace, particularly one crafted from foam board, extends beyond just aesthetics and cost-effectiveness. Here are some compelling reasons why this DIY project is a game-changer for enhancing your home:
- Budget-Friendly: Traditional fireplaces can cost thousands. This foam board alternative uses inexpensive materials, making it accessible to almost any budget.
- Easy Installation & Portability: Unlike permanent structures, foam board fireplaces are lightweight and relatively easy to assemble. They can also be moved to different rooms or even disassembled for storage if you move or wish to redecorate.
- No Mess, No Fuss: Say goodbye to soot, ash, and the need for firewood. This faux fireplace keeps your home clean and requires minimal upkeep.
- Safety First: With no open flames, there’s no risk of fire hazards, making it a safer option for homes with children or pets. You also avoid the dangers of carbon monoxide associated with wood-burning fireplaces.
- Customizable Design: Foam board is incredibly versatile. You can easily cut, shape, and finish it to match any interior design style – from rustic farmhouse to modern minimalist. The possibilities for contact paper or paint finishes are endless.
- Realistic Visuals: By integrating your TV, you can display high-definition fire videos that offer an incredibly convincing and dynamic flame effect, complete with ambient sounds.
- Seasonal Decor Hub: A faux mantel provides the perfect platform for holiday decorations, cherished photos, or decorative accents, allowing you to easily update your home’s look with the seasons.
Materials for Your Elegant DIY Foam Board Fireplace:
Gathering your supplies is the first exciting step in any DIY project. For this stunning faux fireplace, you’ll find that most materials are readily available at craft stores, hardware shops, or even online. Choosing good quality materials will ensure your fireplace is sturdy, looks professional, and lasts for many seasons of enjoyment.
- Foam Board: This is the primary structural component. Look for large sheets, typically 20×30 inches or larger, often available in various thicknesses. A sturdy thickness (e.g., 3/16 inch or 5mm) is recommended for structural integrity.
- Contact Paper: This will be used to cover the foam board, giving it a finished, decorative look. Options range from faux wood grain, marble, stone, or even solid colors. Choose a design that complements your home decor.
- Insulation Board: Often called foam insulation board or rigid foam insulation. This thicker, denser foam provides the substantial feel and look for the mantelpiece. Look for XPS (extruded polystyrene) foam, which is easy to cut and lightweight.
- Brown Wood Sticker Paper: Specifically for covering the insulation board, giving your mantel a realistic wood appearance. Ensure it’s wide enough to cover the top surface adequately.
- Scissors: For cutting smaller pieces of contact paper or making initial cuts.
- Ruler or Yardstick: Essential for accurate measurements, ensuring straight lines and precise cuts. A metal ruler is ideal when working with a craft knife.
- Cutter / Craft Knife: A sharp utility knife or X-Acto knife is crucial for clean, precise cuts through foam board and insulation board. Always use a cutting mat underneath to protect your work surface.
- Hot Glue Gun and Glue Sticks: Your primary adhesive for assembling the foam board sections. A strong, quick-drying bond is essential for a sturdy structure. Keep plenty of glue sticks on hand!
- Optional (but Recommended) Additional Tools:
- Pencil: For marking measurements and cut lines.
- Measuring Tape: For larger measurements of your TV and overall fireplace dimensions.
- Sanding Block: To smooth any rough edges on the foam board before applying contact paper, ensuring a flawless finish.
- Brayer or Squeegee: Helpful for applying contact paper smoothly, removing air bubbles.
- Heavy Objects/Clamps: To hold pieces in place while glue dries.
How to Construct Your Stunning Foam Board Fireplace: A Step-by-Step Guide
Building this faux fireplace is a rewarding process that combines careful measurement with creative assembly. Follow these detailed steps to create a beautiful and stable structure that perfectly frames your television and mimics the grandeur of a traditional fireplace.
Step 1: Planning, Measuring, and Cutting the Fireplace Frame
The foundation of your faux fireplace lies in precise planning and accurate cuts. Begin by carefully measuring the exact height and length of your television screen. These dimensions will determine the inner opening of your fireplace. Next, you need to decide on the desired width or thickness of the fireplace border (the “mantel legs” and “header” surrounding the TV). Consider the overall scale of your room and the look you’re aiming for – a thicker border will give a more substantial, traditional feel, while a thinner one might appear more contemporary.
Once you have your TV measurements and desired border thickness, use these to calculate the dimensions for your foam board pieces. You will need to cut several sections:
- Two Vertical Sides (Legs): These will flank your TV. Their height will be the desired total height of your fireplace. Their width will be the chosen border thickness.
- One Horizontal Top Piece (Header): This will sit above your TV. Its length will span the width of your TV plus twice the border thickness. Its width will also be your chosen border thickness.
- One Horizontal Bottom Piece (Base): While not explicitly mentioned, a subtle base piece can add stability and a finished look. Its dimensions would match the header.
- Internal Support Strips: To give the structure stability and prevent the foam board from bowing, cut numerous small foam board strips (e.g., 1-inch wide) to fit perpendicularly inside each section. These act like internal bracing.
Using your ruler and cutter, meticulously cut all the foam board pieces to size. Take your time to ensure all cuts are perfectly straight and the measurements are precise. Any inaccuracies here will affect the overall appearance and stability of your finished fireplace.
Step 2: Assembling the Structure and Adding the Mantelpiece
With all your foam board sections cut, it’s time for assembly. Using your hot glue gun, carefully join the four main sections (the two vertical legs, the top header, and optionally the bottom base) together to form the main frame of your fireplace opening. Work quickly as hot glue sets fast, and ensure each joint is flush and secure. For enhanced stability, glue the small foam board strips you prepared in Step 1 along the inside edges of each section. These internal supports will significantly strengthen the entire structure, preventing it from collapsing or bending over time.
Once the main frame is sturdy, it’s time to give it a refined finish. Carefully cover the entire foam board structure with your chosen contact paper. This step requires patience to avoid bubbles and wrinkles. Cut the contact paper slightly larger than each section, then slowly peel back the backing, smoothing the paper down with your hands or a brayer as you go. Overlap seams slightly for a seamless look, and trim any excess with your craft knife for clean edges. Once covered, position the fireplace frame in your desired spot, ensuring your TV is nicely centered within its opening.
Now, let’s create the crowning glory: the mantelpiece. Take your insulation board and measure it to fit perfectly on top of your foam board frame, ensuring it overlaps the front and sides slightly. This overlap gives the mantel a realistic, substantial overhang, just like a traditional fireplace. Once cut, cover this insulation board entirely with your chosen brown wood sticker paper. Again, take care to smooth out any bubbles for a flawless, wood-like finish. Finally, carefully place and secure this finished mantelpiece on top of your assembled foam board fireplace structure. Use hot glue to attach it securely, ensuring it’s level and centered.
With the structure complete, the fun part begins: decorating! Adorn your new mantelpiece with ornaments, candles (LED ones are safest!), seasonal garlands, framed photos, or any objects that complement your home’s aesthetic. You can further enhance the illusion by adding a dark backdrop or even reflective material inside the TV opening when the screen is off, giving depth to the ‘firebox’.
Pro Tips for a Perfect Faux Fireplace:
- Precision is Key: Measure twice, cut once! This adage is especially true for foam board projects, where even small discrepancies can be noticeable.
- Sharp Blade: Always use a fresh, sharp blade in your cutter. A dull blade will tear and fray the foam board, leading to messy edges.
- Safety First: When using a craft knife, always cut away from your body and use a cutting mat or sacrificial piece of cardboard to protect your work surface.
- Smooth Contact Paper Application: For a professional finish, use a brayer or a flat-edged squeegee to smooth out contact paper, pushing out air bubbles as you go.
- Conceal Wires: Plan for how you will manage your TV’s wires. You might create a small cut-out in the back of the foam board structure or use cable ties and clips to hide them neatly.
- Personalize Your Design: Don’t be afraid to experiment with different contact paper textures (e.g., distressed wood, white marble, rustic brick) or even paint the foam board before applying paper for a layered look.
Bringing Your Faux Fireplace to Life with Your TV
The true magic of this DIY project comes alive when you integrate your television. Once your foam board structure is complete and positioned, set your TV within the opening. Modern smart TVs and streaming devices offer a plethora of options for displaying realistic fireplace videos. You can find numerous high-definition fireplace scenes on YouTube, Netflix, or dedicated streaming apps. Look for videos that offer extended playtimes, realistic sound effects (crackling logs, gentle pops), and a variety of flame intensities to suit your mood.
Consider the lighting in your room as well. Dimming the overhead lights and relying on the glow from your TV fire will enhance the illusion, creating an incredibly cozy and romantic atmosphere. For an extra touch of realism, you could place a few faux logs or decorative stones at the base of the TV opening, just below the screen, to complete the visual effect of a traditional firebox.
*All these images are credited to Tero Designs via YouTube. Give her channel a visit and subscribe for more innovative and inspiring DIY projects! Her video tutorial provides invaluable visual guidance for this project.
Easy DIY Foam Board Fireplace: Your New Home Centerpiece
Creating a cozy and inviting home doesn’t have to be an expensive endeavor. This DIY foam board fireplace project, inspired by Tero Designs, proves that with a little creativity, a few affordable materials, and some dedicated effort, you can significantly enhance your living space. This versatile faux fireplace offers all the aesthetic benefits of a traditional hearth – the warmth, the beauty, the focal point for decorating – without any of the associated costs, mess, or installation complexities. It’s a fantastic solution for renters, budget-conscious homeowners, or anyone looking to add a touch of charm and sophistication to their decor.
Imagine snuggling up on your couch on a chilly evening, a warm drink in hand, as the flickering flames dance across your television screen, perfectly framed by your custom-built fireplace. This project is more than just a decorative piece; it’s an invitation to create cherished memories and enjoy a heightened sense of comfort in your own home. So, gather your materials, follow these steps, and get ready to transform your living room into a sanctuary of warmth and style. You’ll be amazed at what you can achieve!