
Transforming a new living space can be incredibly rewarding, especially when you find the perfect DIY project that speaks to your aesthetic. Recently, I stumbled upon a truly inspiring sisal rope decorative hat video tutorial by The Shabby Tree on YouTube, and I was instantly captivated. My husband had just finished building the most charming covered deck area for our beach home in Rockport, Texas, and I was on the hunt for unique, coastal-themed decorations to complete our new outdoor sanctuary. This sisal hat idea immediately stood out as a perfect fit for an outdoor decorative accessory. Its robust construction, using sturdy recycled materials I already had lying around the house, made it an ideal and sustainable choice.
The beauty of this project lies not only in its stunning visual appeal but also in its simplicity and cost-effectiveness. It offers a fantastic opportunity to add a personalized touch to your home decor, bringing that desired nautical or rustic vibe without breaking the bank. Whether you’re enhancing a beach house, a lakeside cabin, or simply want to inject some natural texture into your patio or garden, this decorative sisal rope hat is a delightful craft that promises satisfying results.
Why a DIY Sisal Rope Hat is the Perfect Coastal Accent
Choosing the right decor for your home, especially outdoor spaces, involves considering both aesthetics and durability. The decorative sisal rope hat excels on both fronts, making it an excellent choice for a variety of settings. Here’s why this DIY project is more than just a craft; it’s a smart decor solution:
- Authentic Coastal Charm: Sisal rope inherently brings a natural, rustic, and nautical feel. Its earthy tones and robust texture perfectly complement beach-inspired themes, evoking images of fishing boats, docks, and seaside adventures.
- Exceptional Durability for Outdoors: Unlike many delicate decorations, sisal is a strong, natural fiber known for its resilience. When properly sealed (optional) or simply kept under a covered area like a deck, it can withstand outdoor conditions, making it ideal for patios, porches, and garden nooks.
- Sustainable and Eco-Friendly: This project encourages the use of recycled materials like plastic bowls and cardboard. Sisal itself is a biodegradable fiber, contributing to a more sustainable approach to home decorating.
- Unleash Your Creativity: While the basic structure is straightforward, the opportunities for personalization are endless. You can tailor the embellishments to perfectly match your existing decor, making each hat a unique piece of art.
- Budget-Friendly Decor: High-quality coastal decor can often come with a hefty price tag. By DIYing this sisal hat, you can achieve a sophisticated look using readily available and inexpensive materials, saving you money while enjoying the creative process.
Materials For Your Charming Decorative Sisal Hat:
Before diving into the creative process, gathering all your materials is key to a smooth and enjoyable crafting experience. Most of these items are readily available at craft stores, hardware stores, or even around your home.
- A Spool of Sisal Rope (or Twine): This is the star of our project. Sisal rope comes in various thicknesses; a medium thickness (e.g., 1/4 inch or 6mm) is generally easiest to work with for both coverage and flexibility. The natural, rough texture of sisal is what gives this hat its authentic rustic and coastal appeal. Ensure you have enough — it’s better to have a bit extra than run out mid-project!
- A Hot Glue Gun: An essential tool for this craft, providing quick and strong adhesion. Choose a comfortable, reliable hot glue gun.
- Plenty of Glue Sticks: You’ll be using a good amount of glue to secure the sisal rope. Stock up on all-purpose glue sticks suitable for your glue gun. High-temperature glue sticks often provide a stronger bond, which is ideal for a durable outdoor decoration.
- A Plastic Bowl: This will form the dome or crown of your hat. The size of the bowl will determine the overall size of your hat, so choose one that suits your desired decorative scale. Any sturdy plastic bowl will work, as it will be completely covered. Consider recycling an old bowl from your kitchen!
- A Circle of Cardboard: This forms the brim of your hat. A sturdy piece of cardboard from an old delivery box, a cereal box, or even a poster board scrap is perfect. Ensure it’s thick enough to provide a firm base for the brim but thin enough to cut easily. The diameter of this circle will determine how wide your hat’s brim will be.
- Decorations for the Hat: This is where your personal style shines! For our coastal theme, I’m planning to use some salvaged fishing net and an assortment of beautiful seashells collected from the beach. However, the possibilities are limitless:
- Coastal: Starfish, sand dollars, small pieces of driftwood, faux coral, mini buoys, nautical-themed ribbons, burlap scraps.
- Rustic/Farmhouse: Burlap flowers, faux berries, twine bows, dried lavender, small metal embellishments, distressed paint accents.
- Bohemian: Macrame details, colorful tassels, feathers, small beads.
Think about the overall aesthetic you want to achieve and select decorations that complement it perfectly.
Step-by-Step Directions: Crafting Your Sisal Rope Hat
Making this decorative sisal rope hat is a straightforward and enjoyable process. Follow these detailed steps to bring your coastal vision to life.
Step 1: Preparing Your Workspace and Materials
Before you begin gluing, ensure your workspace is clean, well-lit, and protected with newspaper or an old sheet. Gather all your materials within easy reach. If your cardboard circle isn’t perfectly round, now is the time to trim it neatly. Consider drawing a circle with a compass or by tracing a large plate to get a precise shape for the brim.
Step 2: Forming the Hat’s Base – Attaching the Bowl to the Cardboard Brim
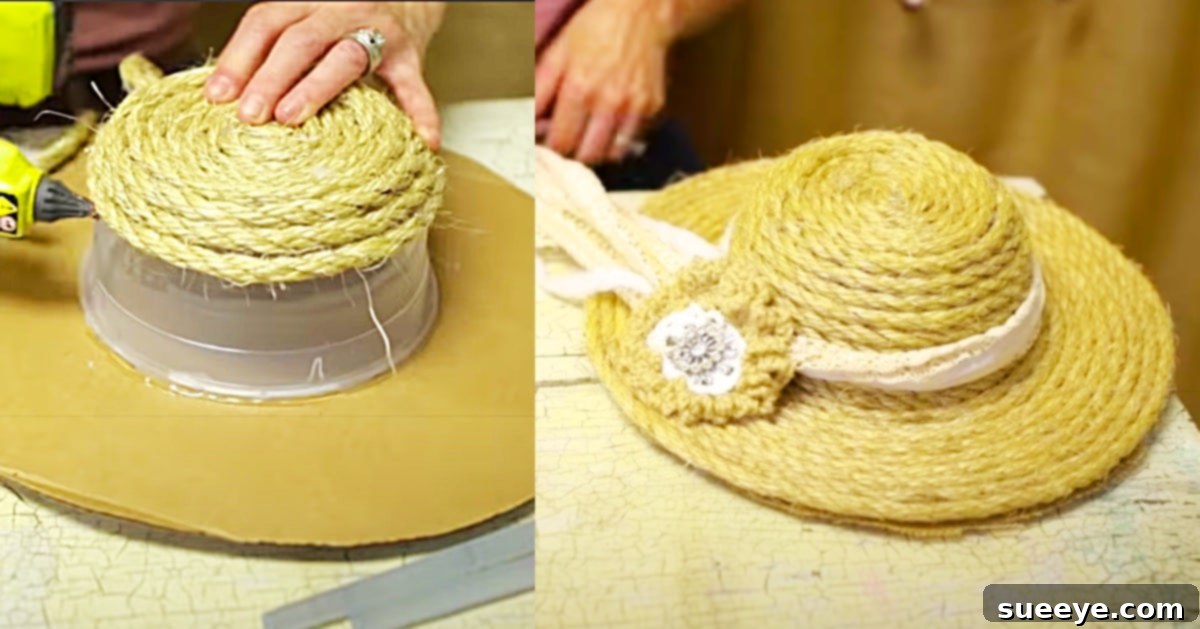
In this wonderful sisal rope decorative hat video tutorial by The Shabby Tree on YouTube, you’ll see the crucial first step: creating a stable foundation. You start by gluing a plastic bowl securely to the center of your cardboard circle using your hot glue gun. Apply a generous bead of hot glue around the rim of the plastic bowl. Carefully center the bowl on the cardboard circle, pressing down firmly to ensure a strong, even bond. Hold it in place for a minute or two until the glue has cooled and set completely. This forms the basic structure – the crown (bowl) and the brim (cardboard) – of your decorative hat.
Step 3: Covering the Crown – Wrapping the Sisal Rope Around the Bowl
With the base secure, it’s time for the main event: covering your hat with sisal rope. Begin by applying a small dot of hot glue to the very top center of the plastic bowl. Press the end of your sisal rope firmly into this glue. Once secured, start coiling the rope tightly around this central point, applying small sections of hot glue as you go. Work outwards in concentric circles, ensuring each coil of rope sits snugly against the previous one. This methodical process ensures full coverage and a neat finish. Continue gluing and coiling the sisal rope twine down the sides of the bowl until the entire surface, from the very top to where it meets the cardboard brim, is completely covered. Take your time to keep the coils tight and even, preventing any gaps that might reveal the plastic bowl underneath.
Step 4: Extending to the Brim – Covering the Cardboard Circle
Once the bowl is fully covered, transition seamlessly to the cardboard brim. Continue the sisal rope in concentric circles, moving outwards from the base of the bowl across the cardboard. Apply glue to the cardboard in small sections, laying the rope down firmly and pressing each coil tight against the last. Maintain consistent spacing and tension to create a smooth, even brim. Once you reach the outer edge of the cardboard circle, carefully cut the rope and secure the end with a final, strong dab of hot glue, tucking it in for a clean finish.
Step 5: Adding Your Unique Decorative Touches
Now for the most exciting part – personalizing your hat! Lay out your chosen decorations (fishing net, shells, starfish, etc.) on the hat to visualize your design before gluing anything down. For my coastal theme, I would drape a piece of fishing net around the base of the crown or gently across the brim, securing it with a few discreet dots of hot glue. Then, I would arrange the shells and other embellishments, like a starfish or a piece of driftwood, strategically on the brim or along the crown, attaching them with hot glue. Remember to create a balanced design, allowing each element to contribute to the overall coastal aesthetic without overcrowding. This step truly transforms a simple sisal structure into a unique piece of decorative art.
Customizing Your Sisal Hat for Any Theme
While a coastal theme is perfect for our beach home, the versatility of the sisal rope hat means you can adapt it to complement various decor styles. Here are some ideas for customization:
- Farmhouse Flair: Instead of shells, consider adding burlap flowers, small distressed wooden tags, a few sprigs of artificial lavender, or a bow made from buffalo plaid ribbon.
- Rustic Cabin Vibe: Embellish with pinecones, faux berries, small twigs, or even a miniature faux bird’s nest. A darker sisal rope or a quick stain could deepen the rustic feel.
- Bohemian Chic: Incorporate colorful yarn tassels, macrame fringe, decorative beads, or small silk flowers in vibrant hues.
- Holiday Seasonal Decor: For Christmas, add some faux evergreen sprigs, miniature ornaments, and red berries. For fall, use small gourds, artificial leaves, and warm-toned ribbons.
You can also experiment with painting sections of the sisal rope before assembly, or lightly dry-brushing the finished hat with a contrasting color to highlight its texture. Consider adding a loop of rope or wire on the back if you plan to hang it on a wall or door.
Care and Maintenance for Your Decorative Sisal Hat
To ensure your beautiful sisal rope hat remains a charming accent for years to come, especially if displayed outdoors, a little care goes a long way:
- Placement: While sisal is durable, prolonged exposure to direct, heavy rain or intense sunlight can affect its longevity. Ideally, place it under a covered deck, porch, or patio.
- Cleaning: Dust can accumulate on the textured surface. Use a soft brush or a vacuum cleaner with a brush attachment to gently remove dust. For minor spots, a slightly damp cloth can be used, but avoid saturating the sisal.
- Pest Control: As a natural fiber, sisal can occasionally attract insects in very humid environments. A light spray with a natural insect repellent designed for fabrics (always test in an inconspicuous area first) might be considered if this becomes an issue.
- Re-gluing: Over time, some decorative elements might loosen. Keep your hot glue gun handy for quick touch-ups.
Final Thoughts on Your New Coastal Masterpiece
This project turned out so incredibly cute, I just really love it! It exceeded my expectations as the perfect coastal accent for our new covered deck. The natural texture of the sisal, combined with the personal touches of fishing net and shells, truly captures the essence of our beach home. It’s more than just a decoration; it’s a tangible piece of our coastal dream, created with my own hands.
I highly encourage you to give this decorative sisal rope hat a try. Whether you follow The Shabby Tree’s tutorial exactly or infuse it with your unique style, the process is incredibly satisfying, and the end result is a charming, durable, and personalized piece of home decor. Imagine the compliments you’ll receive on your beautiful, handmade creation! Get ready to transform your space with this delightful and easy DIY project.