
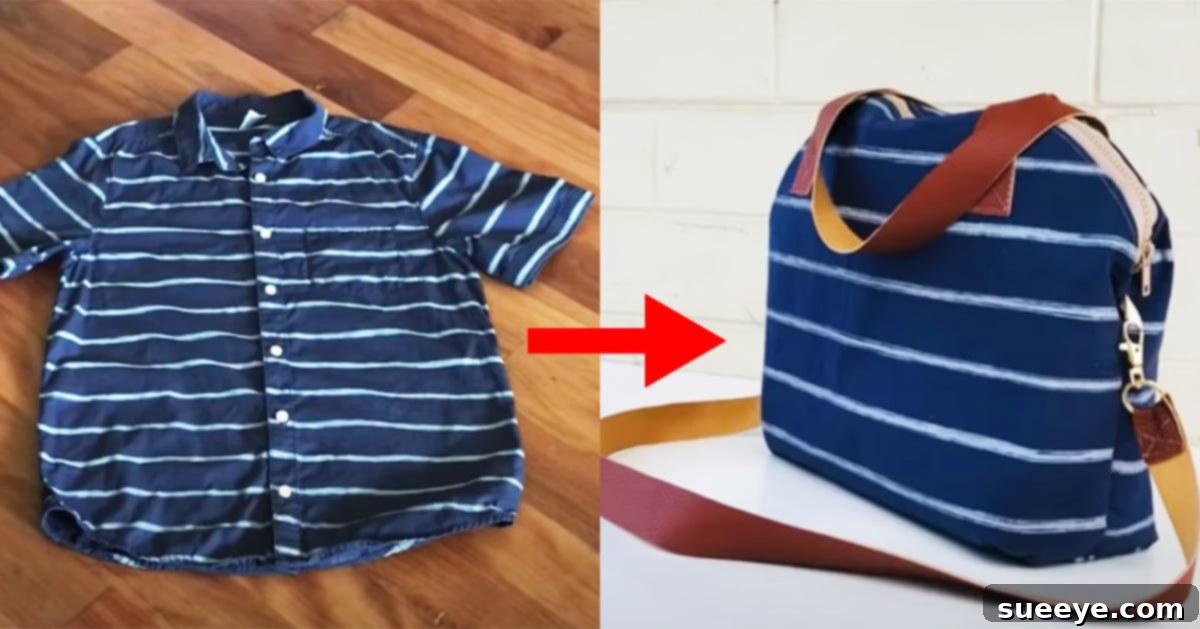
Are you looking for an ingenious way to breathe new life into your old wardrobe, or perhaps seeking a unique and eco-friendly crafting project? Look no further! The world of upcycling offers incredible possibilities, and one of the most rewarding is transforming forgotten garments into stylish, functional accessories. This guide dives deep into an inspired DIY project: turning old button-up shirts into a fashionable crossbody bag.
Many of us have a pile of shirts that no longer fit, are out of style, or simply sit unused in the back of the closet. Instead of contributing to textile waste, imagine giving these fabrics a second life as a trendy, personalized bag. This brilliant idea, showcased by the incredible Ezi2Make Channel on YouTube, demonstrates how accessible and enjoyable upcycling can be. Her detailed video tutorial provides all the necessary guidance to create a stunning crossbody bag, perfect for any occasion.
The beauty of this project lies in its versatility. You’re not limited to a specific fabric or pattern. Unleash your creativity by choosing shirts with vibrant prints, classic plaids, sophisticated solids, or even sentimental value. Perhaps you have a beloved denim shirt that’s seen better days, or a crisp black shirt that no longer fits. These are prime candidates for transformation. While the tutorial primarily features button-up shirts, the core techniques can be adapted for other fabric types, opening up a world of design possibilities. For those who appreciate minimalist aesthetics, a plain and simple bag crafted from a single-color shirt offers timeless appeal, allowing it to seamlessly complement multiple outfits.
Even if you’re not typically “a purse person,” the concept of recycling old shirts into a unique handbag or shoulder bag is undeniably appealing. It’s an opportunity to create something truly one-of-a-kind, reflecting your personal style and commitment to sustainability. Moreover, this project is fantastic for making playful, inexpensive gifts for younger family members like cousins or nieces. Kids often handle their belongings with less caution, and a handmade bag from an upcycled shirt offers a durable yet cost-effective accessory that can withstand their adventures without breaking the bank.
Why Upcycle Shirts into Bags? Embracing Sustainable Style and Creativity
Beyond the sheer enjoyment of crafting, upcycling old shirts into bags offers a multitude of benefits, aligning perfectly with contemporary trends in sustainable living and personalized fashion. It’s more than just a DIY project; it’s a statement.
Environmental Impact: Reducing Textile Waste
The fashion industry is a significant contributor to global waste, with millions of tons of textiles ending up in landfills annually. By choosing to upcycle, you actively participate in reducing this environmental burden. Giving an old shirt a new purpose as a bag prevents it from becoming waste, conserving resources and minimizing pollution associated with manufacturing new products. This simple act is a powerful step towards a more sustainable lifestyle.
Cost-Effectiveness: Budget-Friendly Fashion
One of the most immediate advantages of this DIY project is its affordability. Instead of spending money on a new bag, you’re utilizing materials you already own. The primary components—your old shirts—are essentially free. The additional materials, like interfacing, zippers, and handles, are relatively inexpensive, making this a highly budget-friendly way to acquire a new accessory or a thoughtful gift.
Unique Style: Expressing Individuality
Mass-produced bags, while convenient, often lack character. When you craft your own bag from an old shirt, you create a piece that is truly unique. You have complete control over the design, from the choice of fabric and pattern to the handles and embellishments. This allows you to express your individual style and personality in a way that off-the-rack items simply cannot match. Imagine the compliments you’ll receive on your custom-made bag!
Sentimental Value: Cherishing Memories
Do you have a shirt that holds special memories but is no longer wearable? Perhaps a favorite shirt from a memorable trip, a piece inherited from a loved one, or a uniform from a significant life event. Upcycling such a garment into a bag allows you to preserve those memories in a tangible, functional item. It transforms a relic into a cherished keepsake that you can carry with you every day.
Skill Development: Learning and Growing
For those new to sewing, this project is an excellent way to develop fundamental skills, including cutting, stitching straight seams, applying interfacing, and installing zippers. More experienced sewers can refine their techniques and experiment with advanced customization. The sense of accomplishment that comes from creating something beautiful and useful with your own hands is incredibly rewarding.
Materials: Everything You Need for Your Upcycled Crossbody Bag
Gathering your materials is the first exciting step in any DIY project. For this upcycled crossbody bag, you’ll need a blend of repurposed items and standard sewing supplies. Here’s a detailed list:
- 2 old button-up shirts: These are the stars of the show! Using two shirts allows for a sturdy construction, often with one serving as the main exterior fabric and the other for the interior lining. You can experiment with different sleeve lengths (e.g., one long sleeve, one short sleeve) for variations in fabric quantity or specific design elements. Consider contrasting patterns or complementary colors for a more dynamic look. Ensure the shirts are clean and free from major tears.
- Fabric pins: Essential for holding fabric pieces together before and during sewing, ensuring precise alignment and preventing shifting.
- Interfacing: This is a crucial component for giving your bag structure, stability, and durability. Fusible interfacing (which you iron onto the fabric) is often preferred for its ease of use and ability to add crispness. The weight of the interfacing should be appropriate for your fabric and desired bag stiffness – a medium-weight fusible interfacing is usually a good choice for a crossbody bag.
- Iron: Indispensable for applying fusible interfacing smoothly and for pressing seams open or flat, giving your finished bag a professional, crisp appearance.
- Sewing machine: While some elements could potentially be hand-stitched, a sewing machine will make this project significantly faster, easier, and result in a more durable, professional finish. Ensure it’s threaded with a good quality polyester thread that matches or complements your fabric colors.
- Purse handles (leather): The type of handles you choose will significantly impact the look and feel of your bag. Leather handles offer a classic, durable, and sophisticated touch. However, you could also opt for fabric straps (perhaps made from remnants of your shirts), chain handles, or even wooden handles, depending on your desired aesthetic. Consider the length needed for a comfortable crossbody or shoulder carry.
- Scissors: A sharp pair of fabric shears is vital for clean, precise cuts. Avoid using them on paper to keep them sharp for fabric.
- Zipper for sewing: A zipper closure will keep the contents of your bag secure. Choose a sturdy zipper that is slightly longer than the width of your bag opening. A nylon zipper is generally easy to work with and comes in a wide array of colors.
Directions: Step-by-Step Guide to Creating Your Upcycled Bag
Transforming old shirts into a functional and fashionable bag involves several key steps. While this guide provides a comprehensive overview, remember to consult the excellent Ezi2Make Channel tutorial on YouTube for precise measurements and visual demonstrations, especially as specific dimensions can vary based on your desired bag size.
Step 1: Preparation and Pattern Creation
Begin by washing and ironing your old shirts. This pre-shrinks the fabric and ensures it’s clean and easy to work with. For specific measurement sizes, follow along closely with Ezi2Make Channel’s tutorial. She provides clear guidance on how to determine the dimensions for your bag. Once you have your desired measurements, outline the size of the purse body onto your chosen shirt fabric. You’ll typically need two main pieces for the outer bag and two for the lining. Carefully cut out these two identical main fabric pieces, ensuring crisp, straight edges. Before proceeding, remove any buttons from the shirt pieces you’ll be using for the bag body – you can save these for other craft projects or as embellishments!
Step 2: Applying Interfacing and Constructing the Bag Body
Once your main fabric pieces are cut, it’s time to add structure. Following the interfacing manufacturer’s instructions, apply the fusible interfacing to the wrong side of your main exterior fabric pieces. This step is critical for ensuring your bag holds its shape and has a professional finish. After the interfacing is set, place your two main exterior fabric pieces right sides together. Pin them securely along the edges you intend to sew (typically the bottom and sides), leaving the top open for the zipper and handles. Sew these pieces together with a consistent seam allowance, then repeat this process for your two lining fabric pieces. If you want to create a wider, more structured base for your bag, consider boxing the corners at this stage, as demonstrated in many bag-making tutorials.
Step 3: Attaching the Zipper and Handles
This is where your bag truly starts to take shape and become functional. Neatly install the zipper along the top edge of your exterior bag pieces. This step can sometimes be tricky for beginners, so take your time and use plenty of pins. Once the zipper is securely sewn into place, it’s time to attach your chosen purse handles. Position the leather (or chosen material) purse handles on each side of the bag’s exterior opening, ensuring they are evenly spaced and securely fastened. You’ll likely want to reinforce these attachment points with several lines of stitching to ensure they can withstand the weight of your bag’s contents. Many crafters prefer to attach handles after the lining is joined, hiding the raw edges for a cleaner finish.
Step 4: Joining the Lining and Finishing Touches
With the exterior bag and zipper complete, it’s time to integrate the lining. Place the exterior bag (right side out) inside the lining bag (wrong side out). Align the raw edges of the lining with the remaining raw edges of the exterior bag (especially around the zipper area) and pin them together. Sew around the top edge, leaving a small opening at the bottom of the lining so you can turn the entire bag right side out. Carefully pull the exterior bag through this opening in the lining. Once the bag is fully turned and shaped, hand-stitch or machine-stitch the opening in the lining closed. Push the lining into the bag, smooth it out, and give the top edges a final press with your iron. A topstitch along the top opening of the bag can add a professional touch and help the bag hold its shape.
Customization Ideas: Make Your Bag Truly Yours
The beauty of DIY lies in personalization. Once you’ve mastered the basic construction, consider these ideas to make your upcycled crossbody bag truly unique:
- Add Pockets: Utilize pockets from the original shirts to create exterior or interior slip pockets. You could also sew new patch pockets from contrasting fabric.
- Embellishments: Get creative with embroidery, fabric paint, iron-on patches, studs, or fabric tassels to add flair.
- Strap Variations: Instead of fixed handles, create an adjustable crossbody strap from webbing or a long strip of fabric.
- Mixing Fabrics: Combine panels from different shirts to create a patchwork effect, or use a contrasting fabric for the bottom panel for added durability and style.
- Decorative Topstitching: Use a contrasting thread color for your topstitching to make a design statement.
Tips for Success in Your Sewing Journey
To ensure your upcycled shirt bag project goes smoothly and yields beautiful results, keep these tips in mind:
- Pre-Wash Your Fabrics: Always wash and dry your shirts before cutting to prevent future shrinkage and ensure clean fabric.
- Use Sharp Tools: Sharp fabric scissors make precise cuts, which are crucial for a neat finish. Use a new needle in your sewing machine for smooth stitching.
- Press as You Go: Ironing seams after each stitching step creates crisp edges and a more professional look.
- Take Your Time: Don’t rush the process, especially when cutting or installing the zipper. Patience leads to better results.
- Watch the Tutorial Repeatedly: If a step is unclear, re-watch the Ezi2Make Channel video. Visuals are incredibly helpful.
- Experiment: Don’t be afraid to try different shirt combinations or add your own unique touches. That’s the fun of DIY!
I absolutely adore this DIY project because it so beautifully illustrates how an ordinary item like a shirt can be completely transformed into something new and exciting. When I envision myself attempting this tutorial, I’m confident it would be straightforward to follow, not only because of the clear visual instructions but also because Ezi2Make ensures all the necessary measurements are conveniently displayed on the screen. She genuinely makes the entire process look effortlessly easy, which is incredibly encouraging for anyone, regardless of their sewing experience. This project isn’t just about making a bag; it’s about embracing creativity, sustainability, and the satisfaction of crafting something truly unique with your own hands. So grab those old shirts, fire up your sewing machine, and embark on your own upcycling adventure!