
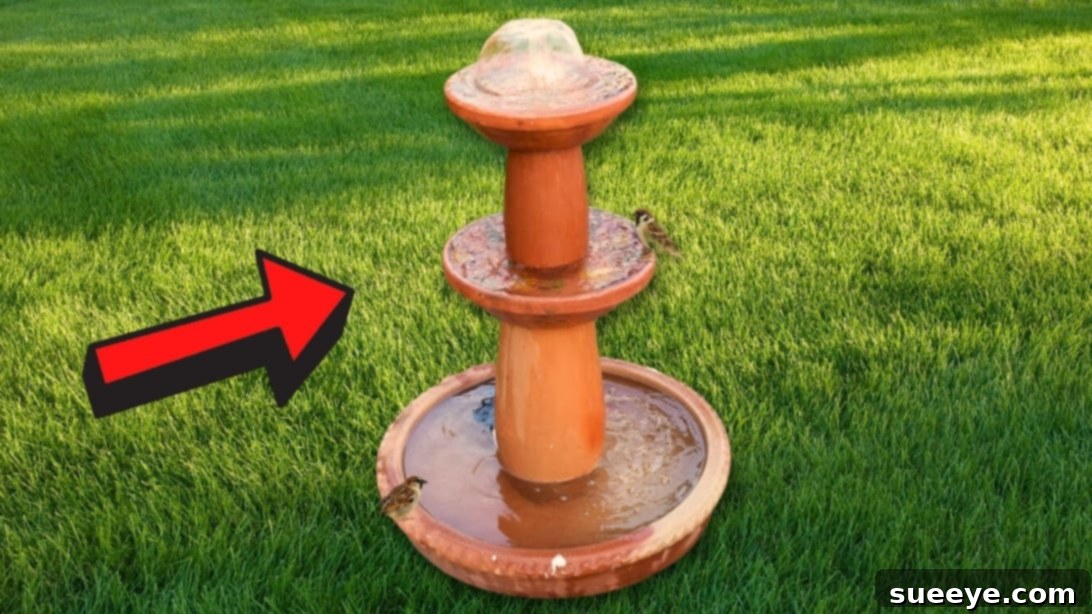
DIY Terracotta Water Fountain: Create a Serene Oasis for Your Garden and Birds
Imagine stepping into your garden and being greeted by the gentle, melodic trickle of water, a sound known to soothe the soul and calm the mind. Envision a vibrant outdoor space, alive with the flutter of birds drawn to a fresh, inviting water source. What if we told you that creating this idyllic scene is not only achievable but also incredibly simple and budget-friendly? This comprehensive guide will empower you to build your very own captivating DIY terracotta water fountain, transforming ordinary terracotta saucers and vases into a stunning focal point.
This project is more than just a craft; it’s an investment in tranquility and a contribution to local wildlife. A backyard water feature instantly elevates the ambiance of any outdoor area, whether it’s a sprawling garden, a cozy patio, or a welcoming front yard. The continuous flow of water provides essential hydration and bathing opportunities for birds, encouraging them to frequent your space. Moreover, the inherent beauty and earthy charm of terracotta naturally blend with any landscape, making your DIY fountain a timeless addition. Prepare to enjoy the delightful sights and sounds of nature, all thanks to your own hands-on creativity!
Why Choose a DIY Terracotta Water Fountain? Benefits Beyond Beauty
Opting to construct your own terracotta water fountain offers a myriad of advantages over store-bought alternatives. Primarily, it’s a remarkably cost-effective solution, allowing you to achieve a luxurious garden aesthetic without the hefty price tag. The satisfaction of building something beautiful and functional with your own hands is an unparalleled reward. You gain complete creative control, enabling you to select specific sizes, shapes, and arrangements of terracotta to perfectly complement your personal style and garden theme.
Terracotta, with its warm, natural hues and porous texture, brings an authentic, old-world charm to any setting. Its breathability helps regulate water temperature, creating a healthier environment for birds and plants. Beyond its visual appeal, a functioning water fountain provides crucial environmental benefits. It acts as a vital water source for various wildlife – from thirsty birds and buzzing bees to delicate butterflies – especially during dry spells. Moving water is less likely to become a breeding ground for mosquitoes than stagnant pools, contributing to a healthier backyard. The subtle white noise generated by the fountain can also help mask unwanted urban sounds, enhancing the peaceful atmosphere of your outdoor sanctuary.
Essential Materials for Your Tiered Terracotta Fountain
Before you begin, gather all your materials. The beauty of this DIY project lies in the accessibility of its components, most of which can be found at local garden centers, hardware stores, or even online. We’ve specified sizes for a balanced, multi-tiered design, but feel free to adapt them to fit your desired scale and space.
- 24-inch Clay Saucer: This forms the spacious base and main water reservoir of your fountain. Its generous size ensures ample water circulation for the pump and provides a stable foundation for the entire structure. Look for a robust saucer that can hold a good volume of water.
- 14-inch Clay Saucer: This will become the second tier, positioned above the base and contributing to the cascading effect. Its diameter should allow for visual appeal and proper water collection from the tier above.
- 10-inch Clay Saucer: The smallest saucer, serving as the uppermost tier from which the water will initially emerge. Its size helps create a distinct, elegant layered look.
- 12-inch Height Clay Vase: This vase acts as the primary support column for the lower sections of your fountain, lifting the first tiered saucer. Choose a sturdy vase that provides good elevation and stability. Ensure its opening is wide enough to accommodate the PVC pipe.
- 8-inch Height Clay Vase: A shorter vase used to elevate the top-most saucer, completing the multi-tiered effect. It should fit securely and stably on the 14-inch saucer.
- Submersible Water Pump: The engine of your fountain! Select a pump specifically designed for outdoor water features, ideally with an adjustable flow rate. The pump’s GPH (gallons per hour) rating will determine the strength and height of your water flow. For this size fountain, a pump rated between 80-250 GPH is generally suitable. Ensure it comes with a sufficiently long, outdoor-rated power cord.
- Flexible Hose Pipe (Tubing): This critical component channels water from the pump up to the fountainhead. It must be flexible, durable, and compatible in diameter with both your pump’s outlet and the fountainhead’s inlet. Clear vinyl tubing is often preferred for its flexibility and subtle appearance.
- Fountainhead Set: These interchangeable nozzles attach to the top of your flexible hose pipe, allowing you to customize the water spray pattern – from gentle bubbling to a multi-stream spray.
- PVC Pipe: This rigid pipe provides the essential central structure and support for your stacked terracotta components, while also housing the flexible hose pipe. Its outer diameter should be chosen carefully to allow a snug fit through the drilled holes in your saucers and vases.
- Water Pipe Tape (Thread Seal Tape / Teflon Tape): Indispensable for creating watertight seals on threaded connections, particularly where the hose connects to the pump and fountainhead. This prevents leaks and ensures efficient water pressure.
- Silicone Waterproof Sealant: A heavy-duty, outdoor-grade, non-toxic, and waterproof silicone sealant is absolutely crucial for sealing all drilled holes in the terracotta. This prevents any water leakage from the saucers and ensures a long-lasting, functional fountain.
- Drill and Masonry Drill Bit: Essential tools for creating clean, precise holes in your terracotta pieces. Use a masonry bit specifically designed for ceramic or clay. The bit’s size should match the outer diameter of your PVC pipe.
- Marker: For accurately marking drilling points on your terracotta.
- Measuring Tape or Ruler: For precise measurements and centering components.
- Utility Knife or Strong Scissors: Useful for cutting the flexible hose pipe and, if necessary, the PVC pipe to the correct lengths.
- Safety Glasses and Gloves: Always prioritize personal safety when drilling, cutting, and handling sealants.
Step-by-Step Guide: Building Your Terracotta Water Fountain
Follow these detailed instructions carefully to construct your beautiful, multi-tiered water fountain. Precision in drilling and thorough application of sealant are paramount for a leak-free and successful project.
Step 1: Preparing Your Saucers – Drilling the Central Passage Holes
Begin with the 8-inch and 14-inch clay saucers. These saucers will form the upper tiers, requiring central holes for the PVC pipe to pass through. Using your marker, carefully identify and mark the precise center of each saucer. Equip your drill with the appropriate masonry drill bit, sized to match the outer diameter of your PVC pipe. It’s crucial that the hole is snug around the pipe, not overly loose, to minimize future sealing challenges. To prevent cracking the terracotta, apply steady, moderate pressure and drill slowly. Many DIYers find it helpful to place a piece of masking tape over the intended drill spot to reduce chipping. Once drilled, clean any dust or debris from the holes.
Step 2: Assembling the Foundation and First Tier Structure
Next, take your largest components: the 24-inch clay saucer (your primary water basin) and the 12-inch height clay vase. The 12-inch vase needs a small hole drilled into its side, close to its bottom rim. This hole will serve as the exit point for the PVC pipe and the flexible hose, connecting to the water pump. Mark the spot carefully and drill a hole just large enough for the PVC pipe to pass through. Now, thread one end of the PVC pipe through this newly created side hole in the 12-inch vase. Guide the PVC pipe upwards through the center of the vase, then continue threading it through the central hole of the 14-inch clay saucer. Carefully position and center the 14-inch saucer on top of the 12-inch vase. Ensure the entire assembly is stable and the PVC pipe is vertical. This forms the robust base and the initial elevated tier of your fountain.
Step 3: Completing the Tiered Structure with Upper Vases and Saucers
Now, take the 8-inch height clay vase. This vase will elevate your smallest saucer. Slide the 8-inch vase down the PVC pipe, positioning it securely and centrally on top of the 14-inch clay saucer. Ensure it is level and stable. Once the vase is firmly in place, take the 10-inch clay saucer (your top tier) and thread the PVC pipe through its central hole. Carefully place this saucer on top of the 8-inch vase. At this point, you should have your complete tiered structure assembled, with the PVC pipe extending neatly through the center of all components and protruding from the top.
Step 4: Installing the Fountainhead and Crucial Waterproof Sealing
With the structure in place, it’s time to integrate the water delivery system. Thread your flexible hose pipe *inside* the PVC pipe, allowing it to emerge from the top. Attach your chosen fountainhead to the exposed end of the flexible hose pipe at the very top of your fountain. Secure this connection firmly with water pipe tape (Teflon tape) to ensure it’s watertight and prevents leaks. Make sure the fountainhead stands perfectly upright for an even and aesthetically pleasing water spray pattern.
Now comes the most critical step for a leak-proof fountain: sealing. Apply a generous amount of silicone waterproof sealant around all points where the PVC pipe passes through the central holes of the 14-inch and 10-inch saucers. Also, thoroughly seal the side exit hole of the 12-inch vase where the PVC pipe emerges. Ensure the sealant completely fills any gaps around the PVC pipe and all holes, creating an impenetrable barrier against water. Smooth out the sealant for a tidy finish. Allow the sealant to cure fully according to the manufacturer’s instructions, which typically requires 24 to 48 hours. Patience here is paramount; rushing this step can lead to disappointing leaks later on.
Step 5: Connecting the Submersible Water Pump
Once the silicone sealant has completely dried and cured, it’s safe to proceed with the pump installation. Locate the bottom end of the flexible hose pipe that extends from the side hole of your 12-inch vase and reaches into the bottom 24-inch saucer. If any excess PVC pipe is protruding from the very bottom of the structure and interferes with pump placement, trim it carefully with a utility knife or strong scissors so it sits flush. Now, connect this flexible hose pipe to the inlet of your submersible water pump. Use water pipe tape on any threaded connections for added security. For smooth connections, a small hose clamp can provide extra assurance against disconnections. The pump will rest at the bottom of the large 24-inch saucer, ready to be submerged in water.
Step 6: Filling, Testing, and Enjoying Your New Fountain!
The moment of truth has arrived! Carefully place your fully assembled terracotta water fountain in its final desired location. Ensure the 24-inch clay saucer is level and stable on the ground, minimizing any wobbling. Next, fill the bottom 24-inch saucer generously with clean water, making sure the submersible pump is completely submerged. This is critical; running a pump dry can cause it to overheat and fail. Double-check all electrical connections and ensure the pump’s power cord is safely routed. Plug in the water pump, and marvel as your beautiful creation springs to life! If your pump has an adjustable flow rate, experiment with it to achieve your preferred water display – from a gentle burble to a lively spray. Congratulations, you’ve successfully built a stunning, soothing, and bird-friendly water fountain for your outdoor space!
Maintenance Tips for a Long-Lasting Terracotta Fountain
To ensure your DIY terracotta water fountain continues to bring joy and tranquility for many seasons, a simple routine maintenance schedule is highly recommended. Terracotta, being a natural material, benefits from consistent care.
- Regular Cleaning is Key: Over time, algae, dust, and mineral deposits can accumulate. Drain your fountain every 2-4 weeks (more often in direct sunlight or if debris is an issue) and gently scrub the saucers and vases with a soft brush and a mild, non-toxic soap. Rinse thoroughly with clean water before refilling. A diluted solution of white vinegar can effectively tackle stubborn mineral stains.
- Maintain Water Levels: Always ensure your submersible pump is completely covered by water. Running the pump dry can lead to motor burnout. Check water levels daily, especially during hot, sunny, or windy weather, as evaporation can significantly reduce the volume. Keep a watering can nearby for quick top-ups.
- Algae Prevention: If algae becomes a recurring problem, consider using a fountain-safe, non-toxic algaecide specifically designed for birdbaths or garden fountains. Introducing beneficial bacteria products can also help maintain clearer water naturally without harming birds or plants.
- Winterization Procedures: For regions experiencing freezing temperatures, proper winterization is crucial. Terracotta is prone to cracking when water freezes and expands within its pores. Before the first frost, completely drain all water from the fountain, disconnect the pump, clean all components, and store them indoors in a dry, frost-free area. If the fountain is too heavy to move, ensure it’s completely dry and covered with heavy-duty waterproof tarps to prevent any water ingress.
- Pump Care: Periodically clean your pump’s filter and impeller to ensure optimal performance. Unplug the pump, detach it from the hose, and remove any accumulated debris (leaves, sediment, hair) that could impede its function.
Customization Ideas for Your Unique Terracotta Fountain
While the classic terracotta fountain possesses an undeniable charm, there are countless ways to infuse your personality and tailor it to your garden’s aesthetic:
- Color and Finish: Embrace the natural terracotta hue, or unleash your artistic side! Paint your saucers and vases with outdoor-grade, non-toxic paints in colors that complement your garden’s palette – vibrant blues, soothing greens, or elegant neutrals. Consider adding decorative stencils or hand-painted designs for a truly unique touch.
- Decorative Fillers: Line the bottom 24-inch saucer (and even the other tiers) with an assortment of decorative elements. Polished river rocks, colorful glass gems, or smooth pebbles not only add visual interest but also provide additional perching and drinking spots for small birds and insects. They can also help camouflage the pump.
- Aquatic Flora: For the largest basin, consider introducing a few small, non-invasive aquatic plants, such as water lettuce, water hyacinth, or miniature water lilies. These plants can help with natural filtration, add lush greenery, and contribute to a more natural pond-like feel. Ensure they don’t interfere with the pump’s operation.
- Enchanting Lighting: Extend the fountain’s appeal into the evening by installing submersible LED lights in the bottom basin. Solar-powered lights are a fantastic, energy-efficient option that are easy to install and create a magical glow after dusk.
- Alternative Arrangements: Don’t feel limited to the exact sizes specified. Experiment with varying diameters of saucers and heights of vases, or even incorporate different types of terracotta pots for a more eclectic, sculptural design. Always prioritize stability and ensure proper sealing for all connections.
Troubleshooting Common Terracotta Fountain Issues
Even with meticulous construction, you might encounter minor hiccups. Here are solutions to common problems you might face with your DIY terracotta water fountain:
- No Water Flow or Weak Flow:
- Power Check: First, ensure the pump is securely plugged into a working outdoor outlet and receiving power. Check for tripped GFCI outlets.
- Water Level: The pump *must* be fully submerged. Low water levels are a primary cause of poor flow or pump failure. Refill the basin if needed.
- Clogged Pump/Hose: Unplug the pump and inspect its filter and impeller for any debris (leaves, sediment, algae) that might be blocking water intake. Also, check the flexible hose pipe for kinks or blockages.
- Clogged Fountainhead: The small nozzles of the fountainhead can become clogged. Remove and clean them.
- Water Leaks:
- Sealant Failure: This is almost always due to insufficient or improperly cured sealant. Carefully examine all points where the PVC pipe passes through the saucers and where the hose connects to the pump and fountainhead. Clean the area, reapply silicone sealant generously, ensuring complete coverage of all gaps, and allow ample time to cure fully.
- Terracotta Cracks: While less common in new pieces, terracotta can develop hairline cracks, especially if mishandled or exposed to freezing temperatures without proper winterization. Inspect the saucers and vases for any visible cracks. Small cracks might be sealed with specialized terracotta repair kits or epoxy.
- Excessive Water Evaporation:
- This is a natural occurrence, particularly in hot, dry, or windy conditions. Simply top up the water regularly. Positioning your fountain in a partially shaded area can help reduce the rate of evaporation.
- Noisy Pump Operation:
- Submersion: Ensure the pump is completely submerged in water. Running partially submerged can cause cavitation and noise.
- Vibrations: The pump might be vibrating against the bottom or sides of the saucer. Try placing it on a small, soft mat (like a rubber mat or a few smooth stones) to dampen vibrations.
- Debris: A noisy pump can also indicate debris trapped in the impeller, causing it to work harder. Clean the pump thoroughly.
Final Thoughts on Your Garden Masterpiece
Building your own DIY terracotta water fountain is a deeply satisfying and rewarding project that brings immense beauty and tranquility to your home. It’s a testament to your creativity, a charming addition to your landscape, and a welcoming haven for local wildlife. The rhythmic sound of flowing water, the visual elegance of tiered terracotta, and the joy of observing feathered visitors will transform your outdoor space into a personal oasis. With simple materials and a little dedication, you’ve created a functional piece of art that will provide enjoyment for years to come. So, sit back, relax, and savor the peaceful ambiance your handmade masterpiece brings. Happy crafting and enjoying your beautiful new fountain!