
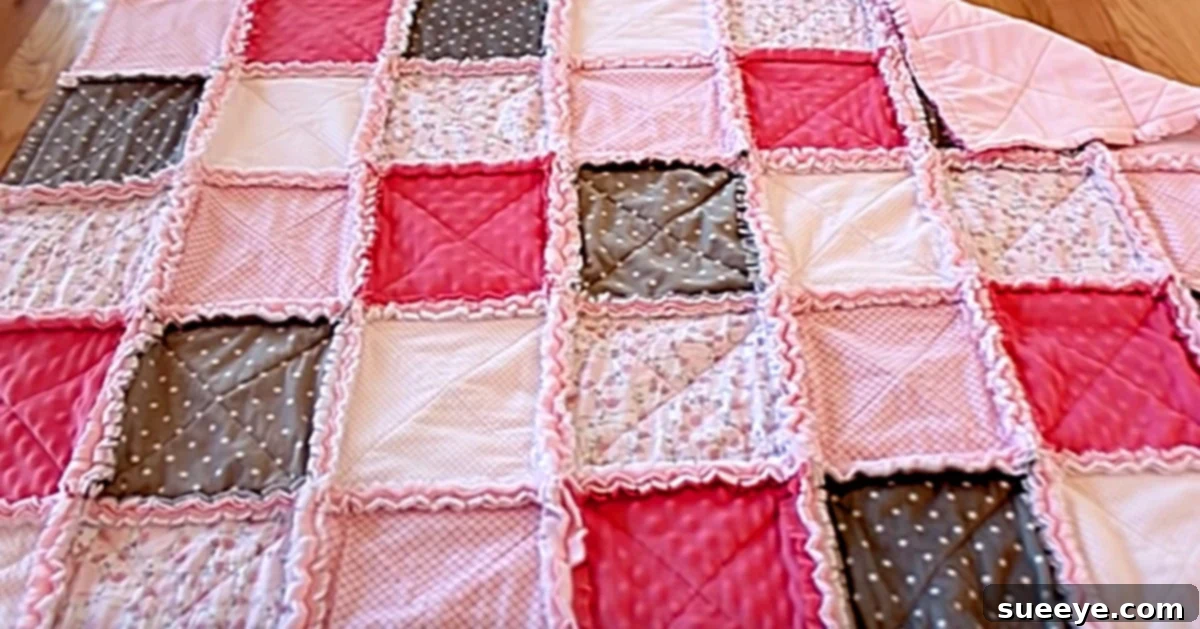
DIY Rag Quilt: Crafting Cozy Comfort with Your Fabric Scraps
There’s a special kind of joy that comes with creating something beautiful and functional with your own hands, especially when it adds warmth and personality to your home. While the love for quilting knows no season, there’s something particularly satisfying about diving into a new sewing project, like a cozy rag quilt, especially as we look to refresh our living spaces. Imagine transforming a pile of cherished fabric remnants into a snuggly masterpiece – a beautiful rag quilt that brings comfort and charm to any room. This project is not only incredibly rewarding but also an excellent way to utilize those fabric scraps you’ve been collecting over the years, breathing new life into forgotten textiles.
A rag quilt stands out from traditional quilts with its unique, fluffy, and frayed edges, which give it an invitingly soft texture and a rustic, lived-in appeal. This distinctive style makes it a favorite among crafters, from seasoned quilters to enthusiastic beginners. It’s an ideal project for those who wish to embark on a quilting journey without the complexities often associated with intricate patchwork or binding. The beauty of a rag quilt lies in its simplicity and the freedom it offers to experiment with different fabrics and colors, creating a truly personalized piece of home decor.
Why Choose a Rag Quilt for Your Next Project?
Rag quilts offer numerous advantages that make them a fantastic choice for any DIY enthusiast:
- Perfect for Scraps: If your fabric stash is overflowing with small pieces and fat quarters from past projects, a rag quilt is the ultimate solution for purging and utilizing those remnants. Even the smallest fabric scraps can find a purpose, contributing to the quilt’s unique charm.
- Beginner-Friendly: Unlike traditional quilting, which often requires precise piecing and intricate borders, rag quilts are forgiving. The construction method is straightforward, making it an excellent starting point for new sewers.
- Incredibly Cozy: The signature frayed edges of a rag quilt create a wonderfully soft and plush texture that invites snuggling. They are perfect for draping over a sofa, adding an extra layer to a bed, or providing warmth on a chilly evening.
- Personalized Home Decor: By selecting fabrics that complement your existing decor or reflect a specific theme, you can create a truly custom piece that enhances your home’s aesthetic. From vibrant patterns to serene solids, the possibilities are endless.
- Durable and Easy to Care For: Rag quilts are surprisingly robust. The more you wash them, the softer and fluffier their edges become, making them a long-lasting addition to your home. They typically require simple machine washing and drying.
I recently embarked on a rag quilt project, specifically for my daughter’s bedroom, and the experience was nothing short of delightful. I had a collection of vintage fabric pieces and some fantastic fat quarters I’d snagged at a bargain from a local craft store. They were beautiful but had been waiting for the right project. A quick search on YouTube led me to a simple yet stunning rag quilt pattern that was perfect for creating a cozy atmosphere in her room. The excitement was immediate, and I couldn’t wait to start!
Gathering Your Materials for a Rag Quilt
Before diving into the sewing process, it’s essential to have all your materials ready. For a single bed quilt, you’ll need the following. Remember, these quantities can be adjusted for different quilt sizes:
- Fabric for Quilt Squares (Front): Approximately 39 squares, each measuring 10×10 inches. This is a great opportunity to use various cotton prints, flannel, or even denim scraps for a varied texture.
- Fabric for Quilt Squares (Backing): Similar to the front, 39 squares, each 10×10 inches. You can use a consistent fabric for the back or continue with your scrap theme.
- Batting Squares (Optional, but Recommended): For extra warmth and puffiness, cut 39 squares of batting, each slightly smaller than your fabric squares (e.g., 9×9 inches). Flannel can also serve as a lightweight batting.
- Sharp Fabric Scissors or Rotary Cutter and Mat: Essential for precise and efficient cutting of your fabric squares.
- Fabric Ruler: For accurate measuring.
- Sewing Machine: A standard sewing machine will work perfectly.
- Thread: A strong, coordinating thread that blends well with your fabric choices.
- Fabric Clips or Pins: To hold layers of fabric together.
When selecting your fabrics, consider mixing different textures and patterns for a visually rich quilt. Flannel is a popular choice for rag quilts due to its softness and tendency to fray beautifully. Cotton fabrics also work wonderfully, offering a crisp, clean frayed edge. Don’t be afraid to combine them!
Step-by-Step Guide to Making Your Rag Quilt
Step 1: Preparing Your Fabric Squares
The first step is to prepare all your fabric squares. Precision here will make the assembly much smoother. I started by meticulously cutting out all my 10×10 inch squares for both the front and back of the quilt. If you’re using batting, cut those squares to approximately 9×9 inches. Lay out your squares on a flat surface to experiment with different arrangements. This visual planning helps ensure a pleasing distribution of colors and patterns before you commit to sewing.
Step 2: Layering Your Quilt Blocks
For each individual quilt block, you will create a ‘sandwich’ of your chosen fabrics and batting. Take one backing square (wrong side up), place a batting square on top of it, and then place one front fabric square (right side up) on top of the batting. Align the edges as best as you can. To hold these layers together, sew an “X” from corner to corner across each layered block. This diagonal stitching prevents shifting and adds stability to the block. Repeat this process for all 39 blocks.
Step 3: Assembling the Quilt Rows
Once all your individual blocks are prepared, it’s time to connect them. Arrange your blocks into rows according to your chosen layout. For a single bed quilt using 39 squares, a common layout might be 6 rows of 6 blocks, with one extra block for a specific design, or 5 rows of 8 blocks minus one. Let’s assume you are going for a 6×6 layout for simplicity, meaning you’ll need 36 blocks for a square quilt (and can make a throw pillow with the rest, or add more blocks for a larger quilt). Place two prepared blocks with their wrong sides facing each other. This is crucial for a rag quilt, as the seam allowance will be exposed on the ‘right’ side. Using a generous seam allowance, typically 1/2 to 3/4 inch, sew along one edge. Continue adding blocks in this manner to form your first row. Repeat for all subsequent rows.
Step 4: Joining the Rows and Edging
With all your rows sewn, it’s time to connect them. Again, place two rows with their wrong sides together and sew them with the same generous seam allowance (1/2 to 3/4 inch). Continue joining rows until your entire quilt top is assembled. Next, sew a seam all the way around the outer perimeter of the quilt, using the same seam allowance. This creates a consistent edge for fraying. It’s important to maintain a consistent seam allowance throughout the entire process to ensure even fraying and a uniform look.
Step 5: Creating the Signature Ragged Edges
Now comes the fun part – making the quilt ‘raggy’! With a pair of sharp fabric scissors, begin clipping into all the exposed seam allowances. Make cuts approximately 1/4 to 1/2 inch apart, being very careful not to cut through your stitch line. This is key to achieving the beautiful fluffy, frayed look that defines a rag quilt. It can be a bit time-consuming, but the effort is well worth it. Keep going until all the interior seams and the outer perimeter seams have been clipped.
Step 6: The Magic Wash and Dry
The final step is what truly transforms your clipped seams into fluffy rags. Place your completed rag quilt into a washing machine. Wash it on a warm machine cycle with a bit of detergent. The agitation of the washing machine will start the fraying process. For an even fluffier result, you can add a cup of vinegar to the wash cycle. After washing, tumble dry the quilt on a low heat setting. During the drying cycle, the frayed edges will really bloom and puff up. Be prepared to clean your dryer’s lint trap several times, as a lot of loose fabric fibers will be shed during this first wash and dry.
Tips for Rag Quilt Success
- Pre-Wash Your Fabrics: To prevent future shrinkage and color bleeding, always pre-wash and dry your fabrics before cutting.
- Use a Walking Foot: If your sewing machine has a walking foot attachment, it can be very helpful for sewing multiple layers of fabric evenly.
- Practice Your Seam Allowance: Before starting on your actual quilt, practice sewing a few scrap pieces with your chosen seam allowance (1/2 to 3/4 inch) to ensure consistency.
- Sharp Tools are Your Friend: A sharp rotary cutter or scissors will make the cutting and clipping process much easier and more precise.
- Take Breaks: Clipping all those seams can be tiring. Don’t hesitate to take breaks to avoid hand fatigue.
Caring for Your Handmade Rag Quilt
Rag quilts are designed for repeated washing, which only enhances their softness and character. To care for your quilt:
- Machine Wash: Use a gentle cycle with cold or warm water.
- Tumble Dry: Dry on a low heat setting. The more you dry it, the fluffier it will get.
- Lint Trap: Always remember to check and clean your dryer’s lint trap regularly, especially during the first few washes.
Embrace the Cozy Charm
Making a rag quilt is a truly enjoyable and rewarding experience. From selecting your fabrics to watching the edges magically fray in the dryer, each step brings you closer to a beautiful, handmade item that will be cherished for years to come. Whether it’s for a child’s bedroom, a cozy throw for your living room, or a heartfelt gift for a loved one, a DIY rag quilt adds a touch of unique warmth and comfort that only handmade items can provide. I hope you enjoy creating your rag quilt as much as I enjoyed making mine. Get ready to snuggle up in your new, beautifully crafted masterpiece!