
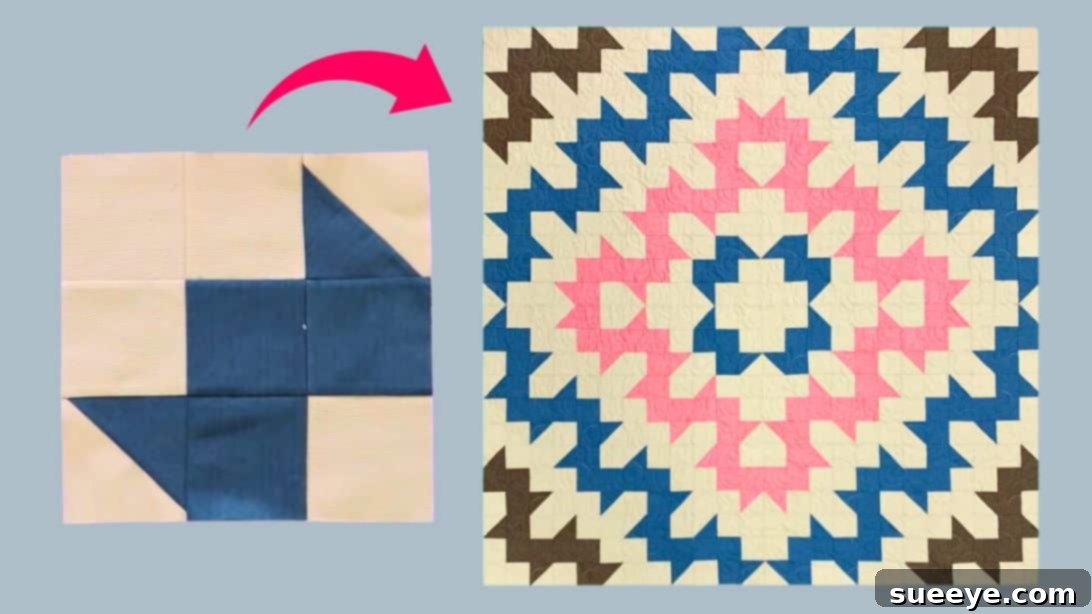
Stunning Snowflake Quilt Tutorial: Create a Unique Winter Masterpiece
Embark on a captivating quilting journey with this exceptional snowflake quilt tutorial, inspired by the creative minds at Sew Yeah. If you’re searching for a quilting project that truly stands out and captures attention, this distinctive snowflake pattern is an ideal choice. While the individual blocks are straightforward to construct, assembling this magnificent quilt requires dedication, precision, and a bit of time – all worthwhile for the stunning final result. This guide will walk you through each step, from precise fabric cutting to the final quilt assembly, ensuring your snowflake masterpiece comes to life beautifully. Get ready to transform your fabric stash into a cozy, eye-catching quilt that will be cherished for years. Happy sewing!
This tutorial is designed to provide clear, step-by-step instructions, making the process enjoyable and manageable. Whether you’re an experienced quilter or an enthusiastic intermediate, you’ll find immense satisfaction in crafting this intricate yet accessible design. We’ll delve into the secrets of creating perfect Half-Square Triangles (HSTs) and arranging them to form dazzling snowflake motifs that seem to dance across your fabric canvas.
Essential Materials for Your Snowflake Quilt
Before you begin, gathering all your materials is key to a smooth quilting process. We recommend using high-quality quilting cotton fabrics for durability and vibrant color retention. Pre-washing your fabrics is also a good practice to prevent shrinkage and color bleeding after your quilt is finished. For this project, you will need four distinct fabrics, carefully chosen to create a beautiful contrast and bring your snowflake design to life.
- Fabric A: 3 yards for the Background
This fabric will serve as the canvas for your snowflakes, making them pop. A solid light color like white, cream, or a pale blue works wonderfully to evoke a wintry feel. - Fabric B: 1 1/4 yards for the Center and Third Ring
Choose a vibrant or contrasting color for this fabric to define the core elements of your snowflake blocks. - Fabric C: 1 yard for the Second Ring
This fabric will add another layer of detail and depth to your snowflake design. Consider a color that complements Fabric B beautifully. - Fabric D: 1/2 yard for Outer Ring
This final accent fabric completes the snowflake motif. It can be a bolder choice to frame the design or a subtle shade to blend harmoniously.
Precise Fabric Cutting Instructions
Accuracy in cutting is paramount in quilting, as it directly impacts the precision of your blocks and the overall success of your quilt. Using a rotary cutter, a self-healing mat, and a clear quilting ruler will ensure sharp, straight cuts. Remember to take your time and measure twice, cut once! “WOF” refers to the “Width of Fabric,” typically 42-44 inches, after selvages are trimmed. These measurements are crucial for efficiently utilizing your fabric and creating the necessary components for each snowflake block.
Fabric A (Background)
- Cut 5 pieces of 5 1/2″ X WOF strips. From these strips, sub-cut to yield a total of 32 pieces of 5 1/2″ squares. These larger squares will be paired with your colored fabrics to form the initial Half-Square Triangle units.
- Cut 22 pieces of 3 1/2″ X WOF strips. From these strips, sub-cut to yield a total of 256 pieces of 3 1/2″ squares. These smaller squares will serve as plain background filler pieces within your snowflake blocks, providing negative space for the design to shine.
Fabric B (Center and Third Ring)
- Cut 3 pieces of 5 1/2″ x WOF strips. From these strips, sub-cut to yield a total of 16 pieces of 5 1/2″ squares. These squares will be integral to forming the colored sections of your Half-Square Triangles.
- Cut 8 pieces of 3 1/2″ x WOF strips. From these strips, sub-cut to yield a total of 96 pieces of 3 1/2″ squares. These plain colored squares will be incorporated directly into your block assembly, adding solid pops of color.
Fabric C (Second Ring)
- Cut 2 pieces of 5 1/2″ x WOF strips. From these strips, sub-cut to yield a total of 10 pieces of 5 1/2″ squares. These will also contribute to the Half-Square Triangle units, adding to the intricate layering of the snowflake.
- Cut 5 pieces of 3 1/2″ WOF strips. From these strips, sub-cut to yield a total of 60 pieces of 3 1/2″ squares. These plain squares will complement Fabric B in the block construction, enhancing the snowflake’s concentric rings.
Fabric D (Outer Ring)
- Cut 1 piece of 5 1/2″ x WOF strip. From this strip, sub-cut to yield a total of 6 pieces of 5 1/2″ squares. These will be used for the outermost colored tips of your snowflakes, adding a final touch of definition.
- Cut 3 pieces of 3 1/2″ x WOF strips. From these strips, sub-cut to yield a total of 36 pieces of 3 1/2″ squares. These smaller squares complete the outer ring elements of your individual snowflake blocks.
Step-by-Step Quilt Assembly
Now that all your fabrics are perfectly cut, it’s time to bring your snowflake quilt to life! This section details the process of creating Half-Square Triangles (HSTs), assembling individual snowflake blocks, and finally joining them to form the complete quilt top. Follow these steps carefully for the best results.
Step 1: Constructing Half-Square Triangles (HSTs)
Half-Square Triangles are fundamental units in quilting, and we’ll be using a method that yields four HSTs from two squares, maximizing efficiency. Begin by pairing up all of your 5 1/2″ colored squares (from Fabrics B, C, and D) with the 5 1/2″ background squares (Fabric A). Place one colored square and one background square right sides together. Use a pencil or fabric marker to draw a diagonal line from one corner to the opposite corner on the back of the lighter fabric square. Next, sew a 1/4-inch seam allowance around all four sides of these paired square units, essentially sewing a square around your larger square. This technique is often referred to as the “four-at-a-time” HST method. Once sewn, gently press your seams to set them. This simple step helps to flatten the stitches and improve accuracy in subsequent steps.
Step 2: Cutting and Trimming Your HSTs
With your sewn square units, it’s time to transform them into individual Half-Square Triangles. Carefully place your sewn unit on your cutting mat. Using your rotary cutter and ruler, cut diagonally from corner to corner in both directions. It’s crucial not to shift the fabric until you have made both diagonal cuts, as this ensures your lines are precise and you get four perfect triangles. This will create four smaller triangular units from each larger square pairing. After cutting, you will have four unpressed HSTs. Take each unit and carefully press them open, ensuring the seam allowance is pressed towards the darker fabric. This minimizes bulk and helps the lighter fabric appear crisp. Finally, using an HST ruler or a regular quilting ruler with a 45-degree line, trim each HST to a precise 3 1/2″ square. Accuracy here is vital for your blocks to fit together seamlessly. You will repeat this process until you have created all the necessary HSTs from your initial 5 1/2″ square pairings.
Step 3: Assembling Individual Snowflake Blocks
Now comes the exciting part: arranging your HSTs and plain squares to form the beautiful snowflake design! Each snowflake block will be a 9-patch unit, meaning it’s composed of a 3×3 grid of 3 1/2″ squares. You will be creating 64 identical snowflake blocks in total for this quilt. Refer to the image below for the precise arrangement. Lay out your 3 1/2″ HST squares and plain 3 1/2″ squares (from all four fabrics) on a design wall or a flat surface. Pay close attention to the orientation of your HSTs to form the distinct points of the snowflake. Once satisfied with the layout of a single block, sew the squares together in rows, using a consistent 1/4-inch seam allowance. Then, sew these three rows together to form one complete snowflake block. Press your seams after each stage of assembly. For best results, consider pressing seams in opposite directions for alternating rows to make nesting easier when joining rows later. This will help your points match up perfectly.
Step 4: Assembling the Full Quilt Top
Once you have successfully constructed all 64 individual snowflake blocks, it’s time to bring them together to form the complete quilt top. The final quilt top will consist of 8 rows, with each row containing 8 snowflake blocks. Again, lay out all your finished blocks on a large surface or design wall. This allows you to visualize the entire quilt and ensure the pattern flows correctly. Take a moment to step back and admire how the individual snowflakes create a larger, cohesive design. When you are satisfied with the arrangement, begin sewing the blocks together into horizontal rows. Pin liberally at seam intersections to ensure your points align precisely. Once all 8 rows are complete, press the seams for each row in alternating directions (e.g., press seams of row 1 to the right, row 2 to the left, and so on). This technique helps the seams “nest” together when you join the rows, reducing bulk and leading to flatter, more professional-looking joins. Finally, sew the rows together, carefully pinning and matching all seam lines. Press the entire quilt top thoroughly once assembled to remove any wrinkles and flatten all seams.
Finishing Your Snowflake Quilt: Quilting, Batting, and Binding
Once your beautiful snowflake quilt top is complete, the journey isn’t quite over! The next steps involve adding the batting and backing, and then quilting and binding to turn your quilt top into a finished, functional, and durable quilt.
Quilting Your Masterpiece
Quilting is the process of stitching through all three layers of your quilt (top, batting, and backing) to hold them together and add texture and dimension. You have several options for quilting:
- Domestic Machine Quilting: For smaller quilts, you can quilt on your home sewing machine. Simple straight lines, stippling, or meandering designs can be very effective and manageable for beginners. Consider following the lines of your snowflake blocks or stitching in the ditch along the seams.
- Hand Quilting: For a traditional touch, hand quilting adds a beautiful, soft texture and a timeless charm to your quilt. This is a slower process but offers a deeply satisfying experience.
- Longarm Quilting: If you prefer professional results or have a large quilt, you can send your quilt top to a longarm quilter. They can execute intricate designs that would be difficult on a domestic machine, adding incredible artistry to your work.
Before quilting, make sure to baste your three layers together. This can be done with safety pins, basting spray, or hand basting stitches, ensuring all layers are smooth and free of wrinkles.
Adding the Binding
Binding is the final frame that encloses the raw edges of your quilt, providing a neat, durable finish. Typically, binding strips are cut at 2 1/2 inches wide, sewn together end-to-end to create a continuous strip long enough to go around the entire perimeter of your quilt.
- Preparing the Binding: Press the binding strip in half lengthwise.
- Attaching to the Quilt: Sew the raw edge of the binding strip to the raw edge of your quilt, using a 1/4-inch seam allowance. Miter the corners for a professional look.
- Finishing the Binding: Flip the binding over to the back of the quilt, encasing the raw edges. You can then hand-stitch the binding in place for an invisible finish or machine-stitch it for a quicker, visible seam.
This step not only makes your quilt look complete but also protects the edges from fraying and wear.
Don’t Forget a Quilt Label!
A quilt label is a wonderful way to personalize your creation and preserve its history. Include important details such as your name (the quilter), the date it was completed, the recipient (if it’s a gift), and perhaps a special message. This turns your quilt into a true heirloom.
Embrace the Joy of Quilting Your Snowflake Masterpiece
Congratulations on embarking on this beautiful snowflake quilt project! This tutorial, inspired by the expertise of Sew Yeah, offers a rewarding experience for anyone looking to create a unique and visually striking quilt. The combination of intricate Half-Square Triangles and thoughtful fabric placement results in a design that is both complex in appearance and surprisingly accessible to construct with patience and precision.
From the careful selection of your background and accent fabrics to the satisfaction of seeing each snowflake block come together, every step in this quilting journey is a chance to express your creativity. The meticulous cutting, the precise sewing of HSTs, and the grand assembly of 64 individual blocks into a cohesive whole are testaments to your dedication and skill.
Imagine this stunning snowflake quilt adorning your home, bringing warmth and a touch of winter wonder to any room, or being gifted to a loved one as a truly handmade token of affection. The process of quilting is not just about producing a finished item; it’s about the joy of creation, the meditative rhythm of sewing, and the pride in crafting something beautiful with your own hands.
We encourage you to share your progress and your finished snowflake quilt with the quilting community. Your unique fabric choices and interpretation of this pattern will undoubtedly inspire others. Whether you followed the video tutorial by Sew Yeah or relied solely on these written instructions, the result will be a timeless piece of textile art. Embrace the magic of quilting, and enjoy the lasting beauty of your handmade snowflake quilt!