
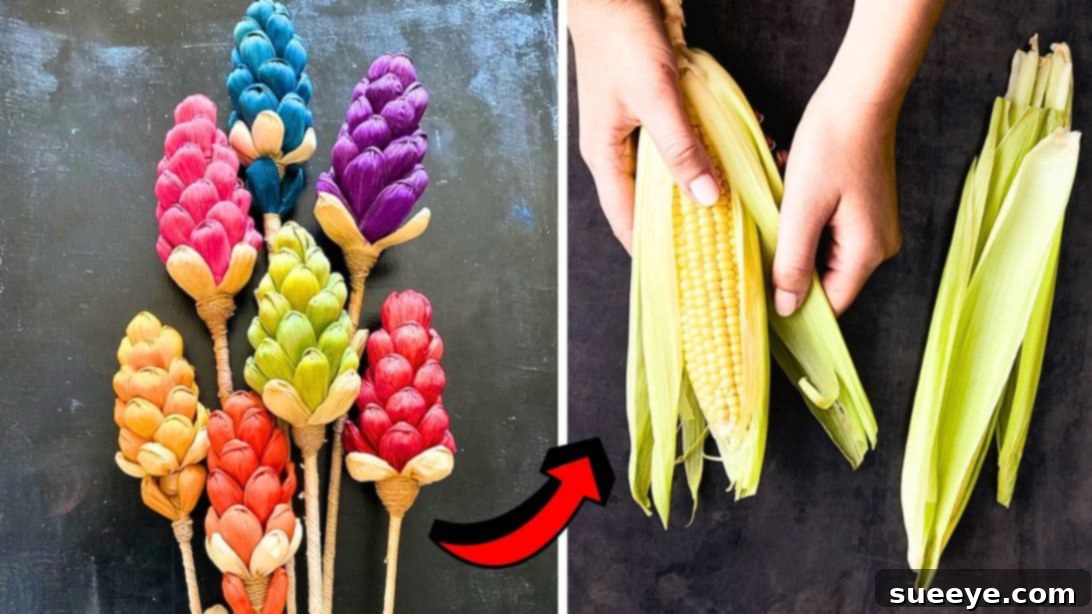
Transform Your Corn Husks into Beautiful DIY Flowers: An Eco-Friendly Craft Guide
In a world increasingly focused on sustainability and creative reuse, the humble corn husk, often discarded as waste, presents a remarkable opportunity for crafting. If you’ve ever enjoyed a delicious meal of corn, you’re likely familiar with the sheer volume of husks that typically end up in the trash. What if we told you these seemingly useless remnants could be transformed into something truly beautiful and enduring? This comprehensive guide will walk you through the process of creating exquisite DIY flowers from corn husks, proving that beauty and craft can emerge from the most unexpected places.
Led by the ingenious ideas often found in communities like DIY Art and Craft on YouTube, this project is more than just a craft; it’s an embrace of eco-friendly practices and a celebration of handmade artistry. Imagine crafting intricate blooms that rival fresh flowers in charm, suitable for elegant home decor, thoughtful handmade gifts, or unique additions to special event arrangements. These aren’t just flowers; they’re conversation starters, symbols of sustainable living, and testaments to your creative spirit.
Why Upcycle Corn Husks? The Benefits of This Eco-Friendly Craft
Choosing corn husks for your crafting projects offers a myriad of advantages, extending beyond just aesthetics. This craft embodies the principles of upcycling, a practice that breathes new life into materials that would otherwise be discarded, reducing waste and minimizing environmental impact. Here’s why corn husk flowers are a fantastic choice for any DIY enthusiast:
- Sustainable and Eco-Friendly: By using corn husks, you’re diverting natural waste from landfills, making a positive impact on the environment. It’s a wonderful way to participate in a circular economy right from your home.
- Cost-Effective: Corn husks are typically free or very inexpensive if purchased dried. This makes crafting accessible and budget-friendly, allowing you to create stunning decor without a hefty price tag.
- Unique Aesthetic: The natural texture and subtle sheen of corn husks create flowers with a distinct, rustic, yet elegant appeal. Each petal has its own character, contributing to the authenticity and charm of the final product.
- Durability and Longevity: Unlike fresh flowers, corn husk blooms last indefinitely with proper care. They retain their shape and color, providing lasting beauty that you can enjoy season after season.
- Versatile Decor: These flowers can be customized with various food colors to match any decor style or occasion. From vibrant bouquets to subtle centerpieces, their versatility is unmatched.
- Rewarding Creative Outlet: Engaging in this craft is not only productive but also incredibly therapeutic. The process of transforming a simple husk into a beautiful flower is deeply satisfying and a wonderful way to express creativity.
Gathering Your Crafting Essentials: Materials Needed
Before you embark on this delightful crafting journey, ensure you have all the necessary supplies within reach. Most of these items are readily available, some you might even find in your kitchen or craft drawer. Having everything prepared makes the crafting process smooth and enjoyable.
- Corn Husks: The star of our project! You can use fresh husks from corn cobs after cooking, or purchase dried corn husks typically found in ethnic grocery stores or craft shops. If using fresh, ensure they are clean and free of silks.
- Food Color: Essential for adding vibrant hues to your petals. Liquid or gel food colors work best, allowing you to achieve a wide spectrum of shades. Experiment with different colors to create diverse floral arrangements.
- Thin Dowel Rod or Skewer: This will serve as the stem for your flowers. A bamboo skewer or a thin wooden dowel is perfect. Remember to cut off any pointed edges for safety and ease of use.
- Paper Towel or Tissue Paper: Used to create the core bud of your flower, giving it shape and volume. A small piece is sufficient for each flower.
- Scissors: For cutting husks, string, and shaping your petals with precision.
- String or Thread: Strong cotton thread or floral wire is ideal for securing the petals and building the flower’s structure. Choose a color that blends with your husks or a contrasting one for an artistic touch.
- White Glue: A craft-grade white glue (like school glue or PVA glue) is needed to secure the final wraps and ensure durability. It dries clear, providing a clean finish.
Step-by-Step Guide: Crafting Beautiful Corn Husk Flowers
Now, let’s dive into the exciting part: transforming those husks into magnificent blossoms. Follow these detailed steps to create your very own collection of corn husk flowers.
Step 1: Preparing Your Corn Husks: Cleaning and Coloring
The journey to a beautiful corn husk flower begins with proper preparation. Start by boiling your corn husks in water infused with your chosen food color. This dyeing process is crucial for achieving vibrant, lasting colors. The heat helps the husks become pliable and absorb the dye evenly. Ensure the husks are fully submerged for uniform coloring. Once dyed and softened, carefully remove them and let them cool slightly. While they are still flexible, it’s easier to work with them.
Next, prepare the core of your flower. Grab a thin dowel rod or a bamboo skewer, making sure to cut off any sharp or pointed edges for safety. This rod will form the stem of your flower. Take a small piece of paper towel or tissue paper and gently crumple it into a compact, small ball. This paper ball will create the central bud of your flower, giving it a rounded, realistic shape.
Select a strip of corn husk, approximately 1 inch wide. Fold this strip neatly in half lengthwise, then twist it gently near the folded side. Place your small paper ball onto the folded side, positioned close to the twist at the center. Carefully fold the corn husk over the paper ball, ensuring it is completely and smoothly covered. The goal is to create a neat, enclosed bud shape that will be the heart of your flower.
Step 2: Constructing the Flower Bud: The Heart of Your Bloom
With your covered paper ball ready, carefully insert the prepared stick (dowel rod or skewer) into the center of the husk, pushing it gently until it firmly nestles against the paper ball. This creates a secure attachment point for the rest of your flower. Once the stick is in place, take a length of string or thread and begin wrapping it tightly around the base of the husk, right where the stick meets the bud. Wrap all the way around the edges of the husk, pulling the string taut to secure the bud firmly to the stick. This tight wrapping prevents the bud from unraveling and provides a stable foundation.
Now, it’s time to create your first petal. Form a corn husk petal using a similar folding and twisting technique that you employed for the bud, but this time, you won’t insert a paper ball. The petals should be flat or gently curved, reflecting the natural form of a flower petal. Once shaped, position this first petal onto the side of the stick, just underneath the bud. Ensure it slightly overlaps the base of the bud to create a natural transition. Use the same string you used to secure the bud, continuing to wrap it around the base of the newly attached petal and the stick, integrating them seamlessly.
This process of attaching petals one by one is crucial for building a full and realistic flower. Each petal should be strategically placed to create a harmonious arrangement, mimicking the layered structure of natural blooms. Keep the string taut with each wrap to maintain the flower’s structural integrity.
Step 3: Layering the Petals: Giving Your Flower Form and Volume
Continue to create more petals, attaching them around the stick in a spiraling or overlapping pattern. The key is to gradually build up the layers, adding volume and fullness to your flower. Place each new petal slightly lower and overlapping the previous one, ensuring there are no visible gaps. Keep wrapping the string tightly around the base of each new petal as you attach it, securing everything firmly to the stem. This careful layering and binding are what give your corn husk flower its realistic and robust form. Continue this process until your flower reaches a desired height, typically around 2½ to 3 inches tall, or until it looks sufficiently full and beautiful.
Once you are satisfied with the main body of your flower, create a set of three slightly larger petals using a non-colored husk. These natural-toned petals will form a subtle calyx or outer layer at the very base of your flower, providing a realistic finish and covering the wrapped string. Attach these three natural-colored petals around the base of the flower, ensuring they seamlessly integrate with the colored petals above. Again, use the string to tie these final petals securely in place. Once all petals are attached and secure, tie the string tightly with a firm knot, then carefully cut off any excess string close to the knot.
Step 4: The Finishing Touches: Securing and Enhancing Your Creation
To ensure the longevity and stability of your beautiful corn husk flower, apply a generous amount of white glue over the tightly tied string and the base where all the petals converge. The glue will dry clear, effectively sealing the knot and reinforcing the entire structure. Be sure to cover all exposed string and the very base of the petals where they meet the stem. Allow the glue to dry completely; this might take several hours, so patience is key. Once fully dry, your first corn husk flower is complete and ready to display!
The beauty of this craft lies in its potential for replication and arrangement. Continue to make more flowers, experimenting with different colors, sizes, and petal shapes. Once you have a collection of these stunning handmade blooms, you can arrange them into an exquisite bouquet, place them individually in small vases around your home, or integrate them into larger decorative pieces. Imagine a vibrant centerpiece for your dining table, a charming accent for a bookshelf, or a heartfelt gift for a loved one. Each flower you create will be a testament to your creativity and commitment to sustainable crafting.
Expert Tips for Stunning Corn Husk Flowers
To elevate your corn husk flowers from good to truly exceptional, consider these additional tips and tricks:
- Varying Husk Thickness: Use thinner, more pliable husks for the inner petals and bud, and slightly thicker ones for outer petals to provide better structure and dimension.
- Achieving Vibrant Colors: For darker or more intense colors, allow husks to soak longer in the food-colored water. You can also layer colors by first dyeing husks a light shade, then re-dyeing them in a darker, complementary hue.
- Shaping Petals: After dyeing, while the husks are still damp, gently curl or shape the edges of your petals by hand. You can use a pencil or a thin rod to create natural-looking curves. Let them dry in this shape.
- Drying Husks: After boiling and dyeing, lay the husks flat on a paper towel or hang them to dry completely before cutting and assembling. This prevents mold and ensures they maintain their shape. However, for initial shaping of petals, slightly damp is better.
- Experiment with Sizes: Don’t be afraid to create flowers of different sizes. A mix of large, medium, and small blooms adds visual interest to any arrangement.
- Adding Fragrance: For a subtle scent, you can lightly spray your finished flowers with a floral essential oil diluted in water.
- Safety First: When using skewers, always cut off the pointed ends before working to prevent accidental pokes.
Creative Display Ideas for Your Handmade Blooms
Once you’ve crafted your beautiful corn husk flowers, the possibilities for displaying them are endless. Here are some inspiring ideas to showcase your sustainable artistry:
- Bouquets and Centerpieces: Arrange a collection of varied sizes and colors in a rustic vase or basket for a stunning centerpiece on your dining table, coffee table, or mantelpiece.
- Wreaths: Attach the flowers to a plain wreath base (grapevine or foam) to create a unique and seasonal decor piece for your front door or wall.
- Gift Embellishments: Use a single corn husk flower as a charming and personalized embellishment on wrapped gifts, making the present even more special.
- Garlands: String multiple flowers together with beads or natural elements to create a beautiful garland for festive occasions or everyday decor.
- Hair Accessories: Smaller flowers can be attached to hair clips or headbands for a unique, natural accessory.
- Table Settings: Place a small flower at each guest’s plate for an elegant and eco-friendly touch to your dinner party.
- Shadow Boxes: Create a lasting art piece by arranging a few flowers in a shadow box, protecting them from dust and creating a framed display.
Care and Maintenance for Lasting Beauty
One of the greatest advantages of corn husk flowers is their longevity. With minimal care, they can remain beautiful for years. To ensure your creations stay pristine:
- Keep Dry: Avoid exposing them to excessive moisture or high humidity, as this can cause the husks to warp or, in rare cases, develop mold.
- Dust Regularly: Gently dust your flowers with a soft brush or a can of compressed air to prevent dirt buildup.
- Avoid Direct Sunlight: Prolonged exposure to direct sunlight can cause colors to fade over time. Display them in a location with indirect light to preserve their vibrancy.
- Handle Gently: While relatively sturdy, corn husk flowers are delicate handmade items. Handle them with care to prevent accidental damage to the petals or stem.
Conclusion: Embrace the Art of Sustainable Crafting
The art of transforming discarded corn husks into exquisite flowers is a testament to the power of creativity and sustainability. This DIY project offers a unique opportunity to connect with nature, reduce waste, and adorn your home with handmade beauty that carries a story. Each petal you shape, each layer you add, contributes to a stunning piece of decor that is both environmentally conscious and aesthetically pleasing.
Whether you’re an experienced crafter or just starting your DIY journey, making corn husk flowers is a rewarding endeavor that yields impressive results. So, the next time you enjoy a corn on the cob, remember that its husks hold the potential for a new life—a life as a timeless, elegant bloom. Gather your materials, unleash your creativity, and start crafting your own garden of sustainable, handmade corn husk flowers today. Share your beautiful creations and inspire others to embrace the joy of upcycled artistry!
All image credit belongs to DIY Art and Craft via YouTube. Follow and subscribe to their channel for more inspiring DIY projects!