
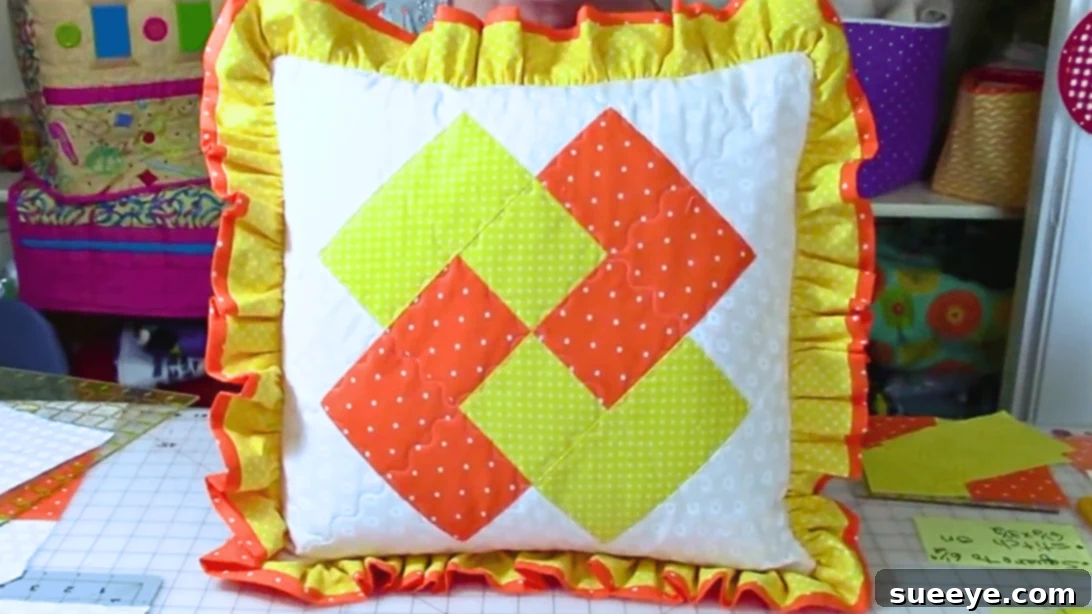
Master the Card Trick Quilt Block: Your Ultimate Beginner’s Guide
Welcome to the enchanting world of quilting, where fabric, thread, and creativity come together to form beautiful masterpieces! Among the countless quilt patterns, the Card Trick Quilt Block stands out as a true classic. Renowned for its mesmerizing optical illusion of overlapping cards, this block might appear intricate at first glance, but it’s surprisingly accessible, even for those new to the art of quilting. This comprehensive tutorial, inspired by the clear and concise instructions from The Sewing Room Channel on YouTube, is designed to guide you through every step, ensuring you achieve a perfectly pieced Card Trick block on your very first attempt.
The Card Trick block has charmed quilters for generations, making it a beloved choice for a wide array of projects, from cozy throws and decorative wall hangings to intricate bed quilts. Its distinctive design creates a sense of depth and movement, making it a fantastic addition to any quilter’s repertoire. What makes it particularly appealing for beginners is that it effectively teaches fundamental quilting techniques such as accurate cutting, precise piecing, and careful pressing—all crucial skills that will serve as the foundation for your future quilting adventures.
This weekend, challenge yourself with a rewarding creative endeavor! Gather your fabrics, prepare your sewing space, and let’s demystify the Card Trick Quilt Block together. We’ll break down the process into easy-to-follow steps, complete with detailed explanations and expert tips. By the time you’re finished, you’ll not only have a stunning quilt block but also a newfound confidence in your quilting abilities. Get ready to add a touch of magic to your fabric stash!
RELATED: If you’re looking for broader insights into making a complete Card Trick quilt, you might find additional inspiration in our guide: Easiest Way To Make A “Card Trick” Quilt.
Essential Materials for Crafting Your Card Trick Quilt Block
Success in quilting often begins with proper preparation. Having all your materials ready and correctly cut is half the battle won. For this Card Trick Quilt Block, you’ll need three distinct fabric types: two main contrasting fabrics that will create the “cards” and one background fabric to make the illusion pop. The specific dimensions provided here are for a standard-sized block, but you can always adjust them proportionally for larger or smaller projects once you’ve mastered the basic technique.
Fabric Selection: The Key to a Striking Illusion
Choosing your fabrics is one of the most exciting parts of any quilting project! For the Card Trick block, selecting fabrics with good contrast is paramount to clearly define the overlapping “cards” and achieve that captivating 3D effect. Consider prints and solids that complement each other but are distinct enough to avoid blending.
Fabric A (Your First Main Color/Print)
This fabric will define one set of “cards” in your trick. Choose a color or print that you love and that contrasts well with Fabric B and your Background Fabric.
- (2) 3.5″ squares: These pieces are vital for forming the initial four-patch unit at the heart of the block.
- (2) 3.5″ x 6.5″ rectangles: These longer strips extend from the center, creating the illusion of cards stretching outwards.
Fabric B (Your Second Main Color/Print)
This fabric will complete the opposing set of “cards.” Ensure it offers a strong visual contrast to Fabric A for maximum impact.
- (2) 3.5″ squares: Paired with Fabric A squares, these complete the foundational four-patch.
- (2) 3.5″ x 6.5″ rectangles: These pieces, along with Fabric A’s rectangles, give the block its unique rectangular form before the final triangles are added.
Background Fabric (The Stage for Your Trick)
The background fabric should ideally be a solid or a subtle tone-on-tone print that allows Fabric A and Fabric B to truly shine. A light or neutral color is often preferred to enhance the illusion.
- (4) 3.5″ squares: These smaller squares, referred to as “Fabric C squares” in some tutorials for Step 2, will form the corner points of the central card-like elements.
- (2) 10″ squares: These larger squares are crucial for creating the final triangular elements that frame the block and complete the Card Trick illusion, making it look as though fabric is woven over and under.
Essential Quilting Tools You’ll Need:
Beyond fabrics, having the right tools makes the quilting process more efficient, enjoyable, and precise. Here’s what you’ll want to have on hand:
- Marking Pen, Pencil, or Chalk: For drawing accurate diagonal lines on fabric, especially helpful for half-square triangles or corner-to-corner stitching. Ensure it’s erasable or disappears with heat.
- Quilting Ruler: A clear acrylic ruler (e.g., 6″ x 24″ or a square ruler) is non-negotiable for precise cutting and trimming. Look for one with clear markings.
- Rotary Cutter and a Cutting Mat: While scissors are an option, a sharp rotary cutter paired with a self-healing mat offers unparalleled speed and accuracy for cutting straight lines and multiple layers of fabric.
- High-Quality Needle and Thread: Use 100% cotton thread for piecing, ideally matching your background fabric or a neutral gray. Ensure your machine needle is sharp and appropriate for quilting.
- Fabric Pins or Wonder Clips: Essential for holding fabric layers together securely, preventing shifting, and ensuring seams align perfectly before stitching.
- Iron and Ironing Board: Proper pressing is as critical as stitching in quilting. An iron helps flatten seams, “set” stitches, and ensures your blocks lie flat without distortion.
- Sewing Machine: A reliable sewing machine equipped with a ¼-inch seam allowance foot will greatly enhance the consistency and accuracy of your piecing.
- Seam Ripper (Optional, but Recommended): Even experienced quilters make mistakes. A good seam ripper is your best friend for quickly and cleanly undoing stitches.
Step-by-Step Guide: Crafting Your Magical Card Trick Quilt Block
With all your materials neatly organized, it’s time to bring your Card Trick Quilt Block to life! Remember, patience and precision are your greatest allies. A consistent ¼-inch seam allowance throughout this project is vital for your block to square up correctly and achieve the desired visual effect. Let’s begin the transformation from fabric pieces to a stunning illusion!
Step 1: Building the Core Four-Patch and Adding Fabric A Rectangles
This initial phase focuses on constructing the central part of your block, which will form the foundation for the ‘card trick’ illusion.
- Create Two-Patch Units:
- Take one 3.5″ square from Fabric A and one 3.5″ square from Fabric B. Place them together, right sides facing each other, ensuring all raw edges are perfectly aligned.
- Stitch along one side using a precise ¼-inch seam allowance. Use a ruler to double-check your seam allowance if needed.
- Carefully open the stitched unit and press the seam allowance towards the darker fabric. This technique, known as “pressing to the dark,” helps to prevent the seam from showing through lighter fabrics. Repeat this process to create a second identical two-patch unit. You now have two rectangular units, each featuring Fabric A and Fabric B.
- Assemble the Four-Patch Center:
- Arrange your two created two-patch units on your workspace. Position them so that the colors are opposite each other (e.g., Fabric A top-left on one unit, Fabric A bottom-right on the other unit) to form a classic checkerboard four-patch pattern.
- Stack these two units right sides together, carefully aligning the center seam where they will join. Pin generously at this intersection to ensure the points match up accurately.
- Stitch the two units together with a consistent ¼-inch seam allowance.
- Open the resulting four-patch block and press the center seam. You can either press it open to reduce bulk or ‘spin’ the seam by pressing it in a clockwise or counter-clockwise direction around the center intersection, creating a small pinwheel effect. Ensure the block lies completely flat. Your current block should measure 6.5″ x 6.5″.
- Attach Fabric A Rectangles to the Sides:
- Retrieve your two 3.5″ x 6.5″ rectangles of Fabric A.
- Take one Fabric A rectangle and place it along one vertical side of your assembled four-patch block, right sides together, aligning the 6.5″ edges.
- Pin along the length to prevent shifting and stitch with a ¼-inch seam allowance.
- Open the unit and press the seam allowance away from the four-patch block, towards the Fabric A rectangle. This again helps reduce bulk where multiple seams meet.
- Repeat this exact process for the second Fabric A rectangle, attaching it to the opposite vertical side of the four-patch block. At this stage, your block should resemble a vertical strip, approximately 6.5″ x 12.5″ (or 9.5″ depending on initial calculation).
Step 2: Completing the Illusion with Background Pieces and Fabric B Rectangles
This phase is where the “trick” truly comes to life, as we introduce the background fabric to create the overlapping effect. Precision in this step will enhance the block’s visual impact.
- Prepare and Attach Background Squares to Fabric B Rectangles:
- Take your two 3.5″ x 6.5″ rectangles of Fabric B and your four 3.5″ squares of Background Fabric (these are the pieces referred to as “Fabric C squares” in the original instructions for this step).
- On the wrong side of each of the four 3.5″ Background Fabric squares, use your marking tool to draw a diagonal line from one corner to the opposite corner. This line will be your stitching guide.
- Place one Background Fabric square on one end of a Fabric B rectangle, right sides together, aligning the raw edges precisely. Stitch directly on the drawn diagonal line.
- Carefully trim away the excess fabric beyond the stitched line, leaving a ¼-inch seam allowance. Press the remaining triangle unit open, away from the Background Fabric, so that the triangle forms a corner.
- Repeat this process for the *other end* of the same Fabric B rectangle, and then repeat for both ends of the second Fabric B rectangle. You will now have two Fabric B rectangle units, each with a Background Fabric triangle attached to both ends, resembling a “flying geese” unit.
- Press all seams flat and crisp.
- Integrate the Fabric B Strip Units to the Main Block:
- Position one of your newly created Fabric B strip units (the rectangle with background triangles on both ends) along the top edge of your main four-patch block assembly. Ensure right sides are together and all edges align.
- Pin securely, paying special attention to matching any seam intersections to ensure a smooth transition. Stitch with a consistent ¼-inch seam allowance.
- Repeat this process for the second Fabric B strip unit, attaching it to the bottom edge of your main block.
- Press the seams towards the newly added strip units. Your block should now be a complete rectangle, but the outer corners are still open.
- Attach the Large Background Triangles:
- Take your two 10″ squares of Background Fabric. Using your rotary cutter and ruler, carefully cut each 10″ square in half diagonally. This will yield four large background triangles.
- Lay out your block on your cutting mat or design wall. You will attach one large background triangle to each of the four outer corners of your block. The longest edge (hypotenuse) of the triangle will align with the outer raw edge of your block.
- Place one background triangle onto one corner of your block, right sides together, aligning the raw edges. Pin in place.
- Stitch with a precise ¼-inch seam allowance.
- Press the seams away from the center of the block, towards the newly added background triangles. This helps to create sharp points at the corners and keeps the bulk of the seam allowances away from the center of the block.
- Repeat for all four corners, attaching a large background triangle to each.
- Final Trimming and Pressing:
- Your Card Trick Quilt Block is now fully assembled!
- Carefully square up your block to its desired final size (often 9.5″, 12.5″ or 15.5″ depending on the initial fabric cuts). Use your ruler and rotary cutter to trim any excess fabric from the outer edges, ensuring all sides are straight and corners are at perfect 90-degree angles. This step is crucial for accurate quilt assembly.
- Give the entire block a final, thorough press. Use a warm iron and gentle steam (if suitable for your fabric) to flatten all seams and ensure a crisp, professional finish. This final pressing step is key for your block to lay perfectly flat and integrate seamlessly into a larger quilt top.
Congratulations! You’ve successfully completed a stunning Card Trick Quilt Block. The intricate appearance, once a mystery, has now been demystified through your diligent work and precise stitching. This block is now ready to become part of a larger quilt or stand alone as a beautiful accent piece!
Tips for Quilting Success and Mastering Your Card Trick Block
Developing excellent quilting habits will significantly improve the quality and enjoyment of your projects. Here are some invaluable tips to help you achieve impeccable results with your Card Trick Quilt Block and every quilt you make:
- Accuracy is King (and Queen!): In quilting, precision is everything. Even a slight discrepancy in your cutting or seam allowance can accumulate and throw off your entire block. Always use a sharp rotary blade, a quality ruler, and take your time with each cut. “Measure twice, cut once” is a quilter’s mantra.
- Consistent ¼-inch Seam Allowance: This is arguably the most critical skill to master. Invest in a ¼-inch presser foot for your sewing machine, or mark a guide on your machine bed with painter’s tape. Practice stitching perfectly straight lines until it becomes second nature.
- Pressing vs. Ironing: Remember to “press” your seams, not “iron” them. Lifting and placing the iron gently prevents distorting your fabric, which can stretch pieces out of shape. Always press seams flat first to “set” the stitches before pressing them open or to one side as directed.
- Starch for Stability: Applying a light starch or fabric sizing to your fabric before cutting can make it crisper and less prone to stretching. This is especially helpful for beginners or when working with tricky fabrics.
- Chain Piecing for Efficiency: When you have multiple identical units to sew (like your two-patch units), consider chain piecing. Stitch one unit, then feed the next unit under the needle without lifting the presser foot or cutting the thread in between. This saves time and thread.
- Pin Generously: Don’t be shy with pins! Especially when aligning seams or points, generous pinning helps prevent fabric layers from shifting. Pin before and after critical intersections to ensure precise alignment.
- Watch the Visual Guide: While these written instructions are thorough, sometimes seeing a process in action can clarify a confusing step. The video tutorial from The Sewing Room Channel is an excellent companion to this guide.
- Good Lighting and Ergonomics: Work in a well-lit area and ensure your sewing space is comfortable. Good posture and regular breaks will help prevent fatigue and improve focus, leading to fewer mistakes.
- Don’t Fear the Seam Ripper: Every quilter, no matter their experience level, uses a seam ripper. View it as a tool for perfection, not a sign of failure. It’s always better to unpick a few stitches than to leave a mistake that will bother you forever.
- Stay Organized: Label your cut fabric pieces, especially when working with multiple fabrics that are similar in size. Keeping your workspace tidy also helps reduce errors and stress.
Exploring Variations and Creative Design Ideas
Once you’ve successfully constructed your first Card Trick Quilt Block, you’ll quickly realize its immense potential for creative adaptation. This versatile block can be tweaked in countless ways to suit your personal style and different project needs.
- Color Palette Exploration:
- Bold Contrast: Experiment with highly contrasting colors (e.g., bright primary colors against black or white) to make the optical illusion even more dramatic.
- Monochromatic Magic: Use various shades and tints of a single color for Fabric A, Fabric B, and the background. This creates a sophisticated, subtle trick that reveals itself upon closer inspection.
- Scrappy Delight: Dig into your scrap bin! Use different coordinating prints for each of the smaller squares and rectangles within the same color family. A controlled scrappy look can add incredible depth and texture.
- Focal Fabric Fun: Choose a show-stopping fabric with a large print for Fabric A or B, and keep the other fabrics more subdued. This draws the eye to your chosen print while still maintaining the block’s structure.
- Block Rotation and Layouts:
- Dynamic Layouts: When assembling multiple Card Trick blocks into a quilt, experiment with rotating some blocks. Turning them 90 or 180 degrees can create mesmerizing secondary patterns that weren’t apparent with a straight set.
- On Point Setting: Instead of setting your blocks in a straight grid, place them “on point” (rotated 45 degrees). This often requires adding setting triangles around the edges but adds another layer of visual complexity and elegance.
- Alternating Blocks: Combine your Card Trick blocks with simpler blocks, such as plain squares, half-square triangles, or four-patch blocks. This provides visual “breathing room” and allows the intricate Card Trick design to truly pop.
- Beyond the Quilt Top: A single Card Trick block, or a few grouped together, can be transformed into a variety of stunning projects:
- A decorative pillow cover for your couch or bed.
- A unique center panel for a tote bag or handbag.
- An eye-catching table runner or placemat for your dining area.
- A small wall hanging to add a touch of handmade charm to any room.
- A personalized hot pad or mug rug for a thoughtful gift.
- Scaling the Block: Once you understand the underlying construction, you can easily scale the Card Trick block up or down by proportionally adjusting the initial dimensions of your squares and rectangles. Just remember to maintain the ¼-inch seam allowance!
Conclusion: Your Journey into the Art of Quilting
Congratulations, magnificent maker! You’ve not only completed your first (or latest!) Card Trick Quilt Block, but you’ve also mastered a design that’s a testament to the timeless appeal and clever construction of traditional quilting. By diligently following these detailed instructions, utilizing the power of precision, and learning from the excellent visual guidance provided by The Sewing Room Channel, you’ve developed crucial skills that will empower you in countless future quilting endeavors.
Remember that quilting is a wonderfully rewarding journey of continuous learning, creative expression, and tactile satisfaction. Each stitch, each perfectly pressed seam, and each completed block adds to your growing expertise and confidence. Don’t hesitate to experiment with different fabric combinations, explore various color palettes, and try new layouts. The Card Trick block is an ideal foundation for tackling even more complex patterns, and its enduring charm guarantees it will always be a cherished design in any quilter’s collection.
We absolutely encourage you to share your finished Card Trick Quilt Blocks! Showcase your beautiful work on social media, in quilting forums, or with friends and family. Your creativity is a source of inspiration for others, and every finished project tells a unique story. Happy quilting, and may your sewing machine continue to hum with joyful creation!
*All image credit belongs to The Sewing Room Channel via YouTube. Follow and subscribe to her channel for more inspiring tutorials and quilting insights!