
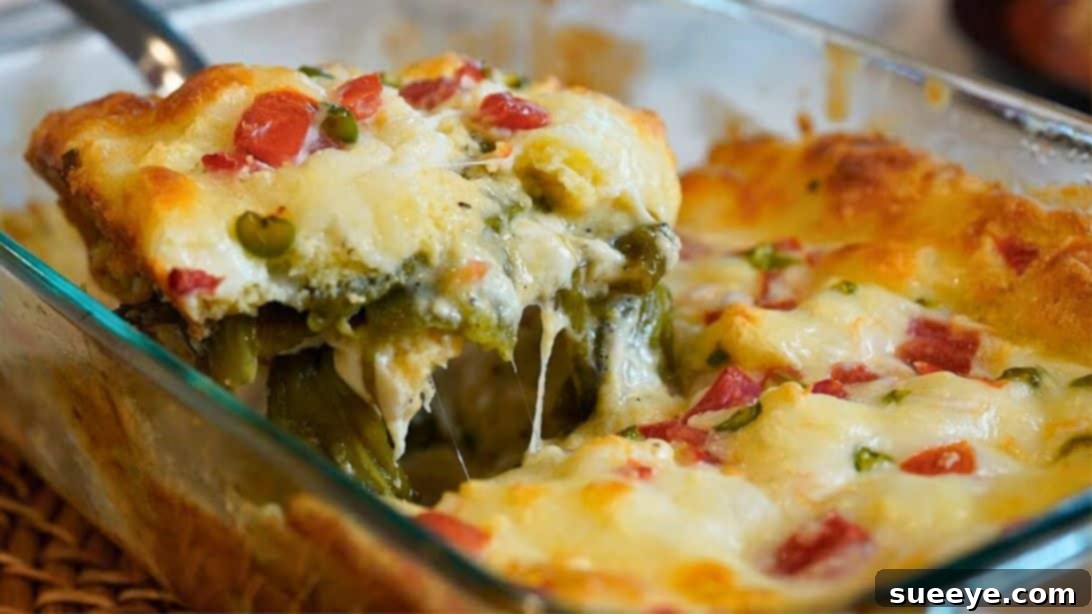
Delicious & Healthy Baked Chile Rellenos Casserole Recipe
Are you searching for an authentic, yet healthier twist on a classic Mexican favorite? Look no further! This incredible Chile Rellenos Casserole recipe, inspired by the culinary genius of Cooking Con Claudia, is an absolute game-changer. Forget the greasy, fried versions; this baked casserole delivers all the rich, vibrant flavors you crave, but in a lighter, simpler-to-make package. It’s perfect for breakfast, brunch, or even a hearty dinner, promising a taste experience that will transport you straight to Mexico.
Chile Rellenos, traditionally, involve cheese-stuffed chiles dipped in an egg batter and fried until golden. While undeniably delicious, the frying process can be time-consuming and often results in a heavier dish. Claudia’s casserole rendition ingeniously skips the deep-fryer, opting for a baked approach that layers the roasted peppers, cheese, and a light, fluffy egg batter. The result is a wonderfully comforting dish that’s both fast to prepare and surprisingly healthy. If you’re a fan of Mexican cuisine, this recipe is an absolute must-try. Get ready to impress your taste buds and your guests!
Ingredients for Your Flavorful Chile Rellenos Casserole
Crafting this sensational casserole requires a careful selection of fresh ingredients, ensuring every bite is bursting with authentic Mexican taste. We’ll divide our ingredients into two main categories: those for the main casserole and those for the vibrant, homemade salsa that truly elevates the dish.
For the Chile Rellenos Casserole:
- 7 Poblano Peppers: Or choose Hatch or Anaheim peppers if Poblanos are not available or if you prefer a slightly different heat level. These form the delicious foundation of our dish.
- 6 Large Eggs: Ensure they are at room temperature, as this significantly helps with achieving a voluminous, fluffy batter.
- 1/2 Teaspoon Black Pepper: Freshly ground for the best flavor.
- 3/4 to 1 Teaspoon Salt: Adjust according to your preference and the saltiness of your cheese.
- 1/2 Teaspoon Baking Powder: The secret ingredient for that incredibly light and airy batter texture.
- 1/3 Cup All-Purpose Flour: Helps bind the batter and gives it structure.
- 1/4 Cup Milk or Heavy Cream: Adds richness and moisture to the batter. Heavy cream will result in a slightly richer casserole.
- 1/4 Onion, 2 Roma Tomatoes, and 1 Jalapeño or Serrano: Finely chopped and mixed together. This fresh vegetable mixture adds a delightful crunch and a burst of fresh flavor inside the peppers.
- Shredded Queso Oaxaca or Any Melting Cheese: Oaxaca cheese is traditionally used for its excellent melting properties and mild, creamy flavor. However, Monterey Jack, mozzarella, or a Mexican blend would also work beautifully.
For the Zesty Homemade Salsa:
- 4 Roma Tomatoes: The base for our fresh, tangy salsa.
- 2-3 Chile Serranos or Jalapeños: Adjust the quantity based on your desired level of spice. Serranos are generally hotter than jalapeños.
- 1-2 Chile de Árbol: These dried chiles add a distinctive smoky heat. Use sparingly if you prefer less spice.
- 1/8 Small Onion: For a subtle aromatic background.
- 1 Garlic Clove: Fresh garlic is essential for a robust salsa flavor.
- 1/2 Teaspoon Dried Oregano: Mexican oregano is ideal, offering an earthy, citrusy note.
- 1/2 Teaspoon Black Pepper: To complement the other spices.
- Salt: To taste, enhancing all the other flavors.
Step-by-Step Instructions: Creating Your Masterpiece
Follow these detailed steps to prepare your healthy and delicious Chile Rellenos Casserole. This recipe is designed to be straightforward, ensuring a perfect result every time.
Phase 1: Preparing the Peppers
- Roast the Peppers: Begin by roasting your poblano, hatch, or Anaheim peppers. You can do this over an open flame on a gas stove, under a broiler, or on a grill. The goal is to char the skins until they are blistered and blackened. This process enhances their flavor and makes them easy to peel.
- Sweat and Peel: Once roasted, immediately transfer the hot peppers to a plastic bag or a bowl covered tightly with plastic wrap. Allow them to “sweat” for at least 10 to 15 minutes. This steaming process loosens the skins, making them incredibly easy to peel. After sweating, carefully peel off the charred skins, remove the stems, and deseed the peppers. You can rinse them lightly if needed, but avoid submerging them in water, as this can wash away some of their smoky flavor. Set aside.
Phase 2: Crafting the Fluffy Egg Batter
- Preheat Oven: While the peppers are sweating, preheat your oven to 350 degrees F (175 degrees C).
- Separate Eggs: Carefully separate the egg whites from the yolks. Place the egg whites into a large, clean mixing bowl (preferably metal or glass) and the yolks into a separate, smaller bowl. Ensure no yolk gets into the whites, as this can prevent them from whipping properly.
- Whip Egg Whites: Add 1/2 teaspoon of black pepper and 3/4 teaspoon of salt to the egg whites. Using an electric mixer, beat the egg whites on high speed until they form stiff peaks – they should be light, fluffy, and hold their shape when the beaters are lifted. This step is crucial for the casserole’s airy texture.
- Combine with Yolks: Gently fold the egg yolks into the whipped whites. Then, add the baking powder, all-purpose flour, and milk (or heavy cream). Mix at a low speed, just until everything is well combined and no streaks of flour remain. Be careful not to overmix, which can deflate the air from the egg whites.
Phase 3: Assembling Your Casserole
- Prepare Baking Dish: Lightly grease your chosen baking dish (a 9×13 inch dish or similar size works well). Pour a small amount of the prepared egg batter into the bottom of the dish and spread it evenly to create a thin base layer.
- Fill and Layer Peppers: Take each peeled and deseeded pepper. Carefully fill it generously with your shredded queso Oaxaca (or chosen melting cheese) and the chopped mixed vegetables (onion, Roma tomatoes, jalapeño/serrano). Arrange the filled peppers on top of the batter in the baking dish. If you have more peppers than can fit in a single layer, you can create a second layer, ensuring each pepper is nestled comfortably.
- Top with Remaining Batter and Toppings: Once all the peppers are arranged, pour the remaining egg batter evenly over them, ensuring they are mostly covered. Finally, sprinkle the rest of the shredded cheese and the remaining chopped vegetable mixture over the top. This creates a beautiful, colorful, and cheesy crust.
Phase 4: Baking to Perfection
- Bake the Casserole: Place the baking dish into the preheated oven. Bake for approximately 40 to 45 minutes at 350 degrees F (175 degrees C). The casserole is done when the top is golden brown, the cheese is bubbly, and a toothpick inserted into the center comes out clean.
Phase 5: Simmering the Zesty Salsa
- Prepare Salsa Ingredients: While the casserole bakes, prepare your homemade salsa. In a medium pot, combine the 4 Roma tomatoes, chile serranos (or jalapeños), chile de árbol, and the 1/8 onion. Cover these ingredients with water, ensuring they are fully submerged.
- Boil and Blend: Place the pot on high heat and bring the water to a rolling boil. Continue boiling for about 5-7 minutes, until the tomatoes and chiles are softened. Carefully transfer the boiled ingredients (using a slotted spoon) to a blender. Add the fresh garlic clove, remaining salt (to taste), black pepper, oregano, and 1/4 cup of fresh water. Blend until the salsa is completely smooth and uniform in consistency.
- Simmer the Salsa: In a clean saucepan, add a little bit of oil (about 1 tablespoon) over medium heat. Pour the blended salsa into the hot oil. Bring the salsa to a gentle simmer. Taste and adjust the seasonings (salt, pepper, or more spice) as needed. Allow it to simmer for at least five more minutes, stirring occasionally. This simmering step deepens the flavors and slightly thickens the salsa.
Phase 6: The Grand Finale
- Rest the Casserole: Once the casserole is done baking, remove it from the oven. This step is crucial! Allow it to sit and rest for 20 to 25 minutes before slicing. Resting allows the casserole to set, preventing it from crumbling when served and ensuring cleaner slices.
- Slice and Serve: After resting, slice the casserole into generous portions. Carefully transfer a slice onto a plate and lavishly top it with your freshly made, warm salsa. Serve immediately and savor every delicious bite!
Tips for Success & Variations
To ensure your Chile Rellenos Casserole is always a showstopper, consider these expert tips and exciting variations:
- Pepper Selection: While Poblanos offer a mild, earthy flavor, don’t hesitate to experiment. For a spicier kick, use more serranos in your salsa or even add a thinly sliced habanero to your vegetable mix (handle with care!).
- Cheese Choices: Oaxaca cheese is supreme for its stretch and mild flavor. Other excellent melting cheeses include Monterey Jack, mild cheddar, or a blend of Mexican cheeses. For a richer flavor, try a touch of cotija cheese crumbled on top after baking.
- Make Ahead Option: You can prepare the roasted and peeled peppers a day in advance and store them in the refrigerator. The salsa can also be made ahead and stored in an airtight container for up to 3-4 days.
- Adding Protein: For a more substantial meal, consider adding cooked, shredded chicken, ground beef, or pork to your pepper filling. Cooked black beans or corn would also be delicious additions.
- Vegetarian Boost: Amp up the veggie content by adding sautéed mushrooms, zucchini, or bell peppers to the filling mix.
- Spice It Up: For those who love heat, a pinch of cayenne pepper in the egg batter or a few dashes of your favorite hot sauce over the top can really turn up the volume.
- Storage & Reheating: Leftovers can be stored in an airtight container in the refrigerator for 3-4 days. Reheat gently in the oven or microwave until warmed through.
Why You’ll Love This Chile Rellenos Casserole Recipe
This baked Chile Rellenos Casserole is more than just a meal; it’s an experience. Here’s why it’s destined to become a staple in your kitchen:
- Healthier Alternative: By baking instead of frying, you significantly reduce the fat content without sacrificing flavor. It’s a guilt-free indulgence!
- Easy to Prepare: While there are a few steps, each is straightforward, making this recipe accessible even for novice cooks. The casserole format simplifies the often intricate process of traditional chile rellenos.
- Incredible Flavor Profile: The combination of smoky roasted peppers, creamy melted cheese, fresh vegetables, and a light, fluffy egg batter, all brought together with a zesty homemade salsa, creates a symphony of flavors that truly delights the palate.
- Versatile for Any Meal: Its hearty yet balanced nature makes it perfect for breakfast with a cup of coffee, a fulfilling brunch, or a comforting dinner served with a side of rice and beans.
- Crowd-Pleaser: This casserole is fantastic for feeding a family or entertaining guests. It looks impressive but requires less hands-on time than individual fried rellenos.