
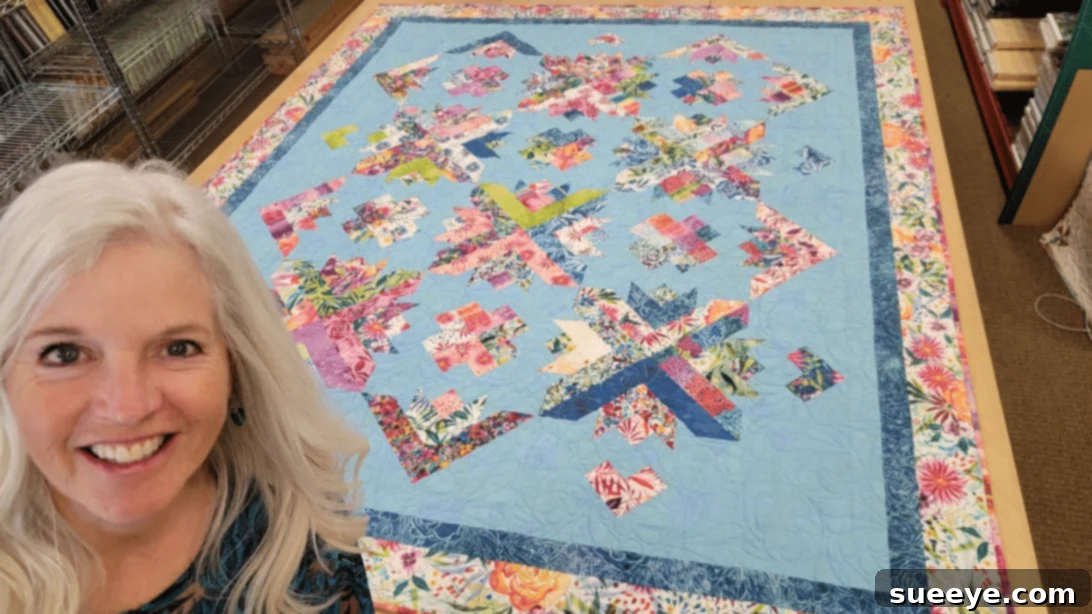
Embark on a delightful quilting journey with the enchanting **Beach City Blooms Quilt** pattern, an exquisite creation by the renowned Jordan Fabrics. This project offers a fantastic opportunity to transform your collection of vibrant print fabrics into a stunning masterpiece that radiates charm and warmth. Whether you’re a seasoned quilter looking for a refreshing design or a complete beginner eager to learn the ropes, this pattern is designed to be incredibly accessible and rewarding. Its straightforward construction makes it a perfect choice for practicing fundamental quilting skills while producing a visually impressive quilt.
The beauty of the Beach City Blooms Quilt lies in its simplicity and the breathtaking visual impact it creates. Imagine a field of blossoming flowers, vibrant and full of life, captured in fabric. This pattern allows you to play with an array of colors and patterns, turning seemingly random strips into an organized explosion of design. The process itself is not just about making a quilt; it’s a creative escape, a meditative craft that yields a tangible symbol of your artistry and dedication. From selecting your fabrics to making the final stitch, every moment spent on this quilt is an opportunity for joy and self-expression. Many quilters, myself included, find immense satisfaction in watching their fabric choices come to life, piece by piece, forming something truly unique. This particular design is so enjoyable that you’ll likely find yourself wanting to create it again and again, exploring different color palettes and fabric collections each time. To get started on your own Beach City Blooms Quilt, follow along with the comprehensive guide and video tutorial provided by Jordan Fabrics.
RELATED: Discover More Easy Bloom Quilt Tutorials for Beginners
Essential Materials for Your Beach City Blooms Quilt Project
Before diving into the fun of piecing, it’s crucial to gather all your materials. Having everything ready ensures a smooth and uninterrupted creative flow. The Beach City Blooms Quilt efficiently utilizes pre-cut fabric strips, simplifying the cutting process and making it an ideal project for those who love quick gratification. Here’s a detailed list of what you’ll need:
- Jelly Roll Strips: These pre-cut 2.5-inch wide fabric strips are the heart of your quilt’s design. A standard jelly roll contains 40 strips, offering a coordinated collection of fabrics that eliminate the guesswork of color matching. Choose a jelly roll with colors and patterns that speak to you, as these will form the vibrant “blooms” of your quilt. Consider solids, blenders, or themed prints to achieve different looks.
- Background Fabric: This fabric provides a foundational canvas against which your jelly roll strips will pop. A solid or subtly patterned background fabric often works best to highlight the intricate “bloom” design, creating contrast and visual depth. Ensure you have enough yardage to accommodate the overall size of your quilt top.
- Border Fabric: The border frames your quilt top, giving it a finished and polished appearance. You can choose a fabric that complements your background, echoes a color from your jelly roll, or introduces a new element to enhance the overall aesthetic. A well-chosen border can significantly elevate the final look of your quilt.
- Backing Fabric: The backing is the bottom layer of your quilt sandwich. It should be comfortable, durable, and wide enough to accommodate the entire quilt top with a few inches of overhang on all sides for quilting. Flannel, minky, or a wide-back quilting cotton are popular choices.
- Binding Fabric: This narrow strip of fabric is used to finish the raw edges of your quilt, encasing the quilt top, batting, and backing. Binding fabric adds a durable and decorative edge, giving your quilt a professional finish. Often, a coordinating solid or a small-scale print is chosen.
- Quilter’s Ruler: Essential for precise cutting and accurate measurements. Look for clear acrylic rulers in various sizes (e.g., 6″ x 24″ for strips, and smaller squares for other pieces). Accuracy in cutting is paramount for successful quilting.
- Marking Pen, Pencil, or Chalk: Used for marking cutting lines, sewing lines, or points on your fabric. Choose a tool that is easily removable or disappears after use.
- Scissors or Rotary Cutter and a Cutting Mat: A rotary cutter paired with a self-healing cutting mat is highly recommended for efficient and precise cutting of fabric strips and blocks. Sharp scissors are also useful for trimming threads and smaller pieces.
- Needle and Thread: High-quality polyester or cotton quilting thread is ideal for piecing and quilting. Ensure your thread color blends well with your fabrics, especially for piecing.
- Iron and Ironing Board: Crucial for pressing seams open or to one side. Proper pressing, not ironing (which involves sliding), sets stitches, flattens seams, and helps your blocks lie flat, resulting in a much more accurate and beautiful quilt.
- Sewing Machine: Any standard sewing machine in good working order can be used for quilting. Ensure it’s clean, oiled, and has a fresh needle. A quarter-inch presser foot can be incredibly helpful for maintaining consistent seam allowances.
- Official Pattern: While this tutorial provides guidance, purchasing the official “Cozy Quilt Designs Beach City Blooms” pattern from Jordan Fabrics is highly recommended for detailed measurements and complete instructions. Click here to download the pattern directly.
Crafting Your Beach City Blooms Quilt: A Step-by-Step Guide
Creating the Beach City Blooms Quilt is a journey of precision and creativity. Follow these steps carefully, and you’ll soon have a stunning quilt top ready for quilting.
Step 1: Fabric Preparation and Precise Cutting
Begin by carefully sorting your jelly roll strips. Organize them by color, pattern, or how you envision them appearing in your “blooms.” This initial organization can save you time and prevent confusion later. Next, refer to your Beach City Blooms pattern for specific cutting instructions. Using your rotary cutter, ruler, and cutting mat, precisely cut each jelly roll strip and your background fabric into the required lengths and shapes. Accuracy is paramount here; even slight inaccuracies can compound and lead to skewed blocks. As you cut, keep your fabric pieces neatly grouped. Labeling or using small containers for different groups of pieces can be incredibly helpful to maintain order and ensure you grab the correct fabric for each step.
Step 2: Constructing the Bloom Units
This step brings the “bloom” effect to life. Take a square piece of background fabric (as specified in the pattern) and place it on top of one of your prepared jelly roll strips. Ensure their right sides are facing each other. Position the square so that it overlaps the strip in a way that allows you to stitch diagonally from one corner of the square to the opposite corner. Using your marking pen or pencil, draw a diagonal line across the square. Stitch precisely along this marked line. Once stitched, carefully trim off the excess fabric layer, leaving a 1/4-inch seam allowance. This creates a neat corner, forming part of your bloom. Repeat this process for all necessary units, carefully following the pattern’s layout instructions.
Step 3: Pressing and Arranging the Units
With your bloom units stitched, it’s time to press. Flip the fabric open so the background square extends, and press the seam flat. You can press the seam open or to one side, depending on your preference and what the pattern recommends for reducing bulk. Consistent pressing is key to flat and accurate quilt blocks. Once pressed, lay out your strip units along with any other fabric pieces you’ve cut according to the overall block design. The video tutorial from Jordan Fabrics is an invaluable resource here, as it visually demonstrates the precise arrangement of these pieces to form the unique “bloom” block. Pay close attention to the orientation of each unit to ensure the blooms are correctly formed and face the desired direction.
Step 4: Assembling Individual Quilt Blocks
Now, begin the assembly of your individual quilt blocks. Stitch the arranged strip units and other fabric pieces together, one at a time, using a consistent 1/4-inch seam allowance. Chain piecing can be a great time-saver if you have many identical units to sew. After stitching each section or unit within a block, take it to your ironing board. Give the block a good press, ensuring all seams lie flat and your block is square. This pressing step is critical for maintaining block accuracy and ensuring your quilt top will lie flat without puckering. Continue this process, meticulously creating all the required “Beach City Blooms” blocks until you have enough to form your desired quilt size.
Step 5: Completing Your Quilt: Top Assembly, Quilting, and Binding
Once all your individual blocks are complete, it’s time to bring them together. Arrange your finished blocks on a design wall or a clean floor to visualize your quilt top. Experiment with different layouts, rotating blocks, or swapping positions until you achieve a design that is visually appealing and harmonious. Once satisfied with the arrangement, stitch the blocks together into rows, and then stitch the rows together to form the entire quilt top. Press all seams as you go. Next, add your border fabric, carefully measuring and attaching it to frame your quilt top. With the quilt top complete, prepare your quilt sandwich: lay out your backing fabric (right side down), then your batting, and finally your quilt top (right side up). Baste these layers together using pins, spray adhesive, or thread basting. Now, you can quilt your project! This involves stitching through all three layers to secure them. Simple straight-line quilting, stitch-in-the-ditch, or more intricate free-motion quilting can be used. Finally, create and attach your binding. This last step gives your quilt a durable and professional edge, neatly encasing all raw edges. Your beautiful Beach City Blooms Quilt is now complete, ready to be enjoyed!
Tips for Success and Customization
- Practice Your Seam Allowance: A consistent 1/4-inch seam allowance is the cornerstone of accurate quilting. Practice on scraps to ensure your machine’s setting and your technique are perfect.
- Embrace Your Fabric Stash: While jelly rolls are fantastic, don’t hesitate to pull from your existing fabric stash for background, border, or even some of the strip pieces if you have suitable leftovers.
- Play with Color Placement: Before sewing, experiment with arranging your jelly roll strips. Different color gradients or random placements can yield vastly different effects.
- Stay Organized: Keep your cut pieces sorted. Using small baskets or clip-on labels can prevent mistakes and speed up your process.
- Don’t Rush Pressing: Proper pressing makes all the difference. Take your time to ensure all seams are flat and blocks are square after each step.
- Consider Batting Type: The type of batting you choose will affect the drape and warmth of your quilt. Cotton, poly, or a blend are common options.
- Personalize Your Quilting: For the quilting step, you can use simple straight lines, a meandering stipple, or more elaborate free-motion designs to add another layer of texture and interest to your Beach City Blooms.
The Joy of Handmade: Why Quilt?
Quilting is more than just a craft; it’s an art form that offers numerous benefits. It provides a creative outlet, allowing you to express your unique style through fabric and thread. The repetitive motion of sewing can be incredibly meditative and stress-relieving, offering a peaceful escape from daily demands. Completing a quilt, especially one as beautiful as the Beach City Blooms, brings a profound sense of accomplishment. These handmade treasures are not just functional items; they are heirlooms, gifts filled with love, and beautiful additions to any home decor, imbued with personal meaning and warmth.
The Beach City Blooms Quilt is a fantastic project that beautifully showcases the charm of pre-cut fabrics and the timeless art of quilting. Its elegant design, combined with clear instructions from Jordan Fabrics, makes it an enjoyable and achievable goal for quilters of all levels. So gather your vibrant jelly rolls, prepare your workspace, and get ready to create a stunning piece that will brighten any room and bring joy for years to come. Happy quilting!
*All these amazing images are thanks to Jordan Fabrics via YouTube. Do visit her channel for more inspiring videos and tutorials like this!