
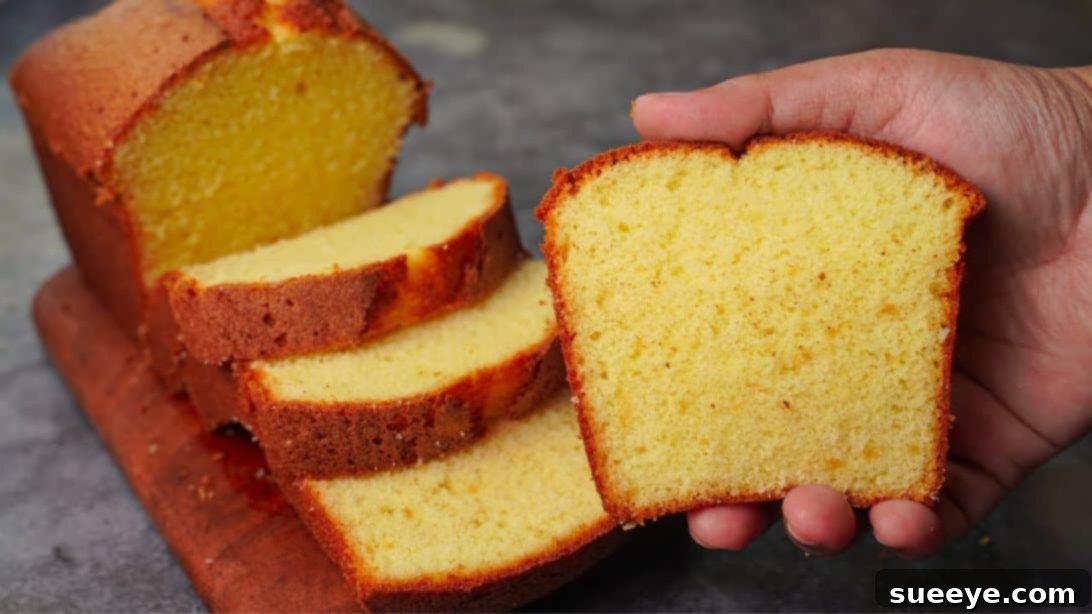
If you’re searching for a cake that’s effortlessly elegant, incredibly moist, and boasts an airy, spongy texture that simply melts in your mouth, then look no further than the delightful Hot Milk Cake. This classic recipe, sometimes known as hot milk sponge cake or even hot milk bread due to its comforting simplicity, is a timeless favorite for a reason. Its unique preparation method, which involves heating milk and butter before incorporating them into the batter, is the secret behind its exceptional tenderness and fine crumb. You might have heard whispers about its charm, but if you haven’t yet experienced the pure bliss of a freshly baked hot milk cake, now is truly the time to discover what you’ve been missing. Prepare to impress your family and friends with a dessert that tastes gourmet but is surprisingly simple to create using just a handful of everyday ingredients likely already in your pantry. We were inspired by the fantastic recipe from Yummy on YouTube, and we’re confident you’ll cherish this rendition just as much!
The Ultimate Guide to Baking a Super Spongy Hot Milk Cake
Baking a cake from scratch doesn’t have to be complicated, and the Hot Milk Cake is a testament to this. It’s a fantastic recipe for both novice bakers eager to make their first successful cake and seasoned pros who appreciate a straightforward approach yielding extraordinary results. The magic lies in the carefully crafted warm milk and melted butter mixture, which when added to the batter, helps to create a rich, yet incredibly light consistency, ensuring a beautifully tender and moist crumb every single time. This method sets it apart from many other sponge cakes, offering a distinct richness without being heavy. Get ready to transform humble, simple ingredients into a truly unforgettable dessert that will quickly become a cherished staple in your baking repertoire.
Why the Hot Milk Cake is a Must-Try for Every Baker
There are countless reasons why the Hot Milk Cake has captivated hearts and palates for generations. Here are just a few compelling factors that make it an essential recipe in any home baker’s collection:
- Incredibly Moist and Tender: The unique addition of hot milk and melted butter directly into the batter creates an exceptionally moist cake that boasts a delicate, almost velvety texture. This ensures the cake remains delicious and fresh for longer.
- Perfectly Spongy and Light: Despite its richness, the cake achieves an enviable light, airy, and bouncy crumb. This signature “sponginess” makes every bite a delightful experience, perfectly contrasting with its inherent moistness.
- Simple, Accessible Ingredients: You won’t need any fancy or hard-to-find items for this recipe. It relies on common kitchen staples like eggs, flour, sugar, milk, and butter, making it economical and easy to whip up anytime.
- Versatile Flavor Base: The Hot Milk Cake has a wonderfully neutral yet comforting vanilla flavor, making it an ideal canvas for customization. It’s delicious on its own but can be easily enhanced with various glazes, frostings, or fruit toppings.
- Beginner-Friendly with Impressive Results: While its final appearance and taste suggest complexity, the steps to bake a Hot Milk Cake are remarkably straightforward. It’s an excellent recipe for new bakers to build confidence, consistently delivering impressive results.
- A True Crowd-Pleaser: Its classic, comforting flavor profile appeals to almost everyone, from children to adults. This makes it an ideal dessert for family gatherings, potlucks, afternoon tea, or simply a sweet treat to brighten your day.
Essential Ingredients for Your Super Spongy Hot Milk Cake
Gathering your ingredients and ensuring they are properly prepared is the crucial first step to baking success. You’ll find that everything on this list is readily available, emphasizing the simplicity and accessibility of this wonderful recipe. For best results, it’s highly recommended that your eggs are at room temperature, as this greatly aids in creating a light and airy batter.
- 2 large eggs, preferably at room temperature
- ½ cup (100g) granulated sugar
- ¼ cup (60ml) neutral-flavored oil (such as vegetable, canola, or light olive oil)
- 1 cup (120g) all-purpose flour, carefully measured and then sifted
- 1 tsp baking powder
- ½ cup (120ml) whole milk
- 1 tbsp (14g) unsalted butter
- 1 tsp pure vanilla extract
Step-by-Step Directions for a Perfect Hot Milk Cake
Follow these detailed instructions carefully to ensure your hot milk cake turns out beautifully spongy, incredibly moist, and utterly delicious every time. Precision, patience, and attention to detail are your best allies in achieving baking perfection!
Step 1: Preparing the Light and Airy Cake Batter Base
Begin your baking journey by taking a generously sized mixing bowl. Crack the two room-temperature large eggs directly into the bowl. Using an electric mixer (either a hand-held mixer or a stand mixer fitted with the whisk attachment), beat the eggs vigorously on medium-high speed for approximately one minute. This initial beating is vital as it starts the process of incorporating air, which is fundamental for creating a light and airy cake structure. Next, gradually add the granulated sugar to the eggs, a little at a time, while continuing to beat. Increase the mixer speed to high and beat the mixture until it transforms into a pale yellow, thick, and wonderfully foamy consistency. This critical stage, often referred to as “ribbon stage,” can take anywhere from 3 to 5 minutes, depending on the power of your mixer. The goal is to incorporate as much air as possible, making the mixture light and voluminous, resembling a ribbon as it slowly falls from the whisk. Once this beautiful texture is achieved, gently pour in the neutral oil, continuing to beat on a lower speed for another minute until it is fully incorporated and the mixture remains smooth and emulsified. Now, it’s time for the dry ingredients: sift the all-purpose flour and baking powder together directly over the wet mixture. Sifting is an indispensable step here, as it not only removes any potential lumps but also further aerates the flour, contributing significantly to a smoother batter and a finer, more tender crumb. After each addition of the sifted dry ingredients, gently fold them into the wet mixture using a rubber spatula until they are just combined. Exercise caution at this stage: do not overmix, as overmixing can develop the gluten in the flour, which will inevitably lead to a tough, dense cake rather than the desired spongy one. Once the flour is just incorporated and no dry streaks remain, set your beautifully prepared batter aside.
Step 2: Creating the Hot Milk Mixture and Its Gentle Incorporation
While your cake batter rests, turn your attention to preparing the crucial hot milk mixture. Place a small saucepan on your stove over medium-high heat. Pour the whole milk into the pan, then add the tablespoon of unsalted butter. Allow this mixture to heat gently, stirring occasionally to help the butter melt evenly and prevent the milk from scorching. Continue heating until the mixture just comes to a boil and the butter is completely melted and integrated into the milk. As soon as you observe a rolling boil, immediately remove the pan from the heat. It’s important not to let it boil vigorously or for too long, as the goal is simply to heat it to this precise point. Stir in the pure vanilla extract into the hot milk and butter mixture. The warmth of the milk will help to “bloom” the vanilla flavor, intensifying its aromatic qualities. With your hot milk mixture now ready, it’s time to gently incorporate it into your prepared cake batter. Slowly pour the warm milk mixture into the cake batter in a steady stream while continuously stirring with your rubber spatula or whisk. Stir gently and deliberately until everything is just combined and the batter achieves a smooth, flowing consistency. The warmth of the milk plays a vital role here; it helps to emulsify the batter and slightly “cook” the flour, which contributes significantly to the cake’s incredibly tender crumb and even texture. Once again, avoid vigorous beating or overmixing; gentle folding is the absolute key to maintaining the precious airiness you worked so hard to create in the egg mixture. Before proceeding, remember to preheat your oven to 180°C (356°F) and prepare your baking pan. Thoroughly grease a 7-inch round baking pan with butter or cooking spray, then line the bottom with a circle of parchment paper. This meticulous preparation ensures an easy, clean release and a beautifully shaped cake once baked.
Step 3: Baking, Cooling, and Savoring Your Masterpiece
Carefully pour the unified cake batter into your meticulously prepared 7-inch baking pan, ensuring it’s evenly spread across the bottom. Gently tap the pan on your kitchen counter a couple of times; this simple action helps to release any large trapped air bubbles, which can prevent uneven baking. Place the pan into your preheated oven at 180°C (356°F). The baking time will typically range from 30 to 40 minutes, but please be aware that this can vary significantly depending on the calibration and nuances of your specific oven. To accurately check for doneness, insert a wooden skewer or a clean toothpick into the very center of the cake. If it comes out completely clean, your cake is perfectly baked and ready. The top should be a beautiful golden brown color and should spring back lightly when gently touched. Once baked to perfection, carefully remove the cake from the oven and allow it to cool in the pan on a wire rack for approximately 10 to 15 minutes. This crucial initial cooling period in the pan allows the cake’s delicate structure to set properly and helps prevent it from crumbling or breaking when handled. After this initial cooling, carefully invert the cake onto the wire rack, gently remove the baking pan, and then peel off the parchment paper from the bottom. Allow the cake to cool completely on the wire rack before attempting to slice it. Cooling completely is paramount; it ensures the cake’s internal structure is fully set, its flavors have time to meld, and it prevents it from becoming gummy or dense. Once fully cooled, slice the cake into generous portions, serve it as is or with your favorite complementary toppings, and savor every delightful, airy, and moist bite of your homemade Super Spongy Hot Milk Cake!
Expert Tips for Baking the Perfect Hot Milk Cake Every Time
Achieving that iconic spongy texture, profound moistness, and rich flavor is surprisingly easy when you keep a few expert tips in mind. Master these simple techniques, and your Hot Milk Cake will be a consistent success:
- Ensure Room Temperature Eggs: This is a crucial step! Eggs at room temperature emulsify far more effectively with sugar, creating a more stable, voluminous, and airy foam. This air is the foundation for the cake’s wonderfully light structure. Plan ahead and take your eggs out of the fridge at least 30 minutes to an hour before you intend to start baking.
- Always Sift Your Flour: Do not be tempted to skip this seemingly minor step! Sifting your all-purpose flour not only ensures the removal of any potential lumps but, more importantly, it aerates the flour. This makes it lighter and much easier to incorporate smoothly into the wet batter, directly preventing a dense or heavy cake.
- The Art of Not Overmixing: Once you’ve added the sifted flour to the wet ingredients, mix only until no dry streaks of flour remain visible. Overmixing is the arch-nemesis of a tender cake; it develops the gluten in the flour excessively, which can quickly lead to a tough, chewy cake rather than the desired tender, ethereal sponginess.
- Heat Milk to Just Boiling Point: The timing for heating the milk and butter is key. Bring the mixture just to a rolling boil. This hot liquid helps to slightly ‘cook’ the flour in the batter upon contact, resulting in a finer, more delicate, and incredibly tender crumb. Immediately remove it from the heat once it boils to prevent scorching or excessive evaporation.
- Gentle Folding is Essential: When it comes to combining the hot milk mixture with the delicate batter, proceed slowly and with a very gentle hand. Your objective is to thoroughly integrate the hot liquid without deflating all the precious air you’ve painstakingly built up in the egg and sugar mixture.
- Proper Pan Preparation Pays Off: Meticulously greasing and lining your baking pan with parchment paper is absolutely crucial for an easy and clean release of the baked cake. This simple step prevents the cake from sticking and ensures it emerges beautifully intact, preserving its perfect shape.
- Understand Your Oven: Ovens can vary significantly in their actual temperature compared to what their dial indicates. Investing in an inexpensive oven thermometer can be incredibly beneficial to ensure your oven is consistently at the correct temperature. Bake until the cake is golden brown and a toothpick inserted into the center comes out clean.
- Cool Completely for Best Texture: Resist the tempting urge to slice into your cake while it’s still warm. Allowing it to cool completely on a wire rack ensures that its internal structure sets properly. This prevents the cake from being gummy or dense and allows its flavors to fully develop and meld, resulting in the best possible texture and taste.
Delicious Variations and Flavor Enhancements for Your Hot Milk Cake
While the classic Hot Milk Cake is absolutely divine on its own, its simple, vanilla-forward base makes it an incredibly versatile canvas for creative customization. Don’t hesitate to experiment with these ideas to elevate your cake and tailor it to your personal preferences:
- Bright Citrus Zest: For a vibrant and refreshing twist, add 1 to 2 teaspoons of finely grated lemon, orange, or lime zest directly into the cake batter along with the dry ingredients. The citrus oils will infuse the cake with a wonderful aroma and tangy note.
- Warm Spiced Cake: Embrace warmer flavors by incorporating ½ teaspoon of ground cinnamon, a pinch of nutmeg, or a hint of cardamom with the dry ingredients. This creates a cozy, aromatic cake perfect for cooler months or alongside a cup of tea.
- Nutty or Floral Extracts: Swap out half of the vanilla extract for a different flavor profile. Almond extract offers a lovely nutty depth, while a touch of lemon extract can brighten the cake even further. Rosewater or orange blossom water can add an exotic, floral touch.
- Subtle Chocolate Milk Cake: For a mild chocolate flavor, whisk 2 to 3 tablespoons of unsweetened cocoa powder into the dry ingredients before sifting. This yields a light chocolate cake that’s still incredibly moist and tender.
- Simple Powdered Sugar Glaze: A quick and easy glaze can add an elegant finish. Whisk powdered sugar with a little milk, lemon juice, or even a touch of vanilla extract until you reach a pourable consistency, then drizzle over the cooled cake.
- Classic Cream Cheese Frosting: For a more decadent and celebratory treat, top your cooled Hot Milk Cake with a light, airy layer of homemade cream cheese frosting. The tanginess of the frosting beautifully complements the cake’s sweetness.
- Fresh Fruit Topping: Serve individual slices with a generous helping of fresh berries (strawberries, blueberries, raspberries), sliced peaches, or a dollop of freshly whipped cream for a delightful and visually appealing dessert.
- Coconut Infusion: Add a couple of tablespoons of shredded unsweetened coconut to the dry ingredients for a subtle tropical hint. You could even use coconut milk instead of regular milk for a more pronounced flavor.
Serving and Storage Suggestions for Your Hot Milk Cake
This wonderfully versatile cake is incredibly adaptable and pairs beautifully with a variety of accompaniments, or simply enjoyed on its own as a delightful treat.
- Serving: A slice of Hot Milk Cake is the perfect companion for your morning coffee, a comforting afternoon tea, or as a light yet satisfying dessert after any meal. It’s especially delightful when served with a side of fresh seasonal fruit, a scoop of premium vanilla ice cream, or a dollop of lightly sweetened whipped cream. Its simple elegance makes it suitable for both casual family moments and more formal occasions.
- Storage: To maintain the freshness and moisture of any leftover Hot Milk Cake, store it in an airtight container at room temperature. It will remain wonderfully fresh and delicious for up to 3 to 4 days. For longer storage, this cake freezes exceptionally well. You can freeze individual slices, wrapped tightly first in plastic wrap and then in aluminum foil, for up to 1 to 2 months. To enjoy, simply thaw the frozen slices at room temperature for a few hours before serving.
*All these images are credited to Yummy via YouTube. We highly recommend visiting their channel and subscribing for more inspiring and delicious recipes!
Conclusion: Your New Favorite Cake Awaits!
The Hot Milk Cake is more than just a recipe; it’s a delightful baking experience that culminates in a truly exceptional dessert. Its inherent simplicity, combined with its profound moistness and ethereal sponginess, makes it a reliable and cherished choice for any occasion, from casual family dinners to more elegant gatherings. This cake’s ability to be a blank canvas for various flavor enhancements also guarantees that it will never get boring. We hope this comprehensive guide has thoroughly inspired you to roll up your sleeves, gather your ingredients, and embark on the joyous journey of baking this incredible cake. Discover for yourself why it remains a beloved classic across generations and prepare to be amazed by the sheer delight of creating and savoring your very own Super Spongy Hot Milk Cake. Happy baking!