
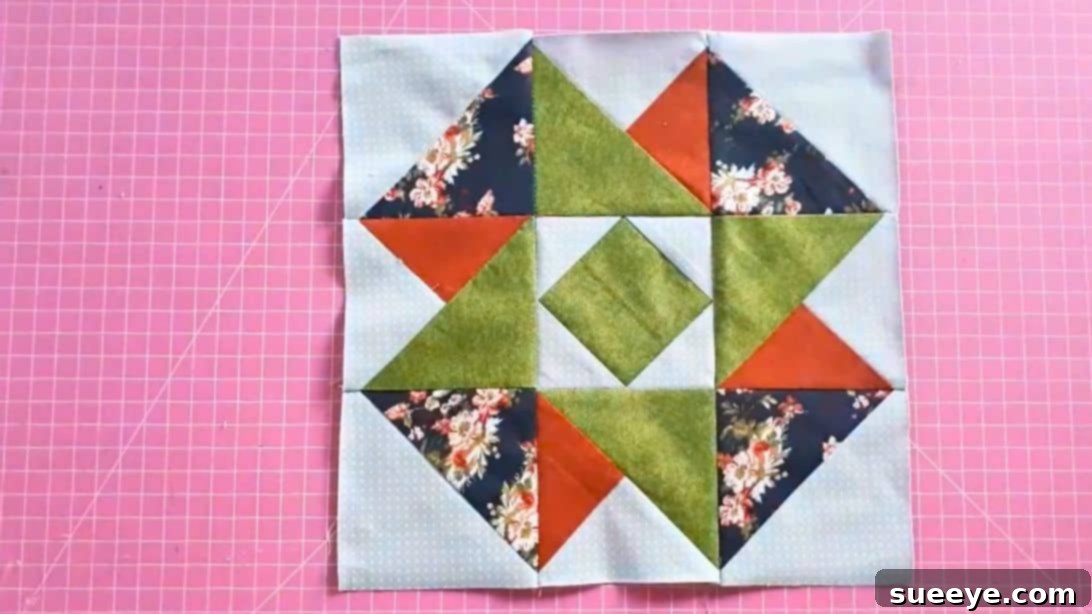
Master the Air Castle Quilt Block: A Step-by-Step Guide to the Towers of Camelot
Embark on a creative journey into the world of quilting with the enchanting Air Castle Quilt Block. This historically rich and visually captivating pattern, sometimes known as “Towers of Camelot,” offers a delightful challenge for quilters of all skill levels, from enthusiastic beginners to seasoned artisans. First published in 1898, its enduring charm lies in its intricate yet approachable design, which beautifully combines classic patchwork elements to form a distinctive architectural motif. If you’re searching for a new project that promises both satisfaction and a stunning finished piece, look no further than this exquisite block. We found this beautiful pattern from Patchwork Fácil’s YouTube channel, and its unique shape immediately caught our attention.
The Air Castle Quilt Block is a variation of the beloved nine-patch design, a cornerstone of traditional quilting. What sets it apart are the clever incorporations of Half-Square Triangles (HSTs) in the corners, innovative Y-units for the middle sections, and a classic Square-in-a-Square unit at its heart. Despite its sophisticated appearance, each component unit is surprisingly simple to construct, making this an ideal pattern for those looking to expand their quilting repertoire without feeling overwhelmed. In this comprehensive guide, we will walk you through every step, ensuring you have all the knowledge and tips needed to create your own majestic Air Castle block. Prepare your fabrics, sharpen your rotary cutter, and let’s dive into the art of quilting!
RELATED: How to Make a Nine-Patch Block with Sashing
You might also enjoy this captivating quilt block: Twist Knot Quilt Block
Why Choose the Air Castle Quilt Block for Your Next Project?
A Touch of History and Timeless Appeal
The “Towers of Camelot,” as it was affectionately called when it debuted in 1898, carries with it a rich heritage. Quilters for generations have admired its structured beauty, evocative of grand castles and whimsical airships floating among the clouds. By choosing the Air Castle block, you’re not just creating a piece of fabric art; you’re connecting with a legacy of creativity and craftsmanship that spans over a century. This historical depth adds significant value and meaning to any project you undertake.
Visually Striking and Architecturally Inspired Design
What makes the Air Castle block truly stand out is its unique visual impact. The clever arrangement of light and dark fabrics, combined with the distinct shapes of Half-Square Triangles, Y-units, and the central Square-in-a-Square, creates a dynamic, three-dimensional effect. It suggests towers, turrets, and perhaps even a bird’s-eye view of a fortified structure. This architectural quality gives your quilt a sophisticated and intricate look that will undoubtedly draw admiration. The interplay of colors and patterns can be endlessly varied, allowing for personalized expressions of this classic design.
Surprisingly Beginner-Friendly Techniques
While the finished block might appear complex, the individual units are fundamental to quilting and easy to master. Half-Square Triangles are a foundational skill, Y-units introduce a fun method for creating dynamic angles, and Square-in-a-Square units teach precise centering. We break down each component into simple, manageable steps, making this an excellent learning project for those new to quilting or anyone looking to build confidence in their piecing skills. You’ll gain valuable experience in accurate cutting, precise sewing, and careful pressing – all essential for beautiful quilting.
Versatility for Endless Creative Projects
The beauty of the Air Castle Quilt Block lies in its incredible versatility. A single block makes a charming mug rug, a small wall hanging, or a decorative pillow cover. Assemble several blocks together, and you can create stunning baby quilts, lap quilts, or even a magnificent full-sized quilt. Experiment with different fabric combinations – bold contrasts for a dramatic effect, or subtle tonal variations for a more ethereal feel. The design can adapt to various aesthetics, from traditional to modern, making it a truly adaptable pattern for any quilter’s vision.
Essential Materials for Your Air Castle Quilt Block
To begin crafting your beautiful Air Castle Quilt Block, gathering the right materials is crucial. Precision in cutting will ensure your units fit together seamlessly, so ensure your rotary cutter is sharp and your ruler is accurate. Below is a list of the fabric cuts you’ll need for one 12.5-inch unfinished block, as demonstrated in the tutorial. Remember to choose high-quality quilting cottons for best results, paying attention to how your chosen colors will contrast and interact.
- 7″ colored square (Fabric A): This will be used for your Half-Square Triangles, offering a vibrant contrast.
- 7″ colored square (Fabric B): Another colored square, essential for creating the Y-units and adding depth.
- 3 1/2″ colored square (Fabric B): A smaller square from Fabric B, forming the center of your Square-in-a-Square unit.
- 4″ colored strip (Fabric C): This strip will be combined with a background strip to form part of your unique Y-units.
- 7″ background square: Crucial for the Half-Square Triangles, providing a clear visual separation.
- 4″ background square: Used to create the outer triangles of your central Square-in-a-Square unit.
- 4″ background strip: Paired with Fabric C to construct the versatile Y-units.
- General Quilting Supplies: You will also need a sewing machine, coordinating thread, a rotary cutter, a self-healing cutting mat, an acrylic ruler, an iron, and a pressing surface.
Step-by-Step Guide: Crafting Your Air Castle Quilt Block
Follow these detailed instructions to construct each component of your Air Castle Quilt Block with precision and ease. Accuracy at each stage will ensure your final block is perfectly square and beautiful.
Step 1: Preparing Your Half-Square Triangle (HST) Units
This initial step creates four cornerstone units for your block. Start by taking your 7″ colored square (Fabric A) and your 7″ background square. Place these two squares right sides together, ensuring all edges are perfectly aligned. Using your sewing machine, sew a seam all the way around the perimeter of the layered squares, approximately 1/4 inch from the edge. Once stitched, use your rotary cutter and ruler to cut the sewn square diagonally from corner to corner in both directions. This will yield four smaller triangle units. Carefully press each of these units open, ensuring the seams are pressed towards the darker fabric to minimize bulk and achieve a crisp, flat finish. Finally, using a square-up ruler, trim each of these four HSTs down to a precise 4 1/2″ square. This trimming step is critical for accuracy.
Step 2: Preparing the Fabric B Triangles for Y-Units
For this step, take your remaining 7″ colored square (Fabric B). Lay it flat on your cutting mat. Using your rotary cutter and ruler, cut this square diagonally from corner to corner in both directions. This will result in four individual triangles. These triangles will serve as one half of your unique Y-units, which add dynamic movement to the block.
Step 3: Constructing the Y-Unit Components
This is where the innovative Y-unit comes to life. Begin by taking your 4″ background strip and your 4″ colored strip (Fabric C). Place these two strips right sides together, aligning the long edges. Sew along both long sides to create a fabric tube. Once sewn, set the tube aside for a moment.
Now, take one of the triangles you created in Step 2 from Fabric B. Fold this triangle in half to find its center point along the longest edge. Place this folded triangle on top of your recently sewn fabric tube, aligning the longest edge of the triangle with one of the seams of the tube. Use the straight edge of the triangle as a guide. Carefully cut a 3 1/2″ square from the fabric tube, ensuring the cut is perpendicular to the tube’s seams. Next, cut this 3 1/2″ square in half diagonally, yielding two smaller triangles. Press each of these small triangles open. Repeat this entire process – using one Fabric B triangle to guide the cut from the tube, then cutting that square diagonally and pressing – three more times, until you have a total of four sets of these small triangles. These will form the crucial “legs” of your Y-units.
Step 4: Assembling the Complete Y-Units
Now it’s time to bring together the components of your Y-units. Take one of the large triangles from Fabric B (prepared in Step 2) and one of the small triangle units you created from the fabric tube in Step 3. Align their raw edges, ensuring they are right sides together, and sew them along the diagonal edge. The goal is to form a complete square unit. Once sewn, press the seam open or to one side, depending on your preference for reducing bulk. After pressing, carefully trim this newly formed unit to a precise 4 1/2″ square. Repeat this process three more times, so you have a total of four perfectly assembled and trimmed Y-units. These units will create a striking visual impact in your block.
Step 5: Constructing the Center Square-in-a-Square Unit
This central unit is the focal point of your Air Castle block. Begin by taking your 4″ background square. Lay it flat and cut it diagonally from corner to corner in both directions, yielding four smaller background triangles. Set these aside. Now, take your 3 1/2″ colored square (Fabric B). To find its precise center, fold it in half once, then fold it in half again, gently creasing the center lines. Unfold it and lay it flat. Take one of the background triangles and align its longest edge with one side of the 3 1/2″ colored square, ensuring the triangle is perfectly centered along that edge. Pin in place if needed. Sew the triangle to the square. Repeat this process for all four background triangles, attaching one to each side of the central 3 1/2″ square. Press all seams outwards towards the background fabric triangles. Once all four triangles are attached and pressed, carefully trim this entire unit to a perfect 4 1/2″ square. This unit forms the grand central “tower” of your castle.
Step 6: Assembling Your Air Castle Quilt Block
With all your individual units prepared and trimmed, it’s time to bring the Air Castle Quilt Block to life! Lay out your nine 4 1/2″ square units on your design wall or flat surface, arranging them in a 3×3 grid. The four HST units from Step 1 will go in the corners. The four Y-units from Step 4 will occupy the middle positions of each side. The Square-in-a-Square unit from Step 5 will be placed in the very center. Refer to the photo below to ensure your arrangement matches the classic Air Castle design.
Once you are satisfied with the layout, begin sewing the units together into rows. Sew the three units of the top row together, then the three units of the middle row, and finally, the three units of the bottom row. Press the seams of the top and bottom rows in one direction, and the seams of the middle row in the opposite direction. This will allow your seams to “nest” when you join the rows, reducing bulk and ensuring perfectly aligned points. Finally, sew the three rows together, carefully matching your seams. Press your finished block one last time, ensuring it lies perfectly flat and square. Congratulations, you’ve just created a stunning Air Castle Quilt Block!
Tips for Success and Beyond with Your Air Castle Quilt Block
Precision is Your Best Friend
In quilting, accuracy is paramount. Pay close attention to your 1/4-inch seam allowances and trim your units to the exact specified sizes. Even a slight deviation can lead to blocks that don’t fit together perfectly. Use a good quality ruler, a sharp rotary cutter, and take your time with each cut and stitch.
Thoughtful Fabric Selection
The Air Castle Quilt Block truly shines with well-chosen fabrics. Consider using a strong contrast between your “colored” fabrics (A, B, C) and your “background” fabric to make the design elements pop. Experiment with different color palettes – perhaps warm tones for a cozy feel, or cool blues and greens for a tranquil, ethereal castle. Small prints or solids often work best to highlight the intricate piecing of this block.
The Power of Pressing
Never underestimate the importance of pressing! Pressing your seams flat and in the correct direction after each step helps to lock in your stitches, minimize bulk, and ensure your block lies flat. This creates a professional finish and makes subsequent steps much easier. A hot iron and a steady hand are essential tools for a beautiful quilt.
Practice Makes Perfect
If you’re new to Half-Square Triangles, Y-units, or Square-in-a-Square techniques, don’t hesitate to practice on scrap fabric first. Building confidence in these individual components will make assembling the full block a more enjoyable and successful experience. Every stitch is a step towards mastery.
Expanding Your Air Castle Project
Once you’ve successfully completed one Air Castle Quilt Block, the possibilities are endless! Create multiple blocks to form a stunning quilt top. You can arrange them side-by-side, rotate them for different visual effects, or even add sashing and borders to create a larger, more traditional quilt. This block also works wonderfully as a standalone decorative piece, a centerpiece for a tote bag, or incorporated into a more complex sampler quilt.
The Air Castle Quilt Block is more than just a pattern; it’s a gateway to historical charm, creative expression, and skill development. Its intricate beauty, combined with accessible techniques, makes it an ideal project for any quilter eager to craft something truly special. By following this detailed guide, you’ve gained the confidence and know-how to bring this timeless “Towers of Camelot” design to life. So, go forth and quilt with joy, and watch as your fabric castle takes majestic form! We encourage you to share your creations and continue exploring the vast and rewarding world of quilting. Happy quilting!