
Comprehensive Guide to Unclogging Your AC Drain: DIY Solutions for a Cooler Home
As summer temperatures soar, your air conditioning unit becomes the unsung hero, providing a much-needed escape from the heat. However, constant use can lead to common maintenance issues, one of the most frequent being a clogged AC drain line. This seemingly small problem can manifest as frustrating leaks, reduced cooling efficiency, and even potential water damage to your home. But don’t fret; many AC drain clogs can be resolved with a few simple DIY steps, saving you time and the expense of a professional service call. This guide will walk you through two effective methods to clear your AC’s condensate drain, ensuring your system runs smoothly and keeps your home comfortably cool. For a visual demonstration, you can always refer to the helpful tutorial by Silver Cymbal on YouTube.
Understanding Your AC Condensate Drain System
Before diving into the fixes, it’s helpful to understand what an AC condensate drain line is and why it clogs. As your air conditioner cools your home, it removes humidity from the air. This moisture, or condensate, collects in a drip pan beneath the indoor evaporator coil and then flows out of your home through the condensate drain line, often a PVC pipe. Over time, this dark, damp environment becomes an ideal breeding ground for algae, mold, mildew, and other biological growth. Dust, dirt, and debris can also accumulate, leading to a slimy blockage that restricts water flow. When the drain line becomes completely clogged, water backs up into the drip pan, overflows, and begins to leak from your AC unit, often through your ceiling or into your living space. Common symptoms of a clogged AC drain include:
- Water leaking from the AC unit or ceiling.
- A musty or mildew smell coming from your vents.
- The AC unit shutting off frequently (due to a safety float switch in some systems).
- Reduced cooling performance.
Addressing these issues promptly is crucial to prevent more significant damage and maintain indoor air quality.
Essential Tools and Materials for AC Drain Cleaning
Before you begin, gather the following tools and materials. Having everything ready will make the process smoother and more efficient:
- Vacuum Cleaner (Wet/Dry Shop Vac Recommended): Essential for creating suction to pull out minor clogs without disassembling the unit. A wet/dry vac is preferred as it can handle any water or sludge it suctions up.
- Rag or Tissue: Used to create a tight seal between the vacuum hose and the AC drain pipe, maximizing suction power.
- Bucket: Crucial for catching any water, debris, or overflow during the cleaning process, especially during flushing or when cutting the pipe.
- Clear Rubber Tubing (Optional but Recommended): For the more advanced method, this allows you to reattach a cut pipe section, offering flexibility and visual confirmation of water flow.
- Hose Clamps: Used to secure the clear rubber tubing firmly to the PVC drain pipe, ensuring a leak-proof connection.
- Pipe Cutter (PVC Cutter): Necessary for making a clean, precise cut if you need to access the inside of the condensate line for more stubborn clogs. A hacksaw can also work but may leave rougher edges.
- Long Wired Pipe Cleaner (Condensate Drain Brush): A flexible, long brush specifically designed to snake through and physically scrub away stubborn blockages inside the drain line.
- Safety Glasses and Gloves: Always recommended for personal protection when working with HVAC systems and potentially dirty water.
Method 1: The Simple Vacuum Suction Technique (For Minor Clogs)
This is often the first and easiest method to try for minor or developing clogs. It requires minimal effort and no advanced tools.
Step 1: Prepare and Locate the Drain Line
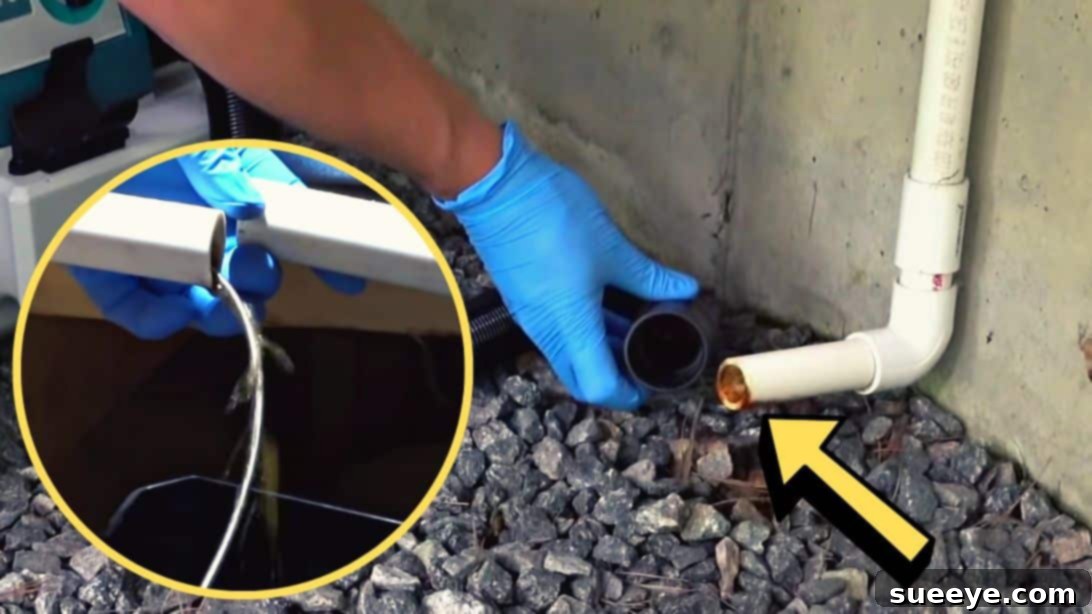
Safety First: Before touching any part of your AC unit, always turn off the power. Locate your indoor air handler unit (usually in a closet, attic, or basement) and switch off the thermostat. For added safety, consider turning off the circuit breaker that powers the AC unit. Next, locate the condensate drain line. This is typically a PVC pipe, usually 3/4 inch in diameter, extending from the indoor unit to an outdoor drain point. Check the outdoor end of the drain line; if you observe a slow drip or no water coming out when the AC is running (but it should be), it’s a strong indicator of a clog.
Step 2: Create a Seal and Apply Suction
Grab a clean rag or a thick wad of paper towels. Wrap it tightly around the end of your vacuum cleaner hose (ensure it’s a wet/dry vac if there’s standing water). The goal is to create a snug, airtight seal when you insert the vacuum hose into the open end of the AC drain pipe. Firmly press the rag-wrapped vacuum hose into the drain pipe opening. Once you have a good seal, turn on your vacuum cleaner to its highest setting. Allow it to run for about 2-3 minutes. The strong suction should pull out any accumulated dirt, slime, mold, or debris that’s causing the blockage. You might hear gurgling sounds or see debris being sucked into the vacuum’s reservoir.
Step 3: Verify the Fix
After vacuuming, turn off the vacuum and carefully remove the hose. You can then gently pour a cup of water into the AC’s condensate pan (if accessible) or directly into the start of the drain line near the indoor unit to check if the water flows freely. If the water drains quickly and smoothly from the outdoor exit point, your clog is cleared. If the water still backs up or drains slowly, the clog might be more stubborn, and you may need to proceed to Method 2.
Method 2: Thorough Cleaning of the Condensate Line with a Pipe Cleaner (For Stubborn Clogs)
When vacuuming isn’t enough, a more direct and invasive approach is required. This method involves cutting a section of the drain line to physically clear the blockage.
Step 1: Prioritize Safety and Access the Unit
Crucial Safety Step: Absolutely ensure the power to your AC unit is completely OFF at the circuit breaker. This is vital as you will be working with internal components. Next, locate the indoor air handler unit. You’ll need to find the condensate drain trap – this is usually a U-shaped or P-shaped section of the PVC pipe designed to hold a small amount of water to prevent sewer gases from entering your home. You may need to remove an access panel or door on your AC unit to fully expose the drain pan and the entire condensate line. Carefully set aside any screws or panels you remove.
Step 2: Prepare for Cutting and Cut the Pipe
Place your bucket directly underneath the section of the drain line you intend to cut. This will catch any water or sludge that drains out when the pipe is severed. Identify a suitable spot to cut the pipe – ideally, about a foot (30 cm) downstream from the drain trap, in a straight section. Using your PVC pipe cutter, make a clean, straight cut through the pipe. Be prepared for a rush of dirty water to spill out into your bucket once the pipe is cut, as this indicates where the blockage was holding water back.
Step 3: Mechanically Clear the Blockage
Now that the pipe is open, take your long wired pipe cleaner (sometimes called a condensate drain brush or coil brush). Carefully insert it into the pipe opening, pushing it gently towards the drain trap. Twist and push the cleaner through the pipe, dislodging any accumulated algae, mold, or debris. Work the cleaner back and forth several times until you feel less resistance and the pipe feels clear. You might pull out significant amounts of slimy buildup. Repeat this process from both ends of the cut pipe section if possible, ensuring the entire affected length is thoroughly cleaned.
Step 4: Flush the System
Once you believe the mechanical cleaning has dislodged most of the clog, it’s time to flush the system. Grab your bucket of clean water (you might even add a cup of distilled vinegar or a small amount of bleach for sanitization, followed by a water rinse). Carefully pour the water into the AC’s condensate pan, allowing it to flow down the newly cleared drain line. Observe the water as it exits the cut pipe section into your bucket. It should flow freely and quickly, carrying away any remaining loose dirt or debris. Continue flushing until the water runs clear, indicating a completely open drain line.
Step 5: Reassemble the Condensate Line
You have a couple of options for rejoining the cut pipe. The most common is to use PVC cement to glue the pipe back together, ensuring a watertight seal. However, for easier future maintenance, consider inserting a clear rubber tubing section (slightly larger in diameter than your PVC pipe) to bridge the gap. This method allows you to visually inspect the drain line and easily remove the tubing for future cleaning without cutting the pipe again. Secure both ends of the rubber tubing to the PVC pipe with hose clamps, tightening them firmly to prevent leaks. Once the drain line is securely reassembled, replace any access panels or doors you removed from the AC unit.
Step 6: Test the System
With everything reassembled, turn the power back on to your AC unit at the circuit breaker and set your thermostat to cool. Monitor the unit closely for the next hour or so. Check for any leaks around the newly rejoined pipe section and ensure that water is now consistently and freely draining from the outdoor exit point. If you notice any drips, recheck your connections. If everything appears to be functioning correctly, you have successfully unclogged your AC drain!
Preventative Measures to Avoid Future Clogs
Once you’ve successfully cleared your AC drain, taking a few proactive steps can help prevent future clogs and keep your system running optimally:
- Regular Flushing: Every few months, especially before and during the cooling season, pour a cup of distilled white vinegar down the condensate drain line (via the access point at the indoor unit or the cleaned section). Vinegar helps kill algae and mold. Let it sit for about 30 minutes, then flush it with a quart of clean water. Avoid using harsh chemicals that could damage your pipes.
- Maintain Air Filters: A dirty air filter restricts airflow and can cause the evaporator coil to freeze. When it thaws, it produces an excessive amount of condensate, potentially overwhelming and contributing to clogs in the drain line. Change or clean your air filter monthly during heavy use.
- Annual Professional Maintenance: Schedule a professional HVAC tune-up once a year. Technicians can thoroughly inspect and clean your entire system, including the condensate drain, ensuring all components are in top working order.
- Keep the Area Clear: Ensure the area around your outdoor condenser unit and indoor air handler is clear of debris, plants, and anything that could impede airflow or introduce dirt into the system.
- Install a Condensate Drain Pan Tablet: These tablets slowly dissolve, releasing chemicals that inhibit algae and slime growth in the drain pan and line.
Conclusion: Empowering Your DIY AC Maintenance
A clogged AC drain is a common and inconvenient problem, but as this guide demonstrates, it’s often a fixable issue for homeowners. By understanding the causes, recognizing the symptoms, and following these detailed DIY instructions, you can effectively clear blockages and restore your air conditioner’s efficiency. Regular maintenance and preventative measures are key to avoiding future disruptions and extending the life of your HVAC system. While these methods are highly effective for most clogs, remember that if you’re uncomfortable with any step, or if the problem persists after your attempts, it’s always best to consult a qualified HVAC professional. Staying proactive about your AC maintenance not only ensures a cooler, more comfortable home but also helps you avoid potentially expensive repairs down the line. Stay cool and enjoy the comfort of a well-maintained air conditioner!
*All image credit belongs to Silver Cymbal via YouTube. Follow and subscribe to his channel for more insightful DIY guides!