
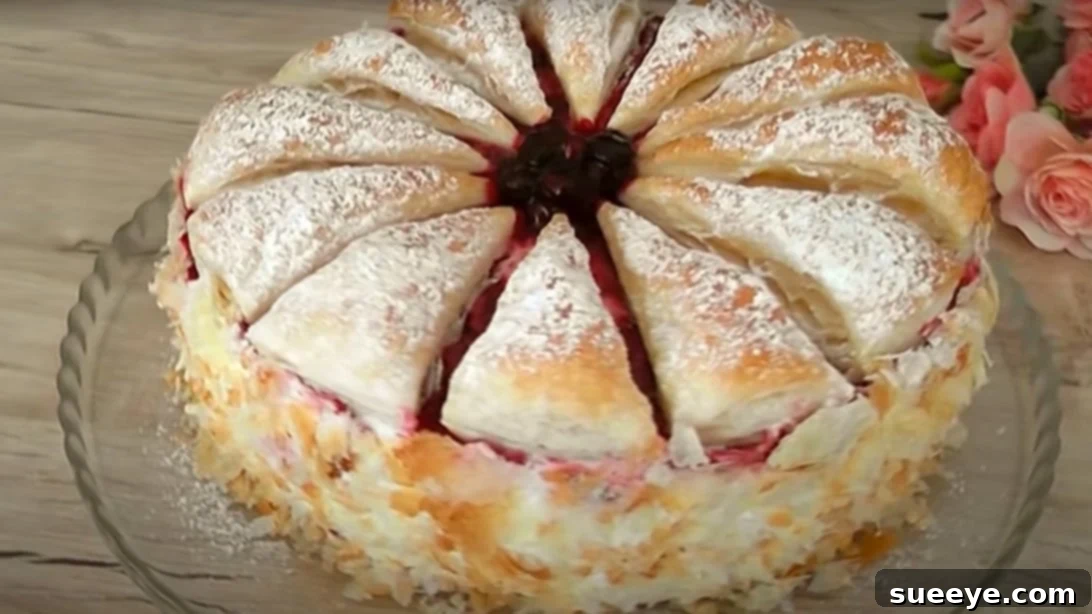
Delightful Berry & Cream Puff Pastry Cake: The Ultimate Christmas Dessert
Prepare to tantalize your taste buds with a dessert that’s as impressive to look at as it is delightful to eat: a luscious Berry & Cream Puff Pastry Cake! This recipe, beautifully demonstrated by Lecker mit Sophie Mayer on YouTube, transforms simple ingredients into a show-stopping centerpiece perfect for your Christmas feast or any festive gathering. Imagine golden, flaky puff pastry layers embracing a rich, creamy filling and a vibrant berry compote – it’s a symphony of textures and flavors that will leave everyone craving more.
What makes this puff cake truly special is its incredible ease of preparation despite its gourmet appearance. You don’t need to be an experienced baker to achieve stunning results. With readily available ingredients and straightforward steps, you can create a dessert that tastes divine and looks professionally crafted. Trust us, once you try this recipe, it will quickly become a cherished tradition in your holiday baking repertoire. It’s light, refreshing, and utterly irresistible – the perfect grand finale to a memorable Christmas dinner.
Essential Ingredients for Your Puff Pastry Masterpiece
One of the beauties of this recipe lies in its minimalist yet impactful ingredient list. Each component plays a crucial role in creating the cake’s exquisite texture and balanced flavor profile. Here’s what you’ll need, along with some insights and tips for each:
- Puff Pastry (500g): This is the foundation of our cake. Opt for high-quality all-butter puff pastry if available, as it offers superior flavor and flakiness. Most commercially available frozen puff pastry works wonderfully; just ensure it’s fully thawed according to package instructions before you begin. You’ll want two sheets of roughly 250g each, or one large 500g block.
- Water: A simple yet essential element used for brushing the pastry. This helps in creating a crispier texture and allows the sugar to adhere better, promoting a beautiful caramelization on the surface.
- Berries (250g, fresh or frozen): The vibrant heart of our cake! A mix of berries like raspberries, blueberries, and blackberries works exceptionally well, offering a complex tartness and sweetness. If using frozen berries, there’s no need to thaw them before cooking; they can go straight into the pot. Fresh berries will yield a slightly brighter flavor.
- Cornstarch (1 teaspoon): This acts as our thickening agent for the berry compote, ensuring it holds its shape and doesn’t make the pastry soggy. It creates a glossy, smooth consistency.
- Lemon Juice (from 1/2 lemon): A squeeze of fresh lemon juice is paramount! It brightens the flavor of the berries, cuts through the sweetness, and adds a refreshing tang that balances the richness of the cream.
- Whipped Cream (350g): The indulgent, airy layer that brings everything together. Use heavy cream or whipping cream (with at least 35% fat content) for best results. Ensure it’s very cold to whip properly into stiff peaks.
- Greek Yogurt (250g): This is the secret ingredient that elevates the cream filling. Greek yogurt adds a delightful tanginess, a smooth, creamy texture, and a touch of lightness, contrasting beautifully with the sweet components. Full-fat Greek yogurt is recommended for maximum creaminess.
- Powdered Sugar (5 tbsp): Also known as confectioners’ sugar, it dissolves instantly, ensuring a smooth, lump-free cream filling. We’ll use 2 tablespoons for the berry compote and 3 tablespoons for the cream mixture.
Step-by-Step Instructions: Crafting Your Flaky Masterpiece
Making this puff pastry cake is a straightforward process, broken down into manageable steps. Follow these detailed instructions to achieve a dessert that looks and tastes phenomenal.
Preparation: The Puff Pastry Foundation
- Preheat Your Oven: Begin by preheating your oven to 200 degrees Celsius (390 degrees Fahrenheit). This high temperature is crucial for the puff pastry to rise quickly and achieve its characteristic flakiness.
- Prepare the Base Pastry: Carefully unroll or lay out one 250g sheet of puff pastry onto a baking sheet lined with parchment paper. Using a 22cm (approximately 8.5-inch) cake molder or a round plate as a guide, gently press it into the center of the puff pastry to mark a circle. Do not cut through yet.
- Create Decorative Edges: With a sharp knife, make four evenly spaced slices from the outer edge of the pastry towards the marked circle, stopping just before reaching the circle’s perimeter. These cuts will divide the outer excess pastry into four sections. Gently transfer the entire pastry sheet to a larger pastry pan if needed, ensuring there’s enough space around the marked circle. Carefully separate each of the four outer slices slightly, fanning them out. This creates a beautiful, star-like effect when baked.
-
Image credit: Lecker mit Sophie Mayer on Youtube - Dock and Season the Base: Using a fork, generously poke holes (this is called “docking”) across the entire surface of the circle-shaped pastry within your marked guide. This prevents the center from puffing up too much, keeping it relatively flat and ideal for holding the filling. Lightly brush some water over the docked circle and then sprinkle a teaspoon of granulated sugar over it. This promotes a lovely golden-brown crust and a hint of caramelization.
- Prepare the Top Layer Pastry: On a separate baking sheet lined with parchment paper, lay out the second 250g sheet of puff pastry. Place the 22cm cake molder or plate on top of this pastry and use it as a guide to cut a perfect 22cm circle using a knife or a rotary baking cutter (like a pizza cutter).
- Portion the Top Layer: Carefully cut this 22cm pastry circle into 12 equal wedge-shaped pieces. A pizza cutter works best for clean cuts. These pieces will form the decorative top layer of your cake. Brush each of these 12 pieces with a little water and sprinkle a small amount of sugar over them, just as you did with the base.
- Bake the Pastry: Place both baking sheets into the preheated oven. Bake for approximately 15-20 minutes, or until both the large pastry base and the 12 smaller pieces are beautifully golden brown and puffed. Keep an eye on them, as oven temperatures can vary. Once baked, remove them from the oven and let them cool completely on wire racks.
Creating the Luscious Berry Compote
While your pastry cools, prepare the vibrant berry compote that will add a burst of fruity flavor to your cake.
- Combine Ingredients: In a medium saucepan, pour in the 250g of fresh or frozen berries. Add 2 tablespoons of powdered sugar, 1 teaspoon of cornstarch, and the juice from half a lemon.
- Simmer and Thicken: Place the saucepan over medium heat. Bring the mixture to a gentle simmer, stirring constantly for about 2 minutes. The cornstarch will activate, and the mixture will thicken into a glossy, spoonable compote. If using frozen berries, they will release more liquid, so it might take a minute or two longer to thicken. Remove from heat and allow the berry compote to cool completely before assembly.
Whipping Up the Dreamy Cream Filling
The creamy, tangy filling is what truly makes this cake irresistible. It’s light, rich, and perfectly balanced.
- Whip the Cream: Pour the 350g of very cold heavy cream into a large mixing bowl. Using an electric mixer (with a whisk attachment if available), beat the cream on medium-high speed until it starts to thicken and holds soft peaks. Ensure your bowl and beaters are cold for best results.
- Sweeten and Enhance: Add 3 tablespoons of powdered sugar to the whipped cream and continue mixing until stiff peaks form. Be careful not to over-whip, as it can turn granular.
- Fold in Greek Yogurt: Gently add the 250g of Greek yogurt to the whipped cream mixture. Using a spatula, carefully fold the yogurt into the cream until just combined. The goal is to incorporate it without deflating the air from the whipped cream. This will create a wonderfully smooth, tangy, and stable cream filling.
Assembly: Bringing Your Cake to Life
Now for the most exciting part – assembling your beautiful puff pastry cake! This is where all your hard work comes together.
-
Image credit: Lecker mit Sophie Mayer on Youtube - Set the Base: On your serving plate, carefully place the cooled, circular puff pastry base. Gently place the 22cm cake molder around it, ensuring it fits snugly. This molder will help contain and shape your layers.
- First Layer of Cream: Pour about half of your whipped cream and Greek yogurt mixture into the molder, spreading it evenly over the pastry base with a spatula.
- Berry Layer: Spoon a generous layer of the cooled berry compote over the cream, gently distributing it.
- Second Layer of Cream: Add the remaining whipped cream mixture on top of the berry layer, spreading it smoothly to create an even surface.
- The Decorative Top: For the top layer, arrange the 12 baked puff pastry slices in a circular pattern over the cream. You can create a fan-like design or a simple radial arrangement. Now, spoon a generous amount of the remaining berry compote onto each of these 12 individual slices. This creates beautiful individual portions when serving.
- Final Touches: Garnish the top of the cake with a few fresh berries for an extra pop of color and freshness.
- Chill: For best results, chill the assembled cake in the refrigerator for at least 1-2 hours. This allows the flavors to meld and the cream to set, making it easier to slice.
Serving and Presenting Your Divine Puff Pastry Cake
The moment of truth! Presenting and serving your puff pastry cake is part of the experience. Here’s how to ensure a perfect presentation:
- Removing the Molder: Once chilled, gently use a thin knife or an offset spatula to glide along the inner edge of the cake molder, separating the cake from the sides. Carefully and slowly lift the cake molder straight up to reveal your beautifully layered dessert.
- Decorating the Sides: You will likely have some excess baked puff pastry pieces that were originally around your base layer. Don’t waste them! Gently crumble these crispy bits with your hands. Take small amounts of the crumbled pastry and gently press them onto the sides of the cake, where the whipped cream is exposed. This not only adds a lovely textural element and visual appeal but also helps to make the cake look more finished and professional. The cream acts as an adhesive, allowing the crumbs to stick easily.
- Slice and Enjoy: Use a sharp, serrated knife to slice the cake, following the lines of the 12 top pastry pieces for perfectly portioned servings. Each slice will reveal the stunning layers of golden pastry, creamy filling, and vibrant berries.
This Berry & Cream Puff Pastry Cake is more than just a dessert; it’s a celebration on a plate. The contrast between the crisp, buttery pastry, the smooth, tangy cream, and the sweet-tart berries creates an unforgettable culinary experience. It’s light enough after a big meal, yet satisfyingly decadent. Enjoy every single glorious slice!
Tips for Success and Creative Variations
To ensure your puff pastry cake is a resounding success, consider these additional tips and ideas for customization:
- Puff Pastry Handling: Work with cold puff pastry. If it becomes too warm and sticky, chill it in the refrigerator for 10-15 minutes before continuing. This helps maintain its flakiness.
- Even Baking: Ensure your oven is fully preheated. If you have two baking sheets, you can bake both pastry components at once. Rotate the sheets halfway through baking for even browning.
- Berry Alternatives: Feel free to experiment with other fruits! Sliced peaches, cherries, or even a mix of tropical fruits (like mango and passionfruit) could create interesting flavor profiles for the compote.
- Cream Cheese Twist: For an even richer and slightly tangier cream filling, replace half of the Greek yogurt with an equal amount of softened cream cheese. Whip it with the cream and powdered sugar.
- Nutty Crunch: Add a layer of finely chopped toasted nuts (like almonds or pistachios) between the cream and berry layers for an extra textural dimension and nutty flavor.
- Citrus Zest: Incorporate a teaspoon of lemon or orange zest into the cream filling for an added burst of aromatic citrus flavor.
- Storage: This cake is best enjoyed on the day it’s made, as puff pastry can soften over time. However, leftovers can be stored covered in the refrigerator for up to 2-3 days.
This impressive yet approachable Berry & Cream Puff Pastry Cake is destined to become a festive favorite. Its elegant appearance and delightful taste make it the quintessential Christmas dessert, leaving a lasting impression on all who gather around your holiday table.