
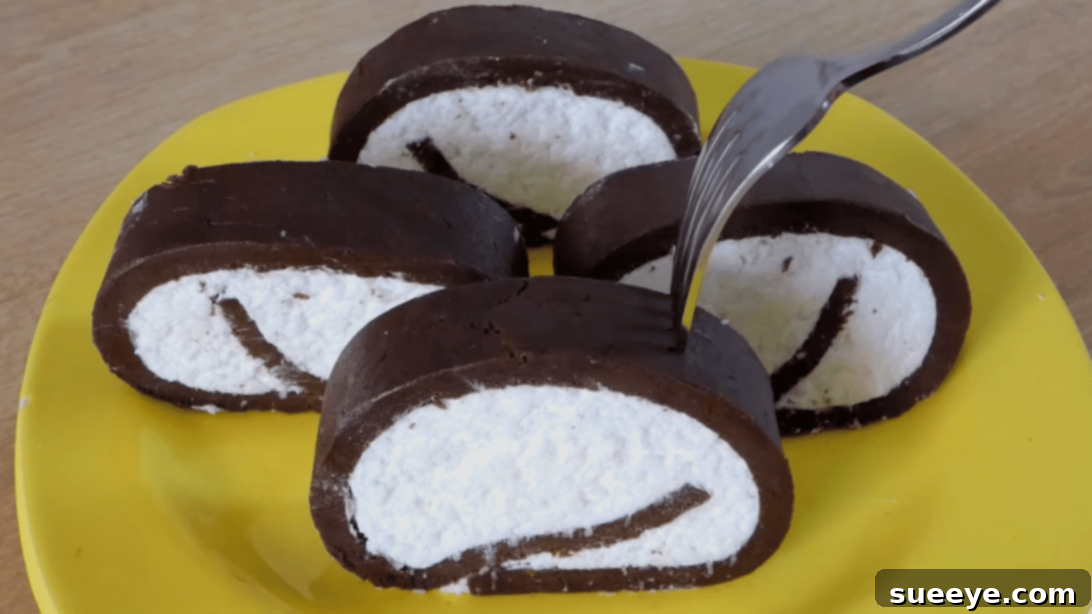
In the world of delightful confections, there’s a special place reserved for treats that offer maximum flavor with minimal effort. Imagine indulging in a decadent dessert that doesn’t require turning on your oven, saving you time and energy, especially on those hot summer days or busy weeknights. We all cherish those quick-to-make sweets, and today, we’re diving into one such marvel: the utterly irresistible No-Bake Biscuit Cocoa Roll. This recipe is a game-changer for anyone seeking an easy yet impressive dessert.
You might be surprised to learn that this wonderfully fluffy and rich chocolate roll starts with humble cracker biscuits, transforming them into a sophisticated treat. If you’re searching for simple, delicious sweets to delight your family and friends, look no further. This recipe, inspired by the creative culinary insights of Damla’s Life, perfectly marries the vibrant freshness of coconut, the deep indulgence of chocolate, and the creamy comfort of milk, all brightened with a hint of lemon zest. It’s a harmonious blend that promises a sweet escape, a perfect pleasure after a long, tiring day, or a delightful centerpiece for any gathering. Prepare to embark on a culinary journey that’s as easy as it is delicious. For a visual guide, be sure to watch the full instructions video.
Beyond its incredible ease of preparation, this no-bake chocolate roll stands out for its unique texture and balanced flavor profile. The biscuits provide a satisfying base, while the cocoa adds depth, and the coconut offers a refreshing counterpoint. It’s a treat that caters to all palates, from young children to adults, making it an ideal choice for parties, potlucks, or simply a cozy night in. Let’s gather our ingredients and discover the magic of transforming simple pantry staples into a show-stopping dessert.
Ingredients:
Crafting this delightful no-bake dessert requires just a handful of readily available ingredients. The beauty lies in their simplicity and how they come together to create something truly special. Quality ingredients will undoubtedly elevate the final taste, so choose wisely!
- 10.6 oz (approx. 300g) of Cracker Biscuits: The foundation of our roll. Opt for plain, unsalted crackers that don’t have strong flavors of their own, allowing the chocolate and coconut to shine. Digestive biscuits or even plain tea biscuits can be used as alternatives for a slightly different texture.
- 1 Tablespoon of Powdered Sugar: Also known as confectioners’ sugar. This fine sugar dissolves easily, contributing to the smooth texture and sweetness without adding graininess.
- 2 Tablespoons of Cocoa Powder: Choose a good quality unsweetened cocoa powder for a rich, deep chocolate flavor. Dutch-processed cocoa powder often yields a darker color and milder taste, while natural cocoa powder is fruitier and more acidic. Both work well, depending on your preference.
- 13.5 oz (approx. 400ml) of Milk: Full-fat milk will give a richer, creamier consistency to both the biscuit mixture and the filling. Skim or semi-skimmed milk can be used, but the texture might be slightly less indulgent.
- Lemon Zest: The zest of one small lemon adds a bright, fresh, and slightly tangy note that beautifully cuts through the richness of the chocolate and coconut. Don’t skip this; it’s a secret ingredient that elevates the flavor profile.
- 2.6 oz (approx. 75g) of Whipped Cream: Heavy cream whipped to stiff peaks, or store-bought pre-whipped cream. This adds lightness and a luxurious creaminess to the filling, contrasting with the denser biscuit base.
- 3.5 oz (approx. 100g) of Shredded Coconut: Freshly shredded or desiccated coconut flakes provide texture and a distinctive tropical aroma and flavor. Ensure it’s unsweetened to control the overall sweetness of the dessert.
These core ingredients are all you need to create a masterpiece. Remember, fresh ingredients always make a difference, so ensure your milk and lemon are at their best!
Instructions:
Creating this magnificent no-bake biscuit cocoa roll is a straightforward and enjoyable process. Follow these detailed steps carefully to ensure a perfect outcome every time. Precision and patience are key to achieving the ideal texture and flavor.
Step 1: Preparing the Biscuit Base
Begin by taking your 10.6 oz of cracker biscuits. The goal here is to transform them into a fine, powdery consistency. You can achieve this using a food processor for speed and efficiency, or by placing them in a sturdy plastic bag and crushing them with a rolling pin or the back of a heavy pan. Ensure there are no large chunks remaining, as a fine powder will result in a smoother, more uniform dough. Once finely ground, transfer the biscuit powder into a large mixing bowl. To this, add 1 tablespoon of powdered sugar and two tablespoons of cocoa powder. Using a whisk or a spatula, thoroughly combine all these dry ingredients. It’s crucial that the cocoa and sugar are evenly distributed through the biscuit powder to ensure a consistent chocolate flavor throughout your roll.
Step 2: Forming the Chocolate Biscuit Dough
Now, it’s time to bring your dry mixture to life. Begin by slowly pouring approximately half of the 13.5 oz of milk into the biscuit mixture. The emphasis here is on ‘slowly’ – do not pour all the milk at once, as this can make the mixture too wet and difficult to handle. Add a small amount of milk, then gently mix with your hands or a spoon, incorporating it into the dry ingredients. Continue this process, adding little by little, and mixing after each addition, until you have used approximately half of the total milk. The goal is to achieve a moist, pliable dough. Next, using your hands, knead the biscuit mixture until it forms a soft, cohesive dough. It should be firm enough to hold its shape but soft enough to be easily pressed and rolled. At this stage, incorporate the fresh lemon zest, kneading it into the dough until it’s evenly distributed. The lemon zest will infuse a delightful subtle fragrance and a refreshing counterpoint to the chocolate. Once fully mixed and kneaded, set this chocolate biscuit dough aside, covering it loosely to prevent it from drying out.
Step 3: Preparing the Creamy Coconut Filling
Now, let’s turn our attention to the luscious filling that will complement the chocolate biscuit base. In a separate clean bowl, add the remaining half of the milk (from the original 13.5 oz) and the 2.6 oz of whipped cream. Using an electric mixer or a whisk, whisk these two ingredients together until the mixture achieves a thick, creamy consistency. It should be soft and spreadable but hold its shape well. Next, gently fold in the 3.5 oz of shredded coconut. Mix thoroughly until the coconut is evenly incorporated into the creamy mixture. This coconut filling will provide a delightful contrast in both texture and flavor, adding a refreshing tropical note to each bite.
Step 4: Assembling and Chilling the Roll
This step requires a little care and technique. Take your prepared chocolate biscuit mixture from Step 2. Place it between two large sheets of plastic wrap or parchment paper. Using a rolling pin, carefully flatten the mixture into a thin, even rectangle. Aim for a thickness of about 1/4 to 1/2 inch (approximately 0.5 to 1 cm). The smoother and more rectangular you can make it, the neater your final roll will be. Once you’ve achieved the desired shape and thickness, gently peel off the top layer of plastic wrap. Now, evenly spread the creamy coconut milk mixture (from Step 3) over the entire surface of the flattened chocolate biscuit base, leaving a small border (about half an inch) around the edges. This border will help prevent the filling from oozing out when you roll it. Carefully and tightly, beginning from one of the longer sides, roll the entire sheet into a log. The tighter you roll it, the more compact and visually appealing your slices will be. Once rolled, wrap the entire log tightly in the plastic wrap. Transfer the wrapped roll to the freezer and chill for a minimum of 2 hours. This crucial chilling period allows the roll to firm up completely, making it much easier to slice and ensuring it holds its beautiful shape.
Step 5: Slice and Serve Your Masterpiece
After the two hours (or even longer for extra firmness) in the freezer, your no-bake biscuit cocoa roll is ready for its grand reveal! Carefully remove it from the freezer and unwrap the plastic. Using a sharp knife, slice the roll into individual portions, about 1/2 to 1 inch thick. For the cleanest slices, you might want to wipe your knife with a warm damp cloth between cuts. Arrange the slices on a serving platter. Each slice will reveal a beautiful swirl of rich chocolate biscuit and creamy white coconut filling, making it as visually appealing as it is delicious. Now, it’s truly ready to serve and impress! Enjoy this delightful, easy-to-make treat with a cup of coffee, tea, or a glass of cold milk.
Why You’ll Love This No-Bake Biscuit Cocoa Roll Recipe
This no-bake biscuit cocoa roll isn’t just a dessert; it’s a testament to the joy of simple, accessible baking. Here’s why this recipe deserves a permanent spot in your culinary repertoire:
- Effortless Preparation: No need for complex techniques or intimidating kitchen equipment. This recipe is perfect for beginners and seasoned bakers alike, offering a stress-free dessert solution.
- No Oven Required: Save on energy and avoid heating up your kitchen, especially during warmer months. The freezer does all the heavy lifting, firming up your creation to perfection.
- Speedy Delight: While it requires chilling time, the active preparation takes mere minutes. This makes it an ideal option for last-minute cravings or unexpected guests.
- Irresistible Flavor Combination: The rich, deep notes of chocolate from the cocoa blend harmoniously with the sweet, tropical essence of coconut, all brightened by a hint of zesty lemon. The creamy filling provides a delightful textural contrast to the slightly dense biscuit base.
- Versatile and Customizable: While the core recipe is a winner, it’s also incredibly adaptable. Feel free to experiment with different types of biscuits (digestive, shortbread), add a touch of coffee powder to the chocolate mixture for a mocha twist, or incorporate finely chopped nuts for extra crunch.
- Perfect for Any Occasion: Whether it’s a casual family treat, a festive gathering, a birthday party, or a thoughtful homemade gift, this roll fits right in. Its elegant presentation makes it look far more complicated than it is.
- Make-Ahead Friendly: You can prepare this roll hours or even a day in advance, storing it in the freezer until needed. This makes entertaining a breeze, as you can focus on other preparations.
Creative Variations and Serving Suggestions
Once you’ve mastered the classic version, feel free to get creative with your no-bake biscuit cocoa roll. Here are a few ideas to inspire you:
- Nutty Crunch: Add finely chopped walnuts, almonds, or hazelnuts to the biscuit mixture for an added layer of texture and flavor.
- Coffee Infusion: Dissolve a teaspoon of instant coffee powder in a small amount of warm milk before adding it to the biscuit mixture. This will create a delightful mocha-flavored roll.
- Orange Zest Delight: Swap the lemon zest for orange zest to give your roll a lovely citrusy warmth that pairs beautifully with chocolate.
- Chocolate Chip Surprise: Fold mini chocolate chips into either the biscuit mixture or the coconut cream filling for extra bursts of chocolate.
- Spiced Comfort: A pinch of cinnamon or cardamom in the biscuit mixture can add a unique warmth, especially appealing during cooler months.
- Elegant Topping: Before serving, drizzle melted chocolate over the sliced pieces, or dust lightly with extra powdered sugar or cocoa powder for a sophisticated finish. A sprinkle of toasted coconut flakes also adds visual appeal and texture.
Serve these delectable slices alongside a hot beverage like coffee, tea, or hot cocoa for a comforting experience. They also make a fantastic pairing with a scoop of vanilla ice cream or a dollop of fresh cream for a more indulgent dessert. For children, a glass of cold milk is the perfect companion.
Storage Tips for Freshness
To keep your no-bake biscuit cocoa roll at its best, store any leftovers in an airtight container in the refrigerator for up to 3-4 days. For longer storage, you can keep the wrapped log in the freezer for up to 2-3 weeks. When ready to enjoy from the freezer, simply remove it about 15-20 minutes before serving to allow it to soften slightly, making it easier to slice and enjoy. The firmer it is, the cleaner your slices will be.
Embrace the simplicity and deliciousness of this No-Bake Biscuit Cocoa Roll. It’s a testament to how humble ingredients, with a little creativity, can be transformed into something truly extraordinary. Whether you’re a seasoned baker or just starting your culinary journey, this recipe offers a rewarding experience with incredibly tasty results. So, gather your ingredients, follow these steps, and prepare to delight your taste buds and those of your loved ones with this quick, easy, and utterly irresistible chocolate coconut treat!