
Transform Your Space: Easy & Affordable Dollar Tree Wood Crate DIY Projects
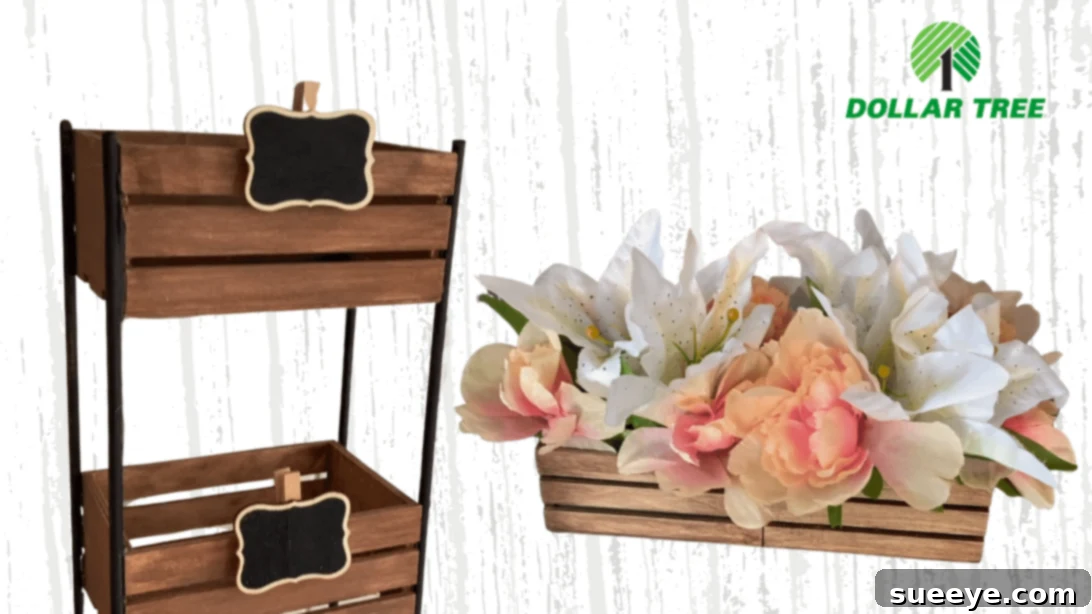
Are you searching for captivating yet affordable ways to spruce up your living space? Look no further than the humble wood crates from Dollar Tree! These versatile and incredibly inexpensive items are a DIY enthusiast’s dream, offering endless possibilities to create custom decor that reflects your personal style without breaking the bank. In this comprehensive guide, we’ll dive into two fantastic Dollar Tree wood crate DIY projects that are not only easy and fun to make but also deliver significant visual impact: a stylish multi-tiered organizer and an enchanting decorative flower crate.
A little decoration goes a long way in making a room feel more inviting, organized, and visually appealing. These wonderful craft ideas, originally inspired by the creative genius of Wendi Lee, demonstrate just how simple it is to transform plain wooden crates into elegant, functional pieces. The classic combination of black and brown paint instantly gives these unassuming crates a sophisticated, rustic, or country-inspired look. Imagine using the organizer not just for crafts or household items, but even as a charming indoor herb garden! If you’re ready to unleash your inner crafter and add a touch of handmade charm to your home, follow along with our detailed instructions and tips.
Why Dollar Tree Wood Crates Are Your Go-To DIY Material
Dollar Tree wood crates are a hidden gem for budget-conscious decorators and crafters. Their accessibility, low cost, and raw wood finish make them an ideal canvas for a multitude of projects. Unlike more expensive craft store alternatives, you can stock up on these crates without guilt, allowing for experimentation and larger-scale projects. They’re lightweight, easy to paint, glue, and assemble, making them perfect for beginners and seasoned DIYers alike. Furthermore, repurposing these simple crates aligns with a sustainable approach to home decor, giving new life to readily available materials.
Benefits of DIY Crate Projects for Your Home
Embarking on DIY projects with wood crates offers a plethora of benefits for your home environment:
- Affordable Transformation: Achieve high-end looks for a fraction of the cost of store-bought decor.
- Personalization: Customize colors, finishes, and functionalities to perfectly match your existing decor and personal taste.
- Enhanced Organization: Create bespoke storage solutions that fit your specific needs, helping to declutter and streamline your space.
- Creative Outlet: Engage in a rewarding activity that boosts your creativity and provides a sense of accomplishment.
- Versatility: These projects are adaptable to various decor styles, from rustic farmhouse and shabby chic to modern industrial or even bohemian, depending on your chosen finishes and embellishments.
Let’s gather our supplies and turn these simple crates into stunning home accents!
Materials You’ll Need:
Before you begin, ensure you have all the necessary items on hand. Most of these can be found at Dollar Tree, a local craft store, or a hardware store.
- 5 small Dollar Tree wood crates: Three for the organizer, two for the flower crate.
- Black acrylic or craft paint: Provides a base for the rustic look.
- Brown acrylic or craft paint: Used to create a weathered or distressed effect when mixed with black.
- Paintbrush: A medium-sized brush is ideal for covering the crate surfaces.
- Barbecue skewers (bamboo): These will serve as the connecting rods for your organizer.
- Hot glue gun and glue sticks: Essential for quick and strong adhesion.
- Floral foam: To securely hold your faux flowers in place.
- Fake flowers: Choose varieties that complement your home decor.
- Optional: Sandpaper (fine grit), craft knife or sturdy scissors, protective surface covering, paper towels, small containers for mixing paint, chalkboard clips for labeling.
Detailed Instructions: Bringing Your Crate Projects to Life
Let’s begin crafting these beautiful and functional Dollar Tree wood crate projects. Remember to allow adequate drying time between paint coats for the best results.
General Preparation & Painting Tips:
Before you start, ensure your workspace is protected with newspaper or a drop cloth. Briefly wipe down your wood crates to remove any dust or debris. This will help the paint adhere better.
- Mixing the Paint: In a small container, mix your black and brown paints. You’re aiming for a dark, rich, almost charcoal-like brown. Experiment with the ratio until you achieve a shade you love. A slightly uneven mix can even add to the rustic charm.
- Painting Technique: Apply thin, even coats of your mixed paint to all surfaces of the wood crates. For a more distressed or weathered look, you can apply the paint sparingly or use a dry-brush technique where you dip your brush in paint, then wipe most of it off before applying it to the wood. This allows some of the natural wood grain to show through.
- Drying Time: Patience is key! Allow each coat of paint to dry completely before applying another, or before moving on to the next step. Drying times can vary based on humidity and paint thickness, but typically an hour or two is sufficient.
For the Multi-Tiered Crate Organizer:
This versatile organizer is perfect for craft supplies, spices, small books, or even as a unique display shelf.
Step 1: Painting the Crates
Using your paintbrush, apply the mixed black and brown paint to all three wood crates designated for the organizer. Ensure all visible surfaces are covered. Once painted, set them aside in a well-ventilated area and allow them to dry completely.
Step 2: Preparing the Skewers
While your crates are drying, prepare the connecting rods. Take your bamboo skewers and carefully remove the pointy end using sturdy scissors or a craft knife. This ensures safety and a cleaner finish. Next, cut the skewers into lengths of approximately 12-14 inches. The exact length will determine the spacing between your crates, so consider your desired height. You will need a total of six uniform pieces. Once cut, paint these skewer pieces with the black paint you used, ensuring full coverage, and set them aside to dry.
Tip: To ensure even spacing and stability, it’s crucial that all six skewer pieces are cut to precisely the same length.
Step 3: Assembling the Organizer
Once all your painted components (crates and skewers) are thoroughly dry, it’s time for assembly. This is where your hot glue gun comes in handy for quick adhesion.
- Start with one crate as your base. Apply a line of hot glue along the two shorter sides of the crate where the skewers will attach.
- Carefully press two painted skewers onto these glued lines, ensuring they are positioned upright and evenly spaced. Hold them in place for a few seconds until the glue sets.
- Next, apply hot glue to the top ends of these two attached skewers and gently place the second crate on top, aligning its sides with the skewers. Press down firmly to create a strong bond.
- Repeat this process for the remaining two skewers and the third crate, stacking it on top of the second. Ensure all crates are aligned and level.
- After the main structure is complete, take a fine-grit sandpaper and gently sand the very top ends of the skewers (if they protrude slightly) to create a smooth, finished edge.
- Finally, do a quick touch-up with your paint on any areas that might have been scuffed during assembly or where glue is visible. Let the entire piece dry completely before use.
Your elegant crate organizer is now ready! For an added touch of functionality and charm, consider purchasing small chalkboard clips from Dollar Tree to label each tier. This is perfect for organizing craft supplies, office essentials, or even categorizing your spices.
For the Charming Flower Crate:
This decorative piece is perfect for adding a touch of floral beauty to any tabletop, shelf, or entryway.
Step 1: Painting the Flower Crates
Just as with the organizer, mix your black and brown paint in a small container. Using your paintbrush, apply this mixture evenly to the two remaining wood crates. Ensure full coverage on all visible surfaces. Set them aside to dry thoroughly.
Step 2: Assembling and Decorating the Flower Crate
Once the painted crates are completely dry, it’s time to assemble and add the floral elements.
- Take one of the painted crates and apply a generous line of hot glue along one of its longer sides.
- Carefully attach the second painted crate to this glued side, aligning them perfectly to create a single, elongated unit. Hold them firmly together until the glue sets. For added stability, you can apply glue to the inside seams as well.
- Next, take your floral foam piece. Using a craft knife or sturdy scissors, cut two blocks of foam that will fit snugly inside each section of your joined crates. Ensure they sit securely without wobbling.
- Prepare your fake flowers. Trim the stems of your chosen artificial flowers to varying lengths. This will allow you to create a more dynamic and natural-looking arrangement.
- Begin decorating by inserting the flower stems into the floral foam. Start with your larger, focal flowers, then fill in with smaller blooms and greenery. Experiment with different heights and angles to create a visually appealing arrangement. Consider color balance and texture for a professional look.
Your beautiful Dollar Tree flower crate is now complete! Place it on a mantel, bookshelf, coffee table, or as a centerpiece to instantly brighten up any room. This also works wonderfully for displaying faux succulents or small potted plants, making it a versatile decorative piece.
Customization Ideas and Creative Variations
These projects are just starting points! Feel free to let your creativity soar with these customization ideas:
- Paint Colors: Instead of black and brown, try bright pastels for a children’s room, metallics for a modern look, or white and distressed blue for a coastal vibe.
- Staining: Use wood stain instead of paint to highlight the natural grain of the wood for a more authentic rustic feel.
- Embellishments: Add stencils, decals, decorative knobs, rope handles, or even line the inside of the crates with fabric or decorative paper.
- Wheels: Attach small caster wheels to the bottom of your organizer for easy mobility, turning it into a rolling storage cart.
- Different Sizes: Experiment with different sizes of Dollar Tree crates (if available) to create varied proportions and unique designs.
- Themed Decor: Adapt the flower crate for seasonal decor. Think fall leaves and mini pumpkins, or pinecones and berries for winter.
- Outdoor Use: If planning for outdoor use, ensure you use exterior-grade paint and sealant to protect the wood from the elements.
Maintenance and Care for Your DIY Crate Projects
To ensure your beautiful Dollar Tree wood crate projects last, a little care goes a long way:
- Dusting: Regularly dust your crates with a soft cloth to keep them looking fresh.
- Cleaning: For painted surfaces, a damp cloth with a mild soap solution can be used for spot cleaning, followed by drying immediately.
- Protective Coating: Consider applying a clear sealant or varnish (matte or glossy, depending on your preference) over the painted surfaces. This will protect the paint from chips and make the surface easier to clean.
- Indoor Placement: For untreated or unsealed crates, indoor use is recommended to prevent warping or damage from moisture.
Conclusion: Craft Your Way to a Beautiful Home
These Dollar Tree wood crate DIY projects prove that you don’t need a large budget to create stunning and functional decor for your home. With just a few inexpensive materials, some creativity, and a little time, you can transform simple items into personalized pieces that add character, organization, and beauty to any room. Whether you opt for the practical organizer or the charming flower display, you’re sure to enjoy the process and the delightful results.
So, head to your nearest Dollar Tree, grab some crates, and start crafting today! Don’t forget to share your unique creations and how you’ve customized these projects to fit your home. Happy crafting!