
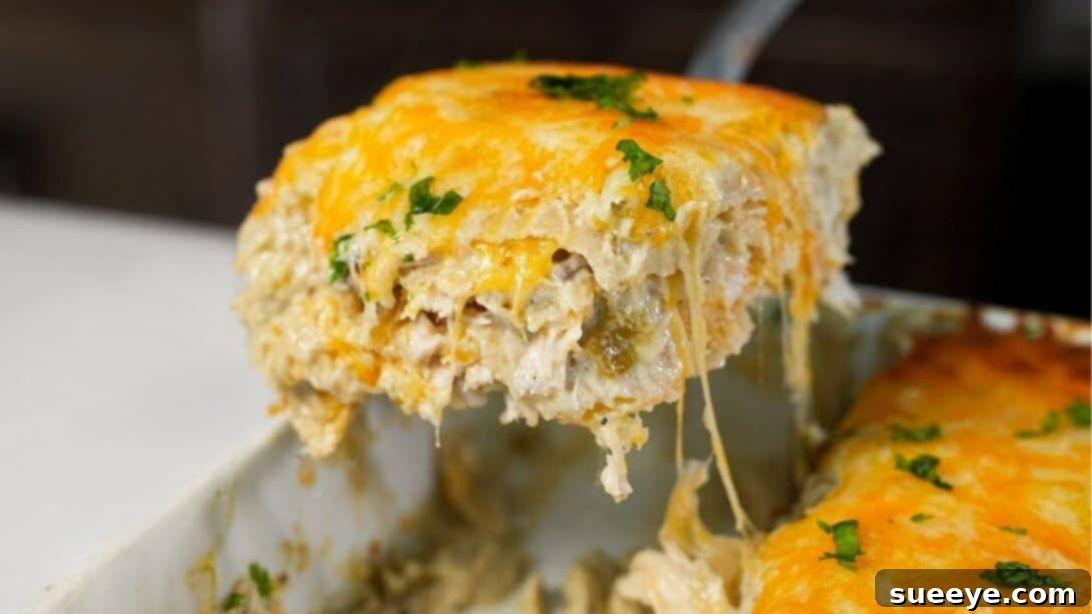
Prepare to delight your taste buds with an unforgettable dinner tonight! We’re diving into the world of comfort food with an incredibly easy and utterly delicious Chicken Enchilada Casserole recipe, inspired by the culinary genius of Cooking Con Claudia. Just one glance at this vibrant, layered masterpiece is enough to ignite a craving for its rich, savory goodness. This casserole isn’t just a meal; it’s an experience, boasting irresistible layers of soft corn tortillas, succulent shredded chicken, melted cheese, and a uniquely creamy green enchilada sauce that gets its luscious texture from a blend of sour cream and classic cream of mushroom soup. Each bite promises a burst of authentic Mexican-inspired flavors, making it a guaranteed crowd-pleaser for any occasion.
RELATED: Craving more comfort? Try our Chicken Pot Pie Baked Potatoes Recipe!
What makes this chicken enchilada casserole truly stand out is its remarkable simplicity without compromising on taste. You only need a handful of readily available ingredients to bring this culinary dream to life: corn tortillas, flavorful green enchilada sauce, creamy sour cream, tangy diced green chiles, a can of Campbell’s cream of mushroom soup, tender shredded chicken, a generous amount of shredded Mexican blend cheese, and essential salt and pepper to season perfectly. The secret weapon for ultimate convenience and depth of flavor? A pre-cooked rotisserie chicken. Utilizing a rotisserie chicken not only streamlines the preparation process, saving you precious time in the kitchen, but also infuses the casserole with a wonderfully roasted flavor that elevates the entire dish. It’s so good, you might find yourself wanting to enjoy it every day – it’s that addictive! While phenomenal on its own, this casserole pairs beautifully with a variety of sides. Consider serving it alongside creamy refried beans, a refreshing corn salad, fluffy rice, hearty black beans, or a crisp coleslaw to complete your perfect meal.
Essential Ingredients for Your Easy Chicken Enchilada Casserole
Crafting this irresistible chicken enchilada casserole begins with selecting high-quality ingredients that will contribute to its robust flavor and comforting texture. Here’s a detailed list of everything you’ll need, along with insights into why each component is crucial for achieving enchilada perfection:
- 12 Corn Tortillas: The foundation of our casserole. Corn tortillas provide that authentic Mexican flavor and a delightful texture when properly prepared. We’ll briefly fry them to prevent sogginess and add a subtle chewiness to each layer.
- 2 Cups of Green Enchilada Sauce: This vibrant sauce is the heart of the dish, delivering a tangy and mildly spicy base. You can opt for your favorite store-bought brand for convenience, or if you’re feeling adventurous, a homemade version can add an extra layer of freshness.
- 1 Cup of Sour Cream: Crucial for adding richness and a creamy consistency to our enchilada sauce mixture. It mellows the spice of the chiles and enchilada sauce, creating a beautifully balanced flavor profile that everyone will love.
- 4 oz Diced Green Chiles: These small but mighty chiles infuse the sauce with a distinctive, earthy tang and a gentle warmth. They are integral to the classic green enchilada flavor and provide a mild kick without overpowering the dish.
- 1 Can of Campbell’s Cream of Mushroom Soup: This unexpected ingredient is the secret to the casserole’s unparalleled creaminess and depth. It acts as a binder, emulsifies the sauce, and contributes a savory, umami note that makes the casserole incredibly satisfying.
- 1 Rotisserie Chicken (Shredded): The ultimate time-saver! A pre-cooked rotisserie chicken provides tender, seasoned shredded chicken that’s ready to go. This significantly cuts down on prep time and adds a wonderful roasted flavor that enhances the entire dish. Alternatively, you can boil and shred chicken breasts or thighs.
- Shredded Mexican Blend Cheese: A medley of cheeses like Monterey Jack, Cheddar, and Colby, this blend is chosen for its superior melting qualities and balanced flavor. It creates gooey, cheesy layers that hold the casserole together and provide that essential comfort food appeal.
- Salt and Pepper to Taste: These fundamental seasonings are vital for bringing all the flavors together. Always taste your sauce mixture before assembly and adjust to ensure it’s perfectly seasoned to your preference.
Crafting Your Masterpiece: How to Make Chicken Enchilada Casserole
Follow these straightforward steps to assemble your incredibly flavorful and satisfying chicken enchilada casserole. Each step is designed to maximize flavor and ensure a perfectly baked dish every time.
Step 1: Preparing Your Tortilla Foundation
The first crucial step to an enchilada casserole that holds its shape and avoids sogginess is properly preparing your corn tortillas. Begin by adding a generous amount of oil – enough to lightly submerge the tortillas – to a large skillet or frying pan over medium-high heat. Allow the oil to heat thoroughly until it shimmers, but not to the point of smoking. Once the oil is hot, carefully place one corn tortilla into the pan and fry it for approximately 5 seconds on each side. The goal isn’t to make them crispy, but rather to soften them and create a slight blister on their surface. This quick fry enhances their flavor, makes them more pliable for layering, and creates a protective barrier against the sauce, preventing them from becoming mushy during baking. Using tongs, transfer the softened tortilla to a plate lined with paper towels to drain any excess oil. Repeat this process with the remaining corn tortillas until they are all lightly fried and ready for assembly. This small extra step makes a significant difference in the final texture of your casserole.
Step 2: Crafting the Creamy Enchilada Sauce Mixture
Now it’s time to create the luscious, flavorful sauce that will bind all the ingredients together. In a large mixing bowl, combine the entire can of Campbell’s cream of mushroom soup, the diced green chiles (undrained, as the liquid adds flavor and moisture), the cup of sour cream, and the two cups of green enchilada sauce. Add a pinch of salt and a grind of fresh black pepper to start. Using a whisk or a large spoon, mix all these ingredients thoroughly until they are completely well combined and the mixture is smooth and uniform in color. This ensures that every spoonful of your casserole will have a consistent and balanced flavor profile. Once mixed, perform a taste test. This is a critical moment to adjust the seasonings. If you prefer more salt, add a little more. If you like a spicier kick, you can add a dash of hot sauce or a few extra diced jalapeños (ensure they are finely diced). Don’t be shy about tasting and adjusting; perfect seasoning is key to a truly outstanding casserole.
Step 3: Assembling Your Delicious Layers
With your tortillas prepared and your creamy sauce ready, it’s time for the exciting part: assembling the casserole! Begin by preheating your oven to 350°F (175°C). Take your chosen baking dish – a 9×13 inch pan works perfectly for this recipe – and pour a generous amount of your prepared enchilada sauce mixture into the bottom. Use the back of a spoon or a spatula to spread it evenly across the entire base of the dish. This initial layer of sauce helps prevent the first layer of tortillas from sticking and adds moisture from the very bottom. Next, arrange a single layer of your lightly fried corn tortillas over the sauce. Don’t worry if they don’t fit perfectly; you can cut them into smaller pieces or tear them to fill any gaps, ensuring the sauce is fully covered. On top of the tortilla layer, scatter a portion of the shredded rotisserie chicken, spreading it out evenly. Then, sprinkle a generous amount of shredded Mexican blend cheese over the chicken. Now, repeat the layers: another layer of sauce, followed by tortillas, then chicken, and finally cheese. Continue this layering process until you have used all of your corn tortillas. The grand finale should always be a thick, enticing layer of shredded cheese on top. This final cheese layer will melt into a golden-brown, bubbly crust, sealing in all the flavors and creating an irresistible finish.
Step 4: Baking to Perfection and Savoring
Once your beautiful chicken enchilada casserole is fully assembled, it’s ready for its transformation in the oven. Carefully place the baking dish into your preheated oven at 350°F (175°C). Allow it to bake for approximately 20 to 25 minutes. The baking time may vary slightly depending on your oven, so keep an eye on it. You’ll know it’s perfectly done when the sauce is visibly bubbly around the edges and the top layer of cheese has melted into a golden, gooey, and slightly browned crust. This indicates that all the layers are heated through and the flavors have fully melded together. Once it reaches this point of perfection, carefully remove the casserole from the oven. Resist the immediate urge to dig in! It’s crucial to allow the casserole to rest for a few minutes – typically 5 to 10 minutes – before slicing and serving. This resting period allows the cheese and sauce to set slightly, making it much easier to cut neat portions without the casserole falling apart, and it also prevents you from burning your mouth on the piping hot filling. After a brief rest, your homemade creamy chicken enchilada casserole is ready to be enjoyed! Serve it warm, garnished with fresh cilantro, a dollop of extra sour cream, or a squeeze of lime for an added burst of freshness. Prepare for an explosion of comforting flavors that will make this a staple in your recipe rotation.
Serving Suggestions and Perfect Pairings for Your Chicken Enchilada Casserole
While this creamy chicken enchilada casserole is a complete meal in itself, pairing it with complementary side dishes can elevate your dining experience and create a well-rounded feast. Here are some fantastic serving suggestions that enhance the flavors and textures of the casserole:
- Creamy Refried Beans: A classic Mexican side, refried beans offer a smooth, savory contrast to the casserole. You can easily whip up your own or choose a high-quality canned version for convenience. Garnish with a sprinkle of cheese or a dollop of sour cream.
- Fresh Corn Salad: A vibrant corn salad, featuring fresh or frozen corn, diced red onion, bell peppers, cilantro, and a lime vinaigrette, adds a refreshing crunch and a sweet, tangy counterpoint that cuts through the richness of the casserole.
- Fluffy Mexican Rice: Whether it’s a simple white rice or a more elaborate Mexican red rice, a side of rice is perfect for soaking up any extra sauce and provides a satisfying carbohydrate base. Consider adding cilantro and lime for a zesty touch.
- Hearty Black Beans: Seasoned black beans, either plain or cooked with onions, garlic, and spices, offer a protein-rich and fiber-packed accompaniment. They provide an earthy depth that complements the chicken and cheese beautifully.
- Crisp Slaw: A light and crunchy coleslaw, either creamy or vinaigrette-based, provides a welcome textural contrast. The crispness and acidity help to refresh the palate between bites of the rich casserole.
- Avocado or Guacamole: Sliced fresh avocado or a generous scoop of homemade guacamole adds a luxurious creaminess and healthy fats, along with a mild, buttery flavor that pairs wonderfully with the enchilada spices.
- Pico de Gallo or Fresh Salsa: The bright, fresh flavors of pico de gallo (diced tomatoes, onions, jalapeños, cilantro, lime) or your favorite salsa provide a burst of acidity and freshness, adding another layer of complexity.
- Sour Cream or Greek Yogurt: An extra dollop of sour cream on top of each serving adds more cool creaminess, while plain Greek yogurt can be a lighter, tangier alternative.
- Lime Wedges: A squeeze of fresh lime juice over your serving brightens all the flavors, adding a zesty finish that truly makes the dish sing.
- Fresh Cilantro: A sprinkle of freshly chopped cilantro not only adds a pop of color but also a fresh, herbaceous note that is quintessential to Mexican cuisine.
By pairing your chicken enchilada casserole with one or more of these delicious sides, you can create a diverse and satisfying meal that will impress your family and friends. Don’t be afraid to mix and match to discover your favorite combinations!
Customization and Variations: Make It Your Own!
One of the best aspects of casserole dishes like this chicken enchilada creation is their incredible versatility. This recipe serves as a fantastic foundation, but don’t hesitate to experiment and tailor it to your personal preferences, dietary needs, or what you have on hand. Here are several ideas to customize your chicken enchilada casserole:
- Protein Alternatives:
- Ground Beef or Turkey: Browned and seasoned ground beef or turkey can easily replace the shredded chicken for a different flavor profile.
- Pork Carnitas: Leftover slow-cooked pork carnitas would be an incredibly delicious and tender alternative.
- Vegetarian Option: For a meatless version, use black beans, pinto beans, or a combination of both. You can also add sautéed vegetables like bell peppers, onions, and zucchini.
- Sauce Experimentation:
- Red Enchilada Sauce: Swap the green enchilada sauce for red enchilada sauce for a classic, rich, and often spicier flavor.
- Different Cream Soups: While cream of mushroom is a classic, try cream of chicken or even cream of celery for subtle variations in creaminess and underlying flavor.
- Homemade Sauce: If you have time, making your own green chile sauce from scratch (using roasted tomatillos and poblanos) will take this casserole to an entirely new level of fresh flavor.
- Vegetable Boost:
- Sautéed Onions and Bell Peppers: Add a layer of finely diced and sautéed onions and bell peppers for extra flavor and nutrients.
- Spinach or Corn: Stir in some fresh spinach or corn kernels into your chicken mixture for added color and texture.
- Diced Zucchini or Yellow Squash: These mild vegetables blend seamlessly into the casserole, adding moisture and nutrients without altering the core flavor too much.
- Cheese Choices:
- Cheddar and Monterey Jack: A classic combination that melts beautifully.
- Oaxaca or Asadero: For a more authentic Mexican cheese experience, these stringy, mild cheeses are fantastic.
- Pepper Jack: If you love a little extra heat, Pepper Jack cheese will add a pleasant kick.
- Cotija Cheese: A sprinkle of crumbly cotija cheese on top after baking can add a salty, tangy garnish.
- Spice Level Adjustments:
- More Chiles: Increase the amount of diced green chiles or add a can of diced jalapeños for more heat.
- Hot Sauce: A few dashes of your favorite hot sauce stirred into the sauce mixture will intensify the spice.
- Chipotle Powder: A pinch of chipotle powder adds a smoky heat that’s incredibly delicious.
- Tortilla Alternatives:
- Flour Tortillas: While corn tortillas are traditional, flour tortillas can be used for a softer, chewier texture. You might not need to fry them if using flour.
- Gluten-Free Tortillas: Many brands now offer gluten-free corn tortillas, making this recipe accessible for those with gluten sensitivities.
Don’t be afraid to get creative in the kitchen! This chicken enchilada casserole is wonderfully forgiving and adaptable, encouraging you to personalize it to your heart’s content. Enjoy the process of making it truly your own!
Make-Ahead and Storage Tips for Ultimate Convenience
This chicken enchilada casserole isn’t just delicious; it’s also incredibly convenient, especially if you’re looking for a meal prep solution or planning a dinner party in advance. Here’s how you can make it ahead and store it effectively to enjoy later:
- Assembling Ahead of Time:
- You can fully assemble the casserole up to 24 hours in advance. Follow all the steps for preparation and layering, but do not bake it.
- Once assembled, cover the baking dish tightly with plastic wrap, then with aluminum foil, to prevent air exposure.
- Store the covered casserole in the refrigerator.
- When you’re ready to bake, remove it from the refrigerator at least 30 minutes to an hour before baking to allow it to come closer to room temperature. You might need to add an extra 10-15 minutes to the baking time since it’s starting from a colder state.
- Alternatively, you can bake it directly from the fridge, but expect the baking time to increase significantly (potentially up to 45-60 minutes), ensuring it’s heated through to the center.
- Baking and Reheating Leftovers:
- Refrigeration: Leftover baked casserole should be cooled completely and then transferred to an airtight container or kept in the baking dish, tightly covered with plastic wrap or foil. It will stay fresh in the refrigerator for up to 3-4 days.
- Reheating in the Oven: For best results, reheat individual portions or the entire casserole in a preheated oven at 300-325°F (150-160°C). Cover it loosely with foil to prevent the cheese from over-browning and drying out. Reheat until thoroughly warmed through, about 20-30 minutes for individual portions, or longer for a whole casserole.
- Reheating in the Microwave: For a quick reheat, individual slices can be warmed in the microwave. Place a slice on a microwave-safe plate, cover loosely with a paper towel, and heat for 1-2 minutes, or until hot. Be careful not to overheat, as this can make the tortillas tough.
- Freezing for Future Meals:
- Unbaked Casserole: You can freeze the assembled, unbaked casserole. Wrap it very tightly with several layers of plastic wrap and then aluminum foil to prevent freezer burn. It can be stored in the freezer for up to 2-3 months. Thaw overnight in the refrigerator before baking, or bake from frozen (this will significantly increase baking time, potentially to 1.5-2 hours, covered for the first hour).
- Baked Casserole: You can also freeze portions of the baked casserole. Allow it to cool completely. Cut into individual serving sizes, wrap each piece tightly in plastic wrap, and then place them in freezer-safe bags or containers. This allows you to pull out single servings as needed. Thaw overnight in the fridge and reheat in the oven or microwave. Freezing individual portions of a baked casserole is an excellent strategy for quick, homemade meals on busy weeknights.
With these make-ahead and storage tips, your delicious chicken enchilada casserole can become an even more convenient and versatile part of your meal planning, ensuring you always have a comforting and flavorful dish ready to go!
The Ultimate Comfort: Your Chicken Enchilada Casserole Awaits
Congratulations! You’ve just journeyed through the steps of creating a truly exceptional chicken enchilada casserole. This recipe, inspired by Cooking Con Claudia, is more than just a list of ingredients and instructions; it’s an invitation to bring warmth, flavor, and comfort into your home. Whether you’re a seasoned chef or a kitchen novice, the simplicity and delicious results of this casserole make it an absolute winner. From the time-saving magic of a rotisserie chicken to the rich, creamy sauce and the perfectly layered textures, every element works in harmony to deliver an unforgettable dining experience. It’s the perfect dish for a cozy family dinner, a lively gathering with friends, or simply a comforting treat after a long day. We encourage you to embrace the joy of cooking this easy chicken enchilada casserole and make it a cherished staple in your culinary repertoire. Don’t forget to share your creations and tell us how you customized it in the comments! Enjoy every savory bite!