
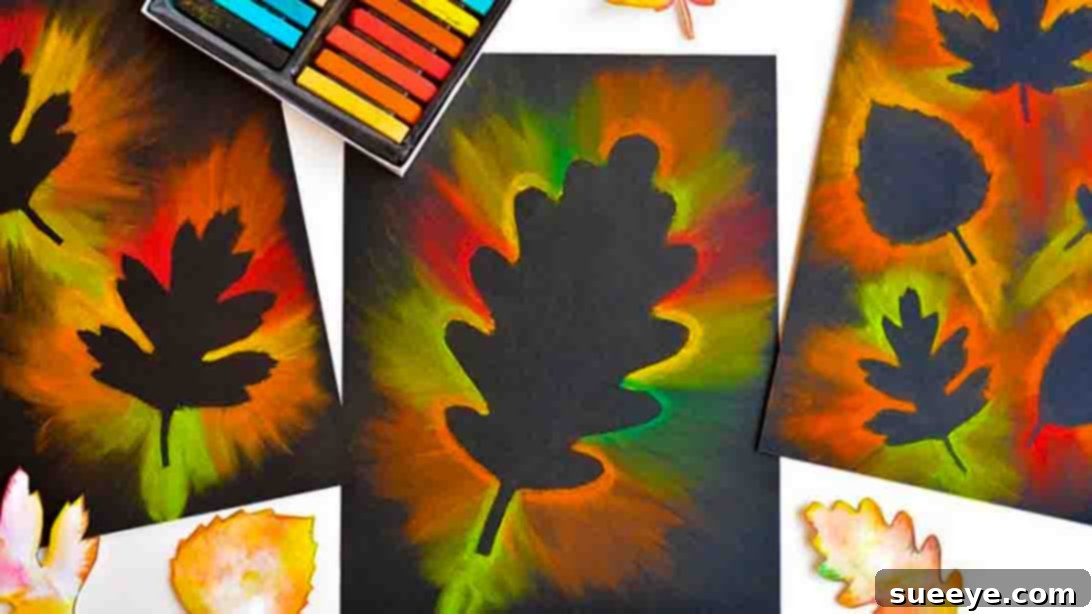
DIY Fall Leaf Chalk Art: Your Perfect Autumn Craft Project
As the vibrant hues of summer give way to the warm, inviting palette of autumn, there’s no better time to embrace the spirit of the season with a delightful DIY craft. Imagine capturing the breathtaking beauty of fall foliage and transforming it into a piece of art that brightens your home. This guide will walk you through creating exquisite Fall Leaf Chalk Art – a project so simple, yet so visually stunning, that it’s perfect for crafters of all skill levels. Whether you’re a seasoned artist or just looking for a fun, relaxing activity, this project promises a rewarding experience.
Inspired by the wonderfully creative minds at One Little Project on YouTube, this chalk art technique is designed to be beginner-friendly and incredibly easy to achieve. It’s an ideal way to spend a cozy afternoon with friends, engage your children in a fun and educational activity, or simply enjoy a moment of mindful creativity by yourself. The result? A vibrant, unique piece of autumn decor that celebrates the magic of fall. In fact, many people find their finished pieces so captivating that they become cherished decorations, adorning bedrooms, living rooms, or even gifted to loved ones. Let’s gather our materials and dive into making something beautiful that truly captures the essence of the season!
Why This Fall Leaf Chalk Art Project Is a Must-Try
Beyond creating a beautiful piece of art, engaging in this DIY project offers a host of wonderful benefits, making it an excellent choice for anyone looking to add a touch of fall charm to their lives:
- Beginner-Friendly & Accessible: You don’t need any prior artistic skill or experience to achieve impressive results. The technique is straightforward, making it perfect for everyone from young children to adults.
- Affordable & Budget-Friendly: Most materials required are inexpensive and readily available at local craft stores, art shops, or even online, ensuring a low-cost creative outlet.
- Therapeutic & Relaxing: The process of applying and smudging chalk pastels can be incredibly calming and meditative. It’s a fantastic way to unwind, de-stress, and engage in mindful creativity.
- Perfect for All Ages & Family Fun: This project is wonderfully inclusive, providing an enjoyable activity for individuals, friends, and families. Kids can develop fine motor skills and color recognition, while adults can appreciate the artistic expression.
- Stunning Seasonal Decor: Create unique, vibrant artwork that perfectly captures the essence of autumn. These pieces are ideal for decorating your home, classroom, office, or any space that needs a touch of fall festivity.
- Highly Customizable: Experiment with different leaf shapes, an array of colors, and various arrangements to create a piece that is uniquely yours and reflects your personal style.
- Great for Gifting: Handmade chalk art makes for a thoughtful, personalized, and cherished gift for friends, family, and teachers during the autumn season.
- Connect with Nature: Drawing inspiration directly from real leaves fosters a deeper appreciation for the natural world and the changing seasons.
- Boosts Creativity: Encourages experimentation with color blending, composition, and texture, nurturing creative thinking and problem-solving skills.
This project isn’t just about making art; it’s about making memories, celebrating the vibrant energy of autumn, and adorning your space with personal, handcrafted beauty. Ready to transform simple supplies into a stunning masterpiece?
Essential Materials for Your Fall Leaf Chalk Art
Gathering your supplies is the exciting first step in any creative endeavor. For this project, you’ll find that the list of materials is wonderfully simple and accessible, ensuring you can jump right into the fun without much hassle. Here’s a detailed look at what you’ll need, along with tips for selection:
- Black Drawing Paper (or Construction Paper): The choice of paper is crucial. A dark background, especially black, truly makes the vibrant chalk pastel colors pop, creating a dramatic and beautiful contrast that mimics the richness of fall evenings. Opt for a slightly thicker paper (like cardstock or heavier construction paper) as it will better withstand the pressure of coloring and the smudging process without tearing or wrinkling.
- Chalk Pastels: These are the stars of our show! Unlike regular sidewalk chalk, chalk pastels offer a much richer pigment, smoother application, and superior blendability. They are perfect for achieving the soft, painterly, and diffused effects central to this project. Look for a set that includes a good variety of fall colors: fiery reds, brilliant oranges, sunny yellows, deep browns, earthy greens, and perhaps hints of burgundy, purple, or even a touch of white for highlights.
- Printable Leaf Template: You can easily find a plethora of free printable leaf templates online by searching for “fall leaf templates” or “autumn leaf outlines.” Consider printing a variety of shapes and sizes – maple, oak, birch, or even more abstract leaf forms – to create a diverse and visually interesting collection. Alternatively, you can collect real fall leaves and carefully trace their outlines onto thin cardboard to create your own unique templates.
- Scissors: A good pair of sharp, comfortable scissors is essential for neatly cutting out your chosen leaf template(s). Precision here will help define the crisp edges of your final artwork, so take your time and cut carefully along the lines.
- Painter’s Tape: This is a key material for securing your leaf template without damaging your precious drawing paper. Painter’s tape is specifically designed to be low-tack, meaning it adheres just enough to hold things in place but peels off cleanly without leaving sticky residue or tearing the delicate surface of your paper. Avoid strong adhesive tapes like masking tape, which can ruin your artwork.
Pro Tip on Materials: While black paper is highly recommended for its striking contrast and dramatic effect, feel free to experiment with other dark-colored papers like navy blue, deep forest green, or even dark grey for different atmospheric effects. If chalk pastels aren’t readily available, softer oil pastels can work too, though they will produce a slightly different texture and may be harder to smudge as smoothly. Always test your materials on a scrap piece of paper first!
Step-by-Step Guide to Creating Your Fall Leaf Chalk Art
Now that you have all your materials ready and laid out, let’s dive into the wonderfully creative process! Follow these detailed instructions to bring your beautiful fall leaf chalk art to life. Remember, art is a journey of discovery, so feel free to experiment and infuse your unique personality into each step.
Step 1: Preparing Your Leaf Template and Initial Coloring
Your journey into fall chalk art begins with precision and planning. First, take your chosen leaf template(s) and carefully cut them out using your scissors. Aim for smooth, clean edges, as these will define the silhouette of your leaf in the final artwork. Once cut, take a moment to consider the placement of your leaf template(s) on your black drawing paper. This is your canvas, and you have complete freedom! You can opt for a single, prominent leaf as a focal point, or arrange multiple leaves in a dynamic composition – perhaps overlapping them slightly, creating a cluster, or distributing them across the paper for a more intricate design. Experiment with different orientations and positions until you’re completely satisfied with the layout.
When you’ve found the perfect spot for each leaf, gently secure it in place with small pieces of painter’s tape. Apply the tape along the edges of the leaf, pressing down lightly to ensure it lies flat against the paper without any gaps. The tape’s purpose is twofold: to prevent the template from shifting while you work, and crucially, to allow for clean removal later without damaging your artwork or leaving adhesive residue. Ensure the template is well-adhered, especially around intricate points and edges.
Now, for the most vibrant part – coloring with chalk pastels! Select a range of colors that truly evoke the richness and warmth of autumn – think fiery reds, brilliant oranges, sunny yellows, deep browns, and perhaps hints of burgundy, deep purples, or even some forest green. Begin applying the chalk directly over the edges of your paper leaf template, extending your chalk marks onto the black paper. A good guideline is to color approximately 1/2 to 1 inch beyond the leaf’s edge. This creates a stunning “halo” effect around the eventual leaf silhouette. Don’t hesitate to blend different colors as you go; for instance, you might start with a bright yellow closest to the leaf, transition to orange, and then to a deep red or brown further out. Apply the chalk with a moderate amount of pressure to ensure good color transfer and a rich pigment.
Continue this process, working your way around the entire perimeter of each leaf template you’ve placed. The beauty of chalk pastels lies in their incredible blendability, so let the colors overlap and mix organically on the paper. You can create soft, seamless gradients or bold, striking transitions – the choice is entirely yours! Ensure that there’s a good, even amount of chalk dust deposited around the leaf, as this will be absolutely crucial for achieving the magical smudging effect in the next step.
Step 2: Smudging and Revealing Your Artwork
Once you’ve diligently finished applying all your chosen chalk pastel colors around the leaf templates, it’s time for the truly transformative step that creates the soft, ethereal, and magical glow effect. Using your finger (your index finger often works best), or for more precision and to keep your hands cleaner, a cotton swab or a blending stump, gently begin to smudge the chalk dust *away* from the very edge of the leaf template and outward onto the black paper. The motion should be light, circular, or short, outward strokes, akin to softly feathering the colors. The goal is to blend the vibrant chalk smoothly, softening any hard lines created during the application and creating a gradual fade from the intense colors to the dark background.
Work methodically around the entire perimeter of each leaf, ensuring an even and consistent smudge. You’ll immediately notice the colors beautifully diffusing and blurring, creating a stunning, luminous aura around where the leaf template lies. Take your time with this step, as the quality of the smudging significantly contributes to the overall aesthetic and professional appearance of your artwork. If you find certain areas need more intensity or blending, you can always reapply a little more chalk pastel and then smudge again until you achieve your desired effect. This iterative process allows for fine-tuning and perfection.
After you’re completely satisfied with the smudging and blending, it’s time for the big reveal! Gently lift the paper and lightly shake off any excess chalk dust. You can also use a very soft, dry brush (like a clean makeup brush) to carefully sweep away any loose particles without disturbing your blended art. The final, and arguably most satisfying, step is to carefully remove the painter’s tape and then lift off the leaf template. Peel the tape slowly and at an angle, pulling it back on itself rather than straight up, to avoid damaging the paper or lifting any of your chalk art. As the template comes off, it will unveil a crisp, perfectly uncolored leaf silhouette against a vibrant, softly blended chalk pastel background – a striking contrast that is truly breathtaking. Your stunning DIY Fall Leaf Chalk Art is now complete and ready to admire!
Creative Variations and Display Ideas for Your Chalk Art
While the basic technique of Fall Leaf Chalk Art yields undeniably beautiful results, don’t hesitate to personalize your creations further. The beauty of DIY projects lies in their adaptability! Here are some inspiring ideas to spark your creativity and help you showcase your finished pieces:
- Explore Different Leaf Shapes & Sizes: Beyond the classic maple, experiment with various tree leaves – oak, birch, aspen, sassafras, or even the delicate needles of evergreens – to create a diverse and botanically interesting collection. Varying sizes also adds visual depth.
- Create Layered & Overlapping Compositions: Instead of individual leaves, try layering several templates, allowing them to overlap slightly. The areas where the chalk colors blend across overlapping templates can produce surprisingly intricate and beautiful color mixtures.
- Alternative Color Palettes: While traditional fall colors are gorgeous, consider stepping outside the box. Try a cool palette with blues, greens, and purples for a serene, twilight forest effect. Or, create a striking monochromatic design using different shades of a single color, from light to dark.
- Add Sparkle with Glitter or Embellishments: For a touch of magic, after your artwork is complete and the template is removed, carefully apply a thin layer of spray adhesive (ensure it’s suitable for paper) around the chalked area and sprinkle fine glitter. Gold, copper, or iridescent glitter can enhance the autumn glow. Small self-adhesive rhinestones or sequins can also add subtle sparkle.
- Frame Your Masterpiece: To protect your artwork and give it a polished, professional look, consider placing your finished piece in a simple frame. Black, natural wood, or even a distressed metallic frame will complement the autumn theme beautifully. This also helps prevent smudging over time.
- Design a Festive Fall Garland: Create several smaller chalk art pieces, perhaps using mini leaf templates. Once dry, punch a small hole at the top of each piece and string them together with twine, jute, or a complementary ribbon to create a charming garland for your mantelpiece, doorway, or window.
- Craft Handmade Cards or Unique Gifts: Resize your artwork by making smaller pieces to fit on the front of greeting cards, transforming them into heartfelt, handmade autumn wishes. These pieces can also be incorporated into personalized autumn-themed gifts, such as embellishments on gift tags or as decorative elements on a scrapbook page.
- Utilize as Elegant Table Decor: Place framed pieces or smaller, unframed chalk art creations on your dining table, coffee table, or side tables as part of a sophisticated autumn centerpiece. Pair them with candles, mini pumpkins, or pinecones for a complete seasonal display.
- Ideal for Classroom & Educational Displays: This project is a fantastic activity for teachers to do with students, creating a vibrant, interactive, and educational display that celebrates the changing seasons in the classroom.
Important Note on Preservation: Remember that chalk pastels, by their nature, can smudge easily. To protect your beautiful artwork and preserve its vibrancy for longer, consider using a specialized fixative spray. These clear, protective sprays are available at most art supply stores. Simply apply a light, even coat from a distance of about 10-12 inches in a well-ventilated area, following the product instructions. This will seal the chalk and prevent accidental smudges, ensuring your autumn creation remains stunning for seasons to come.
Embrace the Beauty of Autumn with Your Own Chalk Art
Creating DIY Fall Leaf Chalk Art is more than just a craft; it’s a delightful opportunity to connect with the season, express your inherent creativity, and produce something genuinely beautiful and uniquely yours. It stands as a testament to how simple, readily available materials can yield spectacularly artistic results, making it an accessible and enjoyable activity for everyone, regardless of age or artistic background. Whether you’re decorating your home with a personal touch, sharing a moment of creative joy with loved ones, or simply indulging in a peaceful, solitary escape into art, this project is sure to leave you with a profound sense of accomplishment and a stunning, vibrant piece of autumn art.
We sincerely hope this detailed guide has inspired you to pick up some chalk pastels, explore the myriad colors of fall, and celebrate the vibrant spirit of the season through art. A huge thank you once again to One Little Project for generously sharing such a gorgeous, accessible, and inspiring art idea with the crafting community. Be sure to visit their channel for more wonderful DIY projects and creative tutorials that spark joy and creativity!
Happy crafting, and may your autumn be filled with color, creativity, and countless beautiful moments!