
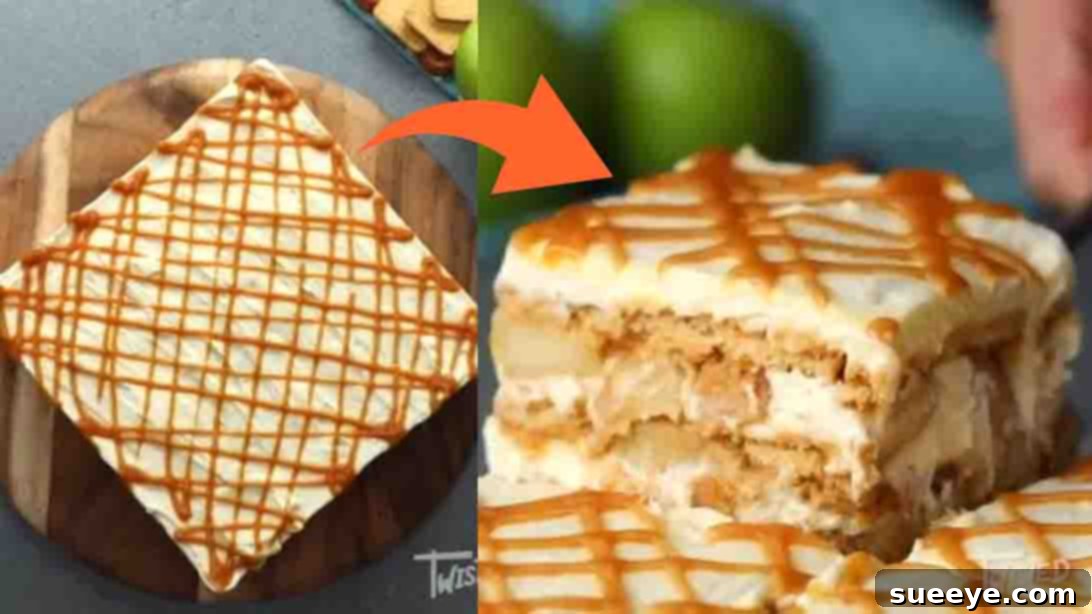
Are you searching for a truly decadent yet surprisingly simple caramel dessert that will leave everyone speechless? Look no further! This Caramel Apple Ice Box Cake, inspired by the culinary creators at Twisted on YouTube, is an absolute masterpiece of flavor and convenience. It’s not just delicious; it’s an effortless culinary creation that promises to become a staple in your dessert repertoire. Imagine layers of tender, spiced apples, rich cream cheese frosting, crunchy malted biscuits, and luscious caramel sauce, all without ever turning on your oven. This no-bake wonder is a game-changer for anyone who loves the irresistible combination of sweet apples and buttery caramel.
One of the many charms of this caramel apple ice box cake is its remarkable ease of preparation. Forget about complicated baking techniques or precise temperature controls. This recipe simplifies dessert making, making it accessible even for novice cooks. Furthermore, it’s a fantastic make-ahead dessert, meaning you can assemble it hours, or even a day, before your event. This flexibility makes it an ideal choice for potlucks, family gatherings, holiday feasts, or simply a delightful treat to enjoy throughout the week. Its impressive presentation and incredible taste belie its simple origins, ensuring rave reviews from everyone who takes a bite. Get ready to impress with minimal effort!
Why This Caramel Apple Ice Box Cake Is A Must-Try
There are countless reasons why this particular dessert stands out. Firstly, the harmonious blend of flavors is simply unparalleled. The tartness of the apples perfectly balances the sweetness of the caramel and the creamy richness of the frosting, creating a symphony of taste in every spoonful. Secondly, its no-bake nature is a huge advantage, especially during warmer months or when you simply want to avoid the fuss of baking. It frees up your oven for other dishes and reduces cleanup time.
Beyond its convenience, this cake offers a delightful textural experience. The soft, cooked apples, the smooth and airy cream cheese mixture, and the slight crunch of the malted biscuits combine to create a truly satisfying mouthfeel. It’s a dessert that feels luxurious and comforting, yet remains incredibly refreshing. We’ve found that this dessert is not only a family favorite but also a consistent hit with friends. Prepare to be asked for the recipe every time you serve it!
The Magic of Ice Box Cakes
Ice box cakes have a rich history, originating in the early 20th century as a way to create desserts without an oven, relying instead on the refrigerator. These desserts are typically composed of layers of cookies or biscuits, cream, and sometimes fruit, which soften and meld together over time in the chill of the fridge. This particular caramel apple ice box cake beautifully exemplifies this tradition, transforming simple ingredients into a sophisticated and cohesive dessert. The magic truly happens during the chilling process, as the biscuits absorb moisture from the cream and apples, softening to a cake-like consistency while infusing the entire dessert with their distinct malted flavor.
Ingredients for Your Caramel Apple Ice Box Cake:
Gathering the right ingredients is the first step to creating this magnificent dessert. Each component plays a crucial role in building the layers of flavor and texture that make this cake so special.
- 2 tbsp Butter: Unsalted butter is preferred to control the saltiness, used for sautéing the apples and adding richness.
- 6 Apples, sliced: Opt for firm, slightly tart apples like Granny Smith, Honeycrisp, or Fuji. They hold their shape well when cooked and provide a delightful contrast to the sweet caramel.
- 1/4 cup Brown Sugar: Adds a deep, molasses-rich sweetness and helps caramelize the apples.
- 1 tsp Cinnamon: The quintessential spice for apples, cinnamon infuses warmth and a classic autumnal flavor.
- 4 cups Double Cream (Heavy Cream): Essential for creating a rich, airy whipped cream base. Ensure it’s very cold for optimal whipping.
- 1 cup Cream Cheese: Full-fat cream cheese is recommended for the best texture and tangy counterpoint to the sweetness. Make sure it’s softened to room temperature for smooth blending.
- 2 tbsp Icing Sugar (Powdered Sugar): Fine texture ensures smooth incorporation into the cream mixture without grittiness, providing delicate sweetness.
- 1 tsp Vanilla Extract: A crucial flavor enhancer that complements both the cream and the apples beautifully. Use good quality pure vanilla extract for the best results.
- 3 packs Malted Biscuits (e.g., Malt-O-Meal or similar tea biscuits): These biscuits provide a wonderful malty flavor and a firm yet tender base once softened. Alternatives include graham crackers, digestive biscuits, or even shortbread.
- Caramel Sauce: A high-quality store-bought caramel sauce works wonders for convenience, but feel free to use homemade caramel for an extra touch of indulgence.
Directions: Step-by-Step to Perfection
Step 1: Prepare the Spiced Apples and Creamy Mixture
Begin by preparing your delicious spiced apples. In a large skillet, melt 2 tablespoons of butter over medium heat. Once the butter is shimmering, add the thinly sliced apples. Cook them for about 5-7 minutes, stirring occasionally, until they start to soften slightly. Then, sprinkle in 1/4 cup of brown sugar and 1 teaspoon of cinnamon, mixing well to ensure the apples are evenly coated. Continue to cook for another 3-5 minutes, allowing the apples to caramelize slightly and absorb the flavors. Once tender-crisp and fragrant, remove them from the heat and set aside to cool.
While the apples cool, prepare the luscious cream cheese mixture. In a separate large mixing bowl, combine 4 cups of chilled double cream (or heavy cream), 1 cup of softened cream cheese, 2 tablespoons of icing sugar, and 1 teaspoon of vanilla extract. Using an electric mixer on medium-high speed, whisk the ingredients together until the mixture is light, fluffy, and forms soft peaks. Be careful not to overmix, as this can cause the cream to become grainy.
Now, it’s time to start assembling the cake. Line a greased baking pan (a 9×13 inch pan works wonderfully) with parchment paper, leaving an overhang on the sides to easily lift the cake out later. Spread a generous layer of the cream cheese mixture evenly at the bottom of the pan. This will be your base. On top of this cream layer, arrange a single layer of malted biscuits, breaking them as needed to fit snugly and cover the entire surface. Next, spread another layer of the decadent cream cheese mixture over the biscuits, followed by an even layer of your cooled, spiced apples.
Step 2: Layer and Chill for Perfection
After laying down the first layer of spiced apples, it’s time for the star ingredient: caramel! Drizzle a generous amount of caramel sauce evenly over the apples. This layer will seep into the other components, adding a rich, gooey texture and intense flavor. Once the caramel is in place, repeat the layering process: start with another layer of malted biscuits, followed by a layer of the creamy cheese mixture. Next, add more spiced apples, another decadent drizzle of caramel sauce, and then one final layer of malted biscuits. Finish with the remaining cream cheese mixture, ensuring the top is smooth and even, and then complete the masterpiece with a final, enticing drizzle of caramel sauce over the top. You can swirl it gently with a knife for a beautiful marbled effect.
Once all the layers are complete and beautifully assembled, cover the pan tightly with plastic wrap. This is a crucial step to prevent any refrigerator odors from affecting your dessert and to ensure optimal chilling. Transfer the cake to the refrigerator and chill for a minimum of four hours. For the best results and a truly firm, sliceable cake, it’s highly recommended to chill it overnight. The extended chilling time allows the biscuits to fully soften and meld with the creamy layers, creating that characteristic “cake-like” texture. Once thoroughly chilled, simply lift the cake out of the pan using the parchment paper overhang, slice into generous portions, and serve this irresistible no-bake caramel apple ice box cake.
Tips for Perfection and Customization
- Chill Your Cream and Bowl: For the best whipped cream, ensure your double cream (heavy cream) is ice cold, and even chill your mixing bowl and whisk attachment in the freezer for 10-15 minutes beforehand.
- Softened Cream Cheese: Always use room temperature, softened cream cheese to avoid lumps in your creamy mixture.
- Even Layers: Take your time to spread each layer evenly. This ensures every slice has a balanced distribution of all components.
- Biscuit Choice: While malted biscuits offer a unique flavor, feel free to experiment with other flat, crisp cookies like graham crackers, digestive biscuits, or even ginger snaps for a spicy kick.
- Caramel Quality: A good quality caramel sauce makes a significant difference. If you have time, making homemade caramel will elevate this dessert even further.
- Spice It Up: Don’t limit yourself to just cinnamon! A pinch of nutmeg, allspice, or a touch of pumpkin pie spice blend can add more depth to your apples.
- Add Nuts: Toasted chopped pecans or walnuts can be added between layers or sprinkled on top for an extra crunch and nutty flavor.
- Chocolate Drizzle: For an even richer dessert, a light drizzle of melted chocolate over the top alongside the caramel can be a fantastic addition.
Serving and Storage Suggestions
This Caramel Apple Ice Box Cake is best served chilled. You can garnish individual slices with a dollop of fresh whipped cream, an extra drizzle of caramel, or a sprinkle of cinnamon for an appealing presentation. It pairs wonderfully with a cup of coffee or tea, making it perfect for an afternoon treat or an after-dinner indulgence.
Store any leftover cake in an airtight container in the refrigerator for up to 3-4 days. While it’s best enjoyed within the first two days when the biscuits have the perfect cake-like texture, it will still be delicious beyond that. Freezing is not recommended as the texture of the cream cheese mixture and apples may change upon thawing.
Frequently Asked Questions (FAQ)
- Can I use a different type of apple? Yes, firm apples like Honeycrisp, Fuji, or Braeburn also work well. Avoid overly soft or mealy apples.
- Can I make this dairy-free? While the recipe relies heavily on dairy, you might find success with plant-based heavy cream alternatives and dairy-free cream cheese, though the texture and flavor may vary.
- What if my cream cheese mixture is too runny? Ensure your cream cheese was softened and your double cream was very cold. Over-whipping can sometimes make it too soft. If it’s still too runny, try chilling it for 30 minutes before layering, or add a tiny bit more icing sugar.
- How far in advance can I make this? You can prepare this cake up to 24 hours in advance. The longer it chills, the better the flavors meld and the biscuits soften.
Conclusion: Your New Favorite No-Bake Dessert
This Caramel Apple Ice Box Cake truly embodies the best of no-bake desserts: it’s incredibly easy, requires minimal effort, and delivers maximum flavor. It combines the comforting taste of spiced apples with the luxurious richness of caramel and cream, all brought together by the satisfying texture of malted biscuits. Whether you’re a seasoned baker or a complete beginner, this recipe promises a show-stopping dessert that will delight your taste buds and impress your guests. So go ahead, gather your ingredients, follow these simple steps, and prepare to fall in love with your new favorite caramel dessert. Enjoy the process, and more importantly, enjoy every single delicious bite!