
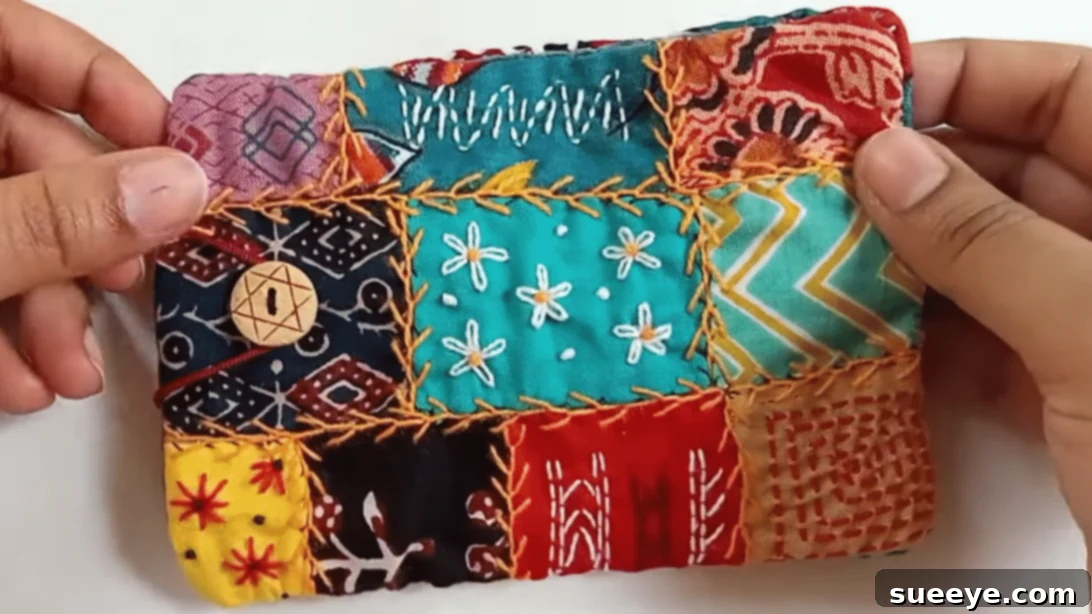
Are you searching for a creative and rewarding sewing project that won’t break the bank or overwhelm you with complex steps? Perhaps you’ve accumulated a collection of beautiful fabric scraps and are looking for the perfect way to give them a new life. Look no further! A few weeks ago, I embarked on a mission to craft a small pouch or wallet, only to find that many tutorials were either too intricate for a quick project or demanded a long list of specific materials.
Fortunately, my search led me to an ingenious DIY project idea shared by Stitch Workshop on YouTube. This particular tutorial immediately stood out because it promised not only a super simple and utterly beginner-friendly approach but also made brilliant use of those precious fabric scraps we all tend to hoard. It’s a fantastic example of upcycling in action, turning leftover materials into something both functional and aesthetically pleasing.
I wasted no time in giving this charming project a try, and I can genuinely say it was one of the cutest and most satisfying endeavors I’ve ever undertaken. The result was a unique, personalized wallet, with its handmade embroidery adding a special touch and its “scrappy” aesthetic exuding a rustic yet elegant appeal. This versatile concept isn’t limited to just a small wallet; you can easily scale the design to create a larger pouch, a tiny coin purse, or even adapt it into a small bag. The possibilities for customization are endless!
Dive into the detailed steps below to learn how to craft your very own scrappy wallet, and be sure to watch the full video tutorial for visual guidance and additional tips that will make your sewing experience even smoother.
RELATED: Transform Old Altoids Tins into a Unique DIY Wallet
Why Choose a Scrappy Wallet Project?
Opting for a scrappy wallet project offers a myriad of benefits beyond just creating a new accessory. It’s an incredibly sustainable choice, as it helps reduce textile waste by utilizing fabric remnants that might otherwise be discarded. This eco-friendly approach not only cleans out your stash but also instills a sense of accomplishment knowing you’ve given materials a second life.
For beginners in sewing, this project is a true confidence builder. Its straightforward steps and forgiving nature make it an ideal starting point for learning basic sewing techniques like straight stitching, turning corners, and adding closures. Plus, working with smaller pieces of fabric is often less intimidating than handling large cuts. The freedom to mix and match various colors and patterns also encourages creativity, allowing you to design a wallet that truly reflects your personal style or that of a loved one.
Moreover, a handmade scrappy wallet makes for a thoughtful and unique gift. Each piece, with its distinct fabric combination and optional embroidery, tells a story and carries a personal touch that store-bought items simply cannot replicate. It’s a practical item that can be used daily, serving as a constant reminder of your craftsmanship and care. From holding coins and cards to storing small essentials, this versatile pouch is a delightful addition to anyone’s everyday carry.
Materials for Your Handmade Scrappy Wallet:
Gathering your materials is the first exciting step in bringing your scrappy wallet to life. The beauty of this project lies in its simplicity and the use of readily available items, many of which you might already have around your home or in your sewing stash. Here’s what you’ll need:
- Fabric (for the main body and lining): Choose a sturdy cotton fabric for the main piece, as it will serve as the base for your scrap fabric design. For the lining, a lighter cotton or broadcloth in a complementary color will work perfectly. The size of this fabric will dictate the final dimensions of your wallet.
- Assorted Fabric Scraps: This is where the “scrappy” magic happens! Collect small pieces of fabric in various colors, patterns, and textures. Cotton scraps work best for ease of sewing, but you can experiment with other lightweight fabrics for added interest. Even tiny pieces are valuable for this project.
- Sharp Scissors: Essential for precise cutting of both your main fabric and the small scraps. A good pair of fabric shears will make a significant difference.
- Needle and Thread: A universal sewing machine needle (size 70/10 or 80/12) is generally suitable for cotton fabrics. For hand sewing, use a sharp hand sewing needle. Choose a strong, all-purpose polyester thread that matches or complements your fabrics.
- A Small Piece of Cord: This will be used to create the loop closure for your wallet. Approximately 4-6 inches of thin cord (like rattail cord, waxed cotton cord, or even a piece of ribbon) will suffice.
- Button: Select a button that is functional for your closure and aesthetically pleasing. Consider its size, color, and design to ensure it complements your scrappy fabric choices.
Essential Tools for Sewing Success:
While the materials are key, having the right tools on hand will streamline your sewing process and ensure a professional finish. These tools are common in most sewing kits and will be invaluable for this project:
- Sewing Machine (Optional but Recommended): While this project can be hand-sewn, a sewing machine will make the process much quicker and result in more consistent stitches, especially for beginners.
- Iron and Ironing Board: Pressing your fabric at various stages is crucial for crisp seams, accurate measurements, and a polished final look. Don’t skip this step!
- Pins or Fabric Clips: To hold your fabric pieces securely in place before stitching, preventing shifting and ensuring accurate alignment.
- Ruler or Measuring Tape: For precise measurement of your main fabric and for ensuring your scraps are consistently sized if you choose.
- Fabric Marker or Chalk: To mark cutting lines, stitch lines, or placement points on your fabric, which can be easily removed.
- Seam Ripper: Every sewist’s best friend! Inevitable mistakes happen, and a seam ripper allows you to easily unpick stitches without damaging your fabric.
How to Make a Charming Scrappy Wallet: Step-by-Step Tutorial
Step 1: Prepare Your Fabrics and Start the Scrappy Design
Begin by preparing your fabric scraps. For a cohesive look, it’s often helpful to trim your assorted fabric scraps into small, manageable squares or rectangles of a similar size, though varying sizes can also create a wonderfully eclectic aesthetic. Aim for pieces that are roughly 1.5 to 2.5 inches. Next, decide on the desired finished size for your wallet. Cut your main or base fabric to this chosen dimension. For instance, if you want a finished wallet that is 4 inches by 8 inches when open, cut your main fabric slightly larger to allow for seam allowances, perhaps 4.5 inches by 8.5 inches. Take one of your small scrap fabric pieces. Fold one of its sides cleanly to the back, about 1/8 to 1/4 inch, and press it flat. Position this folded scrap piece onto your main base fabric, near one edge, and stitch it down firmly. This initial stitch establishes your foundation for the scrappy design.
Step 2: Build Your Scrappy Panel with Care and Creativity
Continue working with your scrap fabric pieces. For each new square you add, fold its edges to the back as you go, creating neat, finished edges. Carefully stitch the scrap fabric onto the main base fabric, ensuring all four sides are securely attached. This process is akin to a raw-edge appliqué or patchwork technique, where each scrap is meticulously layered and stitched down. Keep adding your scrap fabric squares, overlapping them slightly if desired, until the entire surface of your main base fabric is completely covered. Press your newly created scrappy panel gently to ensure all pieces lie flat. Once your base is fully covered, this is an excellent opportunity to add some personalized embroidery. As demonstrated in the video tutorial, simple running stitches, decorative crosses, or even small free-form designs can enhance the visual texture and uniqueness of your wallet. Choose thread colors that either blend in or boldly contrast with your fabric scraps to create different effects.
Step 3: Construct the Lining and Assemble the Wallet Body
Now, it’s time to prepare the interior of your wallet. Cut your chosen lining fabric to the exact same size as your finished scrappy front piece. With both the scrappy panel and the lining piece ready, lay them together with their right sides (the pretty sides) facing each other. Align all edges carefully. Stitch them together around all four sides, using a consistent seam allowance (typically 1/4 inch). Crucially, remember to leave a small opening, about 2-3 inches wide, along one of the longer sides. This gap is essential for turning the wallet right side out later. Once stitched, carefully trim off any excess fabric around the seam allowances, especially at the corners. Clip the corners diagonally, close to the stitching line but without cutting through it, to reduce bulk and ensure sharp, crisp corners when turned. Then, gently reach into the opening and turn the entire piece right side out. Use a point turner or a dull pencil to carefully poke out all the corners nicely, creating a clean, defined shape. Press the entire piece flat, ensuring the edges of the opening are neatly tucked in.
Step 4: Prepare the Cord Closure and Finish the Opening
Take your small piece of cord and tie a secure knot at each end. To prevent the cord from fraying over time, you can carefully use a flame (like from a lighter) to gently melt and seal the ends of synthetic cords, or use a dab of fabric glue for natural fibers. Be very cautious if using a flame. Now, revisit the opening you left on the front piece in Step 3. Neatly tuck in the raw edges of this opening, so they are flush with the stitched seam. Topstitch this opening closed, very close to the edge, attaching each knotted end of the cord securely into the seam at the start and finish of your topstitching. Position the cord so that its loop extends outward from the wallet’s future opening. This cord will serve as the loop for your button closure. Ensure the cord is firmly attached and centered for optimal functionality and appearance. Once this is done, set this piece aside, as it forms the main flap or front of your wallet.
Step 5: Create the Back Panel and Secure the Button
For the back of your wallet, you will create a second piece similar to the front piece, but without the cord. This can be another scrappy panel or simply a solid piece of fabric that matches your lining or main fabric. Repeat the process from Steps 1-3 to create this second panel, ensuring it is the same size as your front piece. This time, you can stitch it completely closed, as it won’t have an opening for turning. Once both panels are complete, it’s time to join them. Lay the front piece (with the cord) and the back piece with their right sides together. Stitch them around three of their four edges, leaving the short edge where the cord is attached completely open. This open edge will become the main opening of your wallet. Turn the combined piece inside out through this opening. Gently bring the cord over to the front of the wallet, allowing it to naturally extend over the flap. With the wallet closed and the cord looped over, measure carefully where the button should be sewn on the main body of the wallet to create a snug and secure closure. Mark this spot precisely. Finally, firmly sew your chosen button onto that marked part, ensuring it aligns perfectly with the cord loop. Reinforce the button stitching to withstand frequent use. Your handmade scrappy wallet is now complete!
Customizing Your Scrappy Wallet: Endless Possibilities
The beauty of this DIY scrappy wallet project lies in its incredible adaptability. Once you’ve mastered the basic technique, you can unleash your creativity and customize every aspect to make it truly your own. Consider experimenting with different types of closures: instead of a button and cord, you could integrate a snap button, a small piece of Velcro, or even a zipper for added security. Explore various embellishments beyond simple embroidery – think small fabric appliques, beads, or decorative stitches to add texture and visual interest to your scrappy panel.
Don’t limit yourself to a single size either. By simply adjusting the dimensions of your main fabric, you can create a range of useful pouches: a tiny coin purse, a compact cardholder, a medium-sized travel pouch for toiletries, or even a larger clutch. You might also want to add internal pockets for better organization, perhaps a small slip pocket for bills or a divider for cards. Playing with different fabric types for your scraps – incorporating denim, linen, or even small pieces of faux leather – can yield vastly different aesthetics and durability. This project is a fantastic canvas for your imagination!
Tips for Sewing Success, Especially for Beginners:
Embarking on a sewing project, especially as a beginner, can be both exciting and a little daunting. Here are some invaluable tips to ensure your scrappy wallet project is a smooth and enjoyable experience, leading to a result you’ll be proud of:
- Press, Press, Press: This cannot be stressed enough! Ironing your fabric pieces before cutting and pressing your seams after each stitching step makes a huge difference. It ensures accuracy, removes wrinkles, and gives your finished project a crisp, professional look.
- Use Sharp Tools: Dull scissors can fray fabric and lead to inaccurate cuts. A sharp pair of fabric shears is a worthwhile investment. Similarly, use a fresh, sharp needle in your sewing machine; a dull needle can skip stitches or damage your fabric.
- Consistent Seam Allowance: Strive for a consistent seam allowance (e.g., 1/4 inch or 3/8 inch as indicated in the pattern or tutorial) throughout your project. This is key to ensuring your pieces fit together correctly and your finished dimensions are accurate.
- Pin Generously: Don’t be shy with pins or fabric clips. Use them to hold fabric layers securely together before stitching, especially when working with multiple layers or curves. This prevents shifting and helps maintain alignment.
- Take Your Time: Sewing is not a race. Go slowly, especially when stitching corners or intricate details. If you’re using a sewing machine, don’t be afraid to use a slower speed setting. Patience leads to precision.
- Test Stitches: Before sewing on your actual project fabric, always test your stitch length and tension on a scrap piece of the same fabric. This helps you catch and adjust any machine issues beforehand.
- Embrace the Seam Ripper: Mistakes are part of learning. Don’t be afraid to use your seam ripper if a stitch isn’t quite right. It’s better to unpick and redo than to settle for a flawed result.
- Watch the Video: For visual learners, watching the accompanying video tutorial from Stitch Workshop provides invaluable insights and demonstrations of techniques that might be harder to grasp from text alone.
Caring for Your Handmade Scrappy Wallet:
To ensure your beautiful, handmade scrappy wallet lasts for years to come, proper care is essential. Since it’s made from various fabric scraps, it’s generally best to hand wash your wallet in cool water with a mild detergent. Gently scrub any soiled areas, then rinse thoroughly. Avoid harsh wringing, as this can distort the shape. Lay it flat on a clean towel to air dry, reshaping it if necessary. If ironing is needed, use a low to medium heat setting, possibly with a pressing cloth, especially if your scraps include delicate materials or embroidery. This gentle approach will help maintain the vibrancy of the colors and the integrity of your stitches, preserving your unique creation.
Congratulations on completing your easy DIY scrappy wallet! This project is a testament to how simple materials and a little creativity can result in a truly unique and functional accessory. Whether you keep it for yourself, gift it to a friend, or make several in different styles, each wallet will carry a special charm of its own. Remember, the journey of sewing is as rewarding as the final product. So keep those fabric scraps handy, and continue exploring the wonderful world of handmade crafts!
*All image credit belongs to Stitch Workshop via YouTube. Follow and subscribe to her channel for more inspiring and easy-to-follow DIY sewing projects!