
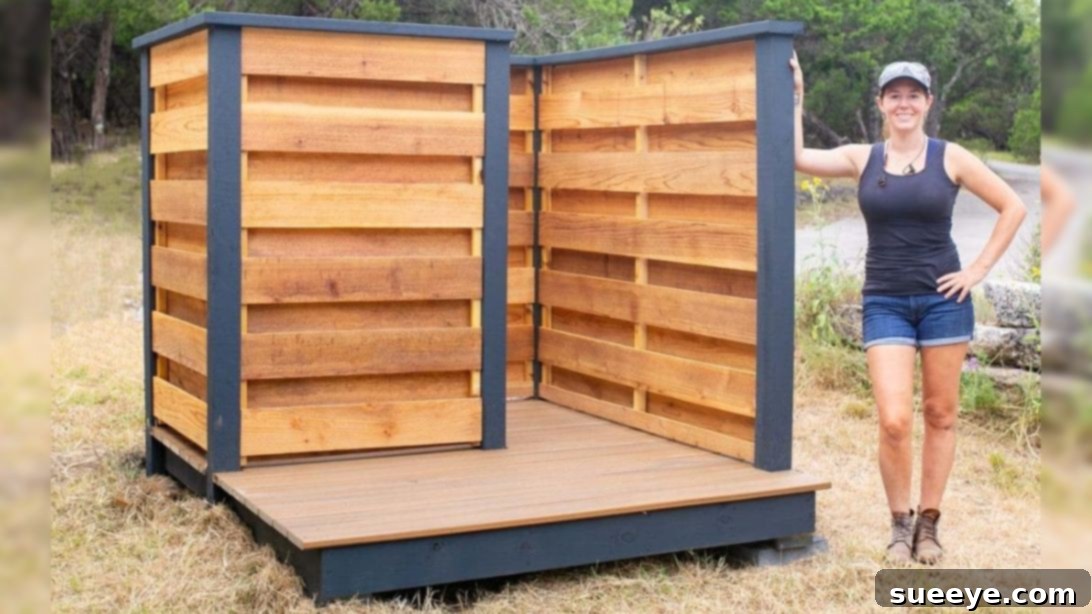
How To Build An Outdoor Shower: Your Ultimate DIY Guide for Summer Bliss
Imagine stepping out of your pool on a scorching summer day or returning from a sandy beach trip, and instead of tracking dirt and chlorine through your house, you have a refreshing, private outdoor shower waiting for you. This summer, transform your backyard into a personal oasis with a DIY outdoor shower. Not only does it offer unparalleled convenience for rinsing off after water activities, but it also provides a charming aesthetic touch to your outdoor living space. This comprehensive guide, inspired by the fantastic tutorial by April Wilkerson on YouTube, will walk you through every step of constructing a sturdy, functional, and beautiful outdoor shower that guarantees privacy and comfort.
Why an Outdoor Shower is a Must-Have for Your Home
An outdoor shower is more than just a luxury; it’s a practical addition that significantly enhances your home’s functionality and your family’s quality of life, especially during warmer months. Here are just a few reasons why you should consider building one:
- Unmatched Convenience: Easily rinse off after swimming in the pool, a dip in the ocean, or even after a sweaty gardening session. This prevents dirt, sand, chlorine, or mud from being tracked into your indoor living spaces, keeping your home cleaner.
- Enhanced Hygiene: A quick rinse before entering the pool can also help keep pool water cleaner by washing off body oils and lotions.
- Ultimate Privacy: With properly constructed walls, an outdoor shower provides a secluded spot for a refreshing wash, offering an experience akin to a spa retreat in your own backyard.
- Pet-Friendly Solution: It’s the perfect spot to wash your furry friends without making a mess in your indoor bathroom.
- Gardening Companion: Gardeners will appreciate a convenient spot to clean off tools or themselves after a day in the dirt.
- Refreshing Escape: On particularly hot days, a cool outdoor shower can be a simple yet incredibly effective way to cool down and re-energize.
- Boosts Property Value & Aesthetics: A well-designed outdoor shower adds character and resort-like appeal to your property, potentially increasing its allure and value.
Planning Your Outdoor Shower Project: Key Considerations
Before you even pick up a tool, careful planning is crucial for a successful and long-lasting outdoor shower. Consider these essential aspects:
Location, Location, Location
Choosing the right spot is paramount. Look for an area that offers:
- Proximity to Water Source: Ideally, close to an existing water line for easier plumbing installation.
- Adequate Drainage: This is critical. Water needs to drain away efficiently to prevent pooling, erosion, and potential issues with your home’s foundation. Consider a spot with natural slope or where you can easily install a gravel bed or French drain. Avoid areas near septic tanks or where runoff could damage plants you wish to preserve.
- Sunlight Exposure: A sunny spot can naturally warm the water in your shower’s pipes, offering a pleasantly lukewarm rinse even if you only connect to a cold water line.
- Privacy: Ensure the chosen location provides natural privacy from neighbors or high-traffic areas, or plan for adequate wall coverage.
Water Supply and Drainage Solutions
Decide whether you want hot and cold water or just cold. A simple cold water hookup is easier, often connecting to a garden hose spigot. For hot water, you might need a plumber to tap into your home’s hot water line or consider an on-demand tankless water heater specifically designed for outdoor use. For drainage, a simple gravel bed is often sufficient for gray water, but local regulations might require connecting to a proper drain or a gray water system.
Local Building Codes and Permits
Always check with your local municipality for any building codes, zoning restrictions, or permits required for outdoor structures and plumbing installations. This step can save you significant headaches down the line.
Design and Aesthetics
Think about how the shower will integrate with your existing backyard design. Will it match your deck, fence, or house siding? Consider materials that are durable, weather-resistant, and aesthetically pleasing. The design can range from a simple, open rinse-off station to a fully enclosed, private cabin.
Essential Materials and Tools for Your DIY Outdoor Shower
To successfully build your outdoor shower, you’ll need a combination of basic carpentry tools and specific building materials. Here’s a comprehensive list:
Materials:
- Lumber Posts: For the main structural framework and privacy walls (pressure-treated wood, cedar, or redwood are excellent choices for outdoor durability).
- Decking Boards: For the shower floor (again, pressure-treated, cedar, or composite decking).
- Paver Blocks: Large, sturdy blocks to serve as the foundation for your shower floor, ensuring stability and preventing direct contact between wood and soil.
- Gravel: For the drainage bed underneath the deck.
- Varnish or Exterior Paint/Stain: To protect the wood from weathering, moisture, and UV damage.
- Screws: Exterior-grade, rust-resistant screws (e.g., galvanized or stainless steel) for all connections.
- Joist Hangers: Metal connectors to securely support the deck joists.
- Plumbing Supplies: (Shower head, faucet, pipes, fittings, PEX tubing or copper pipes, water line connector) – specifics will depend on your plumbing setup.
- Optional: Shelves, hooks, towel rack, privacy screens, decorative elements.
Tools:
- Circular Saw: Essential for cutting lumber posts and decking boards to size.
- Drill: For pre-drilling holes and driving screws.
- Level: Crucial for ensuring your foundation and frame are perfectly level.
- Measuring Tape: For accurate measurements.
- Shovel: For digging the foundation area.
- Post Hole Digger (Optional): If you plan to set posts directly into the ground with concrete.
- Painter’s Tape & Masking Film: For protecting areas you don’t want painted or varnished.
- Paint Brushes/Rollers: For applying paint or varnish.
- Safety Glasses & Gloves: Always prioritize personal safety.
- Pencil/Marker: For marking cuts.
- Speed Square/Framing Square: For ensuring accurate 90-degree cuts and angles.
Step-by-Step Construction Guide: Building Your Outdoor Shower
Follow these detailed steps to bring your DIY outdoor shower to life, creating a functional and beautiful addition to your backyard.
Step 1: Site Preparation and Foundation Laying
Begin by clearly defining the footprint of your outdoor shower. Mark the area where the shower will stand, considering both its size and the space required for privacy walls. Using a shovel, start digging the designated land to create a level and solid base. Aim for a depth of about 6-8 inches, removing any rocks, roots, or debris. Once excavated, compact the soil thoroughly to ensure a stable foundation. This crucial step prevents future settling and maintains the structural integrity of your shower. Next, strategically place four large paver blocks at the corners of your planned shower floor. These blocks will serve as the primary base, elevating the wooden structure off the ground to prevent rot and provide a level surface. Ensure they are perfectly level with each other using a spirit level, adjusting the soil underneath as needed. The spacing of these blocks should correspond to the desired width and length of your shower floor frame.
Step 2: Constructing the Shower Deck Frame
With your paver blocks securely in place, it’s time to build the sturdy frame for your shower deck. Cut four pieces of lumber to create the perimeter of your shower floor, forming a square or rectangle atop the paver blocks. Use exterior-grade screws to secure these pieces together at the corners, ensuring the frame is square and rigid. Next, add intermediate boards, known as joists, between the main frame pieces. These joists provide crucial support for the decking boards and distribute weight evenly. Space your joists according to the manufacturer’s recommendations for your decking material, typically 16-24 inches on center. To enhance the structural integrity and load-bearing capacity of your deck frame, install metal joist hangers. These U-shaped connectors securely attach the ends of the joists to the main frame, preventing twisting and ensuring long-term stability.
Step 3: Erecting the Support Posts and Top Structure
Once the deck frame is complete, it’s time to install the vertical support posts that will form the corners of your shower enclosure. Cut four lumber posts to your desired height, typically around 7-8 feet for adequate privacy and head clearance. Position each post at a corner of your deck frame and securely attach them using robust exterior-grade screws, ensuring they are plumb (perfectly vertical) with a level. To further stabilize these posts and create the top structure of your shower, connect them to each other at the top. This can be done by cutting and attaching additional boards horizontally between the top ends of the posts, creating a strong upper frame. This not only locks the posts firmly in place but also provides a structure for future additions like a shower curtain rod or lighting.
Step 4: Preparing the Drainage Bed and Laying the Decking Boards
Before installing the actual decking boards, prepare the area directly underneath the joists. Spread a layer of gravel, approximately 3-4 inches deep, across the ground beneath your framed deck. This gravel layer serves multiple purposes: it facilitates excellent drainage, preventing water from pooling and becoming stagnant; it helps suppress weed growth; and it significantly reduces muddy splash-back onto your legs and walls during use. Once the gravel is spread and leveled, begin laying your decking boards on top of the joists. Ensure that the boards are spaced evenly, typically with a gap of 1/8 to 1/4 inch, to allow for water drainage and wood expansion/contraction. Secure each decking board to the joists using two exterior-grade screws at every joist intersection. Use a circular saw to precisely cut any boards to length as needed.
Step 5: Building the Privacy Walls
Now, let’s construct the privacy walls that define your outdoor shower space. Cut lumber boards to the desired length for your wall panels. You have options for spacing: for maximum privacy, install boards close together with minimal gaps; for a more open, airy feel that still offers good coverage, space them about almost a board’s width apart. Start installing the boards vertically or horizontally, attaching them securely to the vertical support posts using exterior-grade screws. Ensure consistent spacing for a professional look. Continue around the planned wall sections, filling in the spaces as desired. If you opt for wider gaps, go to the other side of the wall and install boards in those spaces, effectively creating an overlapping slat design that offers privacy from all angles while still allowing for air circulation and light. This method provides excellent privacy without making the shower feel completely enclosed.
Step 6: Finishing Touches and Plumbing Installation
With the structure complete, it’s time for the finishing touches. If you’re spray painting your boards, carefully wrap any areas you wish to protect with masking film and painter’s tape to prevent overspray. Apply several coats of a high-quality exterior-grade varnish, paint, or stain to all wooden surfaces. This not only enhances the aesthetic appeal but, more importantly, protects the wood from moisture, UV rays, and general weathering, significantly extending the life of your outdoor shower. Once the finish is dry, you can personalize your shower by attaching practical elements such as shelves for soap and shampoo, hooks for towels and clothes, or even a small bench. Finally, move on to the plumbing for the shower. This is often the most technical part of the build. If you need detailed guidance on connecting to a water source, installing the shower head, faucet, and ensuring proper drainage, we highly recommend watching April Wilkerson’s video (specifically part two, if available, as she often breaks down complex steps) on YouTube. She provides an excellent visual guide to understanding the water system installation process. Ensure all connections are watertight to prevent leaks.
Maintenance and Care for Your Outdoor Shower
To ensure your DIY outdoor shower remains a cherished feature of your backyard for years to come, regular maintenance is key:
- Cleaning: Periodically clean the decking and walls with a mild soap and water solution to remove dirt, mildew, and mineral deposits.
- Re-sealing: Depending on your climate and the type of finish used, plan to reapply varnish, paint, or stain every 1-3 years to maintain protection against the elements.
- Drainage Check: Regularly inspect the gravel bed to ensure it’s free of debris and draining efficiently. Clear any blockages as needed.
- Winterizing: In colder climates, it’s crucial to properly winterize your outdoor shower to prevent pipes from freezing and bursting. This typically involves shutting off the water supply, draining all water from the pipes, and disconnecting the shower head.
- Structural Integrity: Periodically check all screws and connections for tightness and signs of wear. Address any loose components promptly.
Customization Ideas to Make Your Outdoor Shower Unique
Your DIY outdoor shower is a canvas for personal expression. Consider these ideas to make it truly your own:
- Lighting: Install solar-powered string lights or waterproof LED fixtures for ambiance and usability after dark.
- Seating: Add a small wooden bench inside the shower for convenience or a larger bench outside for changing.
- Planters & Greenery: Surround the shower base with water-loving plants or add vertical planters on the walls to integrate it beautifully with your landscape.
- Different Shower Heads: Experiment with rain shower heads, handheld wands, or even multiple heads for a luxurious experience.
- Curtains: While the walls provide privacy, a simple waterproof curtain can add an extra layer of seclusion or a pop of color.
- Towel Racks & Storage: Beyond hooks, consider a stylish wooden towel rack or a small waterproof cabinet for toiletries.
Building your own outdoor shower is a rewarding project that combines practical utility with the joy of DIY craftsmanship. It promises endless refreshing moments and a unique enhancement to your outdoor living space. Gather your materials, follow these steps, and get ready to enjoy the ultimate summer luxury right in your backyard, all thanks to your own hands and the inspiration from experts like April Wilkerson.
*All images are credited to April Wilkerson via YouTube. Give her channel a visit and subscribe for more amazing DIY projects!