
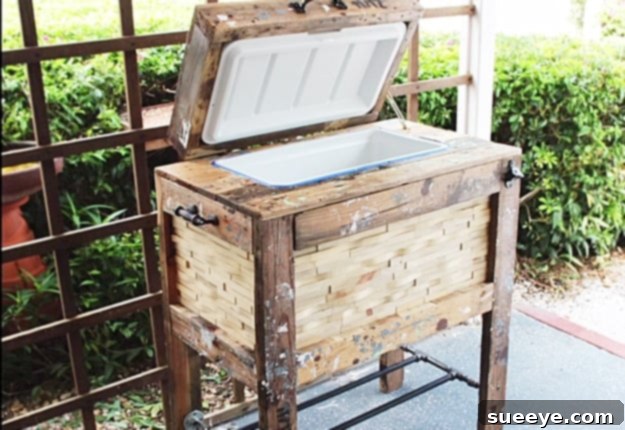
Build Your Own Rustic Pallet Cooler: The Ultimate DIY Outdoor Beverage Station
Imagine relaxing on your porch or back patio, enjoying the warmth of summer, with a cold drink always within arm’s reach. Now, imagine achieving this convenience without a brightly colored, cumbersome plastic cooler clashing with your meticulously crafted outdoor aesthetic. If the thought of a large, mass-produced cooler disrupting your rustic, farmhouse, or even modern industrial decor has been holding you back, then this DIY pallet furniture idea is precisely what you need. A custom-built pallet cooler not only seamlessly integrates with and elevates your outdoor decor, but it also provides an incredibly practical solution for keeping your beverages chilled and accessible. No more leaning over to fumble for a drink on the ground; your stylish new cooler will offer comfortable access and become a true centerpiece of your outdoor living space.
This project is perfect for anyone looking to enhance their backyard or patio with a piece that’s both functional and visually appealing. Whether you’re an experienced DIY enthusiast or just starting, the process is surprisingly straightforward, and the results are incredibly rewarding. What’s more, you don’t even need to purchase a brand new cooler for this project! This is an ideal solution for repurposing an old, beat-up cooler that’s too big to haul around but still perfectly functional, or even one you might find for a steal at a thrift store. Embrace sustainability, unleash your creativity, and craft a unique outdoor beverage station that reflects your personal style and meets your entertainment needs.
Why a DIY Pallet Cooler? More Than Just a Drink Holder
The appeal of a DIY pallet cooler extends far beyond its primary function of keeping drinks cold. It represents a confluence of design, sustainability, and practicality that can significantly improve your outdoor living experience.
Elevate Your Outdoor Aesthetics
One of the most compelling reasons to build a pallet cooler is its ability to instantly upgrade your outdoor decor. Unlike generic plastic coolers, which are often eyesores, a pallet cooler brings natural textures and a rustic charm that complements a wide range of styles. Whether your patio features a cozy farmhouse vibe, a rugged industrial look, or a laid-back bohemian aesthetic, the raw beauty of wood pallets can be stained, painted, or left natural to perfectly match your existing decor. It transforms a utilitarian object into a statement piece, creating a cohesive and inviting outdoor environment that feels both curated and comfortable.
Convenience at Your Fingertips
Beyond its looks, a pallet cooler offers unparalleled convenience. Designed to be elevated, it eliminates the need to constantly bend or stoop to grab a drink, making it a much more ergonomic solution, especially when entertaining guests. Many designs also incorporate additional features like a built-in bottle opener, side shelves for glasses or snacks, and even a discreet drainage spigot for easy cleaning. This thoughtful integration of features ensures that everything you need for a refreshing drink is right where you want it, enhancing your enjoyment of outdoor gatherings.
Sustainable & Budget-Friendly
In an age where sustainability is paramount, repurposing wood pallets stands out as an eco-conscious choice. Pallets are frequently discarded by businesses, making them an abundant and often free resource. By transforming them into a functional piece of furniture, you’re not only saving money but also diverting waste from landfills. This project is a testament to the beauty of upcycling, allowing you to create something valuable and stylish from materials that might otherwise be overlooked. Coupled with the ability to reuse an old cooler, this DIY project offers significant cost savings compared to purchasing new outdoor furniture or a high-end commercial cooler.
A Rewarding DIY Project
There’s immense satisfaction in creating something with your own hands. Building a pallet cooler is a manageable project that offers a tangible sense of accomplishment. It allows you to express your creativity, learn new skills, and end up with a unique piece that is perfectly tailored to your needs and space. It’s a project that brings joy not only in its creation but also in every use, as you enjoy the fruits of your labor with friends and family.
Gathering Your Resources: What You’ll Need
Before diving into construction, a thorough understanding of the materials and tools required will ensure a smooth and enjoyable building process. Planning ahead will save you time and potential frustration.
The Cooler Itself
The foundation of your pallet cooler is, naturally, the cooler itself. As mentioned, an old, well-loved plastic cooler is ideal. Look for one that’s still insulated and holds ice effectively, even if its exterior is scuffed or faded. Thrift stores, garage sales, and even your own attic or garage are excellent places to find suitable candidates. Consider the size carefully: a larger cooler will require more pallets and create a bigger unit, while a smaller one will be more compact. Ensure it has a drain plug for easy water removal, or be prepared to add one.
Pallets: The Heart of Your Project
The quantity of pallets needed will depend on the size of your chosen cooler and the complexity of your design. Generally, 3-5 standard-sized pallets should be sufficient for a medium-sized cooler. When selecting pallets, always prioritize safety:
- Look for “HT” (Heat Treated) stamps: This indicates the wood has been heat-treated to prevent pests, making it safe for indoor and outdoor use.
- Avoid “MB” (Methyl Bromide) stamps: Pallets treated with this chemical should be avoided as it can be toxic.
- Inspect for damage: Choose pallets that are relatively clean, free from significant rot, mold, or chemical spills.
- Source responsibly: Ask permission before taking pallets from businesses, as they often have their own recycling programs. Local construction sites, industrial parks, or pallet recycling centers are common sources.
Essential Tools
Having the right tools will make the disassembling and building process much easier and safer. Here’s a list of commonly required tools:
- Safety glasses and gloves (non-negotiable for pallet work!)
- Pry bar or pallet buster (for disassembling pallets)
- Hammer
- Circular saw or jigsaw (for cutting wood to size)
- Drill/driver (for pre-drilling and driving screws)
- Measuring tape and pencil
- Sander or sandpaper (for smoothing rough edges)
- Wood clamps (helpful for holding pieces while assembling)
Hardware & Fasteners
These components will hold your pallet cooler together and add functionality:
- Wood screws (various lengths, appropriate for outdoor use and treated wood)
- Wood glue (waterproof for outdoor durability)
- Hinges (for the cooler lid, choose sturdy outdoor-rated ones)
- Bottle opener (optional, but a popular addition)
- Drainage spigot (if your cooler doesn’t have one, or if you want to extend it)
- Handles (for the lid or sides, if desired)
Finishing Touches
To protect your pallet cooler from the elements and enhance its aesthetic appeal, consider these finishing options:
- Wood stain (to achieve a desired color and protect the wood)
- Waterproof sealant or outdoor varnish (crucial for longevity in outdoor conditions)
- Outdoor paint (if you prefer a solid color finish)
- Casters/wheels (optional, for easy mobility)
Step-by-Step Guide to Building Your Pallet Cooler
While specific measurements will vary based on your cooler’s dimensions, this general outline provides a roadmap for constructing your custom pallet cooler. Always measure twice and cut once!
Step 1: Disassemble & Prepare Your Pallets
This is often the most labor-intensive part. Carefully disassemble your pallets using a pry bar or pallet buster. The goal is to separate the deck boards from the stringers with as little damage as possible. Once separated, remove any old nails, screws, or staples. Sand all the boards thoroughly to remove splinters, rough patches, and any grime, ensuring a smooth and safe surface for handling and finishing.
Step 2: Build the Cooler Frame
Begin by constructing a sturdy base for your cooler. This will typically consist of a rectangular frame made from the pallet wood, sized to precisely fit the bottom of your cooler. Next, construct four corner posts that will form the vertical structure of your cooler box. These posts will determine the final height of your cooler stand. Attach horizontal support pieces between the posts to create the side and back walls of the frame, leaving an opening at the top for the cooler and a space at the bottom for shelves or just aesthetic appeal. Ensure the frame dimensions are slightly larger than your cooler to allow for easy insertion and removal.
Step 3: Integrate the Cooler
Once your basic frame is built, create a lip or support structure inside the frame that your cooler can rest on. This ensures the cooler sits securely within the wooden box, rather than simply dropping to the bottom. Measure the cooler’s dimensions precisely and cut boards to create a snug fit. Install these support boards around the inside perimeter of your frame, at a height that allows the top edge of your cooler to be flush or slightly below the top edge of your wooden frame. Test fit your cooler to ensure it slides in and out easily but remains stable when in place.
Step 4: Construct the Lid
The lid is a critical component, not just for aesthetics but for insulation. Cut pallet boards to create a top surface that fits perfectly over the opening of your cooler, with a slight overhang for a finished look. For added insulation, you might consider attaching a piece of foam insulation to the underside of the lid. Attach sturdy outdoor-rated hinges to the back of the lid and the back of your cooler frame. Ensure the lid opens smoothly and can be propped open if desired.
Step 5: Add Functional Details
This is where you can truly personalize your cooler. Attach a bottle opener to one of the side panels. If your cooler has a drain plug, consider extending it through the pallet wood frame with a short length of hose and a spigot for easy drainage. You can also add side handles, hooks for towels, or even small shelves below the cooler for storing additional items like cups or sunscreens.
Step 6: Sand & Finish
With the construction complete, give your entire pallet cooler a final sanding to smooth any remaining rough spots. This is crucial for a professional finish and to prevent splinters. Apply several coats of a high-quality outdoor wood stain or paint, followed by a marine-grade sealant or exterior varnish. This step is vital for protecting the wood from moisture, UV rays, and general wear and tear, significantly extending the life of your DIY pallet cooler. Allow ample drying time between coats.
Personalize Your Outdoor Oasis: Customization Ideas
One of the greatest joys of DIY is the ability to customize your project to perfectly match your vision. Here are some ideas to make your pallet cooler truly unique:
- Stains & Paints: Experiment with different wood stains to achieve various looks, from a dark, rich espresso to a light, natural oak. Alternatively, paint it a vibrant color to make a bold statement, or a soft pastel for a shabby-chic vibe.
- Hardware: Choose hinges, handles, and bottle openers that complement your style. Rustic wrought iron, sleek stainless steel, or antique brass can dramatically alter the look.
- Additional Storage: Incorporate pull-out drawers, open shelving, or a built-in caddy for utensils, napkins, or condiment bottles.
- Mobility: Add heavy-duty casters or wheels to the base, making your cooler easy to move around your patio or deck for different occasions.
- Countertop Surface: Instead of a simple wood lid, consider tiling the top with decorative ceramic tiles, adding a piece of slate, or even integrating a small cutting board section for drink garnishes.
- Lighting: Integrate solar-powered LED strip lights under the lid or around the base for a magical glow during evening gatherings.
- Built-in Planters: For a truly integrated garden look, you could add small planters to the sides of the cooler for herbs or decorative plants.
Safety First: Working with Pallets
While pallet projects are rewarding, safety should always be your top priority. Always wear appropriate personal protective equipment, including safety glasses to protect against flying debris and sturdy gloves to prevent splinters and cuts. Be mindful of hidden nails or staples when disassembling pallets. Use power tools responsibly and according to manufacturer instructions. Most importantly, always double-check the pallet markings to ensure you are working with heat-treated (HT) pallets and avoiding chemically treated (MB) ones.
Maintenance for Longevity
To ensure your DIY pallet cooler stands the test of time and continues to enhance your outdoor space for years to come, a little maintenance goes a long way:
- Regular Cleaning: Wipe down the exterior with a damp cloth periodically to remove dust, pollen, and spills. Clean the interior of the cooler after each use.
- Re-sealing/Staining: Depending on your climate and exposure to the elements, plan to reapply your sealant, varnish, or stain every 1-2 years. This will protect the wood from moisture, prevent rot, and keep it looking fresh.
- Winter Storage: In areas with harsh winters, consider covering your pallet cooler with a waterproof cover or storing it in a garage or shed during the off-season to protect it from extreme cold and prolonged moisture.
- Check Hardware: Periodically tighten any loose screws and inspect hinges and other hardware for signs of rust or wear.
Watch and Learn: Visual Guidance for Your Project
—- VIDEO TUTORIALS BELOW —-
For many DIY projects, visual aids can be incredibly helpful. While written instructions provide a clear guide, seeing the steps in action can clarify complexities and boost your confidence. Numerous online video tutorials demonstrate the process of building a pallet cooler, often showcasing different designs and techniques. These resources can be invaluable, offering practical tips for disassembling pallets safely, making precise cuts, and assembling the components. Watching a video before you start, and referencing it throughout your build, can help you visualize each stage, anticipate challenges, and learn best practices directly from experienced crafters. Look for videos that match your cooler’s size or your desired design aesthetic to gain the most relevant insights.
Creating your own DIY pallet cooler is more than just a home improvement project; it’s an investment in your outdoor lifestyle. It transforms a simple cooler into a stylish, functional, and conversation-starting piece of furniture that seamlessly blends with your rustic decor. Enjoy the satisfaction of building something beautiful and practical with your own hands, knowing you’ve contributed to a more sustainable world by repurposing materials. Get ready to impress your guests, enjoy endless cold drinks, and elevate your outdoor living experience with this unique and rewarding pallet creation. Your backyard oasis is calling!