
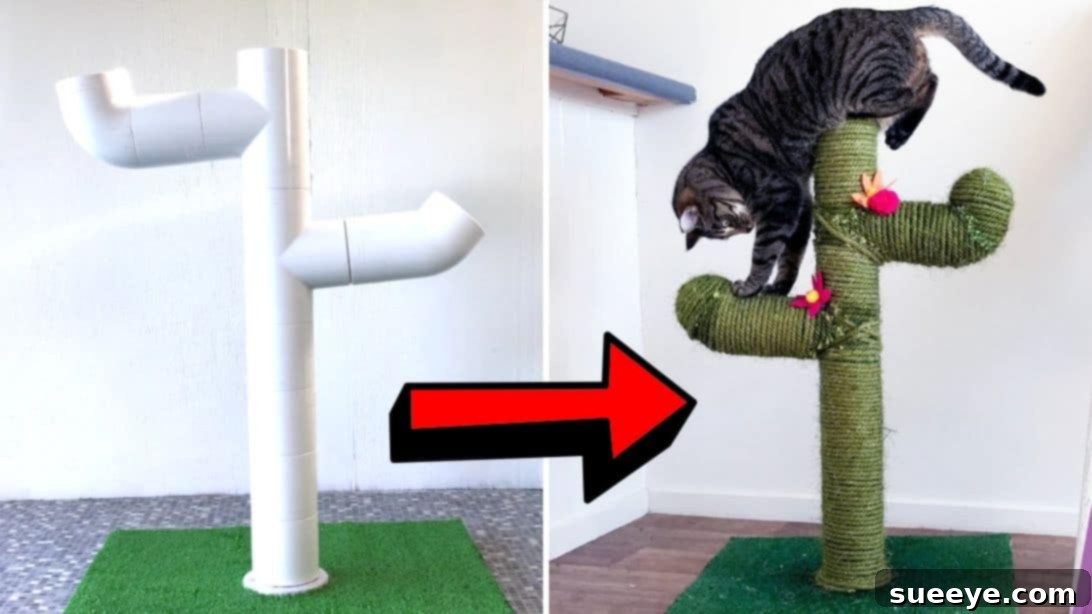
Pawsitively Perfect: Craft Your Own Adorable & Durable DIY Cactus Cat Scratching Post with PVC Pipes
Every cat owner knows the familiar struggle: beloved feline friends have an innate, undeniable urge to scratch. Whether it’s the leg of your dining table, the arm of your favorite couch, or the delicate fibers of your rug, cats will seek out surfaces to satisfy this essential instinct. Rather than battling this natural behavior, why not channel it into a constructive and stylish outlet? This comprehensive guide will walk you through building a charming, sturdy, and highly effective DIY cactus cat scratching post using readily available PVC pipes. Not only is this project more budget-friendly and robust than many store-bought alternatives, but its unique cactus design will also add a touch of adorable whimsy to your home décor, making it a win-win for both you and your cherished pet. Get ready to transform ordinary materials into an extraordinary piece of cat furniture that your furry companion will adore!
The Indispensable Need: Why Cats Scratch
Understanding why cats scratch is the first step toward providing them with appropriate outlets. Scratching is not merely a destructive habit; it’s a deeply ingrained and vital behavior for felines, serving several crucial purposes:
- Nail Health: When cats scratch, they remove the outer layer of their claws, revealing sharper, healthier nails underneath. This process is essential for maintaining optimal claw condition.
- Stretching and Exercise: Scratching posts allow cats to fully extend their bodies, stretching their back, shoulder, and leg muscles. It’s a full-body workout that keeps them agile and flexible.
- Territorial Marking: Cats have scent glands in their paws. When they scratch, they deposit their unique scent, marking their territory. This visual and olfactory signal communicates their presence to other felines.
- Stress Relief and Enjoyment: Scratching can be a form of stress relief and pure enjoyment for cats. It’s a satisfying activity that helps them unwind and expend energy.
Without an appropriate scratching surface, cats will inevitably turn to your furniture, carpets, or walls. Providing a dedicated, attractive, and sturdy scratching post like our DIY cactus design is crucial for redirecting this natural behavior and protecting your home investments.
Unleash Your Creativity: The Benefits of a DIY Cactus Scratcher
While the market offers a plethora of cat scratching posts, opting for a DIY project, especially one as unique as a cactus design, comes with a host of advantages:
- Cost-Effectiveness: Store-bought scratching posts, particularly those with unique designs or sturdy construction, can be surprisingly expensive. This DIY project utilizes common, affordable materials like PVC pipes, wood, and rope, allowing you to create a high-quality product at a fraction of the cost.
- Superior Durability: Many commercial scratchers can be flimsy and quickly fall apart under the enthusiastic attack of a playful cat. By constructing your own, you can ensure a robust and stable base, secure pipe connections, and ample weight to prevent tipping, guaranteeing a long-lasting scratching solution.
- Customization Potential: This project offers unparalleled opportunities for personalization. Choose your preferred colors for paint and rope, add unique embellishments, or even adjust the height and number of “branches” to perfectly suit your cat’s size and your home’s aesthetic.
- Aesthetic Appeal: Let’s face it, some cat furniture can be an eyesore. This cactus design is not only functional but genuinely adorable, adding a whimsical and charming element to your living space. It’s pet furniture that doubles as quirky home decor!
- The Joy of Creation: There’s immense satisfaction in crafting something with your own hands, especially when it benefits your beloved pet. This project is accessible even for novice DIY enthusiasts, making it a rewarding endeavor.
Embrace the challenge and reward yourself and your cat with a bespoke scratching post that truly stands out!
Gather Your Tools & Treasures: What You’ll Need
Before embarking on this creative journey, ensure you have all the necessary materials and tools ready. Sourcing these items is straightforward, and many might already be lurking in your garage or local hardware store. Here’s a detailed list:
- Wooden Board: This will serve as the sturdy foundation for your cactus. Opt for a piece that is thick and wide enough to provide excellent stability, preventing your finished scratcher from wobbling or tipping over. A square or round piece around 12-16 inches (30-40 cm) across and at least ¾ inch (2 cm) thick is ideal.
- Light Bulb Socket: While unconventional for a scratch post, the original design incorporates this for attaching the initial PVC pipe segment securely to the wooden base. Choose a standard screw-in socket without any wiring attached, purely for its structural mounting properties.
- Moss Sheet: A decorative moss sheet will provide a natural, appealing look for the base and help to cover the mechanical components. You can find these at craft stores or gardening centers. Ensure it’s large enough to cover your wooden base.
- Hammer: Essential for gently tapping components into place and ensuring secure fits, especially for the initial pipe connection.
- Wide PVC Pipe: This will form the main trunk of your cactus. The diameter should be suitable for your cat to comfortably scratch and for stability. White PVC is common and easy to paint, but you can choose any color you prefer.
- Bend PVC Pipe: Used to create the characteristic “arms” or branches of the cactus. The angle of the bend will determine the shape of your cactus arms.
- Single Tee PVC Pipe: This T-shaped connector will allow you to attach the bending pipes to the main wide pipe, creating the branching structure.
- Adhesive or Hot Glue Gun and Glue Sticks: A heavy-duty adhesive (like construction adhesive) is recommended for strong, permanent bonds, especially for the moss sheet and pipe connections. A hot glue gun is excellent for quick fixes, securing rope, and embellishments.
- Dome Caps: These caps are crucial for covering the open ends of the PVC pipes, giving your cactus a polished, finished look and preventing sand from escaping. You’ll need one for each pipe end that isn’t connected to another pipe.
- Sand: Used as ballast to add significant weight to the base of the scratching post, enhancing its stability and preventing it from toppling over during vigorous scratching sessions.
- Spray Paint (Green): The star color for your cactus! Choose a durable, pet-safe spray paint in a vibrant green shade. You might also want a lighter green or brown for accents.
- Rope (Green, or painted green): Sisal or jute rope is the traditional and most effective material for scratching posts. If you can’t find green rope, natural-colored rope can be easily spray-painted to match your cactus theme. You’ll need a substantial amount, typically 50-100 feet (15-30 meters) depending on the height and diameter of your pipes.
- Scissors or Cutter: For cleanly cutting the rope to size and trimming any excess materials.
- Embellishments (Optional): Unleash your creativity! Consider adding small faux flowers, felt cacti “spines,” or miniature desert creatures to truly personalize your scratching post. Ensure any embellishments are securely attached and not easily ingested by your cat.
With these materials assembled, you’re ready to bring your charming cactus scratching post to life!
Step-by-Step Construction Guide: Building Your Cactus Scratching Post
Phase 1: Building the Sturdy Base
The foundation of your cat’s new scratching haven needs to be absolutely rock-solid. A stable base ensures the entire structure won’t tip over, even during the most enthusiastic scratching sessions. This initial phase focuses on securing the primary support and creating an aesthetically pleasing ground cover.
- Prepare the Wooden Base and Socket: Begin by carefully centering the light bulb socket on your wooden board. Use a pencil or marker to precisely mark the locations of the screw holes on the socket’s base onto the wooden board. Once marked, temporarily remove the socket.
- Pre-Drill for Easy Assembly: Using a drill bit slightly smaller than the diameter of your screws, pre-drill pilot holes at each of the marked points. Pre-drilling prevents the wood from splitting and makes screwing in the socket much easier and more secure.
- Secure the Socket: Place the light bulb socket back onto the wooden board, aligning its holes with your pre-drilled pilot holes. Using appropriate screws, firmly fasten the socket to the board. Ensure it’s tightly secured to provide a stable anchor for the main pipe.
- Prepare the Moss Sheet: Take your moss sheet and carefully determine its center. Using scissors or a cutter, create a hole in the middle of the moss sheet. This hole should be just large enough for the center of the light bulb socket to fit through snugly, allowing the socket to remain exposed while the moss sheet covers the rest of the board.
- Adhere the Moss Sheet: Apply a generous and even layer of strong adhesive or hot glue across the entire surface of the wooden board, working outwards from the secured light bulb socket. Carefully position the moss sheet over the board, aligning the hole with the socket, and press it down firmly and smoothly. Ensure the moss sheet adheres flatly and without wrinkles, creating a natural-looking “ground” for your cactus.
- Attach the First PVC Pipe Segment: Once the moss sheet is securely in place, apply a strong adhesive or hot glue around the top edge of the light bulb socket. Carefully take the initial wide PVC pipe piece (the base of your cactus trunk) and position it directly over the socket, lining them up perfectly. Press the pipe down firmly, using a hammer to gently tap around the base of the pipe if needed, to ensure a tight and secure bond between the pipe and the socket. This connection is critical for the overall stability of your scratching post.
Phase 2: Assembling the Cactus Structure
With the base firmly established, it’s time to give your scratching post its distinctive cactus shape. This involves adding more PVC pipes, creating the branches, and ensuring internal stability.
- Continue Adding Pipe Layers: Systematically add more segments of the wide PVC pipe, stacking them securely on top of the initial piece. For a taller, more imposing cactus, use longer segments. If you’re aiming for a shorter design, use fewer and shorter pieces. Apply adhesive or glue between each connection point to ensure they are robustly joined and won’t detach under pressure.
- Integrate the Tee and Bend Pipes for Branches: At the desired height where you want a “cactus arm” to sprout, incorporate a single tee PVC pipe. This T-connector will allow you to extend a branch horizontally. Securely glue the tee piece into the main pipe column. Then, attach a bend PVC pipe into the open side of the tee, followed by another segment of wide PVC pipe to create the length of the branch. Repeat this process if you wish to add more branches at different heights or angles, giving your cactus a unique silhouette.
- Add Weight for Stability (Sand Filling): As you build up the PVC pipe structure, it’s crucial to add weight to prevent the finished scratching post from being easily toppled by your cat. Pour sand into the open ends of the PVC pipes as you go. Gravity will pull the sand down, filling the base and lower sections of the pipes, significantly increasing the overall stability and heft of the entire structure. Ensure the sand is dry to avoid any moisture issues.
- Cap the Pipe Ends: Once all the pipe pieces are assembled and your cactus shape is complete, it’s time to seal the open ends. Apply a generous bead of strong adhesive or hot glue around the inner rim of each dome cap. Firmly press these caps onto all exposed pipe ends (the top of the main trunk and the ends of any branches). This not only gives the cactus a finished look but also prevents the sand from spilling out. Allow all glued connections to dry and cure completely according to the adhesive manufacturer’s instructions, ensuring maximum strength and stability.
Phase 3: Bringing Your Cactus to Life with Color and Texture
Now comes the fun part: transforming the plain PVC structure into a vibrant, textural cactus that will entice your cat and beautify your home.
- Spray Paint the Cactus: In a well-ventilated area, place your fully assembled and dried PVC cactus scratching post on a drop cloth. Apply an even coat of green spray paint over the entire PVC structure and the dome caps. For a more authentic look, consider using varying shades of green, perhaps a darker base and lighter highlights. Allow the first coat to dry completely, then apply a second coat if necessary for full, opaque coverage.
- Prepare the Scratching Rope: While your cactus structure is drying, prepare your rope. If you couldn’t find green rope, lay out your natural-colored sisal or jute rope on a separate drop cloth. Spray paint the rope green, ensuring even coverage. This step is crucial for the overall cohesive look of your cactus. Allow the painted rope to dry thoroughly, as wet paint can transfer and make wrapping difficult.
- Wrap with Rope – The Scratching Surface: Once both the painted cactus structure and the rope are completely dry, it’s time to create the scratching surface. Begin at the very bottom of the main trunk, just above the mossy base. Apply a line of hot glue around the pipe. Press the end of your green rope firmly into the glue, holding it in place until secure.
- Continue Wrapping Systematically: Starting from the initial glued point, begin tightly wrapping the rope upwards around the PVC pipe. As you wrap, continuously apply hot glue in short sections (e.g., every 1-2 inches or 3-5 cm) to the pipe before wrapping the rope over it. This ensures the rope is securely fastened and won’t unravel when your cat starts scratching. Keep the coils of rope very tight and close together, leaving no gaps where the PVC pipe is visible. Maintain consistent tension as you wrap upwards.
- Cover Branches and Secure Ends: Continue wrapping the rope all the way up the main trunk, securing the end with a final dab of hot glue. Then, wrap each of the cactus branches in the same meticulous manner, ensuring every part your cat might scratch is covered with the durable rope. Secure the end of the rope on each branch with hot glue. The entire PVC pipe surface that your cat will interact with should be covered, creating a perfect scratching texture.
- Add Embellishments (Optional): Once the rope wrapping is complete and all glue has dried, you can add optional decorative touches. Securely attach faux flowers, small felt shapes resembling cactus spines, or other desert-themed adornments using strong adhesive or hot glue. Ensure that any embellishments are firmly attached and pose no choking hazard to your cat.
Personalize Your Pet’s Paradise: Tips for Customization & Success
One of the greatest joys of DIY projects is the ability to infuse your personal style and tailor the creation to your specific needs. Here are some tips to make your cactus scratching post even more successful and unique:
- Varying Heights and Branches: Don’t feel limited to a single branch or a specific height. Consider making multiple cactus scratchers of different sizes for various rooms, or adding more branches to create a truly elaborate “cactus patch” for your cat to explore.
- Color Palette Exploration: While green is traditional for a cactus, you could experiment with different shades (lime green, forest green, olive) or even add touches of brown or red for a desert-sunset theme. The rope can also be painted in contrasting or complementary colors.
- Alternative Textures: While sisal rope is excellent, you could also experiment with other cat-friendly scratching materials like jute, carpet remnants (securely glued), or even strips of corrugated cardboard for different sections, offering your cat a variety of tactile experiences.
- Interactive Elements: Consider drilling small, cat-safe holes in the PVC pipes before wrapping them and inserting dangling toys or feathers for an added element of play. Ensure they are securely attached.
- Introduction to Your Cat: Once complete, introduce your cat to their new scratching post. You might sprinkle some catnip on it, dangle a toy near it, or gently guide their paws to the rope. Praise them enthusiastically when they use it.
- Safety First: Always ensure all components are securely attached. Check for any sharp edges or loose parts that could harm your cat. Use non-toxic paints and adhesives.
A Happy Cat, A Happy Home: Placement & Maintenance Tips
Congratulations! You’ve created a fantastic DIY cactus scratching post. Now, to ensure its longevity and your cat’s consistent use, proper placement and occasional maintenance are key.
- Strategic Placement: Place the scratching post in areas where your cat frequently scratches or lounges. Often, this is near a window, in a main living area, or close to their sleeping spots. Cats like to scratch after waking up or after a good meal. Having multiple scratching options around the house is often beneficial.
- Stability Check: Periodically check the stability of the scratching post. If you notice any wobbling, reinforce the base or pipe connections as needed. The sand ballast should keep it very stable, but it’s always good to check.
- Rope Condition: Over time, the rope will inevitably fray and wear down. This is a sign of a well-used and loved scratcher! When the rope becomes too worn, you can easily remove the old sections and re-wrap new rope. This is a simple and cost-effective way to refresh your DIY post.
- Cleaning: Dust or cat hair can accumulate on the moss base or between rope coils. Use a vacuum cleaner with a brush attachment or a lint roller to keep it tidy. If necessary, gently wipe down the painted PVC with a damp cloth.
- Positive Reinforcement: Continue to encourage your cat to use the scratching post with praise and treats. If you catch them scratching furniture, gently redirect them to their cactus post.
Final Thoughts: A Gift from the Heart
Building your own DIY cactus cat scratching post is more than just a home improvement project; it’s a labor of love for your feline companion. You’re not only protecting your furniture but also providing a vital outlet for your cat’s natural instincts, promoting their physical and mental well-being. This sturdy, adorable, and customizable scratcher will be a testament to your creativity and care, offering countless hours of scratching satisfaction for your purr-fect friend. So gather your materials, follow these steps, and enjoy the rewarding process of creating a functional work of art that both you and your cat will cherish!
*All image credit belongs to Create & Craft TV via YouTube. Follow and subscribe to their channel for more inspiring DIY projects!