
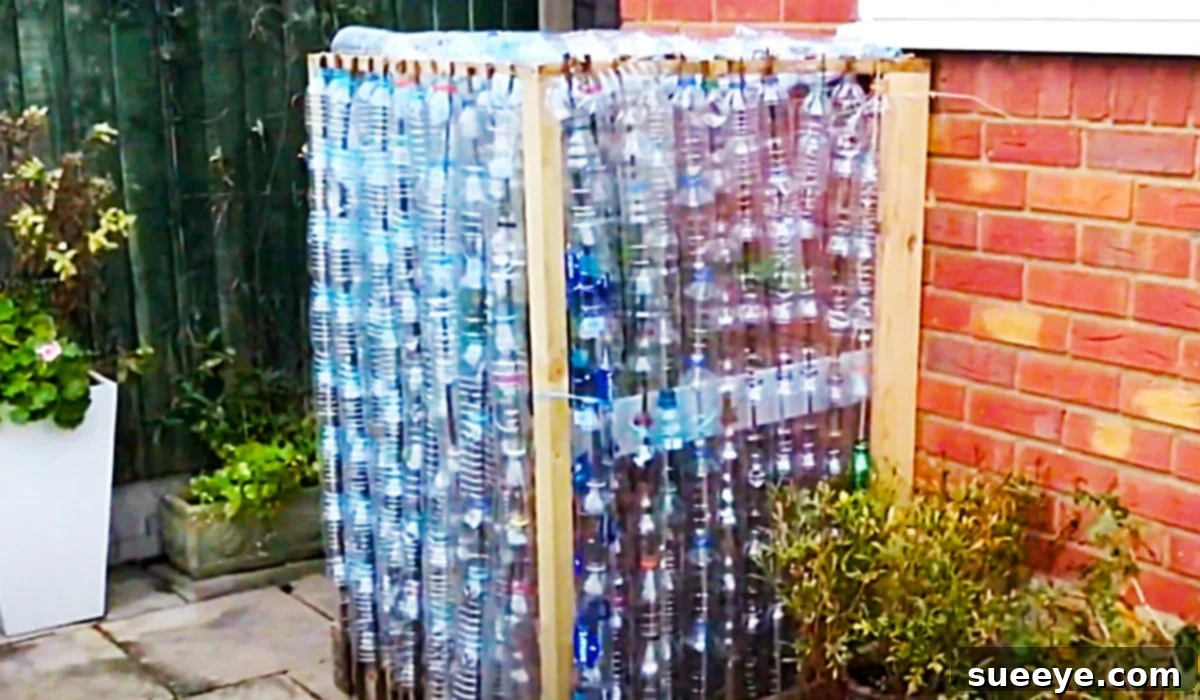
Build Your Own Sustainable DIY Recycled Plastic Bottle Greenhouse: An Eco-Friendly Gardening Solution
Embracing sustainable practices and fostering self-sufficiency has become more vital than ever, particularly when it comes to food production. For many gardening enthusiasts and those looking to enhance their preparedness, owning a greenhouse is a dream. It offers a controlled, warm environment perfect for cultivating a diverse range of plants, extending your growing season, and protecting delicate flora from harsh weather. While traditional greenhouses can often be a significant investment, both in terms of cost and construction complexity, there’s an ingenious and budget-friendly alternative that’s gaining popularity: the DIY recycled plastic bottle greenhouse. If you’ve been searching for an accessible, affordable, and highly rewarding gardening project, this innovative approach to greenhouse building is truly exceptional. It leverages common household waste – plastic bottles – to create a functional and effective growing space, aligning perfectly with principles of recycling and resourcefulness.
My own journey to find an affordable greenhouse solution led me down many paths, often encountering designs that were either too expensive, too intricate, or required specialized skills beyond my comfort level. That’s why when I stumbled upon the brilliant recycled plastic bottle small greenhouse video tutorial by Nature Slice on YouTube, I instantly recognized it as the perfect fit. This tutorial promised a practical, straightforward, and incredibly cost-effective method to build a greenhouse, making sustainable gardening accessible to everyone. The excitement of transforming everyday waste into a thriving green space was palpable, and I knew this project was destined to become a cornerstone of my gardening endeavors.
Why Choose a Recycled Plastic Bottle Greenhouse?
Opting for a greenhouse built from recycled plastic bottles offers a multitude of benefits that extend beyond mere cost savings. Firstly, it’s an incredibly eco-friendly choice. By repurposing plastic bottles that would otherwise end up in landfills, you’re actively participating in waste reduction and promoting a circular economy. This project transforms potential pollutants into a productive tool for sustainable living. Secondly, the double-layered structure created by using bottles, especially when filled with air, provides excellent insulation. This natural thermal barrier helps to trap warmth inside, protecting your plants from cold snaps and extending your growing season well into the cooler months. This makes it an ideal solution for gardeners in diverse climates, allowing you to cultivate tender plants or start seedlings much earlier than traditional outdoor planting would permit.
Beyond its environmental and insulating advantages, a DIY plastic bottle greenhouse offers unparalleled flexibility and customization. The modular nature of bottle construction means you can design a greenhouse to fit almost any space, whether a small patio or a larger garden plot. It’s a project that builds practical skills, fosters creativity, and provides a profound sense of accomplishment. Furthermore, the materials are largely free or very inexpensive, making sustainable gardening accessible to individuals on any budget. It’s not just a greenhouse; it’s a statement about responsible consumption, ingenuity, and the power of repurposing.
Materials You’ll Need for Your Eco-Friendly Greenhouse
One of the most appealing aspects of this DIY project is its reliance on readily available and often recycled materials. Gathering your supplies is the first exciting step toward creating your very own sustainable growing haven. Here’s a detailed look at what you’ll need:
- Wood for the Frame: This will form the sturdy skeleton of your greenhouse. Recycled pallet wood is an excellent, cost-effective, and sustainable choice, perfectly aligning with the project’s eco-friendly ethos. Ensure the wood is free from harmful chemicals and structurally sound. You could also use reclaimed lumber or new untreated timber. Consider treating the wood with a non-toxic sealant for increased longevity and resistance to moisture and pests, especially if it will be exposed to the elements.
- Plastic Water or Soda Bottles: This is the star material of your greenhouse! You’ll need a significant quantity, depending on the size of your desired structure. Start collecting clear plastic bottles of uniform size (e.g., 1.5-liter or 2-liter bottles work well). Rinse them thoroughly and remove any labels. The transparency of the bottles is crucial for allowing sunlight to penetrate.
- A Drill: Essential for creating holes in the bottles and for assembling the wooden frame components. Make sure you have appropriate drill bits for both wood and plastic. A smaller bit for pilot holes in wood and a bit slightly larger than your sticks for the bottles will be necessary.
- Nails: Used for securing various parts of your wooden frame together. Choose nails appropriate for the thickness of your wood, ensuring they provide a strong hold.
- A Hammer: The indispensable tool for driving nails efficiently and safely into your wooden frame.
- Sticks (Dowel Rods, Bamboo, or Reclaimed Wood Sticks): These will be inserted through the plastic bottles to create individual insulated panels. Dowel rods offer uniformity, but sturdy bamboo stakes or even slender, straight branches from your garden can be excellent recycled alternatives. Ensure they are strong enough to support the bottles without bowing.
- Screws: Providing additional strength and stability to your wooden frame, especially at stress points or for attaching components that might need future adjustments. Use outdoor-grade screws for better rust resistance.
- Measuring Tape and Pencil: For accurate measurements and marking cuts on your wood. Precision here will ensure your greenhouse frame is square and stable.
- Saw: To cut your wood to the correct dimensions for the frame. A hand saw, circular saw, or miter saw will work, depending on your preference and available tools.
- Optional: Clear Plastic Sheeting or Polycarbonate Panels: While the bottles provide significant insulation, adding an outer layer of clear plastic sheeting or thin polycarbonate panels to the outside of the bottle walls can significantly enhance insulation, particularly in extremely cold climates. This creates an additional air gap, further improving thermal efficiency.
Gathering all these materials might take a little time, especially collecting the plastic bottles, but the effort is well worth it for the sustainable and functional greenhouse you’ll create.
Detailed Directions: Building Your Ingenious Plastic Bottle Greenhouse
The journey to building your recycled plastic bottle greenhouse is a rewarding one, as demonstrated in the insightful video tutorial by Nature Slice on YouTube. By following these easy steps, you’ll transform discarded items into a functional and eco-friendly growing space. This process emphasizes thoughtful assembly and sustainable practices.
Step 1: Planning and Constructing Your Wooden Frame
Begin by planning the dimensions of your greenhouse. Consider the available space in your garden and the number of plants you wish to grow. Once you have your measurements, cut your chosen wood (recycled pallet wood is perfect) to create the base, uprights, and roof supports for your greenhouse frame. Use your drill to create pilot holes before securing the wood pieces with nails and screws. This prevents splitting and ensures a strong, stable structure. Aim for a sturdy rectangular or square base, with vertical corner posts and horizontal supports to create the general shape of your greenhouse. The more robust your frame, the better it will withstand weather elements. Remember to design a sloped roof to allow rainwater runoff, and consider incorporating a simple door frame on one side for easy access.
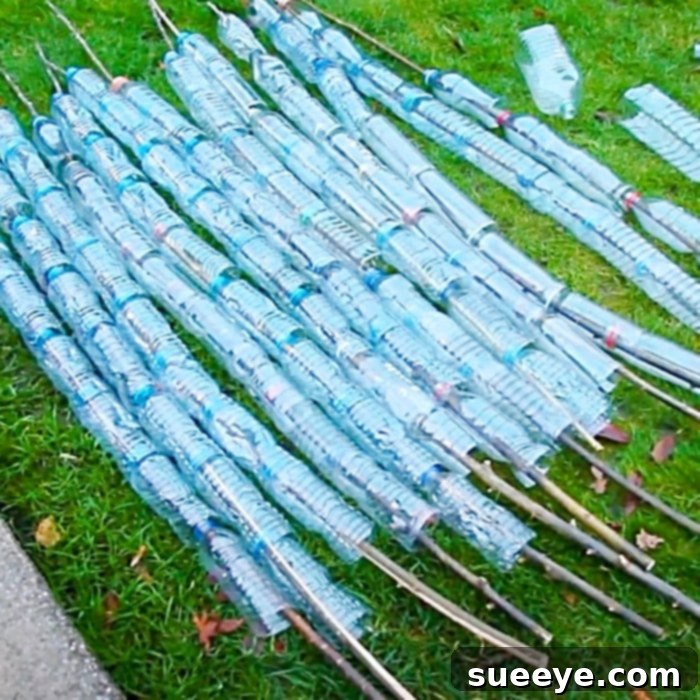
Step 2: Preparing Your Plastic Bottle Modules
This is where the magic happens with your recycled materials. Take your collection of clean plastic water or soda bottles. For each bottle, you will need to drill a hole directly into the center of its base. The size of this hole should be just large enough for your chosen stick (dowel, bamboo, or reclaimed wood stick) to pass through snugly. You’ll then insert a stick through the drilled hole, ensuring it goes through the bottom and extends out through the open neck of the bottle. Repeat this process for all the bottles you’ve collected. The goal is to create long “bottle rods” or “bottle columns” where multiple bottles are stacked one after another on a single stick. These columns will form the insulating walls of your greenhouse. The number of bottles per stick will depend on the height of your greenhouse walls.
Step 3: Assembling the Bottle Walls
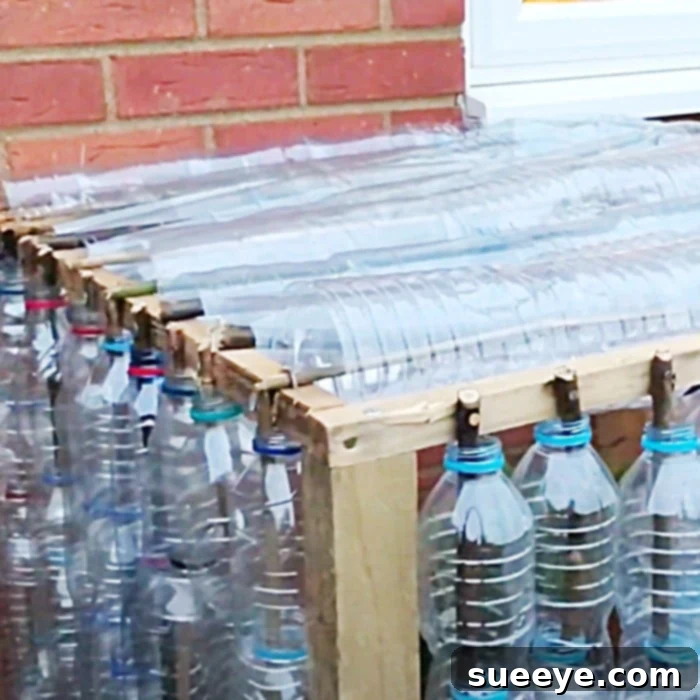
Once you have prepared a sufficient number of bottle columns, it’s time to integrate them into your wooden frame. You will attach these sticks, laden with plastic bottles, to the wooden frame you built in Step 1. This can be done by creating small brackets or grooves in your wooden frame, or by directly screwing the ends of the sticks into the frame. Arrange the bottle columns closely together, side-by-side, to create a solid wall of bottles. This dense arrangement is crucial for maximizing the insulating properties and creating an effective barrier against cold air. Ensure there are minimal gaps between the columns to maintain the internal warmth. Think of it as creating a mosaic of transparent insulation around your growing space.
Step 4: Enhancing Insulation (Optional but Recommended)
For gardeners in colder climates or those looking for superior thermal performance, consider adding an additional layer of insulation. After attaching all the bottle columns to the wooden frame, you can stretch clear plastic sheeting or secure lightweight polycarbonate panels to the outside of the bottle walls. This creates an extra air gap between the bottles and the outer layer, significantly boosting the greenhouse’s ability to retain heat. This double-layering technique is particularly effective for growing more sensitive plants or extending your growing season deeper into winter. Ensure the additional plastic is securely fastened to prevent it from flapping in the wind and creating heat loss.
Step 5: Adding the Roof and Finishing Touches
For the roof, you can continue with the bottle column method, creating shorter columns to fit the slope of your roof frame. Alternatively, you might opt for a clear plastic sheet or polycarbonate panels for the roof, as this can be lighter and easier to install while still providing excellent light transmission. Whichever method you choose, ensure the roof is watertight and securely fastened to prevent leaks. Finally, install a simple door, perhaps also constructed with a wood frame and bottle panels, or a heavy-duty plastic sheet. Check for any remaining gaps or cracks in the structure and seal them with tape or caulk to maximize heat retention. Your DIY recycled plastic bottle greenhouse is now ready for planting!
Benefits and Tips for Your New Sustainable Greenhouse
Having completed your DIY recycled plastic bottle greenhouse, you now possess a powerful tool for sustainable gardening. This homemade structure offers a myriad of advantages. You can now cultivate a wider variety of plants, including those that typically thrive in warmer climates, right in your own backyard. Start seedlings early in spring, protect tender plants from unexpected frosts, or even grow vegetables and herbs through the winter months. The excellent insulation provided by the layered plastic bottles creates a stable microclimate, fostering ideal conditions for plant growth, accelerating germination, and enhancing overall yields.
To make the most of your new eco-friendly greenhouse, consider these tips: place your greenhouse in a location that receives ample sunlight throughout the day, ideally facing south. While the bottles offer insulation, on exceptionally cold nights, you might want to add an extra layer of horticultural fleece over your plants for added protection. Conversely, on very sunny days, ensure adequate ventilation to prevent overheating, especially if you have sensitive plants; a simple propped-open door or vent can do wonders. Monitor soil moisture levels regularly, as the protected environment can alter watering needs. With a little care and attention, your recycled plastic bottle greenhouse will provide you with fresh produce and beautiful blooms for years to come, truly embodying the spirit of sustainable living and ingenious DIY solutions.
This truly is such an incredibly creative and practical idea for anyone interested in sustainable gardening and making the most of recycled materials. I am genuinely excited to embark on this project and witness the transformation of plastic bottles into a vibrant, productive growing space. It’s a testament to how simple ingenuity can lead to profound environmental and personal benefits. Happy gardening!