
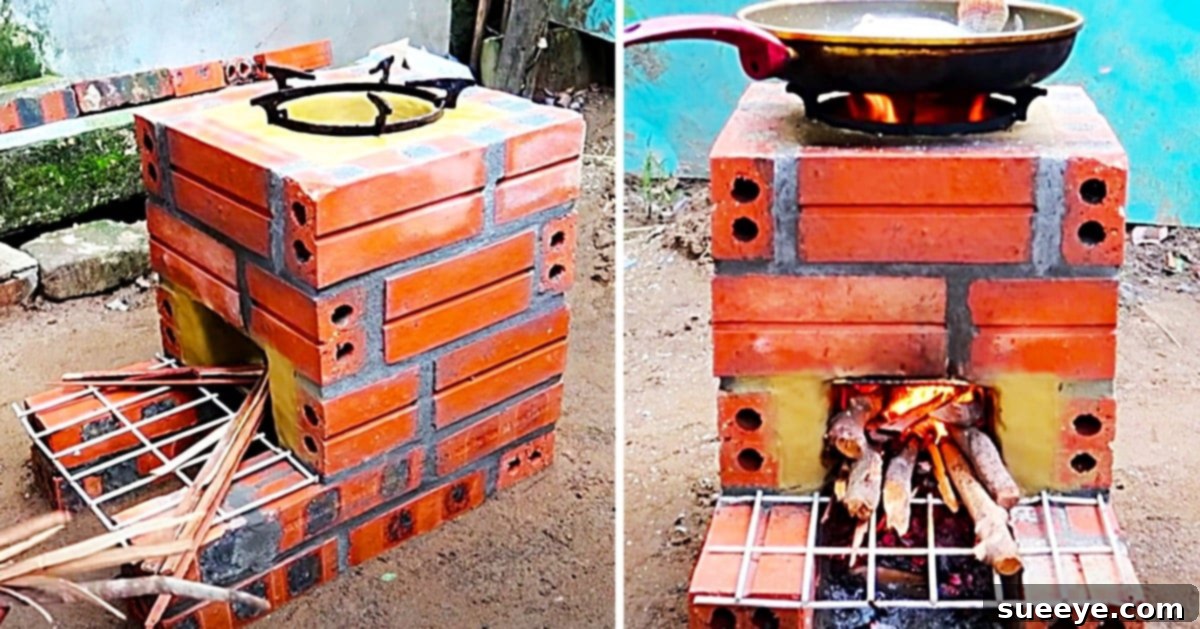
DIY Brick Rocket Stove: Your Essential Guide to Outdoor Cooking and Emergency Preparedness
In an increasingly unpredictable world, the ability to be self-sufficient, especially when it comes to basic necessities like cooking, becomes invaluable. Whether you’re preparing for potential power outages, seeking a cost-effective solution for outdoor cooking, or simply embracing a more sustainable lifestyle, a DIY brick rocket stove offers a remarkably efficient and reliable answer. Living in regions prone to weather events, like the South, where electricity disruptions are a recurring concern, having an independent cooking source isn’t just a convenience – it’s a vital component of household resilience.
This comprehensive guide will walk you through the process of constructing your very own brick rocket stove, inspired by the excellent video tutorial from Garden Design on YouTube. Simple in design yet incredibly effective, this project requires only a few basic materials and offers immense long-term benefits. Prepare to unlock a new level of outdoor independence and culinary adventure right in your backyard!
What is a Rocket Stove and Why Build One?
A rocket stove is an innovative and highly efficient biomass burning stove that utilizes a unique “L” or “J” shaped combustion chamber. This design creates a powerful draft that pulls air into the fire, resulting in a hot, clean-burning flame with minimal smoke. The super-heated air travels up a vertical chimney, directing the heat directly to your cooking surface. This focused heat, combined with insulated combustion, means a rocket stove uses significantly less fuel than an open fire or many traditional wood stoves, making it an eco-friendly and resource-efficient choice.
Key Advantages of a DIY Brick Rocket Stove:
- Emergency Preparedness: In scenarios like power outages, natural disasters (hurricanes, ice storms, earthquakes), or grid failures, a rocket stove becomes a lifesaver. It allows you to cook food, boil water for drinking or sanitation, and even provide a localized heat source without relying on electricity or propane. Its sturdy, ground-built construction makes it resistant to wind damage and incredibly stable, crucial during adverse conditions.
- Cost-Effectiveness: Building your own brick rocket stove is significantly cheaper than purchasing commercial outdoor cooking units or gas grills. The primary materials – bricks, mortar, and rebar – are relatively inexpensive and widely available at most hardware or home improvement stores.
- Sustainable Outdoor Cooking: Embrace the charm of wood-fired cooking for everyday meals, camping trips, or backyard gatherings. Rocket stoves burn small twigs, branches, wood scraps, or other biomass, turning yard waste into usable fuel. This not only reduces waste but also provides a satisfying, primal cooking experience.
- Durability and Longevity: Constructed from robust bricks and mortar, a well-built rocket stove is incredibly durable and designed to withstand the elements for many years. Unlike portable metal stoves that can rust or warp, a brick stove is a semi-permanent fixture that stands strong.
- Fuel Efficiency: The design of a rocket stove maximizes heat transfer to the cooking vessel while minimizing fuel consumption. This means you can cook meals with a handful of twigs that would barely sustain an open fire. Less fuel also translates to less smoke and ash.
- Personal Satisfaction: There’s immense pride and satisfaction in building something useful and resilient with your own hands. This DIY project is accessible for most skill levels and provides a tangible asset for your home.
Materials Required for Your Rocket Brick Stove Project
One of the beauties of this DIY project is its simplicity and the readily available nature of the materials. Before you begin, gather everything you’ll need to ensure a smooth and continuous build process. The exact quantity of bricks and rebar will depend on the desired size of your stove, but for a standard family-sized unit, you won’t need an overwhelming amount.
Essential Materials List:
- Bricks: Any standard red bricks or common building bricks will work effectively. While fire bricks offer superior heat retention and longevity, they are not strictly necessary for a functional rocket stove. Estimate your needs by sketching your design first; a common stove might use between 30-60 bricks.
- Mortar Mix: A standard cement mortar mix suitable for bricklaying. You’ll need enough to bind all your bricks securely. Ensure you have clean water for mixing.
- Rebar Rods: A few pieces of rebar (reinforcing bar), typically 3/8 inch or 1/2 inch thick, cut to lengths that will span the width of your stove’s chimney opening. These will serve as a sturdy pot support or grill grate.
- Shovel: Essential for preparing the ground, digging a foundation if desired, and mixing mortar.
- Trowel: A bricklaying trowel is crucial for applying mortar neatly and effectively between bricks.
Recommended Tools and Safety Gear:
- Measuring Tape: For accurate dimensions and ensuring consistency.
- Level: A spirit level is critical for ensuring your brick courses are straight and true, which impacts stability and performance.
- Rubber Mallet: For gently tapping bricks into place.
- String Line and Stakes: Helpful for maintaining straight lines during bricklaying.
- Mixing Bucket or Wheelbarrow: For preparing mortar.
- Water Source: For mixing mortar and keeping bricks damp (some bricklayers prefer wetting bricks slightly before laying).
- Safety Gloves: To protect your hands from mortar and rough brick surfaces.
- Safety Glasses: Essential when working with tools and materials to protect your eyes.
Step-by-Step Directions for Building Your DIY Brick Rocket Stove
This project is straightforward, making it an excellent weekend endeavor for DIY enthusiasts. Following these steps, you’ll construct a durable and efficient outdoor cooking solution. Remember, taking your time with each step ensures a stronger, more effective stove.
1. Site Selection and Preparation
The first critical step in building your outdoor brick rocket stove is selecting the ideal location. Choose a flat, stable area in your yard that is clear of any flammable materials such as dry grass, leaves, or overhanging branches. Ensure there’s adequate ventilation, but also consider protection from prevailing winds to maximize efficiency. Proximity to a water source can also be beneficial for both building and fire safety.
For ultimate stability and longevity, consider digging a shallow trench (around 4-6 inches deep) to create a level foundation for your stove. This will help prevent settling and shifting over time. Compact the soil at the base of your trench firmly. While the original tutorial suggests starting on wet sand, laying a solid, level foundation is key. You can then add a thin layer of wet sand or gravel on top of the compacted soil to help with leveling your first course of bricks.
2. Laying the Foundation and First Course
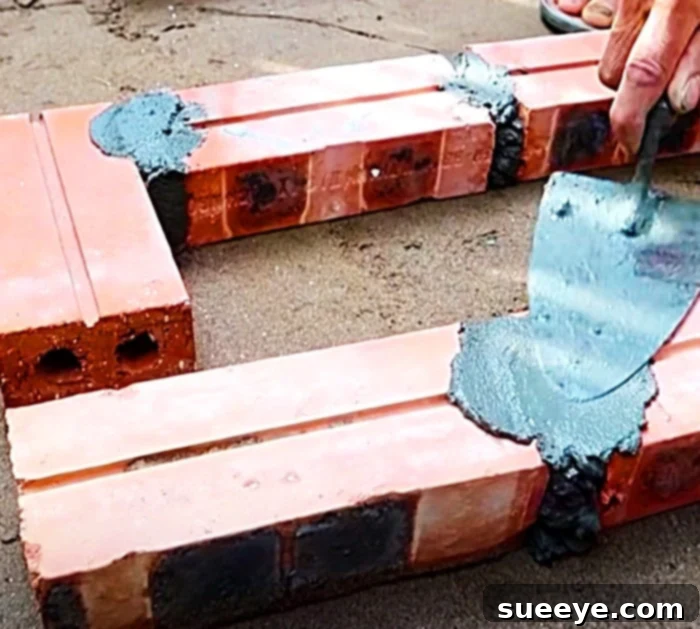
Begin by mixing your cement mortar according to the manufacturer’s instructions, aiming for a consistent, workable consistency – not too wet, not too dry. Using your trowel, spread a bed of mortar for your first course of bricks. This initial layer is crucial for establishing the footprint of your rocket stove. You will create an ‘L’ shape: one arm will be the fuel feed tunnel, and the other will form the initial base of the combustion chamber and chimney.
Carefully lay your first bricks, pressing them firmly into the mortar. Use your level to ensure each brick is perfectly horizontal and aligned with its neighbors. This foundational course dictates the geometry and stability of your entire stove. Make sure your corners are square and the dimensions of your fuel feed and combustion chamber are consistent.
3. Building Up the Walls and Integrating Rebar Support
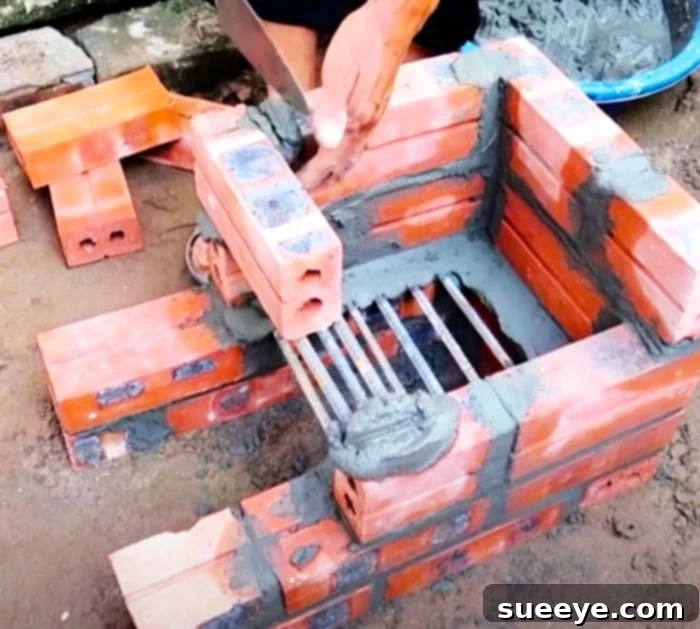
Continue building your stove upwards, course by course. Apply mortar evenly to the top surface of the previously laid bricks and the ends of the bricks you are about to lay. Stagger the joints of each new course over the bricks below, similar to traditional bricklaying, to ensure maximum strength and stability. Regularly check for levelness and plumb (vertical alignment) as you proceed.
The “L” shape of your stove will develop as you add layers. One side forms the horizontal feed chamber for fuel, and the other, the vertical chimney where the combustion and heat rise. The efficiency of a rocket stove relies on the hot gases being funneled upwards.
Typically, on the second or third course (depending on your desired pot height), you will integrate the rebar rods. These rods serve as the crucial support for your cooking pot or pan. Lay them across the opening of the vertical chimney section, embedding their ends securely into the mortar of the surrounding bricks. Ensure they are spaced adequately to support your cookware while allowing heat to pass through. You might use 2-4 pieces of rebar depending on the size of your stove and the weight of your anticipated pots.
4. Completing the Structure and Curing
Continue adding brick courses to the vertical chimney section until you reach your desired height. A taller chimney generally improves the draft, enhancing efficiency. Ensure the top course is level and clean. Smooth any excess mortar from the joints using your trowel for a tidy finish.
Once construction is complete, it’s vital to allow the mortar to cure properly. This process typically takes at least 24-48 hours, but for full strength, it’s often recommended to wait up to 7 days before its first use. During this time, protect your stove from heavy rain or freezing temperatures if possible, to allow the mortar to set without compromise.
Using Your New DIY Rocket Stove Safely and Effectively
After your brick rocket stove has fully cured, you’re ready to put it to the test! Here are some tips for safe and efficient operation:
First Burn and Fueling
For the very first burn, start with a small, gentle fire. This allows any residual moisture in the bricks and mortar to escape gradually, preventing potential cracks. Once seasoned, you can use a variety of small biomass fuels: twigs, small branches, wood chips, and even some types of dry yard waste. Feed the fuel into the horizontal chamber from the front, pushing it forward as it burns. The unique design means you only need to burn a small amount of fuel at a time for significant heat output.
Cooking and Heat Management
Place your pot or pan directly on the rebar support rods. The concentrated heat rising from the chimney will efficiently heat your cookware. You can manage the heat by adjusting the amount of fuel fed into the chamber. For intense searing, push more fuel in; for a gentle simmer, reduce the fuel. The stove is excellent for boiling water, frying, and even slow cooking in a Dutch oven.
Safety Precautions are Paramount:
- Fire Clearance: Always ensure the area around your rocket stove is clear of any flammable materials. Maintain a safe distance from buildings, fences, and dry vegetation.
- Supervision: Never leave a burning rocket stove unattended, especially when children or pets are nearby.
- Water/Extinguisher: Have a bucket of water, a hose, or a fire extinguisher readily available whenever the stove is in use.
- Heat: Bricks will become extremely hot during operation and retain heat for a long time afterward. Exercise caution and avoid direct contact with the stove body.
- Ventilation: While primarily an outdoor appliance, ensure adequate air circulation to prevent smoke inhalation, though the efficient burn minimizes this concern.
Maintenance and Long-Term Care
A brick rocket stove requires minimal maintenance to ensure its longevity. Regularly inspect the mortar joints for any cracks, especially after prolonged use or extreme weather fluctuations. Minor cracks can be repaired with fresh mortar. Periodically clear out any ash build-up from the combustion chamber and chimney to maintain optimal airflow and efficiency. Protecting your stove with a cover when not in use can also extend its life by shielding it from excessive rain, snow, and UV exposure, preventing premature wear on the mortar.
Expanding Your Outdoor Kitchen: Advanced Considerations
Once you’ve mastered the basic brick rocket stove, you might consider enhancing its functionality. For instance, incorporating a permanent cooking grate made of cast iron or heavy-gauge steel can offer a flatter and more stable cooking surface than rebar alone. Some builders also choose to insulate the combustion chamber with materials like perlite or vermiculite mixed with cement, further boosting thermal efficiency and reducing exterior heat transfer.
For those envisioning a more elaborate outdoor kitchen, the rocket stove can serve as a foundation. You could integrate it into a larger brick counter space, add shelving for utensils and fuel, or even construct a small roof or awning to provide shelter from the elements, making it usable in various weather conditions and transforming it into a true backyard focal point.
Conclusion: Embrace Self-Sufficiency and Outdoor Living
Building a DIY brick rocket stove is more than just a construction project; it’s an investment in self-sufficiency, sustainability, and an enhanced outdoor lifestyle. From providing a critical cooking solution during power outages to offering a unique way to enjoy wood-fired meals in your backyard, its benefits are numerous and long-lasting. The simplicity of its design, combined with its impressive efficiency and durability, makes it an ideal addition to any home.
Inspired by the practical insights of Garden Design, you now have the knowledge and steps to create your own robust outdoor cooking station. So gather your materials, roll up your sleeves, and embark on this rewarding project. Your family’s emergency preparedness plans will be significantly bolstered, and you’ll gain a versatile tool for countless enjoyable outdoor culinary adventures. Happy building and happy cooking!