
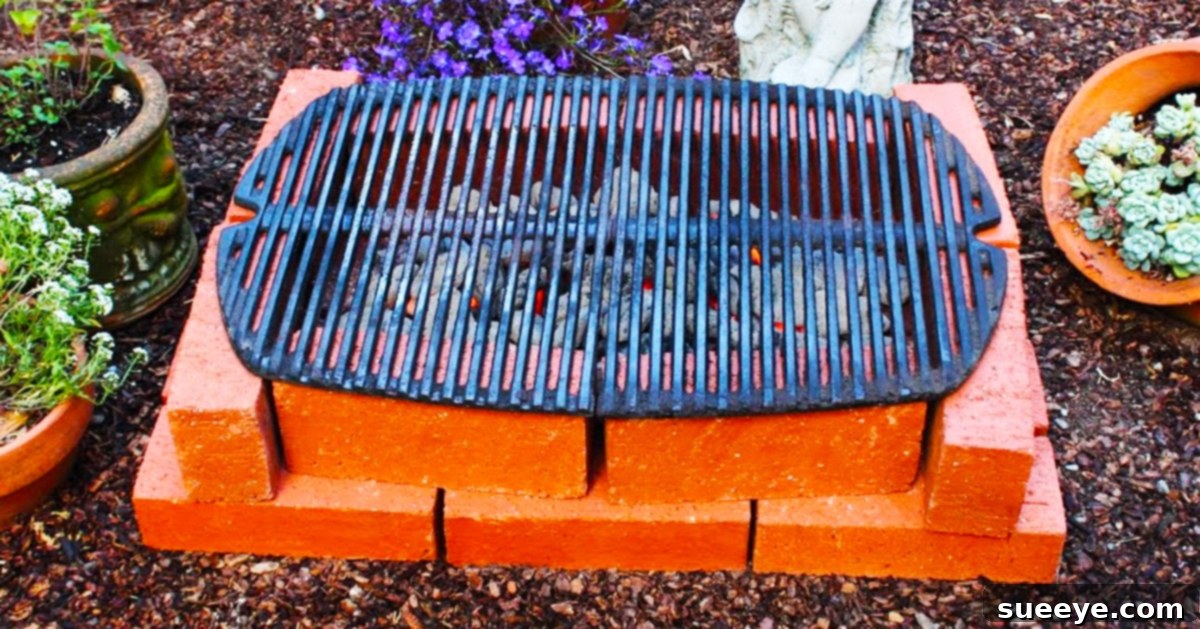
DIY Brick Grill: Build Your Own Budget-Friendly Backyard BBQ in Minutes
Imagine savoring the rich, smoky flavors of perfectly grilled food without the hefty investment in a traditional barbecue. For those who love the authentic taste of charcoal grilling but seek a cost-effective, portable, and temporary solution, the DIY brick grill is an absolute game-changer. This ingenious setup allows you to construct a fully functional outdoor cooking station using a mere 20 standard clay bricks and a sturdy cast iron grate. Forget complex assembly instructions or exorbitant prices – this backyard innovation, famously highlighted by the Food Wishes tutorial, can be ready for action in under five minutes, revolutionizing your approach to outdoor entertaining.
The allure of a homemade brick grill lies in its unparalleled simplicity and remarkable affordability. It delivers the quintessential charcoal grilling experience, infusing your culinary creations with that distinct charred aroma and flavor profile that propane simply cannot replicate. Whether you’re an occasional griller, a seasoned outdoor chef in need of a secondary cooking area, or someone just embarking on their grilling journey, this temporary solution offers maximum flavor with minimal investment. It’s perfect for those spontaneous summer evenings when the urge to grill strikes, or for anyone needing a portable setup that can be effortlessly packed away when not in use. Let’s explore how you can easily create this practical and satisfying outdoor cooking marvel.
Why Choose a DIY Brick Grill for Your Outdoor Cooking Adventures?
In a market saturated with an array of grilling options, ranging from elaborate gas behemoths to compact electric models, the unassuming DIY brick grill distinguishes itself for several compelling reasons:
- Unbeatable Affordability: The most significant draw is undoubtedly the minimal cost. By utilizing readily available and inexpensive materials like standard clay bricks and a basic grill grate, you can construct a highly functional grill for a mere fraction of the price of most manufactured units. This makes authentic charcoal grilling accessible to virtually any budget, eliminating the financial barrier to enjoying outdoor feasts.
- Exceptional Portability and Versatility: Unlike fixed grills that occupy permanent space, a brick grill offers incredible flexibility. It can be assembled and disassembled on demand, making it an ideal companion for a variety of occasions – be it impromptu backyard parties, picnics in the park, tailgating events, beach outings (where permitted), or even just temporarily relocating your cooking station within your own yard. Its temporary nature means no permanent footprint, offering ultimate freedom and adaptability.
- Authentic Charcoal Flavor: For many enthusiasts, the true essence of grilling emanates from the rich, smoky, and robust flavors imparted by burning charcoal. The brick structure creates an efficient, enclosed environment that radiates heat evenly and helps to infuse food with that coveted char and complex aroma, a nuanced quality often absent from gas-cooked meals.
- Effortless Setup and Takedown: The design is so straightforward that even a complete novice can construct it in mere minutes. When your grilling session concludes, simply allow the structure to cool completely, safely remove the spent charcoal, and neatly stack the bricks for storage. There’s no complex maintenance beyond cleaning the grate and ensuring your bricks remain dry, making it a hassle-free option.
- Sustainability and Resourcefulness: Embracing a DIY brick grill embodies a resourceful and sustainable approach to outdoor living. Whether you opt for new or reclaimed bricks, this method minimizes the demand for manufacturing new, often complex and resource-intensive, appliances. It utilizes durable, long-lasting materials that can serve your grilling needs for many years to come.
Essential Materials for Your Budget-Friendly Brick Grill Project
Building this practical and temporary grill requires very few core components, emphasizing functionality, heat retention, and durability. Here’s a detailed look at what you’ll need to gather:
- 20 Plain Clay Bricks: Standard red clay bricks are the optimal choice for this project due to their outstanding heat retention properties and inherent durability. These bricks are specifically designed to withstand high temperatures, making them a safe and highly effective material for grilling. You can readily find them at local hardware stores, home improvement centers, or sometimes even reclaimed from construction or demolition sites (though always ensure any reclaimed bricks are clean and free of hazardous materials). The quantity of 20 bricks provides a stable, multi-layered structure with sufficient height for efficient charcoal burning and proper airflow, which is critical for even cooking.
- 1 Cast Iron Grate (or heavy-duty steel equivalent): This component serves as your primary cooking surface. Cast iron is highly recommended for its exceptional heat retention capabilities, which are crucial for achieving beautiful sear marks and ensuring your food cooks evenly throughout. When selecting a grate, choose a size that can comfortably span the opening created by your brick structure, ensuring it sits securely without any wobbling or risk of falling through. While an old oven rack, if robust enough and meticulously cleaned, can serve as a temporary alternative, a dedicated cast iron grate truly elevates the grilling experience through its superior performance.
Beyond these fundamental items, it’s wise to have standard grilling accessories readily available. This includes a charcoal chimney starter (which is highly recommended for efficient and chemical-free ignition), long-handled tongs, a sturdy heat-resistant spatula, and appropriate heat-resistant safety gloves to protect your hands while working around the hot grill.
Step-by-Step Directions: Constructing Your DIY Brick Grill with Ease
The construction process for this temporary brick grill is remarkably straightforward and requires minimal effort. By following these simple steps, you’ll have your outdoor cooking station ready for action in a matter of minutes, allowing you to quickly transition from building to grilling:
1. Select and Prepare Your Ideal Grilling Site
Before you begin stacking any bricks, it is paramount to carefully choose a flat, level, and non-combustible surface for your grill. This initial step is absolutely crucial for ensuring both the stability of your structure and, more importantly, the safety of your grilling operation. Avoid placing the grill near any potentially flammable materials such as dry grass, wooden fences, overhanging tree branches, or structures. Optimal locations include a concrete patio, a dedicated gravel area, or a patch of bare earth that has been thoroughly cleared of any debris or vegetation. Always ensure there’s ample clear space around the grill for safe maneuvering, proper ventilation, and easy access.
2. Lay the Foundation: Creating the Sturdy Base Layer
Begin the construction process by creating the foundational perimeter of your grill. For a robust and functional structure using 20 bricks, a common and highly effective layout (as vividly demonstrated in the Food Wishes tutorial) involves constructing a rectangular base that will securely house your charcoal. Here’s how to do it:
- Lay down 4 bricks side-by-side, placing them flat on your prepared surface, to form one longer side of your rectangular base.
- Parallel to this first row, lay down another 4 bricks to form the opposite longer side. Ensure you leave sufficient space between these two rows – this gap will accommodate your charcoal and dictate the width of your cooking grate.
- Next, connect these two parallel long sides by placing 2 bricks on each of the shorter ends, positioned perpendicularly. This configuration creates a complete rectangular outline, essentially forming a hollow rectangle. For this critical base layer, you will have used 4 + 4 + 2 + 2 = 12 bricks. This layer firmly defines the footprint of your grill and delineates the internal area where your charcoal will be placed.

3. Build the Walls: Adding Height with the Second Layer
Once your stable base layer is firmly established, the next step is to build up the walls of your grill. This second layer is crucial for creating the necessary height to ensure proper airflow for your charcoal and to securely support your cooking grate. For this layer, you will utilize the remaining 8 bricks:
- Carefully place these 8 bricks on their sides, directly on top of the bricks from the first base layer. Positioning them on their sides adds significant height to your grill structure.
- Orient them to follow the exact same rectangular pattern as your base. For instance, if your base layer used 4 bricks along the longer sides, you will place 4 bricks on their sides along those same long sides for this layer. Do the same for the shorter ends.
- This second layer serves as the primary support for your cooking grate and ensures there’s ample space beneath for the charcoal to burn efficiently and for ash to accumulate without suffocating the coals. With this step, you will have used a total of 12 bricks (for the base) + 8 bricks (for the walls) = 20 bricks, completing the structural foundation of your grill.
4. Position the Cast Iron Grate for Cooking
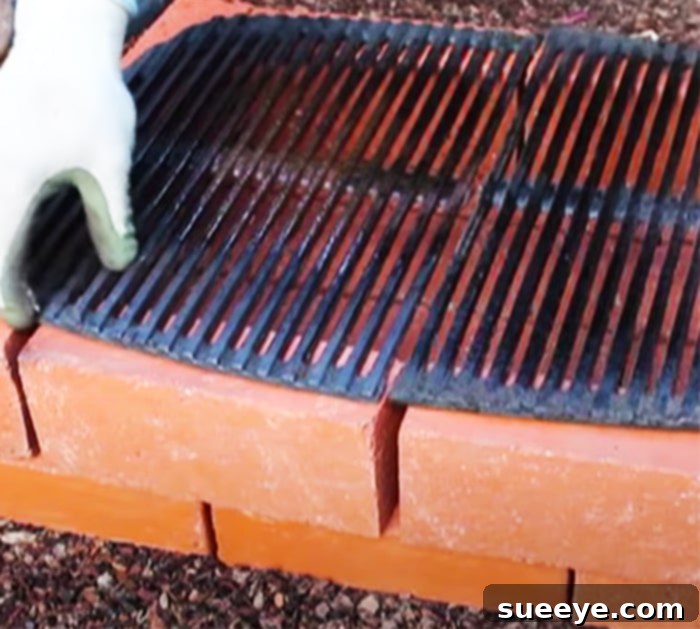
With your brick structure fully assembled, the final step in construction is to carefully place your chosen cast iron grate on top of the second layer of bricks. Take a moment to ensure it sits securely and is perfectly stable. The bricks should be positioned closely enough to provide consistent support for the entire grate, preventing it from wobbling or inadvertently falling through into the charcoal area. Make any minor adjustments to the bricks if needed to achieve a perfect, snug, and safe fit for your grate. With this final placement, the physical construction of your DIY brick grill is complete and ready for the next exciting phase: cooking!
Using Your DIY Brick Grill for Optimal Grilling Results
Now that your budget-friendly brick grill is meticulously assembled, it’s time for the most rewarding part – cooking! Here’s how to effectively use your temporary setup to achieve deliciously grilled food:
1. Adding and Lighting the Charcoal for Perfect Heat
Carefully place your chosen charcoal (whether briquettes or lump charcoal) into the hollow space created by your brick structure. You can place it directly on the ground, or for easier cleanup, line the bottom with a layer of heavy-duty aluminum foil. For the best and most consistent results, it is highly recommended to use a charcoal chimney starter. This method ensures even ignition, produces perfectly ash-covered coals, and crucially, allows you to avoid the need for chemical lighter fluids, which can impart an undesirable taste to your food. Fill the chimney with charcoal, light some crumpled newspaper or a natural fire starter underneath, and wait approximately 15-20 minutes until the charcoal is thoroughly covered in a light gray ash. Once ready, carefully pour the hot, glowing coals into the base of your brick grill.
2. Preheating the Grate for Superior Searing
Once the charcoal is evenly distributed and glowing hot, gently place your cast iron grate back onto the supporting bricks. Allow the grate to preheat for at least 5-10 minutes. A properly preheated grate is absolutely essential for several reasons: it prevents food from sticking, helps to create those coveted, beautiful, and flavorful sear marks, and ensures your food cooks evenly. You can gauge the heat by performing a simple hand test: hold your hand about an inch above the grate – if you can only comfortably hold it there for 2-3 seconds, your grill is adequately hot and ready for most types of food.
3. Grilling Your Favorite Foods with Confidence
With a perfectly preheated grate, you are now fully equipped to cook a wide variety of your favorite foods! Burgers, hot dogs, chicken pieces, succulent steaks, fresh vegetables, and even delicate fish fillets cook wonderfully on a brick grill. Keep these essential grilling tips in mind:
- Avoid Overcrowding: To ensure even cooking and facilitate easy flipping, cook your food in batches if necessary. An overcrowded grate can lead to uneven cooking and steamy, rather than seared, results.
- Monitor and Manage Heat: Since this DIY grill doesn’t have adjustable vents like commercial models, heat management primarily involves strategically moving your food. Place items needing more heat directly over the hottest coals and move them to slightly cooler spots on the grate if they are cooking too quickly. You can also adjust the amount or distribution of charcoal to fine-tune the heat.
- Utilize Direct Heat: The compact and open nature of this brick grill makes it ideal for direct heat cooking, which is best suited for foods that cook relatively quickly. For thicker cuts or items requiring slower cooking, consider pushing coals to one side for a two-zone cooking effect, if space allows.
- Clean as You Go: For easier maintenance, use a sturdy grill brush to clean the grate after each use while it is still warm. This prevents food residue from hardening and becoming difficult to remove later.
Safety Considerations and Post-Grill Care for Your DIY BBQ
While grilling is an immensely enjoyable activity, safety should always remain your paramount concern, particularly when operating a DIY setup:
- Fire Safety Vigilance: Always have essential fire safety equipment readily accessible. This includes a fire extinguisher, a large bucket of water, or a garden hose charged and ready nearby. Crucially, never, under any circumstances, leave the hot grill unattended.
- Heat Protection: Use long-handled grilling tools to maintain a safe distance from the heat, and always wear heat-resistant gloves when handling hot grates, repositioning charcoal, or moving warm bricks.
- Thorough Cool Down Period: Allow all charcoal to burn out completely and cool down for several hours before attempting to dispose of it. Ensure that the bricks themselves are entirely cool to the touch before you attempt to disassemble the grill structure. This prevents burns and ensures safe handling.
- Efficient Disassembly and Storage: Once everything is cool, carefully remove and clean your grate. Properly dispose of the cooled ash, ensuring it’s not placed in combustible containers. The bricks can then be neatly stacked and stored in a dry place for future use, perfectly demonstrating how this temporary design excels in both ease of setup and efficient takedown, minimizing storage space requirements.
Advantages and Potential Limitations of Your Homemade Brick Grill
While the DIY brick grill offers an abundance of compelling benefits, understanding its inherent characteristics helps in setting realistic expectations and maximizing its potential:
Key Advantages:
- Unmatched Cost-Effectiveness: As previously highlighted, it is an incredibly budget-friendly solution for authentic charcoal grilling, requiring minimal initial investment.
- Superior Portability & Flexibility: Its ability to be easily assembled and disassembled makes it uniquely suited for temporary needs, spontaneous events, and various outdoor locations.
- Authentic Charcoal Flavor: Consistently delivers that coveted, deep, and smoky BBQ taste that many grill masters cherish.
- Remarkable Simplicity: Features no complex parts or intricate mechanisms, making it exceptionally easy to build, operate, and maintain.
- Durability of Materials: Both clay bricks and cast iron are renowned for their robustness and longevity, promising many years of reliable service.
Potential Limitations:
- Size Constraint: Typically, a brick grill will be smaller than most permanent manufactured grills, which might limit the overall quantity of food that can be cooked simultaneously, requiring batch cooking for larger groups.
- Less Precise Heat Control: Unlike commercial grills equipped with adjustable vents and thermometers, heat control is less precise. Managing temperatures primarily involves the careful distribution and quantity of charcoal, rather than mechanical adjustments.
- Not a Permanent Fixture: Its temporary nature means it needs to be set up and taken down for each grilling session, which, while quick, could be a minor inconvenience for individuals who grill on a very frequent, almost daily, basis.
- Requires a Level Surface: For optimal stability and safety, building the grill on a perfectly flat and level surface is crucial. This requirement might restrict placement options in yards with uneven terrain.
Beyond the Basic Grill: Expanding Your Brick Creativity for Other Projects
The simple, yet effective, brick structure isn’t solely confined to grilling. The very nature of how these bricks efficiently contain heat and fire naturally lends itself to inspiring other fantastic outdoor projects. The initial idea of a functional, temporary grill can quickly spark inspiration for creating a cozy, temporary, or even a semi-permanent fire pit. By strategically adjusting the number of brick layers, modifying the overall footprint, and potentially adding a top grate to create a flat surface, you can easily transform the basic grill design into a charming fire pit perfect for evening gatherings, providing both warmth and inviting ambiance. This inherent modularity and adaptability are testaments to the remarkable versatility of bricks as an fundamental construction material, encouraging endless creative outdoor possibilities.
Conclusion: Embrace the Simplicity and Joy of DIY Grilling
Building your own DIY brick grill is far more than just a practical construction project; it’s an open invitation to embrace simplicity, cultivate resourcefulness, and rediscover the pure, unadulterated joy of outdoor cooking. With minimal effort, negligible investment, and a few basic materials, you can create a highly functional charcoal grill that consistently delivers delicious, deeply smoke-infused flavors that will impress your family and friends. Whether you are actively seeking a convenient temporary solution for casual summer gatherings, a truly portable grill for your outdoor adventures, or simply a budget-friendly entry point into the rewarding world of authentic charcoal barbecue, this ingenious brick grill effortlessly ticks all the right boxes. So, gather your bricks, secure your grate, and get ready to experience the rich, genuine taste of homemade grilled food – a true and delightful testament to the timeless wisdom that sometimes, the simplest solutions are indeed the most effective and satisfying.