
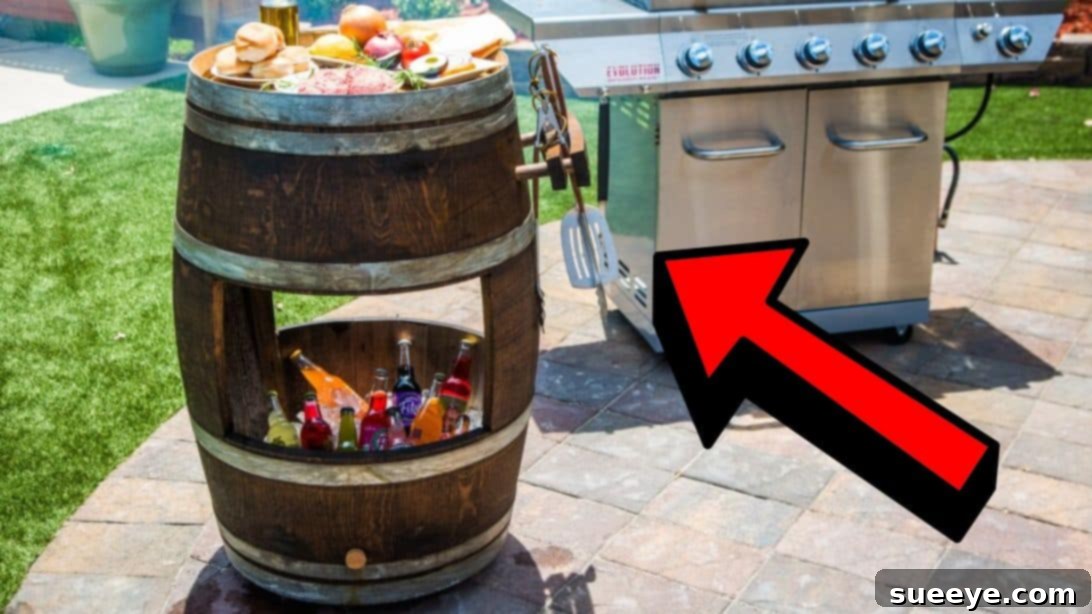
Summer days are synonymous with gathering friends and family, firing up the grill, and enjoying delicious food outdoors. However, constantly shuttling between your kitchen and the grill can dampen the fun. What if you could have all your grilling essentials, from condiments and utensils to beverages and ingredients, conveniently by your side? This fantastic DIY project, inspired by the creative minds at Hallmark Channel on YouTube, offers the perfect solution: a multi-purpose and aesthetically pleasing barrel grill cart. This repurposed masterpiece not only brings unparalleled convenience to your outdoor cooking but also adds a unique, rustic charm to any patio or backyard. Say goodbye to endless trips and hello to seamless entertaining with this innovative craft. Dive into our detailed guide below to learn how to transform an ordinary wine barrel into an extraordinary outdoor essential, and don’t forget to watch the video tutorial for a comprehensive visual walkthrough. Prepare to elevate your summer cookouts and impress your guests with this incredibly helpful and enjoyable DIY project!
Why You Need a DIY Barrel Grill Cart for Your Next Cookout
An outdoor grill cart isn’t just a luxury; it’s a game-changer for anyone who loves to entertain. Here’s why this DIY barrel version stands out:
- Unmatched Convenience: Imagine having everything you need – tongs, marinades, spices, plates, and even an ice bucket for drinks – all within arm’s reach of your grill. This cart eliminates the constant back-and-forth, allowing you to focus on cooking and enjoying your guests.
- Unique Aesthetic Appeal: A repurposed wine barrel brings a rustic, elegant, and conversation-starting element to your outdoor decor. Its natural wood tones and classic shape blend seamlessly with various backyard styles, from farmhouse chic to modern industrial.
- Portability and Flexibility: Equipped with sturdy casters, your barrel cart can be easily moved wherever the party takes you. Position it next to the grill, by the patio seating, or even transport it for an outdoor event in a different part of your yard.
- Multi-Functional Design: While perfect as a grill companion, this cart’s utility extends beyond grilling. It can serve as a portable bar, a planter stand, a storage unit for garden tools, or a decorative side table for any outdoor gathering. The internal shelving provides discreet storage, while the top surface offers ample prep or serving space.
- Eco-Friendly Repurposing: Giving a new life to an old wine barrel is a sustainable choice. Instead of sending it to a landfill, you’re transforming it into a functional and beautiful piece, contributing to environmental consciousness.
- Cost-Effective Customization: Building your own cart from a wine barrel is often more economical than purchasing a pre-made outdoor serving cart, especially one with such unique character. Plus, it allows for complete customization to fit your specific needs and style preferences.
Materials You’ll Need for Your Barrel Grill Cart Project
Before you begin, gather all the necessary tools and materials. Choosing quality items will ensure the longevity and stability of your finished cart.
- Wooden Wine Barrel: This is the centerpiece of your project. Look for a barrel that is intact, with all its metal bands secure. While wine barrels are ideal for their size and history, whiskey or bourbon barrels can also be used, often having a darker, richer stain. Ensure it’s clean and free from strong odors if it’s to be used for food or drinks.
- Jigsaw: An essential tool for cutting the access windows into the barrel. A good quality jigsaw with a wood-cutting blade will make clean, precise cuts.
- Shelf Boards: You’ll need wood planks for the internal shelving. The dimensions will depend on the size of your barrel and how many shelves you plan to install. Plywood or solid wood boards are suitable. Consider moisture-resistant wood if you plan to use the cart as an ice chest.
- Shelf Brackets: To secure your shelves inside the barrel. Choose sturdy metal or wood brackets that can support the weight you intend to place on the shelves.
- Wooden Round (or Square Top): This will form the top surface of your cart. A pre-cut wooden round of appropriate diameter can be sourced, or you can cut one yourself from a larger piece of wood. It should be thick enough to be sturdy and provide a stable surface.
- Casters (Wheels): Heavy-duty, locking casters are recommended for mobility and stability. Ensure they are designed for outdoor use and can bear the weight of the barrel plus its contents. Four casters are typical, placed strategically on the bottom.
- Wood Stain or Sealant: To protect the wood from the elements and enhance its appearance. Choose an outdoor-grade stain or a clear sealant that offers UV and moisture protection.
Additional Tools & Supplies (Highly Recommended):
- Measuring tape and pencil for marking.
- Drill with various bits for pilot holes and securing screws.
- Screws or bolts appropriate for wood and metal (for brackets, casters, and handle).
- Sander (orbital or sandpaper) for smoothing rough edges and preparing for stain.
- Safety glasses and gloves.
- Clamps (optional, but helpful for holding pieces while drilling/cutting).
- Paintbrushes or rags for applying stain.
- Level for ensuring shelves are even.
Step-by-Step Directions: Building Your Barrel Grill Cart
Transforming a wine barrel into a functional grill cart is a rewarding project. Follow these detailed steps to achieve a professional and durable result.
Step 1: Preparing Your Barrel and Marking Cuts
Begin by thoroughly cleaning your chosen wine barrel. Ensure there are no lingering wine residues or debris. Once clean, stand the barrel upright. Decide where you want your access windows or doors to be. Typically, two openings on opposite sides, between the metal straps, work best for easy access to the interior. Using a measuring tape and pencil, carefully draw the outlines of these “windows.” Consider the size of items you’ll be storing inside, such as bottles or grill tools, to determine the appropriate height and width of your openings. Ensure your markings are symmetrical and aesthetically pleasing. You’ll also want to decide on the placement for any external handles or towel racks at this stage and mark those areas.
Step 2: Cutting the Barrel Sections
Safety is paramount during this step. Don your safety glasses and gloves. Using your jigsaw, carefully cut along the lines you’ve drawn for the access windows. Take your time to make clean, smooth cuts. It’s often easier to make a pilot hole with a drill first to insert the jigsaw blade. Once the cuts are made, gently remove the cut-out pieces. You may need to support the barrel while cutting to prevent it from shifting. After cutting, sand down all the freshly cut edges to remove any splinters and create a smooth finish, making it safe to handle.
Step 3: Installing Internal Shelving and Attaching the Top
Measure the interior of your barrel to determine the size and shape of your shelf boards. Cut the shelf boards to fit snugly inside the barrel. You might opt for one or two shelves, depending on your storage needs. Position the shelf brackets inside the barrel at your desired heights, using a level to ensure they are straight. Secure the brackets firmly to the barrel staves with screws. Then, place your cut shelf boards onto the brackets, securing them if necessary. For the top surface, take your wooden round (or square top) and center it on the top opening of the barrel. Attach it securely using screws, drilling pilot holes first to prevent splitting the wood. You can choose to make the top fixed, or if you prefer, hinge it for easier access to the barrel’s interior, though the side windows provide ample access.
Step 4: Adding Mobility and Finishing Details
Flip the barrel over carefully to access its bottom. Position the casters evenly around the base, typically four, to ensure even weight distribution and stability. Mark the screw holes, drill pilot holes, and then securely attach the casters with appropriate screws. If you wish to add an external handle for easier maneuvering, choose a sturdy handle, mark its position on the side of the barrel (opposite the grill if applicable), and attach it securely. Consider adding a small towel rack or hooks for grilling utensils on the exterior for extra convenience.
Step 5: Staining and Sealing for Durability and Beauty
Before staining, ensure the entire barrel is clean and free of dust. If there are any labels or old markings, remove them. Lightly sand the entire exterior and all cut edges once more to ensure a smooth surface for staining. Apply your chosen wood stain evenly, following the manufacturer’s instructions. A brush or rag can be used. Allow the first coat to dry completely, then apply a second coat if a deeper color is desired. Once the stain is dry, apply an outdoor-grade wood sealant or varnish. This step is crucial for protecting the wood from moisture, UV rays, and general wear and tear, especially since the cart will be used outdoors. Allow ample drying time for all coats before use.
Creative Customization Ideas for Your Barrel Grill Cart
Once the basic structure is complete, let your creativity flow! Personalizing your grill cart makes it truly yours and enhances its functionality:
- Integrated Ice Bucket: Line the bottom section of the barrel with a sturdy, waterproof liner (like a galvanized tub) to create a built-in ice chest for keeping drinks chilled. This is where those side access windows truly shine.
- Bottle Opener and Cap Catcher: Mount a rustic bottle opener to the side of the barrel, perhaps with a small mesh bag or box underneath to catch the caps.
- Utensil Hooks and Towel Bar: Install hooks along the outer edge of the top or a small towel bar on the side for easy access to grilling tools and a hand towel.
- Cutting Board Surface: If your wooden round top isn’t sealed, consider integrating a removable cutting board section for prep work.
- Lighting: String some battery-operated LED lights inside the barrel or along its exterior for ambiance during evening gatherings.
- Personalized Stenciling: Add your family’s initial, a fun grilling quote, or a custom design using stencils and outdoor-grade paint.
- Magnetic Strip: Attach a heavy-duty magnetic strip to an inner wall or the top edge to hold metal utensils securely.
Maintenance Tips for Longevity
To ensure your DIY barrel grill cart remains beautiful and functional for many summers to come, proper maintenance is key:
- Regular Cleaning: Wipe down the exterior and interior regularly with a damp cloth to remove dust, food spills, and grime. For deeper cleaning, use a mild soap solution and rinse thoroughly.
- Re-sealing: Depending on your climate and how much exposure your cart gets to the elements, plan to reapply a wood sealant every 1-2 years. This will protect against moisture damage, UV degradation, and prevent the wood from drying out and cracking.
- Caster Care: Keep the casters clean and free of debris. If they start to squeak or become difficult to roll, apply a silicone-based lubricant.
- Winter Storage: If possible, store your barrel cart in a covered area during the off-season, such as a garage or shed. This will significantly extend its lifespan by protecting it from harsh winter weather.
- Check Fasteners: Periodically inspect all screws and bolts – for the shelves, casters, and top – to ensure they remain tight. Tighten any loose fasteners to maintain stability.
Safety First: Important Considerations
Working with power tools and heavy objects always requires attention to safety:
- Personal Protective Equipment: Always wear safety glasses when cutting or drilling. Gloves can protect your hands from splinters and when handling stains.
- Tool Handling: Familiarize yourself with your jigsaw and drill before starting. Ensure blades are sharp and bits are appropriate for the material. Keep hands clear of moving parts.
- Stable Workspace: Work on a flat, stable surface. Secure the barrel so it doesn’t roll or tip over during cutting and assembly.
- Ventilation: When applying wood stain or sealant, work in a well-ventilated area to avoid inhaling fumes.
- Heavy Lifting: Wine barrels can be heavy. Get assistance when moving or flipping the barrel to prevent injury.
- Fire Safety: While the cart is designed for outdoor use, ensure it is always placed a safe distance from open flames or hot grills to prevent any fire hazards.
Easy DIY Barrel Grill Cart Tutorial: Your Summer Essential Awaits!
There you have it – a comprehensive guide to crafting your very own barrel grill cart. This project is more than just building a piece of furniture; it’s about enhancing your outdoor living experience, embracing sustainability, and adding a personal touch to your summer gatherings. The satisfaction of creating something so functional and beautiful with your own hands is truly immeasurable. With a little time and effort, you’ll have a stunning, portable serving station that will be the envy of all your guests. Thanks again to Hallmark Channel via YouTube for the original inspiration and all images used here. If you enjoyed this DIY adventure, we highly recommend visiting their channel for more inspiring video tutorials and subscribing to their fantastic content. Now, grab your tools, unleash your inner craftsman, and get ready to enjoy countless memorable moments around your new, spectacular barrel grill cart. Happy crafting and happy grilling!