
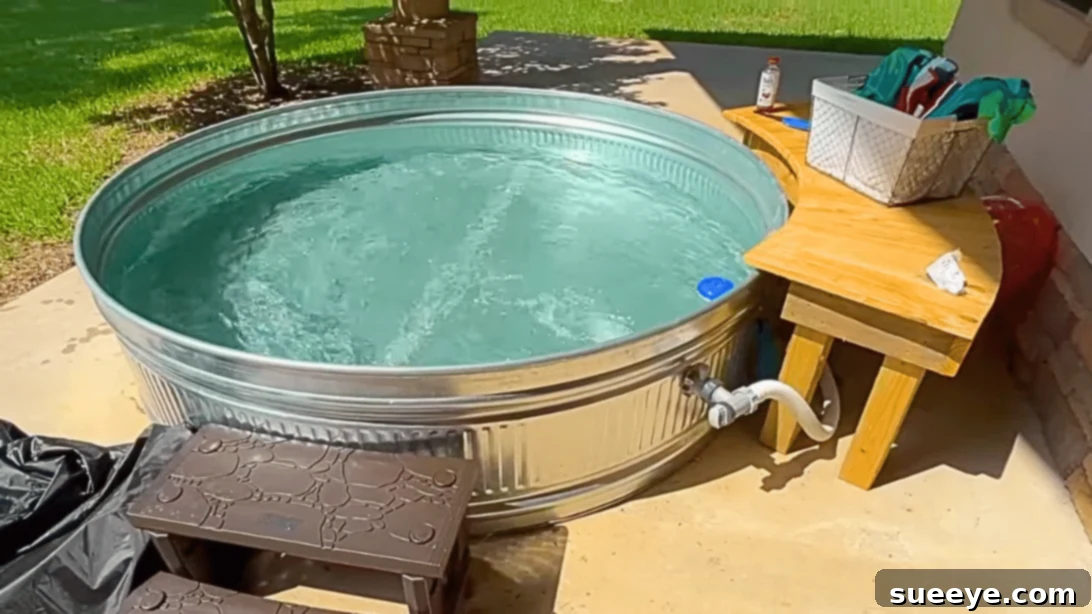
Transforming your backyard into a personal retreat for summer fun doesn’t have to break the bank. While traditional inground pools come with significant costs and permanent installation, there’s an increasingly popular, budget-friendly, and stylish alternative: the DIY stock tank pool, affectionately known as the “cowboy pool.” Imagine having a refreshing oasis right in your yard, perfect for cooling off on hot days, enjoying with family, or simply unwinding after a long week. This innovative approach allows you to create a functional and aesthetically pleasing pool without the hefty price tag or the commitment of a permanent structure.
Whether you dream of a vibrant cookout, an exciting obstacle course, or simply a tranquil spot to soak up the sun, a stock tank pool offers unmatched versatility. This guide delves into creating your very own backyard escape, inspired by the clever methods demonstrated by Nice Flipping Choice on YouTube. Get ready to dive into a refreshing summer with a pool that combines convenience, affordability, and rustic charm.
Why a DIY Stock Tank Pool is Your Ultimate Summer Solution
The concept of a stock tank pool has surged in popularity for several compelling reasons, making it an excellent choice for almost any homeowner or renter looking to enhance their outdoor living space without extensive investment. This type of pool offers a unique blend of practicality and appeal that traditional pools simply cannot match.
Budget-Friendly Backyard Bliss
One of the most attractive aspects of a cowboy pool is its cost-effectiveness. Compared to the tens of thousands of dollars required for an inground pool installation, a stock tank pool can be assembled for just a few hundred dollars. The primary component, the stock tank itself, is far less expensive than fiberglass or vinyl pool liners. This affordability makes backyard aquatic fun accessible to a much broader audience, allowing you to allocate your savings to other summer essentials, decor, or even a DIY Pool Deck to complement your new plunge pool.
Unrivaled Convenience and Portability
Unlike permanent structures, stock tank pools offer incredible convenience. They are relatively easy to set up and, crucially, to take down. Once the summer season concludes, or if you decide to relocate, you can simply drain, clean, and store your stock tank and filtration system. This makes them ideal for renters, individuals with temporary living situations, or anyone who doesn’t want the long-term commitment of a fixed pool. Their portability also means you can experiment with different locations in your yard from one season to the next, optimizing for sun exposure or privacy as your needs change.
Versatility and Customization Potential
A stock tank pool isn’t just a basic container for water; it’s a blank canvas for your creativity. Available in various sizes, typically ranging from 6 to 10 feet in diameter, you can choose one that perfectly fits your available space and personal preferences. While smaller tanks are excellent for a quick dip or children’s play, larger 8-foot tanks provide ample space for adults to lounge and cool off. Beyond size, these pools can be integrated into your landscaping with custom decking, decorative surrounds, solar heating solutions, or even unique lighting, transforming a simple agricultural trough into a stylish focal point for your backyard oasis.
Essential Materials for Your DIY Cowboy Pool Project
Building your own cowboy pool is a straightforward process that requires a few key materials, most of which are readily available at hardware stores, farm supply outlets, or online. Gathering everything before you begin will ensure a smooth and efficient build.
- 8 ft Stock Tank: This is the heart of your pool. While an 8-foot tank is popular for providing a good balance of size and manageability, stock tanks come in various dimensions. Consider your available space and desired capacity. Ensure it’s a galvanized steel tank, designed to hold water.
- Filter Pump Set: A robust filter pump is crucial for maintaining water quality, cleanliness, and circulation. Look for an above-ground pool filter pump that matches the volume of your stock tank. These sets typically include the pump, filter cartridge, and connecting hoses.
- 2¾ inch Hole Saw with Arbor: This specialized drill bit is essential for creating clean, perfectly sized holes in the stock tank for your pump’s inlet and outlet connections. Accuracy here prevents leaks, so invest in a quality saw.
- Inlet Strainer: Part of your filtration system, the inlet strainer prevents larger debris from entering the pump and helps draw water efficiently for filtration.
- Plunger Valve: Often included with filter pump sets, these valves allow you to control water flow to and from the pump, making filter changes and maintenance much easier without significant water loss.
- Plumber’s Putty: An indispensable sealing compound, plumber’s putty creates a watertight seal around the pump fittings where they pass through the tank walls. It’s flexible and durable, ensuring no leaks.
- Pool Cover: A good quality pool cover is vital for keeping debris out, reducing water evaporation, and maintaining water temperature. It also serves as a safety measure when the pool is not in use.
- Comprehensive Guide: While this article provides a detailed overview, consulting a comprehensive setup guide, like the one available at stocktankpool.net/setup, can offer additional insights, troubleshooting tips, and visual aids specific to various filter pump models.
Step-by-Step Guide to Building Your Cowboy Pool
Building your stock tank pool is an exciting DIY project that can be completed in an afternoon. Follow these detailed steps to ensure a sturdy, leak-free, and enjoyable backyard feature.
Step 1: Site Preparation and Tank Placement
Before you even think about drilling, choose the perfect spot for your pool. It should be on a level, stable surface to prevent the tank from tilting or settling unevenly once filled with hundreds of gallons of water. A concrete patio, a compacted gravel bed, or a reinforced deck are ideal. Ensure the area is clear of sharp objects that could damage the tank’s bottom. Once you’ve selected your spot, thoroughly clean the inside of the stock tank to remove any manufacturing residue, dust, or debris. A quick rinse and wipe will suffice.
Step 2: Drilling for the Filter Pump Connections
This is arguably the most critical step. Carefully determine the placement of your filter pump’s inlet and outlet connections. They are typically positioned near the top of the tank, spaced appropriately for your pump’s hose lengths. Mark these spots clearly. Using your 2¾ inch hole saw with an arbor attached to a powerful drill, slowly and steadily drill the two holes. Apply firm, consistent pressure, allowing the saw to do its work. Be mindful of safety – wear appropriate eye protection and gloves. A clean, smooth cut will be easier to seal later.
Step 3: Installing the Filtration System Components
Once the holes are drilled, it’s time to install the inlet strainer, plunger valve, and connect the filter pump. For each connection point, apply a generous amount of plumber’s putty to both sides of the tank opening before inserting the fittings. This creates a waterproof gasket. Tighten the fittings securely but avoid over-tightening, which could warp the tank or fittings. Connect the hoses from the filter pump to the newly installed inlet and outlet valves, following your pump’s specific instructions. Ensure all clamps are tightened properly.
Step 4: Leak Testing and Initial Fill
Before fully filling your pool, perform a crucial leak test. Fill the stock tank with water just enough to cover the newly installed fittings. Let it sit for at least an hour, meticulously checking all connection points, inside and out, for any signs of dripping or seepage. If you find a leak, immediately drain the water slightly, re-tighten the fitting, or reapply plumber’s putty as needed, then re-test. Once confident there are no leaks, give the inside of the tank another quick wipe-down if necessary.
Step 5: Full Fill and Enjoyment
With the leak test passed, you can now fully fill your stock tank pool! Use a garden hose to fill it to your desired level, typically a few inches from the rim. Once filled, turn on your filter pump to begin circulating the water. At this stage, you’ll also want to test and balance your water chemistry, adding any necessary sanitizers like chlorine or a non-chlorine shock, and adjusting pH levels for safe and comfortable swimming. Finally, step in, relax, and enjoy your brand new, refreshing cowboy pool!
Maintaining Your Stock Tank Pool for Lasting Enjoyment
Proper maintenance is key to ensuring your stock tank pool remains a clean, safe, and inviting haven all summer long. While simpler than traditional pools, a cowboy pool still requires regular care.
Water Chemistry Management
Just like any other pool, maintaining balanced water chemistry is crucial. You’ll need a basic pool testing kit to monitor pH levels (ideally between 7.4-7.6) and sanitizer levels (e.g., chlorine). Regular testing and the addition of appropriate chemicals will prevent algae growth, keep the water clear, and protect bathers from skin and eye irritation. Shocking the pool periodically, especially after heavy use or rain, will help oxidize contaminants.
Filtration and Cleaning
Your filter pump is your first line of defense against dirty water. Run the pump for several hours each day (the exact duration depends on pump size and pool usage) to circulate and filter the water. Clean or replace the filter cartridge regularly, typically weekly or bi-weekly, to maintain filtration efficiency. Additionally, skim the water surface daily to remove leaves, bugs, and other debris, and use a soft brush or sponge to gently scrub the interior walls of the tank as needed to prevent biofilm buildup.
Winterization and Storage
As summer fades, proper winterization will protect your investment and make setup easier next season. Drain the stock tank completely, clean its interior thoroughly, and allow it to air dry. Disconnect the filter pump and hoses, drain any water from them, and store them in a dry, frost-free location. The stock tank itself can be stored upright or on its side, ideally covered to prevent accumulation of debris. This careful approach ensures longevity for all components.
Customization and Enhancements for Your Backyard Oasis
Your cowboy pool is more than just a place to cool off; it’s an opportunity to express your personal style and create a truly unique backyard retreat. The rustic aesthetic of a galvanized stock tank provides a fantastic foundation for a variety of enhancements.
Decking and Surrounds
Elevate the look and functionality of your stock tank pool with custom decking. A simple wooden deck built around the pool can transform it into a more integrated feature, providing space for lounging, towels, and drinks. Consider linking back to our related guide on How To Build A DIY Pool Deck for inspiration. You can also use pavers, gravel, or stone to create attractive borders and pathways leading to your pool.
Lighting and Ambiance
Extend your pool enjoyment into the evening with thoughtful lighting. Solar-powered string lights draped around the perimeter, waterproof LED lights submerged in the water, or even simple lanterns placed nearby can create a magical, inviting atmosphere. Combine with outdoor speakers for music, and you have the perfect setting for evening relaxation or entertaining.
Landscaping and Shade
Integrate your stock tank pool into your garden by surrounding it with drought-tolerant plants, ornamental grasses, or vibrant flowers. Add comfortable seating, hammocks, or bean bags for ultimate relaxation. For protection from the sun, consider a large cantilever umbrella, a sail shade, or even building a pergola over the pool area, providing much-needed relief on scorching summer days.
Safety First: Important Considerations for Your Stock Tank Pool
While a stock tank pool offers immense fun, safety should always be your top priority. Adhering to these guidelines will help ensure a safe environment for everyone enjoying your backyard oasis.
Constant Supervision
Never leave children unsupervised around any body of water, including a stock tank pool. Even shallow water poses a drowning risk. Designate an adult to be a “water watcher” at all times when the pool is in use.
Secure Grounding and Electrical Safety
Ensure your stock tank is placed on a completely level and stable surface to prevent tipping, which could cause injury or significant water loss. For the filter pump, always use a GFCI (Ground Fault Circuit Interrupter) protected outlet. Never use extension cords unless they are rated for outdoor use and specifically for pool pumps, and ensure all electrical connections are kept dry and away from the pool area.
Fencing and Barriers
Check local regulations regarding pool fencing and barriers. Depending on your area and the depth of your stock tank, you might be required to install a fence or other barrier to prevent unauthorized access, particularly by young children or pets. A sturdy pool cover, securely fastened, can also act as an additional layer of protection when the pool is not in use.
Cleanliness and Water Quality
Regularly test and treat your pool water to prevent the growth of harmful bacteria and algae. Unclean water can lead to skin rashes, ear infections, or more serious health issues. Educate all users on basic pool hygiene, such as showering before entering the pool.
Building an inexpensive cowboy pool is a fantastic way to enhance your outdoor living space and make lasting summer memories. With careful planning, a few essential materials, and a commitment to maintenance and safety, you can create a beautiful, functional, and refreshing retreat right in your own backyard. Special thanks to Nice Flipping Choice via YouTube for inspiring this accessible and enjoyable DIY project. Follow and subscribe to his channel for more innovative ideas!