
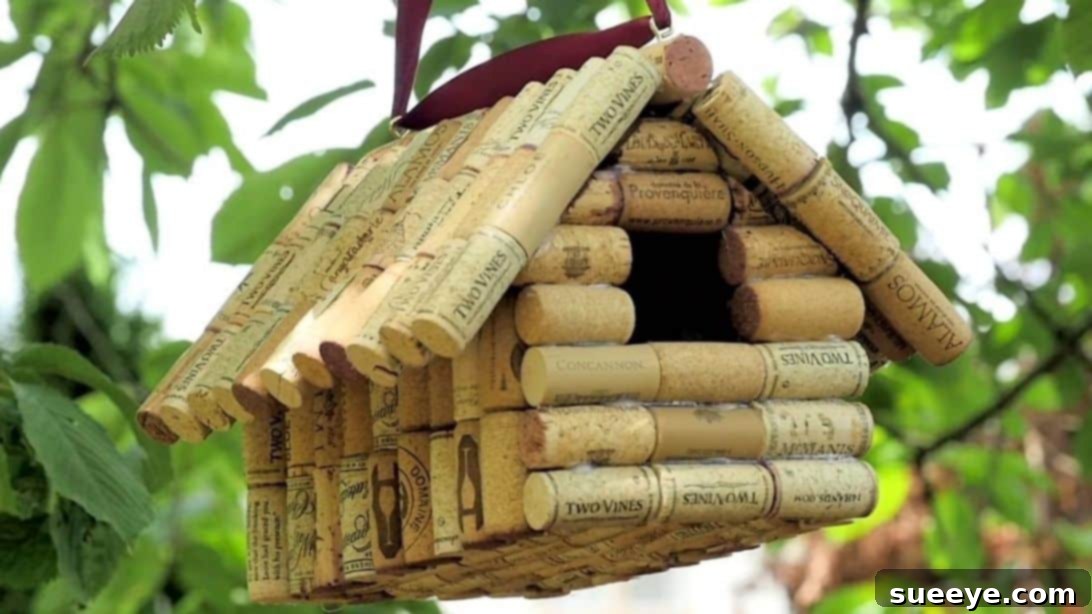
Craft a Charming DIY Wine Cork Birdhouse: An Eco-Friendly Project for Your Garden
Are you an avid wine enthusiast with a growing collection of corks, unsure what to do with them? Or perhaps you’re simply looking for a unique, sustainable, and utterly charming craft project to enhance your outdoor space? Look no further! This comprehensive guide will walk you through creating a delightful DIY wine cork birdhouse, transforming what might otherwise be discarded materials into a functional and aesthetically pleasing haven for local birds.
Inspired by creative designs like those shared by Crafty House on YouTube, this project is surprisingly simple to execute and incredibly rewarding. It’s an excellent way to repurpose materials, add a personal touch to your garden, and contribute to local wildlife by offering a cozy shelter. You don’t need extensive crafting experience or specialized tools; just a willingness to create, a steady hand, and a collection of those wonderful wine corks. Let’s dive into the world of sustainable crafting and build something truly special!
Why Build a Wine Cork Birdhouse? More Than Just a Craft!
Creating a birdhouse from wine corks offers a multitude of benefits, extending beyond just the joy of crafting. Here are several compelling reasons to embark on this eco-friendly project:
- Sustainable Upcycling: Every cork you use is one less item in a landfill. This project is a fantastic example of upcycling, giving new life to materials that would otherwise be considered waste. It’s a small but meaningful step towards a more sustainable lifestyle.
- Unique Garden Decor: Forget mass-produced garden ornaments! A wine cork birdhouse boasts a rustic charm and unique texture that store-bought items can’t replicate. It adds a quirky, handcrafted touch that instantly personalizes your garden or patio.
- Attracting Local Wildlife: Providing shelter is crucial for birds, especially during harsh weather or nesting seasons. A well-placed birdhouse can attract a variety of local species, turning your garden into a lively hub of natural activity. Observing birds can be a source of immense joy and a great way to connect with nature.
- Easy and Accessible: This project is suitable for crafters of all skill levels, from beginners to experienced DIY enthusiasts. The materials are inexpensive and readily available, making it an accessible craft for everyone.
- A Perfect Gift Idea: A handmade wine cork birdhouse makes a thoughtful and unique gift for nature lovers, gardeners, or anyone who appreciates handmade treasures. It shows care, creativity, and a touch of environmental consciousness.
- Educational Opportunity: For families, building a birdhouse can be a fantastic educational activity, teaching children about sustainability, bird habitats, and the importance of respecting nature.
By investing a little time and creativity, you’re not just making a birdhouse; you’re creating a statement piece, a wildlife sanctuary, and a testament to the power of repurposing.
Gather Your Essentials: Materials for Your Cork Creation
Before you begin assembling your charming wine cork birdhouse, it’s essential to gather all your materials. Having everything at hand will ensure a smooth and enjoyable crafting process. Here’s a detailed list of what you’ll need:
- A Generous Collection of Wine Corks: This is, of course, the star of our project! You’ll need a substantial number of corks, especially if you plan to make a larger birdhouse. For the dimensions described in this guide, aim for at least 150-200 corks to be safe. You can collect these from your own bottles, ask friends and family to save theirs, or even purchase them in bulk from craft stores or online. Natural corks are generally easier to work with and more authentic in appearance than synthetic ones.
- Hot Glue Gun: An indispensable tool for this project. A reliable hot glue gun will be your primary adhesive method, providing quick and strong bonds between corks. Ensure your glue gun is clean and in good working order.
- Plenty of Hot Glue Sticks: Given the number of corks you’ll be assembling, you will go through several glue sticks. Stock up to avoid interruptions in your crafting flow.
- Craft Knife or Utility Knife: A sharp knife is crucial for precise cutting and trimming of corks. Always use a fresh, sharp blade for safety and efficiency. Remember to exercise extreme caution when handling any sharp object.
- Eye Hooks (Rust-Resistant): Two small eye hooks will be used to create the hanging mechanism for your birdhouse. Opt for rust-resistant hooks, especially if your birdhouse will be exposed to the elements.
- Durable Ribbon, Twine, or Wire: Choose a strong material like a thick satin ribbon, natural jute twine, or even a sturdy floral wire for hanging your birdhouse. Consider its weather resistance and load-bearing capacity.
- Optional but Recommended Tools:
- Cutting Mat: Protect your work surface when using the craft knife.
- Ruler or Straight Edge: For measuring and ensuring straight lines, especially when building the base and walls.
- Pencil: For marking cut lines or cork positions.
- Sandpaper (fine-grit): To smooth any rough edges on cut corks, if desired.
- Outdoor Sealant or Varnish: To waterproof and protect your finished birdhouse from the elements, significantly extending its lifespan.
- Safety Gloves: While not strictly necessary for corks, if you’re prone to minor cuts or want added protection, gloves can be helpful.
Once you have all your materials neatly organized, you’re ready to embark on the exciting journey of building your very own wine cork birdhouse!
Step-by-Step Guide: Crafting Your Wine Cork Birdhouse
Now that you have all your materials, let’s begin the fun part: assembling your beautiful wine cork birdhouse. Follow these detailed steps for a successful and sturdy creation.
Step 1: Constructing the Sturdy Base
The base is the foundation of your birdhouse, so it needs to be robust and flat. Begin by creating a rectangular base that is approximately 4 wine corks wide by 5 wine corks long. To do this:
- Lay out your corks horizontally on a flat, protected surface.
- Apply a line of hot glue along the side of one cork, then firmly press another cork against it, ensuring they are perfectly aligned. Hold for a few seconds until the glue sets.
- Repeat this process to create rows of corks. You will make five rows, each consisting of four corks glued side-by-side.
- Once you have your five rows, apply hot glue along the long edges of these rows and carefully press them together to form a solid 4×5 cork rectangle. Ensure all connections are secure and the base is flat and stable. Set this aside to allow the glue to fully cool and cure.
Step 2: Building the Walls and Defining the Entrance
With the base complete, it’s time to build the walls of your birdhouse. This involves attaching corks in a standing (vertical) manner around the perimeter of the base.
- Take your corks and stand them upright. Apply hot glue to the bottom of each cork and to one side, then press it firmly onto the edge of your base.
- Begin by building the two longer sides and one of the shorter back sides. Cover these three sides of the base with two full layers of standing corks. Each layer should be tightly packed, with corks glued to the base and to their neighboring corks.
- The remaining short side will be the front of the birdhouse, where the entrance will be. For this front side, you will start by building approximately 5 layers of horizontal corks. Lay these corks flat, stacking them one on top of the other, gluing each cork to the one below and to its neighbors on the sides.
- Creating the Entrance Hole: When you reach the desired height for the entrance (typically within the last two layers of these 5 horizontal layers), you will strategically leave a gap. For instance, in the 4th and 5th layers of the front wall, leave a central space by skipping two corks. This creates the birdhouse’s entrance. Ensure the corks around this opening are firmly glued to define the shape.
Step 3: Crafting the Pitched Roof
A classic pitched roof adds charm and functionality, protecting the birds from rain and sun. This requires a bit of precision in cutting and assembly.
- Prepare the Roof Panels: Create two rectangular panels for the roof. Each panel should be approximately 9 wine corks long by 3 wine corks wide, with two layers of corks for added thickness and insulation. Glue these corks together horizontally, similar to how you made the base, ensuring strong, flat panels.
- Forming the Slants for the Roof: To give the roof its pitched appearance, you’ll need to create slants on the top edges of the birdhouse’s side walls. Add three more layers of horizontal corks on each of the *short side walls* (the ones without the entrance). These layers will gradually step upwards.
- Once these extra layers are in place, use your craft knife to carefully cut a diagonal slant into the top edges of these layered short walls. The slant should be even on both sides, allowing the roof panels to sit flush and meet at a peak. Exercise extreme caution when cutting.
- Attaching the Roof: Apply a generous amount of hot glue along the slanting edges you just created on both side walls. Carefully position one of your pre-made roof panels onto one slant, pressing firmly. Repeat with the second roof panel on the opposite slant, ensuring the two panels meet at the top center, forming a strong “V” shape.
- You will likely have a small gap at the very top center where the two roof panels meet. Fill this gap by carefully cutting and gluing small pieces of wine cork, or full corks if they fit, to create a neat and secure ridge. Ensure all sides of the roof are glued together tightly for maximum stability and weather resistance.
Step 4: Adding the Hanging Mechanism and Finishing Touches
The final steps involve preparing your birdhouse for hanging and adding any desired protective elements.
- Attach Eye Hooks: Take your eye hooks and carefully screw them into the top center of each side of the roof, about an inch or two in from the edge. Twist them firmly until they are securely embedded in the corks. These will serve as the attachment points for your hanging material.
- Insert Ribbon or Twine: Thread your chosen ribbon, twine, or wire through both eye hooks. Ensure you have enough length to hang the birdhouse at your desired location.
- Secure the Loop: Bring the ends of the ribbon together and tie a strong, secure knot. A double knot or a square knot is recommended to prevent it from coming undone. Trim any excess material.
- Optional Weatherproofing: For a birdhouse that will withstand the elements outdoors, consider applying an outdoor-grade sealant or varnish to all cork surfaces. This will protect the corks from moisture and UV damage, significantly extending the life of your birdhouse. Allow it to dry completely according to the product instructions.
And there you have it! Your charming, handcrafted wine cork birdhouse is now complete and ready to welcome its first feathered residents. Take a moment to admire your work!
Pro Tips for a Perfect Wine Cork Birdhouse
To ensure your wine cork birdhouse is not only beautiful but also durable and functional, consider these expert tips:
- Quality Over Quantity for Corks: While having many corks is great, try to select corks of similar size and shape for a more uniform and structurally sound birdhouse. Natural corks are often preferred for their organic look and ease of cutting, though synthetic corks can also be used.
- Patience with Glue: Hot glue sets quickly, but giving it a few extra seconds to cool and solidify after pressing corks together ensures a stronger bond. Don’t rush the assembly process.
- Reinforce Key Joints: For areas under stress, like where walls meet the base or where the roof panels join, apply a little extra glue or even consider a more permanent, waterproof adhesive (like silicone or construction adhesive) if you plan for it to be a long-term outdoor fixture.
- Safe Cutting Practices: Always cut away from your body and use a fresh, sharp blade. A cutting mat will protect your surfaces. If a cork is difficult to cut, score it several times rather than trying to cut through in one go.
- Weatherproofing is Key: If your birdhouse will live outdoors, weatherproofing is crucial. A clear, non-toxic, outdoor-grade sealant (like Mod Podge Outdoor, clear acrylic sealant, or marine varnish) will protect the corks from rain, humidity, and UV rays, preventing decay and discoloration. Apply several thin coats, allowing each to dry thoroughly.
- Bird-Friendly Design: Ensure the entrance hole is an appropriate size for the birds you wish to attract (e.g., smaller holes for wrens, larger for bluebirds). Avoid painting the inside of the birdhouse, as fumes can be harmful to birds.
- Add a Perch: You can easily add a small perch just below the entrance hole. Simply drill a small hole into a cork piece, insert a sturdy twig, and glue the cork piece to the birdhouse.
- Consider Drainage: While cork is somewhat porous, a small drainage hole in the center of the base can prevent water from pooling inside the birdhouse.
Customization and Creative Variations
Once you’ve mastered the basic wine cork birdhouse, unleash your creativity with these customization ideas:
- Varying Sizes and Shapes: Experiment with different dimensions for the base and roof to create birdhouses of various sizes, suitable for different bird species. You could even try round or hexagonal bases!
- Decorative Elements:
- Paint or Stain: While cork has a natural beauty, you can paint or stain specific corks or sections of the birdhouse for a pop of color. Use non-toxic, outdoor-friendly paints.
- Natural Accents: Glue small twigs, dried flowers, moss, or even tiny pinecones to the exterior for an even more rustic and natural look.
- Beads or Buttons: Add small, weatherproof beads or buttons for a whimsical touch.
- Multi-Compartment Birdhouses: For the ambitious crafter, design a larger structure with internal dividers to create separate nesting spaces for multiple bird families.
- Bird Feeder Hybrid: Instead of a fully enclosed birdhouse, design an open-sided structure with a shallow tray or platform for seeds, creating a unique bird feeder.
The Benefits of Welcoming Birds to Your Garden
Beyond the aesthetic appeal of your new birdhouse, inviting birds into your garden offers numerous ecological and personal benefits:
- Natural Pest Control: Many birds feast on insects like aphids, caterpillars, and mosquitoes, acting as natural pest controllers and reducing the need for chemical pesticides in your garden.
- Pollination Assistance: While not all birds are pollinators, some species, particularly hummingbirds, play a role in pollinating flowering plants as they seek nectar.
- Weed Control: Certain birds, like finches, consume weed seeds, helping to keep unwanted plants from sprouting in your flowerbeds.
- Increased Biodiversity: Providing food, water, and shelter helps support local bird populations, contributing to a healthier and more diverse ecosystem in your immediate surroundings.
- Joy and Relaxation: Birdwatching is a deeply calming and rewarding hobby. The sight and sound of birds can reduce stress, improve mood, and provide endless hours of peaceful observation.
- Educational Value: For children and adults alike, observing birds can be a fascinating way to learn about nature, wildlife behavior, and environmental cycles.
Maintaining Your Cork Birdhouse for Longevity
To ensure your wine cork birdhouse remains a welcoming and safe haven for birds year after year, proper maintenance is essential:
- Regular Cleaning: Birdhouses should be cleaned annually, ideally in late winter or early spring before nesting season begins, or after a brood has fledged. Remove old nests, debris, and any parasites. Use a stiff brush and warm water (avoid harsh chemicals). Ensure it’s completely dry before re-hanging.
- Inspection for Damage: Periodically check your birdhouse for any signs of wear and tear, especially if it’s exposed to harsh weather. Look for loose corks, decaying glue, or structural weaknesses.
- Repairs: If you find loose corks, re-glue them promptly. If the hanging ribbon starts to fray, replace it with a new, sturdy one. Prompt repairs can prevent minor issues from becoming major damage.
- Re-sealing: If you’ve applied an outdoor sealant, consider reapplying a fresh coat every few years, especially if the birdhouse is in direct sunlight or exposed to heavy rain. This will prolong its life and maintain its protective qualities.
- Optimal Placement: Place your birdhouse in a sheltered spot, away from strong winds and direct predators (like cats or squirrels). Ensure it’s easily accessible for cleaning but out of the reach of curious hands.
By following these maintenance tips, your handmade wine cork birdhouse will continue to be a cherished part of your garden and a safe refuge for feathered friends for many seasons to come.
Conclusion: A Sustainable Craft, a Beautiful Garden Addition
There you have it – a comprehensive guide to crafting your very own DIY wine cork birdhouse! This project is a wonderful blend of creativity, sustainability, and practicality. You’ve transformed simple, discarded wine corks into a charming piece of garden art that not only enhances your outdoor aesthetic but also provides a vital sanctuary for local birds.
Embracing upcycled crafts like this not only minimizes waste but also allows you to express your unique style and connect more deeply with the natural world around you. The process is enjoyable, the materials are accessible, and the end result is a truly special item that will bring joy for years to come.
So, gather your corks, fire up your glue gun, and start building! We encourage you to share your creations and inspire others to embark on their own eco-friendly crafting adventures. Enjoy the satisfaction of creating something beautiful and functional with your own hands, and delight in the feathered visitors your new cork birdhouse will surely attract. Happy crafting!
*These amazing images are all credited to Crafty House via YouTube. Check their other content and follow for more inspiring DIY projects!