
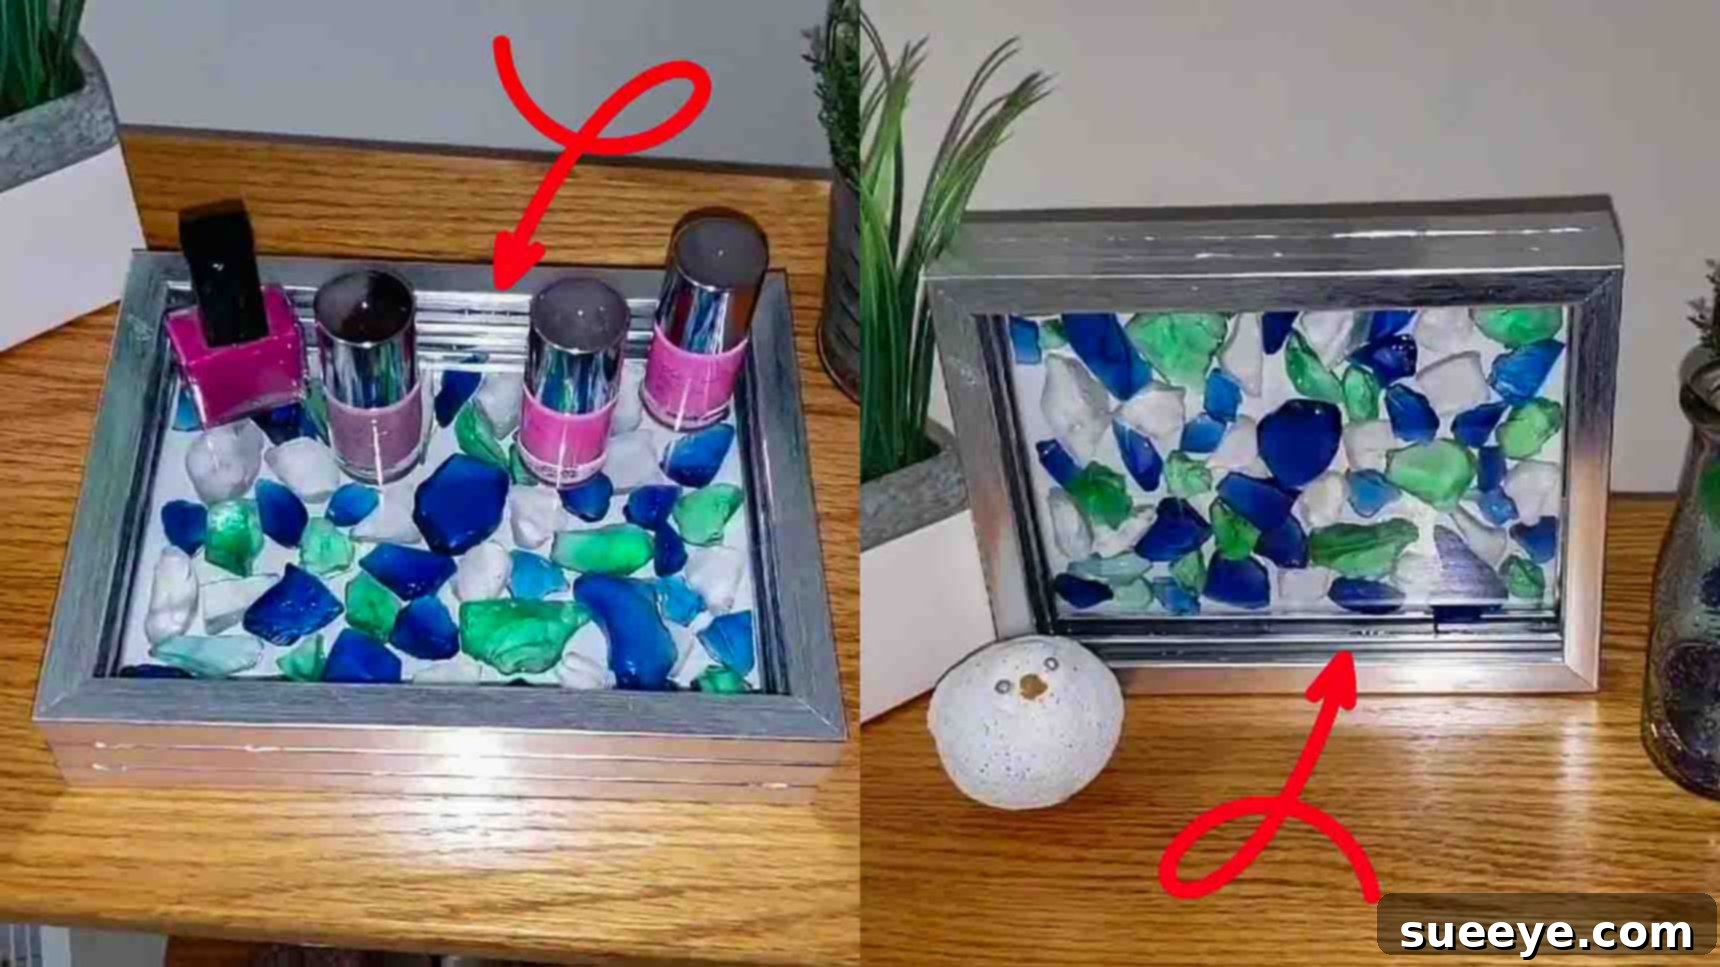
DIY Dollar Tree Sea Glass Tray: Craft Coastal Charm Affordably
Are you searching for an engaging and budget-friendly weekend craft project that adds a touch of personalized elegance to your home? Look no further! This DIY sea glass tray, inspired by the brilliant creativity of Jennifer Mowan5 on YouTube, is the perfect solution. Imagine transforming humble Dollar Tree items into a stunning piece of coastal-inspired decor that looks far more expensive than it is. This project is not only incredibly easy but also remarkably quick and economical, making it ideal for crafters of all skill levels. With just a few readily available materials, you can create a unique accent piece that will undoubtedly enhance any space, bringing a serene, beachy vibe indoors. Dive into this comprehensive tutorial and discover how simple it is to craft your very own beautiful sea glass tray.
Why Choose a DIY Sea Glass Tray?
Beyond its aesthetic appeal, crafting your own sea glass tray offers a multitude of benefits:
- Affordable Elegance: Achieve a sophisticated, high-end look without a hefty price tag, thanks to the accessibility of Dollar Tree materials.
- Personalized Decor: Enjoy the freedom to customize colors, textures, and arrangements to perfectly complement your existing home aesthetic and personal taste.
- Simple Crafting: This project is designed for beginners and seasoned crafters alike, requiring minimal specialized tools or advanced expertise.
- Versatile Functionality: The finished tray is incredibly versatile, ideal for organizing trinkets, serving light refreshments, or simply acting as a standalone decorative centerpiece.
- Creative Expression: Indulge your creative spirit by transforming everyday items into a unique piece of art that reflects your style and personality.
- Sense of Accomplishment: There’s immense satisfaction in creating something beautiful and functional with your own hands.
Gathering Your Materials & Tools: Everything You’ll Need
One of the most appealing aspects of this project is how accessible and inexpensive the materials are. You can find almost everything you need at your local Dollar Tree or any major craft store, ensuring this DIY remains firmly within budget. Before you begin crafting, make sure you have these essential items ready.
Essential Materials:
- 3 pcs. 4 x 6 Silver Frames: These photo frames will form the foundational structure of your tray. The standard 4×6 inch size is perfect for creating a compact yet functional decorative piece. While silver frames are suggested for a classic look, feel free to choose other finishes like black, white, or even gold to better suit your desired aesthetic. Ensure the frames come with both glass panels and sturdy backings.
- Sea Glass (Assorted Colors and Sizes): This is the star element that gives your tray its charming coastal character. You can purchase craft sea glass from Dollar Tree, craft stores, or online retailers. For an authentic and unique touch, if you live near a coast, consider collecting your own (remember to clean and dry it thoroughly before use). A harmonious mix of greens, blues, and whites typically evokes the most classic sea glass aesthetic, but don’t hesitate to incorporate other hues or even clear pieces to make your tray truly unique.
- Colored/Printed Papers (for Background): This element provides an excellent opportunity to inject personality and color into your tray. Think carefully about the existing color scheme of the room where you plan to display the tray. Options include solid-colored cardstock, decorative scrapbook paper with subtle patterns (such as delicate waves, abstract textures, or even faux wood grain), or even small fabric scraps. A light blue or sandy beige can beautifully enhance the coastal theme, while a vibrant pattern can transform your tray into a captivating statement piece.
- E6000 Adhesive: This industrial-strength adhesive is paramount for ensuring your tray is durable, stable, and long-lasting. E6000 bonds securely to glass, metal, and paper, providing an incredibly strong hold that can withstand regular light use. It dries clear, which is crucial for a clean, professional finish. Always remember to work in a well-ventilated area when using E6000 due to its strong fumes. As an alternative, a strong, clear craft glue like Gorilla Glue Clear Grip or even a robust super glue can be used, but E6000 is highly recommended for its superior strength and resilience.
Necessary Tools:
- Scissors: Essential for precisely cutting your background paper to size. For even cleaner and straighter edges, a craft knife and a self-healing cutting mat can be a valuable addition.
- Pencil: Used for accurately tracing the frame backing onto your chosen decorative paper, ensuring a perfect fit.
- Ruler or Measuring Tape: While not strictly mandatory if you’re tracing, a ruler is highly beneficial for achieving precise measurements and ensuring your paper is cut perfectly straight, contributing to a polished final product.
- Cleaning Cloth/Glass Cleaner: Crucial for ensuring all glass surfaces are perfectly spotless and free of fingerprints, dust, or smudges before any gluing takes place. A clean surface ensures maximum adhesion and a pristine appearance.
- Protective Surface: Work on a protected surface (like an old newspaper or craft mat) to catch any glue spills and keep your workspace tidy.
- Heavy Books or Weights: These will be needed during the drying process to apply even pressure to the glued frame components, ensuring a strong and secure bond.
Step-by-Step Directions: Crafting Your Sea Glass Tray
Now that you have meticulously gathered all your materials and tools, it’s time to embark on the creative journey of assembling your beautiful sea glass tray. Follow these detailed instructions carefully, paying attention to drying times, to achieve a professional and durable finish.
Step 1: Preparing the Frames and Background Panels
This initial phase focuses on disassembling two of your frames and preparing the decorative background that will peek through your sea glass.
- Disassemble Two Frames: Carefully take two of your 4×6 silver frames. Gently bend back the small metal tabs that hold the backing in place and remove the cardboard backing and the glass panel from each. Set aside both glass panels. You will only need one of the cardboard backings for this step, so you can discard or save the other.
- Select and Cut Your Background Paper: Now, take one of the glass panels you just removed. Lay it on top of your various colored or printed papers. Experiment with different options until you find the perfect background that complements your sea glass and your desired home decor theme. Once you’ve made your selection, place one of the cardboard backings onto the chosen paper. Using your pencil, carefully trace around the perimeter of the cardboard backing. With sharp scissors or a craft knife, meticulously cut along the traced line to create a perfectly sized paper insert.
- Attach Background to Cardboard Backing: Apply a thin, even layer of E6000 adhesive to one side of the cardboard backing. Carefully center your freshly cut background paper onto the glued side. Press down firmly and smooth out any air bubbles or wrinkles to ensure a flat, seamless adhesion. Set this combined piece aside and allow the glue to dry completely, which might take several hours. This will become the attractive base of your tray.
- Prepare the First Two Glass Panels in Frames: While your background is drying, take one of the glass panels you set aside. Ensure it is perfectly clean and free of smudges or dust using glass cleaner. Apply a thin, continuous bead of E6000 around the *inner* edges of one of the empty frames (one of the two you initially disassembled). Carefully place the clean glass panel into this frame, pressing gently but firmly to secure it. Wipe away any excess glue. Repeat this exact process for the second disassembled frame and its glass panel. You should now have two frames with their glass panels securely glued in place, but without their cardboard backings. Allow these to dry completely for several hours or overnight.
Step 2: Assembling the Multi-layered Tray Structure
This critical step involves bonding the prepared frames together to create the sturdy, multi-layered base of your tray. Patience during drying is key here.
- Create the Raised Base: Take one of the frames that now has its glass panel glued firmly in place (from Step 1, item 4). Apply a continuous, generous bead of E6000 adhesive around the *outer* edges of this frame. Carefully take the *third* frame (the one you have not yet touched, which still has its original tabs and backing intact) and align it precisely on top of the glued frame. Press down firmly and evenly, ensuring all edges are perfectly flush. This creates a slightly raised edge, giving your tray a desirable depth. Allow a significant amount of drying time, ideally several hours or even overnight, to ensure a robust and secure bond before proceeding.
- Integrate the Decorative Background: Once the two frames from the previous point are securely bonded and dry, carefully remove the original backing from the *bottom* frame (the one with the tabs). Take the cardboard backing with your chosen paper (prepared in Step 1, item 3). Carefully insert this decorative background into the bottom opening of the combined frame structure. The existing tabs on the bottom frame should help to hold it in place. For extra security, you can add a few small dots of E6000 to the edges of the cardboard backing before inserting it, ensuring it is firmly secured and won’t shift.
- Attach the Top Glass Panel: Now, take the last frame with its glass panel glued firmly in place (the second one from Step 1, item 4). This will form the top, transparent surface upon which your beautiful sea glass will sit. Apply a generous, continuous bead of E6000 all along the top edges of the assembled frame structure. Carefully place the final glass-filled frame on top, aligning it perfectly with the edges below. Press down firmly and evenly across the entire surface.
- Cure Under Pressure: This is a crucial step for ensuring the overall durability and stability of your tray. Place a few heavy books or other flat, evenly distributed weights on top of the newly assembled tray. Allow the E6000 to cure completely for at least 24-48 hours. This extended curing time allows the adhesive to achieve its maximum bonding strength, resulting in a robust and long-lasting tray. Avoid moving or handling the tray excessively during this critical drying period.
Step 3: Arranging and Securing the Sea Glass
With your tray structure solidly built, it’s now time for the most visually rewarding part: decorating the top surface with your gorgeous sea glass. This is where your artistic vision truly comes to life!
- Clean the Top Glass Surface: Before placing any sea glass, ensure the top glass surface of your assembled tray is absolutely pristine. Use a high-quality glass cleaner and a lint-free cloth to remove any lingering fingerprints, dust, or smudges. A clean surface ensures a beautiful final presentation and optimal adhesion for your sea glass.
- Plan Your Sea Glass Design: This is a crucial preparatory step. Before applying any adhesive, carefully arrange your sea glass pieces directly onto the top glass of the tray. Experiment with various patterns, clusters, and color combinations. You might opt for a dense, mosaic-like covering, a more scattered and organic look, or even attempt to form a specific shape or motif. Consider varying the sizes and shapes of the sea glass for added visual interest and texture. Once you are satisfied with an arrangement, take a photograph of it with your phone for easy reference during the gluing process.
- Secure the Sea Glass: Working methodically, pick up one piece of sea glass at a time. Apply a very small, discreet dot of E6000 adhesive to the bottom (the flatter side) of each piece. Carefully place it back onto the glass, precisely following your planned arrangement. Continue this process until all your sea glass pieces are securely glued down. Be extremely mindful not to use too much glue, as excess adhesive can spread beyond the edge of the sea glass and be visibly distracting on the clear glass surface. For very small pieces, a toothpick can be useful for precise glue application.
- Final Curing Period: After all the sea glass is meticulously in place, it is imperative to allow the entire tray to dry completely for another 24-48 hours. This extensive final drying time is critical for the E6000 to achieve its full, maximum bonding strength. A fully cured bond ensures that your sea glass remains firmly attached and that your tray is durable enough for its intended use. During this period, avoid moving, handling, or disturbing the tray excessively.
Creative Uses for Your New Sea Glass Tray
Your beautifully finished Dollar Tree sea glass tray is far more than just a pretty decorative item; it’s a versatile piece that can enhance various areas of your home. Here are some inspiring ideas for how to incorporate your handmade creation:
- Elegant Vanity Organizer: Perfect for stylishly holding perfumes, delicate jewelry, makeup brushes, or small toiletries on a bedroom dresser, vanity table, or bathroom counter. It adds a touch of spa-like luxury.
- Chic Coffee Table Centerpiece: Elevate your living room decor by placing a small vase with fresh flowers, a few decorative candles, or a stack of elegant coasters on the tray. It creates a focal point that ties the room together.
- Welcoming Entryway Catch-All: Position it on an entryway console table or shelf as a designated spot for keys, incoming mail, sunglasses, wallets, or other small items you need to grab on your way out the door.
- Special Occasion Serving Tray: While not designed for heavy-duty serving, it can beautifully present small snacks, delicious desserts, or elegant beverage cups for a special gathering or intimate tea party. (Always ensure no direct food contact with the glued surfaces of the sea glass.)
- Unique Wall Art: If you’ve created a particularly artistic arrangement of sea glass, consider adding small picture hangers to the back of the tray and displaying your creation as a captivating piece of three-dimensional wall art.
- Thoughtful Handmade Gift: Handmade gifts carry immense sentimental value. This exquisite sea glass tray makes a heartfelt and personalized present for birthdays, housewarmings, bridal showers, or any holiday celebration.
- Desk Organizer: Keep your workspace tidy and inspiring by using it to hold pens, paperclips, sticky notes, or other small office supplies.
Tips and Tricks for a Flawless Finish
To ensure your DIY sea glass tray project goes smoothly and results in a beautiful, professional-looking piece, keep these helpful tips and tricks in mind:
- Work in a Well-Ventilated Area: E6000 adhesive has strong fumes. Always ensure you are working in a space with ample airflow, or even outdoors if possible, to prevent inhaling fumes.
- Always Practice Your Layout: Never glue down your sea glass without first arranging all the pieces on the tray’s surface. This allows you to visualize and refine your design, preventing mistakes and ensuring you achieve your desired aesthetic.
- Use a Toothpick for Precision: For very small or irregularly shaped pieces of sea glass, or for applying glue in tight spots, use a toothpick or a small craft stick to apply the adhesive. This offers greater control and prevents excess glue.
- Clean Excess Glue Immediately: If any E6000 seeps out or gets onto unintended surfaces, gently wipe it away immediately with a damp cloth or a cotton swab. Once dry, E6000 is much harder to remove cleanly.
- Experiment with Frame Finishes: While silver frames offer a classic look, consider matte black, crisp white, or even elegant gold frames to completely alter the aesthetic of your tray and better match your decor.
- Explore Other Embellishments: Don’t limit yourself solely to sea glass. You could incorporate small, clean seashells, polished river pebbles, small resin charms, or even fine glitter (sealed with a clear topcoat) for different textures and effects.
- Patience with Drying Times: This cannot be stressed enough. Resist the urge to rush any of the drying or curing periods for the E6000 adhesive. A fully cured glue bond is essential for the tray’s structural integrity and longevity.
- Consider a Protective Felt Backing: Once fully dry, you might consider cutting and gluing a piece of felt or cork sheet to the bottom of your tray. This will protect your furniture from scratches and give your tray an even more finished look.
The Joy of Dollar Tree Crafting
This DIY sea glass tray stands as a brilliant example of the incredible potential inherent in Dollar Tree crafts. It beautifully illustrates that you absolutely do not need expensive materials or advanced crafting skills to create stunning, functional, and deeply personalized home decor items. Dollar Tree, with its ever-changing array of affordable products, offers an inspiring playground for creativity. With just a dash of imagination and a willingness to try, everyday items can be transformed into captivating pieces. Projects like this are not merely about saving money; they are profoundly about the immense satisfaction that comes from creating something beautiful and unique with your own hands, adding distinctive character to your living space, and discovering the sheer joy and empowerment of affordable DIY. Embrace the spirit of repurposing and crafting, and watch your home transform!
Conclusion: Your Beautiful, Handmade Sea Glass Tray Awaits!
Congratulations on successfully completing your stunning DIY sea glass tray! You have masterfully transformed simple, inexpensive Dollar Tree frames into a captivating and elegant piece of coastal-inspired decor that truly reflects your personal style and creative flair. Whether it finds its home gracing your coffee table as a charming centerpiece, organizing your vanity with sophisticated ease, or simply serving as a beautiful conversation starter for guests, this tray is a testament to the power of thoughtful and affordable crafting. We sincerely hope you thoroughly enjoyed this comprehensive tutorial and feel inspired to explore even more exciting DIY possibilities. Don’t hesitate to share your magnificent creations with us and your crafting community. Happy crafting, and enjoy your new, exquisite sea glass tray!