
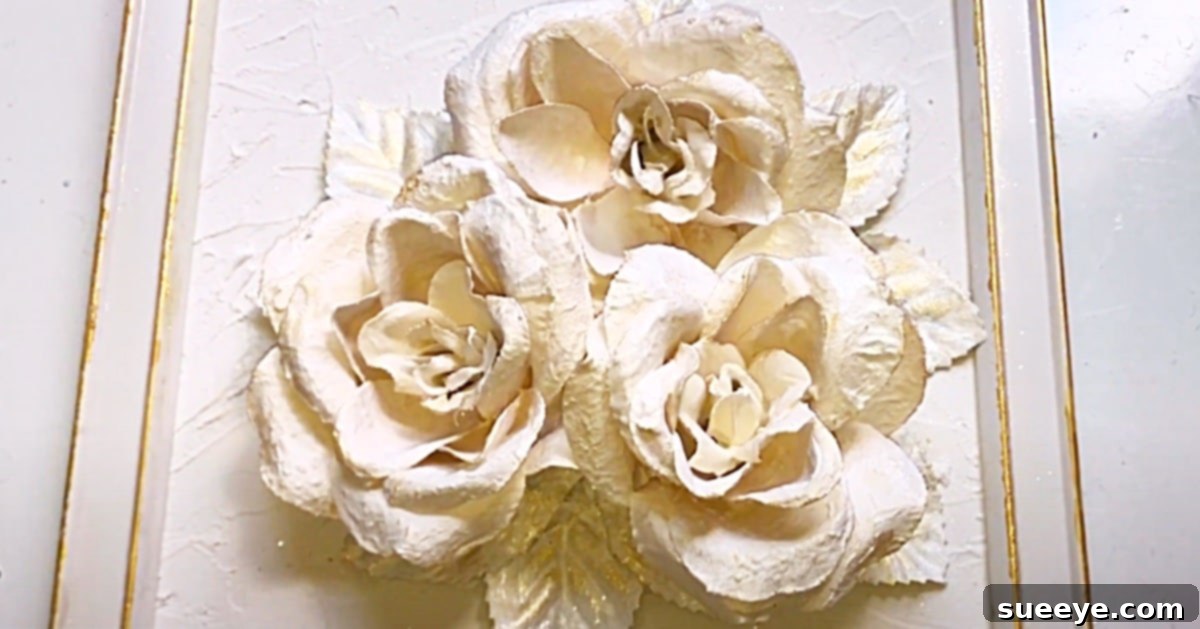
DIY Elegant Floral Sculpture Art: Transform Your Home with Budget-Friendly Wall Decor
Are you searching for a captivating yet affordable way to elevate your home decor? Look no further than the enchanting world of DIY floral sculpture art. Recently, I stumbled upon a truly inspiring flower sculpture video tutorial by Sun’s Arts on YouTube, and I instantly knew it was the perfect project to add a touch of timeless elegance to my bedroom. With its subtle textures and sophisticated aesthetic, this project promises to transform ordinary spaces into serene sanctuaries. Whether your style is Hollywood glam, shabby chic, or minimalist, a beautifully crafted floral sculpture provides a unique focal point that complements a wide array of interior designs. This guide will walk you through creating your own stunning, plaster-like flower art, demonstrating how simple materials can yield truly extraordinary results.
Why Choose This DIY Floral Sculpture Project?
In the realm of home decor, finding pieces that are both unique and budget-friendly can be a challenge. This DIY floral sculpture art project addresses both these needs perfectly. Firstly, it offers an incredible opportunity for personalization; you can choose the types of flowers, the arrangement, and even the colors to match your specific aesthetic. Secondly, it leverages readily available and inexpensive materials, making high-end looking art accessible to everyone. The process itself is surprisingly straightforward, ideal for crafters of all skill levels, and the tactile experience of working with caulk and faux flowers is incredibly satisfying. Beyond its aesthetic appeal, creating your own art provides a profound sense of accomplishment, imbuing your living space with a piece of your own creativity and passion.
Essential Materials for Your Elegant Flower Sculpture Art
One of the most appealing aspects of this project is its accessibility. Most of the required items can be found at local craft stores or even budget-friendly retailers, proving that luxurious decor doesn’t have to come with a hefty price tag. Here’s a detailed look at what you’ll need to gather:
- 1 (8×10) Canvas: This serves as the foundation for your artwork. An 8×10 inch size is perfect for creating a noticeable yet versatile piece, suitable for shelves, desks, or gallery walls. You can easily find canvases at dollar stores or craft suppliers.
- 1 (8×10) White Picture Frame: A simple white frame will elegantly encase your finished sculpture, enhancing its polished look and providing a striking contrast to the textured flowers. Opt for a frame with a clean design that complements the delicate nature of the art.
- 1 Bunch of White Faux Roses: White roses evoke a sense of purity and sophistication, making them ideal for this elegant design. A single bunch, typically containing several individual flower heads, should be sufficient. Consider other faux flowers like peonies or hydrangeas if you prefer a different texture.
- 1 Caulk Tube (Latex or Acrylic Latex): This is the magic ingredient that transforms your faux flowers into a plaster-like sculpture. Caulk provides a durable, textured finish and is surprisingly easy to work with. Ensure you choose a paintable variety for the best results.
- 1 Apple Barrel White Paint (Acrylic Craft Paint): A good quality white acrylic paint will provide a clean, uniform base coat for your entire sculpture, helping to create that cohesive, sculpted look.
- 1 Gold Craft Paint (Acrylic): A touch of metallic gold paint adds a luxurious shimmer and depth to your floral art. It’s perfect for highlighting edges or adding subtle accents.
- 1 Golden Loose Eyeshadow Powder: For an extra layer of sparkle and dimension, a finely milled golden eyeshadow powder can be applied as a delicate dusting. This provides a softer, more ethereal glow than paint alone.
- 1 Set of Pallet Knives: These versatile tools are essential for spreading and shaping the caulk on both the canvas and the flowers, allowing you to create various textures and smooth finishes. A set with different sizes and shapes will offer more creative control.
- 1 Set of Rubber Gloves: Working with caulk can be messy, so protective gloves are highly recommended to keep your hands clean and prevent skin irritation.
- Superglue: For a strong, immediate bond when attaching the flowers to the canvas, superglue is indispensable.
- School Glue (PVA Glue): This can be mixed with caulk for slightly different textures or used for general adhesive purposes if needed.
- Scissors: Essential for preparing your faux flowers by trimming stems or leaves.
- A Hot Glue Gun and Glue Sticks: A hot glue gun offers quick adhesion, which is incredibly useful for securing flowers in place while the superglue sets, or for adding immediate small embellishments.
Step-by-Step Directions to Create Your Floral Masterpiece
Crafting this stunning floral sculpture is a rewarding process that unfolds in a few simple yet artistic steps. Follow this detailed guide to bring your vision to life:
Step 1: Prepare Your Workspace and Canvas
Before you begin, set up a well-ventilated workspace protected with newspaper or a drop cloth, as working with caulk can be a bit messy. Lay out all your materials within easy reach. The first crucial step involves preparing your canvas. Begin by covering the entire surface of your 8×10 inch canvas with an even layer of caulk. Load a generous amount of caulk onto one of your pallet knives and spread it across the canvas, working in small sections. Don’t aim for perfect smoothness; instead, embrace the creation of natural textures. Drag the knife to create subtle ridges, swirls, or peaks, mimicking the organic feel of a hand-sculpted piece. This textured background will add depth and character to your finished artwork, making it truly unique. Allow this layer to partially set, giving it some tackiness before moving to the next stage.
Step 2: Prepare and Coat Your Faux Flowers with Caulk
Next, it’s time to transform your faux roses into sculptural elements. Carefully detach the flower heads from their stems. Using your rubber gloves, pick up each individual flower. Apply caulk generously to each faux flower, ensuring every petal and crevice is thoroughly covered. Use your pallet knife or even your gloved fingers to gently work the caulk into the flower’s form, creating a thick, plaster-like coating. This step is critical as it gives the lightweight faux flowers the substantial, sculpted appearance of solid plaster or clay. The caulk will obscure the artificial sheen of the plastic, lending a matte, organic finish. As you coat them, consider how the caulk might naturally enhance their shape, adding volume and unique textures. Set the coated flowers aside on a non-stick surface to allow the caulk to begin setting.
Step 3: Arrange and Adhere Flowers to the Canvas
With your canvas prepared and your flowers coated, it’s time for the creative arrangement. Before applying any glue, experiment with different layouts on your canvas. Play with symmetry or asymmetry, creating a central focal point or a cascading design. Once you are satisfied with your arrangement, begin attaching the caulk-covered flowers to the canvas. Apply a dab of superglue to the back of each flower and press it firmly onto the caulk-covered canvas. For extra security and immediate hold, you can also use a hot glue gun around the base of the flowers, especially for larger blooms or intricate placements. Ensure a strong bond so your artwork remains intact. Take your time with this step, envisioning the final composition and making small adjustments as you go. Allow ample drying time for all adhesives to fully cure, which may take several hours.
Step 4: Refine Textures and Add Base Paint
Once the flowers are securely attached and the caulk is dry, you might want to add more caulk around the bases of the flowers or fill in any gaps on the canvas, blending the flowers seamlessly into the background. Use your pallet knives to smooth transitions or add more intentional texture. After this additional caulk has dried, it’s time to unify your sculpture with paint. Apply a coat of white acrylic paint over the entire piece – the canvas background and all the caulk-covered flowers. This will create a consistent, pristine finish, giving the illusion of a single, cohesive plaster sculpture. Don’t be afraid to get into all the nooks and crannies to ensure full coverage. Let the white paint dry completely.
Step 5: Apply Gold Accents and Shimmer
This is where your floral sculpture truly begins to shine. With a fine brush, carefully apply the gold craft paint to the edges and raised areas of your flowers. The goal is to highlight their sculptural form and add a touch of sophisticated glimmer, rather than drenching them in gold. Focus on the outer edges of petals, the tips of leaves, or any prominent textures you’ve created. For an even more ethereal and luxurious effect, gently dust the golden loose eyeshadow powder over specific areas of the gold paint or directly onto the white caulk. You can use a soft brush or even your fingertip to delicately apply the powder, creating a subtle, shimmering glow that catches the light beautifully. This step adds dimension and a hint of glamour, completing the elegant aesthetic of your art.
Step 6: Frame Your Masterpiece
The final touch is to mount your finished floral sculpture within the chosen 8×10 white picture frame. Carefully insert the canvas into the frame, ensuring it is centered and secure. The frame will provide a polished edge and a finished look, elevating your DIY creation to gallery-worthy status. Check all angles to make sure the sculpture is properly aligned and sits snugly within the frame. Once framed, your unique and elegant floral sculpture art is ready to be admired!
Customization and Creative Variations for Your Flower Art
While the white and gold palette offers classic elegance, the beauty of DIY lies in customization. Don’t hesitate to experiment with different ideas to make your floral sculpture uniquely yours. Consider using faux flowers in varying shades of a single color, such as an ombré effect from light pink to deep rose, or mix different types of flowers like hydrangeas, peonies, and roses for a richer texture. You could also explore alternative color schemes: an all-black sculpture for dramatic flair, soft pastels for a nursery, or vibrant jewel tones for a bohemian touch. Instead of gold, try silver, bronze, or even iridescent glitter for shimmer. Larger canvases allow for more elaborate arrangements, while smaller ones can be grouped together to form a captivating gallery wall. The sky truly is the limit when it comes to personalizing this fabulous craft.
Displaying Your DIY Floral Sculpture in Your Home
Once your elegant floral sculpture is complete, deciding where to showcase it is part of the fun. This versatile piece fits beautifully into various interior design styles. In a Hollywood-themed bedroom, like mine, it adds a touch of classic glamour. Placed on a mantelpiece, it becomes a sophisticated focal point. Hung in a living room, it offers subtle texture and artistic interest. It can also complement a minimalist aesthetic, providing a soft, organic contrast to clean lines, or enhance a shabby chic space with its delicate charm. Consider placing it where it can catch natural light, allowing the textures and gold accents to truly sparkle. Pair it with other decorative elements like candles, books, or small vases of fresh flowers to create a cohesive and inviting vignette.
The Joy of Creating Your Own Home Decor
There’s a special kind of satisfaction that comes from creating something beautiful with your own hands. This floral wall art sculpture is not just a decorative item; it’s a testament to your creativity and a unique expression of your personal style. It’s a wonderful project that promises both an enjoyable crafting experience and a stunning piece of art to cherish. The transformation of simple, affordable materials into an elegant decor item is truly magical, proving that exquisite taste doesn’t require an extravagant budget.
I absolutely adore how this floral wall art sculpture looks in my bedroom, seamlessly blending with my existing decor. While the all-white aesthetic is captivating, I’m already envisioning several more pieces in different colors, exploring new palettes and arrangements. I hope you enjoy creating this wonderful project as much as I did, and that it brings a touch of handcrafted beauty to your home!