
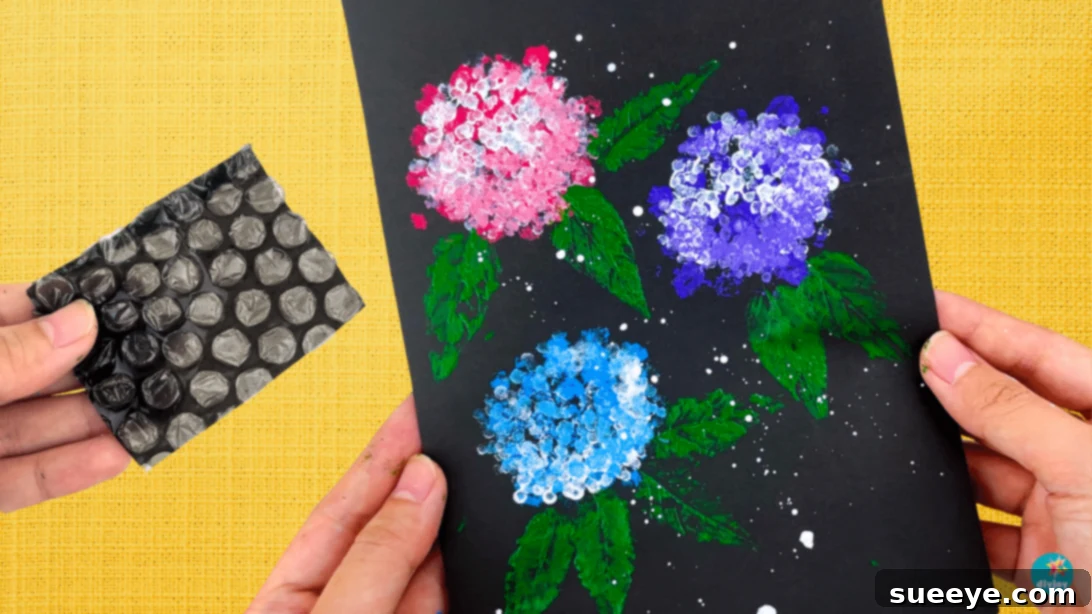
Transform those humble sheets of bubble wrap that accompany almost every package into something truly extraordinary! While the satisfying pop is a joy in itself, there’s an infinitely more creative and rewarding way to repurpose them. Imagine bringing to life vibrant, exquisitely textured hydrangea flowers right onto your canvas or paper. Yes, you read that correctly! We’re diving into the delightful world of **bubble wrap flower painting** – a revolutionary art method that is not only incredibly easy but also consistently yields breathtaking, professional-looking results. This accessible and fun flower painting idea is guaranteed to surprise and delight, making it the ultimate spring craft idea, perfectly suited for artists of all ages and skill levels.
RELATED: Round Crepe Paper Flowers
This isn’t your average, run-of-the-mill painting tutorial that demands years of artistic training or a steady hand developed over decades. Forget about needing any prior art experience whatsoever to embark on this easy flower painting journey. Bubble wrap painting is remarkably forgiving and universally accessible. Its intuitive nature means that even if you’ve never held a paintbrush before in your life, you’ll be astonished and proud of the beautiful, sophisticated artwork you can effortlessly create. It’s a true testament to how everyday materials can unlock profound creative potential.
This method represents the ideal art project for absolute beginners, enthusiastic children, or anyone simply seeking a fun, therapeutic, and utterly stress-free avenue to express their innate creativity. It’s an opportunity to relax, experiment, and produce something beautiful without the pressure of perfection. Ready to unleash your inner artist? Allow me to guide you step-by-step through the process of painting gorgeous hydrangeas using simple bubble wrap and cotton swabs. You’ll be amazed at how quickly you can achieve stunning results.
Why Choose Bubble Wrap for Your Art? Unlocking Unique Textures
If you’re weary of conventional painting techniques and crave a fresh, innovative approach, then bubble wrap painting is precisely what you need to try. Beyond its satisfying popping sound, bubble wrap is an ingenious and versatile tool for crafting incredibly unique, intricate, and deeply textured hydrangea petals that simply can’t be replicated with traditional brushes. The magic lies in its distinctive surface.
Consider the inherent design: the array of small, air-filled bumps on bubble wrap creates fascinating, organic patterns when coated with paint and carefully pressed onto your chosen surface. This innovative stamping technique effortlessly adds immense depth and vivid dimension to your artwork, making your painted flowers truly leap off the canvas. Furthermore, the use of cotton swabs, which we’ll explore in detail, provides another layer of delicate texture and precision without requiring meticulous brushwork. With these two simple yet powerful tools, you don’t have to concern yourself with mastering intricate brushstrokes or complex shading techniques. The bubble wrap does the heavy lifting, delivering that coveted textured effect, while cotton swabs allow for fine detailing and highlights, ensuring your flowers possess a remarkable visual richness.
Throughout this comprehensive flower painting tutorial, I will meticulously guide you through each and every step, ensuring clarity and ease. By the time you complete this project, you won’t just have a stunning, handmade piece of art ready to proudly display in your home or gift to a loved one. You’ll also gain a profound new appreciation for the boundless creative potential hidden within ordinary, everyday materials. It’s an empowering experience that transforms perception and skill, making art accessible to everyone.
Essential Materials You’ll Need to Get Started on Your Bubble Wrap Art
Gathering your materials is the first exciting step towards creating your masterpiece. Most of these items are readily available, perhaps even already in your home or easily found at any craft store. Here’s a comprehensive list:
- Black Canvas or Black Colored Paper: A dark background provides a dramatic contrast, making your colorful hydrangeas truly pop and enhancing their vibrancy.
- Acrylic Paints: You’ll need a selection of colors commonly associated with hydrangeas and foliage. Recommended colors include various shades of blue, green, violet (purple), pink, and white. Acrylic paints are ideal for this project due to their quick drying time and vibrant, opaque finish.
- Bubble Wrap: Any size will do, but aim for pieces with medium to large bubbles for the most distinct petal imprints. A fresh, clean piece is best.
- Flat, Round Object: This will serve as your stamp. A small plate, a jar lid, or even a sturdy piece of cardboard cut into a circle works perfectly. Its purpose is to provide an even surface for pressing the bubble wrap.
- Paintbrushes: A few different sizes will be helpful – a larger one for applying paint to the bubble wrap, and a smaller one for any touch-ups or mixing.
- Cotton Swabs (Q-tips): These are essential for adding delicate details, highlights, and individual petal textures, offering a unique alternative to fine brushes.
- Paper Plates or Palette: For mixing and holding your paints. Disposable options like paper plates make cleanup a breeze.
- Natural Leaves: Small to medium-sized leaves with prominent veins work best for creating realistic leaf prints. Look for sturdy leaves that won’t tear easily.
- Water: For thinning paints if needed and for cleaning your brushes. Have a small container of water handy.
Step-by-Step Guide to Creating Your Bubble Wrap Hydrangea Masterpiece
Follow these detailed instructions carefully, and you’ll be on your way to crafting beautiful, textured hydrangea art in no time!
Step 1: Prepare Your Bubble Wrap “Stamp”
Begin by selecting a flat, circular object that corresponds to the desired size of your hydrangea flowers. This could be anything from a small jar lid to a dinner plate, depending on how large you envision your blooms. Next, cut a piece of bubble wrap large enough to comfortably wrap around this object, ensuring there’s enough overlap to secure it without covering the bubble-side surface you intend to paint. This creates your unique textured stamp. The goal is to have an even surface of bubbles ready to receive paint and transfer its pattern.
Step 2: Prepare Your Acrylic Paints and Palette
Dispense your chosen acrylic paints (blue, violet, pink, green, white) onto your paper plates or artist’s palette. If you desire softer, pastel hues, which are often characteristic of hydrangeas, start with a small amount of your primary color, then gradually add white paint in small increments. Mix thoroughly after each addition until you achieve the perfect pastel shade. This layering technique allows for precise control over your color intensity. Ensure your paints are well-mixed and ready for application.
Step 3: The Bubble Wrap Magic – Stamping Your Flowers
Now for the fun part! Using a paintbrush, generously apply your chosen paint color to the air pockets (the bumpy side) of your prepared bubble wrap stamp. Aim for even coverage, ensuring all the bubbles are coated. If your paint consistency feels too thick and gloopy, add a very small amount of water to thin it out slightly; too much water will make it runny. The paint should be just thick enough to transfer a clear impression without dripping excessively.
Once the bubble wrap is painted, immediately and carefully press it onto your black canvas or colored paper. Apply firm, even pressure across the entire surface of the bubble wrap for a few seconds. This ensures a clear, crisp transfer of the bubble texture. Gently peel the bubble wrap away to reveal your first textured hydrangea bloom. The result will be a beautifully unique floral imprint that forms the base of your flower.
Repeat this stamping process for the other colors you’ve prepared, creating a cluster of hydrangeas. Make sure to space them out thoughtfully, leaving sufficient room at the bottom and between blooms for the addition of leaves and other delicate details. Experiment with slightly overlapping the edges of some flowers to create a more organic and natural appearance, mimicking a real hydrangea bush.
Step 4: Add Delicate Details Using Cotton Swabs
Once your bubble wrap prints are mostly dry, it’s time to add depth and fine texture with cotton swabs. This step truly brings your hydrangeas to life. Dip the tips of three or four cotton swabs together into white acrylic paint. Then, using a gentle dabbing motion, create small, delicate dots within the painted bubble wrap areas. These white dots will act as highlights, catching the eye and giving the impression of individual, tiny petals that make up a hydrangea bloom. Refer to the provided photo below for guidance on placement and density.
To further enhance the dimensionality and create visual interest, mix a lighter shade of each flower’s primary color by adding a bit more white paint. Dip fresh cotton swabs into these lighter shades and dab them onto some of the petals, focusing on areas where natural light would fall. This subtle variation in tone will add incredible depth and realism to your flowers, making them appear more rounded and vibrant. Don’t overdo it; a delicate touch is key.
Step 5: Add Realistic Leaves with a Natural Stamp
To ground your vibrant blooms, it’s time to add some natural foliage. Select a few fresh leaves with clear vein patterns. Paint the back of a chosen leaf generously with green acrylic paint. The back often has more pronounced veins, which will create a better imprint. Carefully position the painted leaf, right side up, at the base of one of your hydrangea flowers. Ensure the leaf tips are pointing outwards, away from the flower, for a natural growth appearance. Gently but firmly press the leaf onto the canvas or paper, transferring its unique texture. Then, carefully peel it away to reveal a beautiful, organic leaf print.
Repeat this process several times around your hydrangea cluster, varying the position and angle of the leaves to create a lush, natural effect. You can also use different sizes or shapes of leaves for added variety. This simple technique adds an incredible touch of realism and completes the botanical scene. Refer to the image below for visual guidance on leaf placement.
Step 6: Create the Magical Splatters and Let Dry
For a final touch of artistic flair and to add a whimsical, ethereal quality to your painting, we’ll introduce some delicate splatters. Lightly load your paintbrush with white acrylic paint. It’s crucial that the brush isn’t dripping; too much paint will create large blobs instead of fine splatters. Hold the paintbrush horizontally above your painting with your non-dominant hand. Then, using your dominant hand, gently but firmly flick the bristles of the paintbrush. This action will create a scattering of tiny white paint splatters across your artwork, mimicking dew drops or distant stars against the dark background. Experiment with the force of your flick to control the size and density of the splatters. Once satisfied, set your painting aside in a safe place to dry completely. Acrylics dry relatively quickly, but ensure it’s fully cured before handling or framing.
Creative Variations and Ideas to Explore Your Artistic Potential
Once you’ve mastered the basic bubble wrap hydrangea technique, don’t stop there! This method is incredibly versatile and can be adapted to create a wide array of stunning effects and other floral designs. Here are some ideas to spark your imagination and help you further explore your artistic journey:
- Embrace Diverse Color Palettes: While classic blues and purples are beautiful for hydrangeas, don’t hesitate to experiment! Try monochromatic schemes (e.g., varying shades of pink), analogous colors (e.g., blues, greens, and yellow-greens), or even complementary colors for a bold statement. Consider seasonal palettes, like warm oranges and reds for autumn flowers, or soft pastels for a spring meadow effect.
- Play with Scale and Composition: Instead of uniformly sized flowers, create blooms and leaves in varying sizes. Place larger flowers as focal points, with smaller ones receding into the background for a sense of depth and perspective. This adds dynamism to your composition and makes the artwork more engaging. You can also experiment with a single large, dramatic bloom or a dense cluster filling the entire canvas.
- Gradient Effects with Bubble Wrap: Before pressing the bubble wrap onto your canvas, try applying two or three closely related colors to it in a gradient fashion. For instance, blend a light blue into a deeper blue, or pink into violet. When pressed, this will create a beautiful, seamless color transition within each flower, adding another layer of complexity and visual interest without extra effort.
- Experiment with Different Backgrounds: While black canvas offers striking contrast, try white for a softer, airy look. You could also paint a gradient background on your canvas before stamping the flowers, or even use patterned paper.
- Mixed Media Exploration: Elevate your artwork by incorporating other materials. After the paint dries, carefully glue small beads or sequins into the center of some bubbles for added sparkle. Use fine-tip markers or gel pens to draw in stems or additional leaf details.
- Beyond Hydrangeas: The bubble wrap technique isn’t limited to hydrangeas. With a bit of imagination, you can adapt it to create cherry blossoms, fluffy dandelions, or abstract floral bursts. For cherry blossoms, use small bubble wrap pieces and pink/white paint. For dandelions, larger bubble wrap and yellow paint, then add thin stems with a brush.
- Functional Art Projects: Don’t limit your bubble wrap art to just framed pieces. Use this technique to create unique greeting cards, personalized gift wrap, decorative placemats (on washable fabric), or even custom art on canvas tote bags (using fabric paints).
Tips for Success and a Flawless Finish
- Work in Layers: For richer colors and more distinct textures, allow each layer of paint (bubble wrap prints, cotton swab details, leaf prints) to dry partially before applying the next. This prevents colors from bleeding and ensures clear impressions.
- Keep Your Tools Clean: Have a container of water nearby to rinse your paintbrushes and clean the bubble wrap stamp between colors. This prevents muddy colors and ensures crisp prints.
- Test Before You Stamp: If you’re unsure about the amount of paint or pressure, do a test stamp on a scrap piece of paper first. This helps you get a feel for the technique without risking your main artwork.
- Good Ventilation: When working with acrylic paints, especially if using a spray varnish later, ensure you’re in a well-ventilated area.
- Seal Your Artwork: Once your painting is completely dry, consider applying a clear acrylic sealant or varnish. This will protect your artwork from dust, UV light, and minor abrasions, preserving its vibrancy for years to come.
Common Questions About Bubble Wrap Painting (FAQ)
- Can I use different types of paint with bubble wrap?
- Acrylic paints are highly recommended due to their quick drying time, opacity, and vibrant colors. Tempera paints can also work, especially for kids’ projects, but they might be less permanent and vibrant. Oil paints would take too long to dry for this technique.
- What if my bubble wrap print isn’t clear?
- This usually means either you didn’t apply enough paint, or you didn’t apply even and firm enough pressure. Ensure the bubbles are fully coated, and press firmly across the entire stamp. Also, don’t let the paint dry on the bubble wrap before pressing.
- How do I clean the bubble wrap for reuse?
- Immediately after use, rinse the painted bubble wrap under lukewarm water, gently rubbing off the paint with your fingers or a soft sponge. Let it air dry completely before storing for future projects.
- Is this project suitable for very young children?
- Absolutely! It’s fantastic for developing fine motor skills and creativity. For very young children, you might want to pre-cut the bubble wrap and handle the paint application on the bubble wrap yourself, letting them do the fun part of pressing and stamping.
- Can I use this technique on fabric?
- Yes, you can! Just make sure to use fabric-specific acrylic paints or add a fabric medium to your regular acrylics. After painting, follow the fabric paint instructions for heat-setting to ensure the design is permanent and washable.
Easy Flower Painting Idea – Bubble Wrap Art: Your Creative Journey Begins Here
And there you have it! A surprisingly simple yet incredibly effective method for creating stunning, textured hydrangea paintings using nothing more than readily available bubble wrap, cotton swabs, and a touch of imagination. This project proves that art doesn’t have to be intimidating or require expensive materials. It’s about looking at everyday objects with a fresh perspective and unleashing your creativity in unexpected ways. Whether you’re a seasoned artist seeking a new technique or a complete beginner looking for a fun, stress-free entry into the world of painting, this bubble wrap art tutorial offers a rewarding experience.
So, the next time you receive a package, don’t just pop that bubble wrap – transform it into a beautiful piece of art. Embrace the joy of creation, experiment with colors and textures, and proudly display your unique, handmade hydrangea masterpiece. Share your creations with friends and family, and inspire others to discover the easy magic of bubble wrap painting. Happy crafting!