
Proper car maintenance is essential not only for extending your vehicle’s lifespan but also for ensuring optimal performance and safety on the road. While some automotive issues demand professional attention, many common problems can be effectively resolved at home with a few simple tools and a bit of know-how. Tackling these tasks yourself not only provides immediate results but also offers significant cost savings. One such common issue that often compromises both safety and aesthetics is the degradation of your car’s headlights. Over time, these vital components can become hazy, yellowed, and oxidized, severely reducing light output and making nighttime driving hazardous.
Fortunately, there’s a surprisingly simple and highly effective DIY method to restore the clarity of your headlights using a common household item: toothpaste. This guide, inspired by popular automotive experts like ChrisFix, will walk you through the process, helping you achieve crystal-clear headlights and significantly enhance your driving experience. Say goodbye to dull, yellowed lenses and hello to improved visibility and a refreshed car appearance!
Why Your Headlights Get Foggy and Why Restoration Matters
Modern car headlights are typically made from polycarbonate plastic, a durable material that is lightweight and shatter-resistant. However, this material is susceptible to damage from environmental factors. Over time, exposure to ultraviolet (UV) radiation from the sun causes the plastic to break down, leading to a process called oxidation. This oxidation manifests as the familiar yellowing and haziness that obscures your headlight bulbs. Additionally, road debris, harsh chemicals from car washes, and general wear and tear contribute to microscopic scratches and pitting on the lens surface, further diminishing clarity.
The impact of foggy headlights extends beyond just aesthetics. Dimmed, scattered light significantly reduces your visibility at night, making it harder to see obstacles, road signs, and other vehicles. This poses a serious safety risk for you and other drivers. Restoring your headlights improves light output, enhances your ability to see and be seen, and gives your car a cleaner, well-maintained look, potentially even boosting its resale value. While professional restoration services can be costly, this DIY toothpaste method offers an incredibly economical and accessible solution.
Materials You’ll Need for Headlight Restoration:
Gathering the right materials is the first step towards successful headlight restoration. Most items can be found around your home or at a local store.
- Toothpaste (Non-Gel Formula): The key ingredient. Opt for a traditional paste with a slightly gritty texture. Toothpastes containing baking soda or hydrogen peroxide can offer enhanced abrasive and cleaning properties, making them even more effective. Avoid gel toothpastes as they lack the necessary abrasive compounds to remove oxidation.
- Baking Soda (Optional): If your chosen toothpaste doesn’t contain baking soda, you can add a small amount to boost its abrasive power. It acts as a mild abrasive to help scrub away oxidation and yellowing.
- Old Toothbrush: Essential for thoroughly scrubbing the headlight surface, especially in crevices and corners that fingers might miss.
- Spray Bottle: For conveniently applying warm water during the rinsing and cleaning stages.
- Warm Water: Helps to rinse away toothpaste residue and dirt effectively.
- Paper Towels: For initial wiping and buffing.
- Microfiber Cloth: Ideal for final buffing and achieving a streak-free shine, particularly after applying wax. Its soft texture prevents new scratches.
- Automotive Wax or Sealant: Crucial for protecting the newly restored headlights from future oxidation and UV damage. Look for car wax with UV protection.
- Painter’s Tape (Optional but Recommended): To mask off and protect the surrounding paintwork from accidental contact with the abrasive toothpaste.
Step-by-Step Directions for Headlight Restoration:
Step 1: Initial Assessment and Preparation
Before you begin, carefully assess the condition of your headlights. Run your fingers over the surface to determine if the yellowness and haziness are external or internal. If the surface feels rough, pitted, and you can see visible spots or a cloudy film on the outside, then this method is perfect for you. If the haziness appears to be deep within the lens, professional help might be required, as the damage could be internal.
Once you’ve confirmed the damage is external, it’s crucial to prepare the area. Clean the headlights thoroughly with soap and water to remove any loose dirt, grime, or bugs. This ensures the toothpaste can directly target the oxidation. After cleaning and drying, use painter’s tape to carefully mask off the painted areas of your car surrounding the headlights. This protective barrier will prevent any accidental scratching or damage to your vehicle’s finish during the scrubbing process, especially if you’ll be applying significant pressure or using tools.
Step 2: Applying the Toothpaste Solution
Now, it’s time for the star of the show: the toothpaste. Dispense a generous amount of toothpaste directly onto your fingers. Remember, avoid gel toothpaste; a traditional paste with a grainy texture is what you need. If your toothpaste doesn’t specify baking soda or hydrogen peroxide, you can add a pinch of baking soda to the toothpaste on your fingers or mix it in a small bowl to create a slightly more abrasive paste. This will enhance its cleaning power.
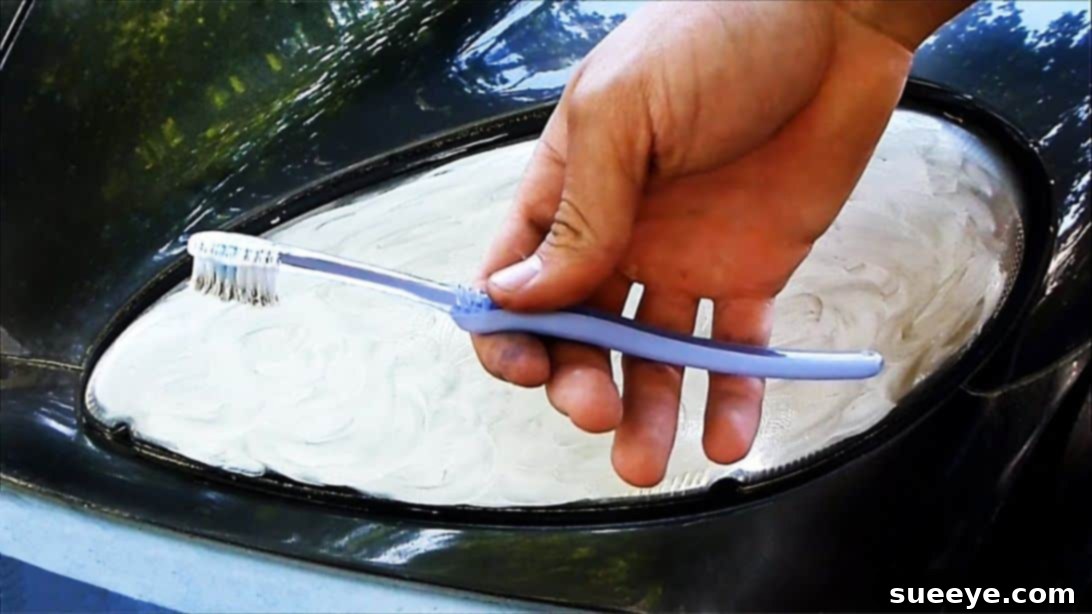
With the toothpaste on your fingertips, begin to gently but firmly rub it across the entire surface of the headlight. Ensure that the lens is completely covered with a uniform layer of toothpaste. Work the paste into all areas, paying particular attention to the most yellowed or hazy sections. This initial application helps to loosen the oxidized layer and primes the surface for more intensive scrubbing.
Step 3: Thorough Brushing and Deep Cleaning
Once the headlight is thoroughly coated, grab your old toothbrush. This is where the magic really happens. Begin to vigorously brush the headlight in small, circular motions. Apply steady pressure across the entire lens. The more yellowed and hazy your headlights are, the longer and more diligently you’ll need to brush. The abrasive particles in the toothpaste, combined with the scrubbing action of the toothbrush bristles, will work to physically abrade and remove the oxidized plastic layer from the surface.
Don’t hesitate to add more toothpaste to the brush or headlight as needed, especially if the paste starts to dry out or thin. For those looking to speed up the process and achieve even better results, consider using a Dremel tool fitted with a soft buffing bit. If you opt for a Dremel, it is crucial to use a very low speed setting to avoid overheating the plastic or causing new damage. Move the Dremel in a controlled, even manner across the headlight surface, letting the tool do the work. Whether manual or powered, ensure every inch of the headlight is thoroughly brushed until you start to see a noticeable improvement in clarity.
Step 4: Rinse, Buff, and Inspect
After a thorough brushing, it’s time to rinse away the toothpaste residue and reveal your progress. Using your spray bottle, generously spray the headlight with warm water. The warm water helps to dissolve and wash away the toothpaste and the loosened oxidized particles. Next, grab a clean paper towel and begin rubbing the headlight with a good amount of pressure. This buffing action will help remove any stubborn residue and further polish the lens. You should already start to see a significant improvement in clarity.
Repeat the spraying and wiping process once more with warm water and a fresh, clean paper towel or a general-purpose cloth. Ensure all traces of toothpaste are completely gone. Take a moment to inspect the headlight. Is it much clearer? Are there any remaining hazy spots? If necessary, you can repeat the toothpaste application and scrubbing steps for particularly stubborn areas. Once you’re satisfied with the clarity, make sure the headlight surface is completely clean and dry before moving on to the final crucial step.
Step 5: Applying a Protective Sealant (Wax)
Restoring your headlights is only half the battle; protecting them is equally important to ensure the clarity lasts. Once the headlights are completely clean and dry, apply a thin, even coat of automotive wax or a specialized headlight sealant all over the lens. This protective layer is crucial as it acts as a barrier against future UV radiation and environmental damage, significantly slowing down the re-oxidation process. Think of it as sunscreen for your headlights.
Allow the wax to cure for a few minutes, according to the product’s instructions. Once it has hazed over, take a clean, dry microfiber cloth and gently buff the entire headlight surface until it shines. The microfiber cloth will help achieve a streak-free finish and bring out the maximum clarity. This final step is essential for maintaining the newly restored condition of your headlights, keeping them crystal clear for much longer. With this protective layer in place, your headlights are now not only clear but also fortified against the elements.
Maintaining Your Clear Headlights for Longer
After investing your time and effort into restoring your headlights, it’s natural to want to keep them looking pristine. Here are a few tips to extend the life of your restoration:
- Regular Cleaning: Wash your headlights regularly with car-safe soap and water to prevent dirt and grime buildup.
- Reapply Wax/Sealant: Reapply a protective car wax or a dedicated headlight sealant every few months, especially before intense sun exposure.
- Parking Habits: Whenever possible, park your car in a garage or shaded area to minimize direct exposure to harsh UV rays.
- Headlight Protection Films: Consider applying a clear protective film specifically designed for headlights. These films offer an extra layer of defense against UV damage and road debris.
When to Consider Professional Help
While the toothpaste method is remarkably effective for external oxidation and light haziness, it’s important to recognize its limitations. If your headlights exhibit deep cracks, internal condensation, or severe, widespread pitting that penetrates beyond the surface, a DIY approach might not be sufficient. In such cases, the damage could be structural or internal, requiring specialized tools, stronger abrasives, or even full headlight replacement. If you’ve tried the DIY method and are not satisfied with the results, or if the damage appears to be more severe than surface-level oxidation, consulting a professional automotive detailer or mechanic is the best course of action to ensure optimal safety and performance.
Conclusion: Embrace DIY Car Care for Brighter Roads
Restoring your car’s headlights using a simple tube of toothpaste is a prime example of how effective and rewarding DIY car maintenance can be. This inexpensive, straightforward process not only dramatically improves your nighttime visibility and driving safety but also significantly enhances your vehicle’s overall appearance. By taking a proactive approach to car care, you save money on costly professional services and gain a deeper understanding and appreciation for your vehicle. So, grab some toothpaste, dedicate a little time, and enjoy the satisfaction of seeing your headlights shine like new again, illuminating your path to safer and more enjoyable journeys. Your car, and your wallet, will thank you!
These amazing images are all credited to ChrisFix via YouTube. Check his other content and follow for more valuable car maintenance tips!