
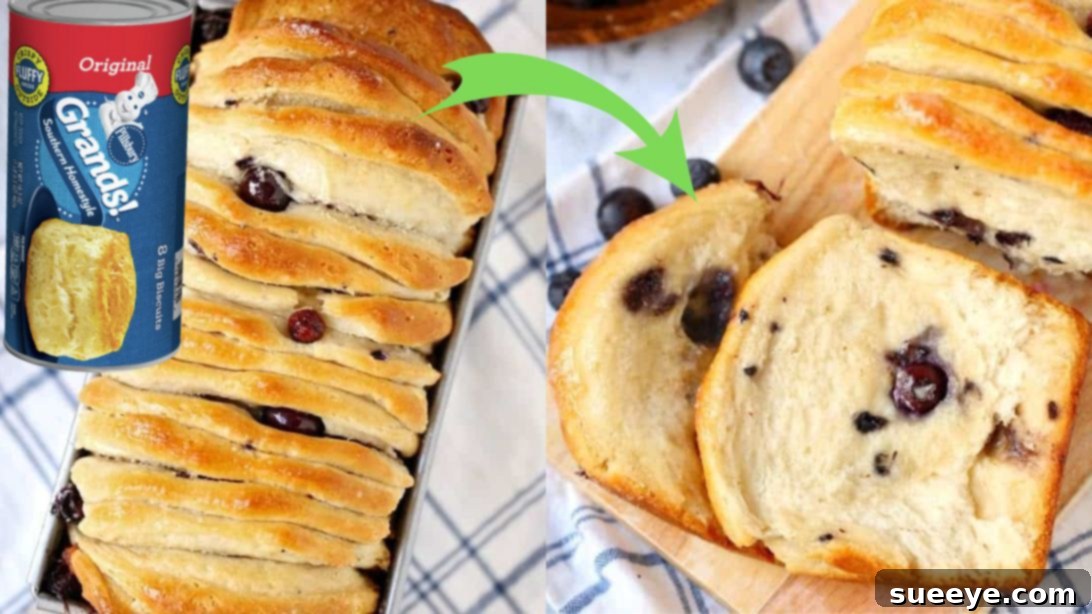
Irresistible Blueberry Cream Cheese Pull-Apart Bread: Your New Favorite Sweet Treat
Get ready to elevate your breakfast or brunch game with an incredibly simple yet profoundly delicious recipe: Blueberry Cream Cheese Pull-Apart Bread. This delightful creation, inspired by the fantastic insights of The Country Cook on YouTube, transforms humble refrigerated biscuits into a show-stopping, berry-filled masterpiece. Imagine soft, tender bread pieces, bursting with fresh blueberries and a creamy, sweet cream cheese filling, all baked to golden perfection. It’s a comforting, shareable treat that promises to be a hit with family and friends alike.
Whether you’re looking for a quick morning indulgence, a crowd-pleasing brunch addition, or a unique dessert, this pull-apart bread delivers on all fronts. Its straightforward preparation makes it accessible even for novice bakers, while its irresistible flavor ensures it won’t last long on the table. Join us as we dive into creating this blueberry dream, step by step, ensuring a smooth and enjoyable baking experience from start to finish.
Why This Blueberry Pull-Apart Bread Is a Must-Try
There are countless reasons why this particular blueberry pull-apart bread stands out and deserves a spot in your recipe collection. It’s more than just a sweet bread; it’s an experience:
- Effortlessly Delicious: Utilizing pre-made refrigerated biscuits cuts down on prep time significantly, making this an ideal recipe for busy mornings or spontaneous baking sessions. You get homemade taste with minimal fuss.
- Irresistible Flavor Combination: The tangy sweetness of cream cheese perfectly complements the juicy burst of fresh blueberries, all encased in soft, fluffy bread. It’s a harmonious blend that tantalizes the taste buds.
- Fun to Eat: As the name suggests, this bread is designed to be pulled apart, making it an interactive and enjoyable treat for all ages. It’s perfect for sharing and creates a relaxed, communal dining experience.
- Versatile for Any Occasion: While excellent for breakfast or brunch, it also makes a wonderful dessert, a delightful snack, or even a comforting accompaniment to coffee or tea.
- Customizable: While blueberries are the star, the base recipe is adaptable. Feel free to experiment with other berries, citrus zest, or even a sprinkle of cinnamon for different flavor profiles.
- Visually Appealing: The layers of biscuit dough, swirled with cream cheese and dotted with vibrant blueberries, create a stunning visual effect, especially when served warm and fresh from the oven.
Ingredients for Your Blueberry Dream Bread
Gathering your ingredients is the first step to creating this delightful pull-apart bread. The beauty of this recipe lies in its simplicity, requiring just a few common items to achieve extraordinary results.
- 2 (16 ounce) cans of Refrigerated Biscuits: These are the backbone of our pull-apart bread. Opt for the flaky layers or homestyle varieties for the best texture. They provide the perfect foundation, saving you the time and effort of making dough from scratch.
- 1 cup of Fresh Blueberries, divided use: Fresh blueberries are key for their vibrant flavor and juicy texture. Dividing them ensures some are incorporated into the cream cheese filling, while others are layered within the bread and sprinkled on top for maximum berry impact. If fresh aren’t available, frozen blueberries can work (see FAQ for tips).
- ½ (4 ounces) block Cream Cheese, softened: Softened cream cheese is crucial for a smooth, lump-free filling. It adds a rich, tangy creaminess that beautifully balances the sweetness of the sugar and blueberries. Make sure to take it out of the fridge at least 30 minutes before use.
- ¼ cup of Granulated Sugar: This sweetens the cream cheese mixture, enhancing the overall dessert-like quality of the bread.
- 2 tablespoons of Milk: A small amount of milk helps to thin out the cream cheese mixture, making it easier to spread smoothly across the biscuit dough. Any type of milk (dairy or non-dairy) will work.
For the Irresistible Topping:
A simple yet effective topping adds the final touch of deliciousness and a beautiful golden sheen to your bread.
- Melted Butter: A generous brush of melted butter before and after baking adds richness, helps with browning, and keeps the bread moist.
- Granulated Sugar: A sprinkle of sugar over the warm, buttered bread creates a delightful sugary crust that sparkles and adds an extra layer of sweetness.
Essential Equipment You’ll Need
Having the right tools on hand will make your baking process smooth and enjoyable:
- 9-inch Loaf Pan: This is essential for shaping and baking your pull-apart bread. A standard metal loaf pan works perfectly.
- Nonstick Cooking Spray: To ensure your bread doesn’t stick and comes out of the pan easily.
- Medium Mixing Bowl: For preparing the cream cheese filling.
- Hand Mixer (Electric): Highly recommended for achieving a perfectly smooth cream cheese mixture without lumps.
- Small Bowls: For melted butter and the topping sugar.
- Pastry Brush: Ideal for evenly coating the bread with melted butter.
- Aluminum Foil: For covering the loaf pan during baking to prevent the top from browning too quickly.
Step-by-Step Directions to Bake Perfection
Follow these detailed instructions to create your own luscious Blueberry Cream Cheese Pull-Apart Bread. Take your time with each step, and you’ll be rewarded with an amazing treat!
Step 1: Prepare Your Workspace and Filling
- Preheat Oven: Begin by preheating your oven to 350°F (175°C). This ensures the oven is at the correct temperature when your bread is ready to go in, promoting even baking.
- Prepare Loaf Pan: Generously spray a 9-inch loaf pan with nonstick cooking spray. This crucial step prevents the bread from sticking and makes for easy removal after baking. Set it aside.
- Create Cream Cheese Mixture: In a medium mixing bowl, combine the softened cream cheese, ¼ cup of sugar, and 2 tablespoons of milk. Use a hand mixer (or a whisk and some elbow grease) to blend these ingredients until the mixture is completely smooth and creamy, with no lumps.
- Incorporate Blueberries into Filling: Gently fold in half of your fresh blueberries into the cream cheese mixture. Be careful not to mash the berries too much, as you want them to remain intact. This creates pockets of berry goodness throughout the bread.
Step 2: Assemble the Biscuit Layers
- Flatten Biscuits: Open your cans of refrigerated biscuits. On a clean, lightly floured surface or a piece of parchment paper, gently roll out each biscuit until it’s flattened into an oval or circular shape, roughly doubling its original diameter. You want them thin enough to layer but not so thin they tear easily.
- Spread Filling: Take one flattened biscuit and spread a thin, even layer of the blueberry cream cheese mixture over its surface, leaving a small border around the edges.
- Add More Blueberries: Sprinkle a few of the remaining fresh blueberries directly on top of the cream cheese layer on each biscuit. This ensures every piece is packed with fruit.
- Stack and Layer: Carefully stack the prepared biscuits one on top of the other, forming two equal stacks. For instance, if you have 16 biscuits total, you’ll create two stacks of 8 biscuits each. Alternate the direction of each biscuit slightly to create a more rustic, pull-apart look.
Step 3: Prepare for Baking
- Arrange in Loaf Pan: Carefully transfer your two stacks of biscuits into the prepared 9-inch loaf pan. Position them side-by-side or slightly offset, ensuring they fit snugly but aren’t overly compressed.
- Final Blueberry Sprinkle: Sprinkle any remaining fresh blueberries over the top of the biscuit stacks in the pan. These will add extra bursts of flavor and a beautiful visual appeal to the finished bread.
- Brush with Butter: Lightly brush the entire top surface of the bread with some melted butter. This helps the top brown nicely and adds flavor.
Step 4: Bake to Golden Perfection
- Initial Bake (Covered): Place the loaf pan into the preheated 350°F (175°C) oven. Cover the pan tightly with aluminum foil. This prevents the top from browning too quickly before the inside is fully cooked. Bake for approximately 40 to 45 minutes.
- Check for Doneness: After 40-45 minutes, carefully remove the foil. The top should be lightly golden, and the bread should feel firm to the touch. To check if the inside is cooked through, you can insert a thin skewer or toothpick into the center; it should come out clean.
- Adjust Baking if Needed: If the top is golden but the inside still seems undercooked, recover the loaf pan tightly with foil and bake for an additional 10-15 minutes. Continue checking until fully baked. The total baking time can vary slightly depending on your oven.
- Final Touches: Once fully baked and gloriously golden, carefully remove the bread from the oven. While it’s still warm, generously brush the entire top surface with more melted butter.
- Sweeten the Top: Immediately after buttering, sprinkle a generous amount of granulated sugar over the warm, buttered top. The butter will help the sugar adhere, creating a delightful, slightly crisp, sweet crust.
Step 5: Serve and Enjoy!
Allow the bread to cool in the pan for about 10-15 minutes before carefully removing it to a wire rack. This allows it to set slightly. Serve warm and watch it disappear! The soft, pull-apart layers are best enjoyed fresh.
Pro Tips for a Perfect Pull-Apart Bread
- Soften Cream Cheese Properly: For the smoothest filling, ensure your cream cheese is at room temperature. Cold cream cheese will result in a lumpy mixture. You can speed up softening by cutting it into smaller cubes.
- Don’t Over-Roll Biscuits: Roll the biscuits just enough to flatten them. Over-rolling can make them too thin and prone to tearing, or make the bread tough.
- Gentle with Blueberries: Be gentle when mixing blueberries into the cream cheese and layering them. Crushed berries can release too much liquid and stain the dough.
- Monitor Oven: Ovens vary, so keep an eye on your bread, especially towards the end of the baking time. If it’s browning too quickly, add the foil back.
- Cooling Time is Important: While tempting to dive in immediately, allowing the bread to cool slightly helps the filling set and prevents it from falling apart too easily when you serve it.
Serving Suggestions for Your Blueberry Delight
This blueberry pull-apart bread is fantastic on its own, but here are a few ideas to make it an even more memorable experience:
- Classic Breakfast/Brunch: Serve warm alongside a cup of coffee or tea, fresh fruit, and perhaps some crispy bacon or scrambled eggs for a complete meal.
- A Dollop of Cream: For an extra touch of indulgence, serve with a spoonful of whipped cream or a scoop of vanilla ice cream if enjoying as a dessert.
- Citrus Glaze: For an additional layer of flavor, whisk together powdered sugar with a squeeze of lemon or orange juice and drizzle over the warm bread.
- Powdered Sugar Dusting: A light dusting of powdered sugar (confectioners’ sugar) can add a beautiful finish and a touch more sweetness.
Storage and Reheating Tips
While best enjoyed fresh and warm, you can certainly store any leftovers:
- Storage: Store any leftover Blueberry Cream Cheese Pull-Apart Bread in an airtight container at room temperature for up to 2 days, or in the refrigerator for up to 4 days. The texture might change slightly, becoming a bit denser.
- Reheating: To reheat, simply place individual portions in the microwave for 15-30 seconds, or wrap the entire loaf in foil and warm it in an oven preheated to 300°F (150°C) for about 10-15 minutes, until heated through.
Frequently Asked Questions (FAQ)
Can I use frozen blueberries instead of fresh?
Yes, you can! If using frozen blueberries, do not thaw them first. Toss the frozen berries directly into the cream cheese mixture and sprinkle them onto the biscuit layers. Thawing them first can make the mixture too watery and potentially dye the dough an odd color. Be aware that frozen berries might release more liquid during baking, which could slightly affect the texture, but the taste will still be delicious.
Can I make this bread ahead of time?
Assembling the bread the night before and baking it fresh in the morning is possible, but with a few considerations. The biscuit dough can get a bit soggy from the cream cheese filling if left overnight. If you wish to prep ahead, you can prepare the cream cheese mixture and store it in the fridge. Then, in the morning, roll out the biscuits, assemble, and bake. This ensures the freshest texture.
What if I don’t have a hand mixer for the cream cheese?
While a hand mixer is recommended for the smoothest cream cheese filling, you can certainly use a sturdy whisk and a good amount of arm power! Just make sure your cream cheese is very soft to facilitate easier blending and prevent lumps.
Can I add other flavors or fruits?
Absolutely! This recipe is quite versatile. You can experiment with adding a teaspoon of lemon zest to the cream cheese mixture for a brighter flavor, or a pinch of cinnamon for a warmer spice note. Other berries like raspberries or mixed berries could also be used, though be mindful of their moisture content. Chocolate chips are another delicious addition!
How do I know when the bread is fully cooked?
The bread is fully cooked when the top is golden brown and a toothpick or thin skewer inserted into the center comes out clean, indicating no raw dough. The internal temperature should ideally reach around 200-210°F (93-99°C) if you’re using an instant-read thermometer.
Final Thoughts on Your Next Baking Adventure
This Blueberry Cream Cheese Pull-Apart Bread isn’t just a recipe; it’s an invitation to create joy in your kitchen. Its ease of preparation, combined with its irresistible flavors and fun-to-eat format, makes it a true winner for any occasion. We encourage you to try this fantastic recipe and experience the delight of homemade goodness without the fuss. A big thank you once again to The Country Cook on YouTube for sharing such a wonderful inspiration. Happy baking!