
Mastering the Easy Rose Garden Quilt Pattern: A Beginner-Friendly Guide
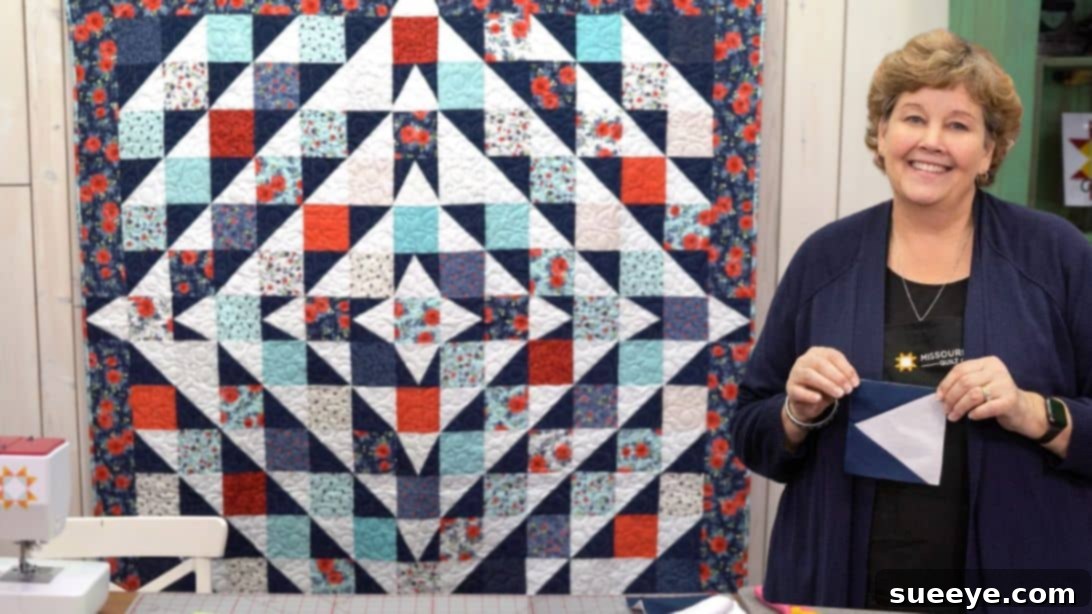
The Rose Garden Quilt, a captivating design brought to life by the experts at Missouri Star, stands out as one of those patterns that instantly capture attention. Its intricate appearance might lead you to believe it requires advanced quilting skills and countless hours of work. However, this visual complexity is surprisingly deceptive. Once you dive into the clear, step-by-step instructions, you’ll discover that this stunning quilt is not only accessible but also incredibly beginner-friendly. Don’t let its grandeur intimidate you; the process is straightforward, making it a perfect project for those new to quilting or looking for a satisfying, quicker make that still yields impressive results.
RELATED: If you enjoy exploring various block techniques, you might also like the Quilt-As-You-Go Crazy Patchwork Flower Block for another creative approach to quilting.
Unveiling the Beauty and Simplicity of the Rose Garden Quilt
The allure of the Rose Garden Quilt lies in its beautiful illusion. It creates a dynamic, floral-like pattern that gives the impression of delicate roses blooming across the fabric landscape. This visual depth is achieved through the clever arrangement of just three fundamental types of blocks: a simple plain square, the versatile half-square triangle (HST), and a unique component often referred to as a “leg” block. What makes this pattern particularly appealing is that you don’t need a specialized template for the “leg” block; its construction is remarkably intuitive and part of what makes this project so manageable.
For quilters searching for a project that merges ease of creation with breathtaking aesthetics, the Rose Garden pattern is an absolute must-try. It’s an ideal choice for enhancing your home decor, creating a heartfelt gift, or simply enjoying the therapeutic process of quilting. Plus, its timeless design makes it suitable for any season, adding a touch of elegance and warmth wherever it’s displayed. Prepare to impress everyone with a quilt that looks far more complicated than it actually is!
Essential Materials for Your Rose Garden Quilt Project
Gathering your materials is the first exciting step in bringing your Rose Garden Quilt to life. While the pattern is flexible for various color schemes, the traditional blue and white combination offers a classic, striking contrast that beautifully highlights the rose effect. Here’s what you’ll need to get started:
- 2 packs of 5″ print squares: These pre-cut squares, often known as “charm packs,” are fantastic time-savers and offer a delightful variety of coordinated prints. They are perfect for introducing visual interest and depth to your quilt.
- 1 1/2 yards of blue fabric: This will be one of your primary colors, providing a foundational hue for your blocks. Choose a shade that complements your print squares.
- 1 1/4 yards of white fabric: The white fabric will serve as a strong contrasting element, crucial for defining the shapes and making your roses pop. A crisp white or a soft cream can work wonderfully.
- 1 1/4 yards of border fabric: The border frames your quilt top, giving it a finished and polished look. Select a fabric that harmonizes with your main colors and enhances the overall design.
- 3/4 yard of binding fabric: Binding is the narrow strip of fabric sewn around the edges of your finished quilt, securing all layers and providing durability. Consider a binding fabric that either matches one of your main colors or offers a subtle contrast.
- 4 1/4 yards of backing fabric: The backing fabric forms the underside of your quilt. This larger piece can be a solid, a coordinating print, or even pieced together from larger scraps to create a unique design on the back.
Beyond the Fabric: Essential Tools for Quilting Success
While the fabric is key, having the right tools makes the quilting process smoother and more enjoyable. Ensure you have:
- A rotary cutter, self-healing mat, and quilting ruler for precise cutting.
- A sewing machine in good working order, equipped with a 1/4-inch seam foot.
- Good quality cotton thread that blends with or complements your fabrics.
- An iron and ironing board for crisp pressing, which is vital for accurate piecing.
- Fabric clips or pins to hold your pieces together.
- A seam ripper (just in case – every quilter needs one!).
Step-by-Step Guide: Crafting Your Rose Garden Quilt
This section will walk you through the creation of each unique block and the assembly of your Rose Garden Quilt top. Precision in cutting and pressing is key to achieving a beautiful, professional-looking finish.
Step 1: Precision in Half-Square Triangles (HSTs)
Half-square triangles are fundamental building blocks in many quilt patterns, and they play a crucial role in creating the dynamic movement within the Rose Garden Quilt. Getting them right sets the foundation for your project.
- Cut Your Squares: Begin by cutting 5 1/2″ squares from both your blue and white primary fabrics. This slightly larger starting size accounts for trimming and ensures your finished HSTs will be perfectly sized.
- Mark for Sewing: Take one of your 5 1/2″ white fabric squares. Using a ruler and a fabric marker or pencil, draw a single diagonal line from one corner to the opposite corner. This line will serve as your guide.
- Layer and Stitch: Place the marked white square directly on top of a 5 1/2″ blue square, aligning all edges perfectly. Pin them together to prevent shifting. Now, using your sewing machine, stitch a seam a scant 1/4 inch away from *either side* of the drawn diagonal line. Do not sew on the line itself.
- Cut and Separate: Once both seams are sewn, carefully cut directly on the drawn diagonal line. This action will yield two raw half-square triangle units from each pair of squares.
- Press and Trim: Open each unit and press the seam open (or to the darker side, depending on your preference for reducing bulk). The crucial next step is to trim each HST unit down to a perfect 5″ square. Use your quilting ruler and rotary cutter to precisely square up each block, ensuring the diagonal seam runs perfectly from corner to corner. This trimming step is vital for accurate piecing later on.
Repeat this process until you have a sufficient number of 5″ HSTs required for your quilt layout.
Step 2: Constructing the Unique “Leg” Blocks
The “leg” block is what truly gives the Rose Garden Quilt its distinctive flair. It’s surprisingly simple to create, embodying the ingenuity of this pattern.
- Prepare White Squares: From your white fabric, cut 5″ white squares. You will need 16 of these base squares to form your “leg” blocks.
- Prepare Blue Strips: Next, cut 3″ x 6″ blue strips. These strips will form the “legs” of your blocks.
- Crease the Base Square: Take one of your 5″ white squares. Fold it in half diagonally and press lightly to create a temporary crease. This crease will serve as a visual guide for centering your blue strip, but don’t worry about it being too exact.
- Attach the First Strip: Place one of your 3″ x 6″ blue strips diagonally across the 5″ white square. Align it so that it crosses the square, with the ends extending beyond the corners of the white square, similar to how it appears in the reference image. Sew this blue strip in place with a 1/4-inch seam allowance along both long edges.
- Press and Open: Once sewn, press the seam open, allowing the blue strip to lie flat.
- Attach the Second Strip: Now, take another 3″ x 6″ blue strip and place it diagonally across the *other* side of the white square, crossing over the first blue strip, creating an “X” shape. Sew this second strip in place with a 1/4-inch seam allowance along its long edges.
- Trim the Excess: After pressing the second seam open, you’ll have excess blue fabric extending beyond the edges of the white 5″ square. Using your rotary cutter and ruler, carefully trim away this excess, using the 5″ white square as your guide. The goal is to end up with a perfect 5″ block with the two blue strips neatly integrated.
Repeat these steps to create all the necessary “leg” blocks for your quilt. This unique block, when combined with the HSTs, is what forms the petal-like shapes of your rose garden.
Step 3: Arranging Your Blocks into the Rose Garden Design
This is where the magic truly starts to happen! Laying out your blocks correctly is crucial for the Rose Garden pattern to emerge.
- Find a Spacious Surface: Clear a large area, such as your design wall, a clean floor, or a large table, where you can arrange all your completed blocks.
- Visualize the Pattern: Begin by placing your plain squares, HSTs, and “leg” blocks according to the reference photo. The key is to arrange them so that the light and dark triangles of the HSTs and the blue strips of the “leg” blocks come together to form the distinct rose shapes. Pay close attention to the orientation of each block. A slight rotation can dramatically change the pattern.
- Observe and Adjust: Step back frequently to view your arrangement from a distance. This allows you to spot any misplaced blocks or areas where the pattern isn’t flowing correctly. Don’t be afraid to experiment with slight adjustments until the rose shapes are clearly visible and aesthetically pleasing.
- Document Your Layout: Once you are satisfied with your layout, take a photograph with your phone. This photo will be an invaluable guide when you move to the sewing machine, ensuring you assemble the blocks in the correct order and orientation.
Step 4: Assembling Your Quilt Top
With your blocks perfectly arranged, it’s time to sew them together to form the quilt top.
- Sew Blocks into Rows: Working row by row, pick up the blocks from your layout, keeping them in order. Sew the blocks within each row together using a consistent 1/4-inch seam allowance. Chain piecing can be a great way to speed up this process and maintain accuracy.
- Press Seams: After sewing each row, press the seams. For adjacent rows, it’s often helpful to press the seams in opposite directions (e.g., seams of row 1 to the left, seams of row 2 to the right). This allows you to “nest” the seams when joining rows, ensuring perfectly matched points and reducing bulk.
- Join the Rows: Once all your rows are sewn and pressed, begin joining the rows together. Pin carefully at each seam intersection to ensure your points align. Sew the rows together with a 1/4-inch seam allowance.
- Final Pressing: After all rows are joined and your quilt top is complete, give it a final, thorough press. Press from the front, taking care to flatten all seams and create a smooth surface. Your beautiful Rose Garden quilt top is now ready for the next stages.
Step 5: The Finishing Touches: Borders, Batting, and Binding
Completing your quilt involves adding borders, creating the quilt sandwich, quilting, and finally, adding the binding.
- Add Borders: Measure your quilt top accurately through the center, both horizontally and vertically, to determine the correct length for your border strips. Cut your border fabric into strips of your desired width (typically 2.5 to 4 inches) and sew them to the sides, then the top and bottom of your quilt top. Press seams towards the border.
- Create the Quilt Sandwich: Lay your backing fabric face down on a clean, flat surface, smoothing out any wrinkles. Tape it securely if needed. Place your batting on top of the backing, centered and smooth. Finally, lay your quilt top face up on top of the batting, again, perfectly centered and smoothed.
- Basting: Secure all three layers together using your preferred basting method – safety pins, basting spray, or hand basting. Ensure the layers are taut but not stretched, and there are no puckers.
- Quilting: This is where you stitch through all three layers to hold them together and add texture. You can choose simple straight lines, a meandering free-motion design, or a more intricate custom pattern. If you’re new to quilting, straight lines stitched on your home machine or sending it to a long-arm quilter are great options.
- Binding: Once quilted, trim the edges of your quilt square. Prepare your binding strips (typically 2.5 inches wide, sewn together end-to-end to create one long strip). Attach the binding to the front of the quilt by machine, then wrap it around to the back and hand-stitch or machine-stitch it down to finish.
Tips for a Flawless Rose Garden Quilt
- Accurate Cutting is Paramount: The foundation of a successful quilt lies in precise cutting. Invest in a sharp rotary cutter, a good self-healing mat, and accurate rulers. Even a slight discrepancy can throw off your block alignment.
- Consistent Seam Allowance: A perfect 1/4-inch seam allowance is crucial. Practice on scrap fabric until you can achieve it consistently. Many sewing machines have a 1/4-inch presser foot, which can be incredibly helpful.
- Pressing Matters: Don’t underestimate the power of a good press! Pressing after each step (not ironing, but lifting and pressing) flattens seams and helps blocks fit together without distortion. Decide whether to press seams open or to one side and stick with it.
- Design Wall/Floor: Utilize a design wall or even a clean section of your floor to lay out your blocks before sewing. This allows you to visualize the entire pattern and make any necessary adjustments before committing to stitching.
- Watch the Video Tutorial: For visual learners, watching the original Missouri Star tutorial by Jenny Doan is highly recommended. Seeing the techniques in action can clarify any uncertainties.
Personalizing Your Rose Garden Quilt
While the classic blue and white combination is timeless, the Rose Garden Quilt offers endless possibilities for personalization:
- Color Palettes: Experiment with vibrant prints for a modern look, pastels for a softer feel, or seasonal fabrics for a themed quilt. Imagine a fall-themed Rose Garden with rich oranges, browns, and creams, or a spring version with bright greens and pinks.
- Fabric Types: While cotton is standard, consider incorporating subtle textures with linen blends or even flannel for a cozier quilt.
- Quilting Designs: The quilting itself can add another layer of design. Simple straight lines enhance the geometric nature, while free-motion quilting with swirls or actual rose motifs can add incredible depth and charm.
Beyond the Rose Garden: Exploring More Quilt Patterns
If the joy of creating the Rose Garden Quilt sparks a passion for more rose-themed designs, you’re in luck! There are many other beautiful patterns to explore:
- The elegant Rose Twirl Quilt Tutorial offers a different take on floral movement.
- For a touch of intricate beauty, delve into the Celtic Rose Quilt Tutorial.
- And for another delightful project with Donna Jordan, check out the Rose Crossing Quilt With Donna Jordan.
Conclusion: Your Beautiful Rose Garden Quilt Awaits
The Rose Garden Quilt pattern truly embodies the spirit of quilting: creating something beautiful and seemingly intricate from simple shapes and straightforward techniques. It’s a testament to the fact that impressive results don’t always require advanced skills, just a little patience and a willingness to follow the steps. Whether you’re making it for yourself, a loved one, or simply for the pure joy of creation, this quilt promises to be a rewarding project that will bring beauty and comfort for years to come. So gather your fabrics, fire up your sewing machine, and embark on the delightful journey of creating your very own Rose Garden Quilt!