
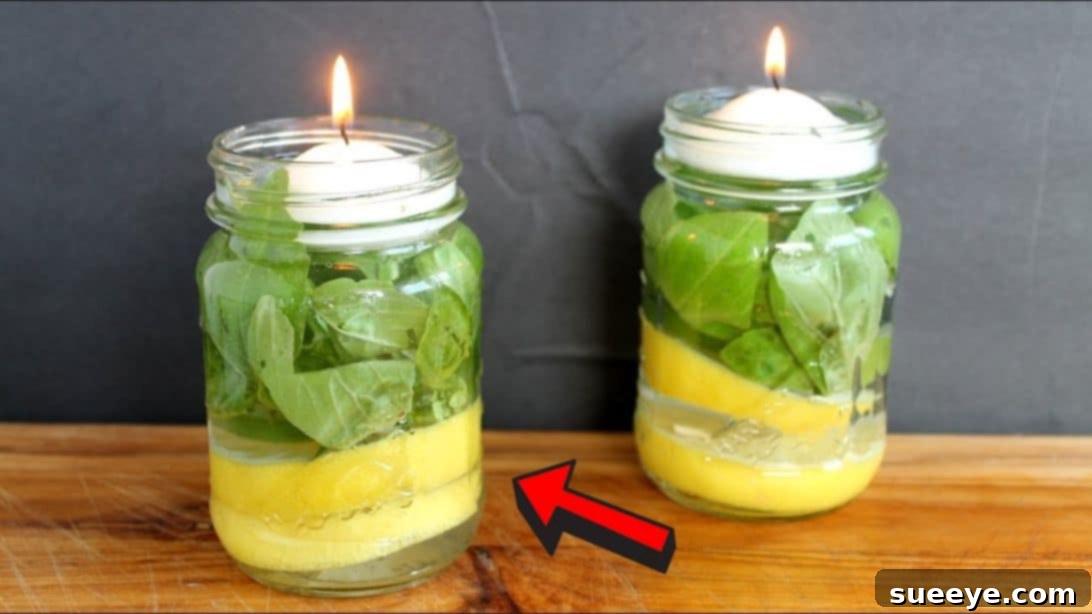
Natural & Effective DIY Mosquito Repellent Candles: Your Ultimate Guide for a Bug-Free Summer
As the warmth of summer and the gentle breeze of early fall invite us outdoors, so too do the season’s less welcome guests: mosquitoes. These persistent pests thrive in warm weather, often turning our pleasant evenings into a battle against itchy bites and the unsettling thought of vector-borne diseases. It’s a common concern for families everywhere, as we seek effective ways to protect our loved ones and reclaim our outdoor spaces without resorting to harsh chemicals.
The quest for a safe, natural, and pleasant alternative to conventional insect repellents has led many to explore the world of DIY solutions. Among the most popular and aesthetically pleasing options are homemade mosquito repellent candles. Inspired by the brilliant and easy-to-follow guide from Angie Holden on YouTube, we’ve discovered a method that not only works wonders but also adds a refreshing aroma and a touch of decor to any setting. Imagine enjoying a peaceful summer evening, surrounded by the soft glow of candles, while mosquitoes are nowhere to be found. This guide will walk you through crafting these simple yet powerful repellents, perfect for your patio, deck, or any outdoor gathering.
Why Choose DIY Natural Mosquito Repellent Candles?
In a world often filled with synthetic products, the appeal of natural solutions is growing. When it comes to mosquito control, chemical sprays and lotions, while effective, often come with concerns about their long-term health impacts and environmental footprint. This is where DIY natural mosquito repellent candles shine. They offer a multitude of benefits:
- Non-Toxic & Safe: Crafted from natural ingredients like citrus, herbs, and essential oils, these candles provide a chemical-free way to deter pests, making them safer for children, pets, and individuals with sensitivities.
- Cost-Effective: Many of the ingredients are readily available and affordable, often found in your kitchen or garden, significantly reducing the cost compared to store-bought repellents.
- Aesthetic Appeal: Far from the utilitarian look of commercial repellents, these homemade candles serve as beautiful decorative elements. The vibrant colors of citrus and basil, combined with the warm glow of candlelight, create a charming ambiance for any outdoor space.
- Refreshing Aroma: Instead of the strong, often unpleasant odor of chemical repellents, these candles infuse the air with delightful scents of lemon, lime, and lemongrass – a refreshing change for both you and your guests.
- Customizable: The DIY approach allows for personalization. You can experiment with different essential oils, herbs, and jar sizes to suit your personal preferences and decor style.
Embracing these homemade repellent candles means choosing a healthier, more beautiful, and equally effective way to enjoy your outdoor living areas, free from the nuisance of biting insects.
Understanding the Power of Natural Repellents: Key Ingredients
The effectiveness of these DIY mosquito repellent candles lies in the natural properties of their ingredients, which have long been recognized for their insect-deterring capabilities. Here’s a closer look at what makes each component a mosquito’s worst nightmare:
- Citrus (Lemon & Lime): The peels and oils of citrus fruits like lemons and limes contain d-limonene, a natural compound that is highly unpleasant to mosquitoes and other insects. When sliced and submerged in water, these fruits release their aromatic oils, creating a natural barrier that mosquitoes avoid. They also add a bright, fresh scent that humans find appealing.
- Lemongrass Essential Oil: This powerful essential oil is a cornerstone of natural insect repellency. It contains citronellal and geraniol, compounds known to mask the scents that attract mosquitoes, essentially confusing them and keeping them away. Lemongrass oil is widely used in commercial natural repellents due to its proven efficacy and pleasant, earthy citrus aroma.
- Fresh Basil Leaves: More than just a culinary herb, basil is a potent mosquito deterrent. Its leaves contain compounds like estragole, citronellol, and eugenol, which release a strong scent that mosquitoes find repulsive. When fresh basil leaves are added to the repellent mixture, they significantly enhance the candle’s bug-fighting power, creating a multi-layered defense.
- Floating Candles: While not a repellent in themselves, floating candles are crucial for activating and dispersing the repellent properties. The heat from the flame helps to gently warm the water and ingredients, encouraging the release of their aromatic compounds into the surrounding air, creating a protective perimeter.
By combining these natural powerhouses, you create a synergistic effect that is highly effective against mosquitoes, offering a refreshing and non-toxic alternative to conventional repellents.
Craft Your Own Effective Mosquito Repellent Candles: Materials You’ll Need
Gathering your materials is the first step towards creating your tranquil, mosquito-free zone. Most of these items are easily found at your local grocery store, craft store, or online. Here’s what you’ll need to prepare:
- Floating Candles: Choose small, lightweight candles designed to float on water. These are widely available in various colors and sizes, allowing you to match your decor.
- Lemon: Select fresh, firm lemons. You’ll need about one whole lemon per two mason jars, depending on slice thickness.
- Lime: Similarly, choose fresh, vibrant limes. One lime should also suffice for two jars.
- Water: Regular tap water is perfectly fine for this project.
- Lemongrass Essential Oil: Ensure you purchase a high-quality, pure essential oil for the best results and aroma. You can find this at health food stores, pharmacies, or online.
- Fresh Basil Leaves: A small bunch of fresh basil from your garden or grocery store will be ideal. The fresher, the better for optimal scent release.
- Two Mason Jars (or similar clear glass containers): Standard pint-sized mason jars (16 oz) work perfectly, offering enough space for ingredients and water. You can also use other clear glass containers, such as recycled jam jars or decorative vases, to match your style.
- Spoon: Any long-handled spoon will do for mixing the essential oil into the water.
Having all your materials organized before you begin will make the crafting process smooth and enjoyable, bringing you closer to a serene, bug-free outdoor experience.
Step-by-Step Guide to Making Your DIY Mosquito Repellent Candles
Making these effective and beautiful mosquito repellent candles is incredibly straightforward. Follow these detailed steps to assemble your natural defense against pesky bugs:
Step 1: Prepare Your Citrus Slices
Begin by thoroughly washing your lemon and lime under cool water. Using a sharp knife, carefully slice both fruits into round discs, aiming for a thickness of approximately 1/4 inch. Consistent thickness helps them sit nicely in the jar and release their essential oils evenly. You’ll need about 2-3 slices of each fruit per jar, so adjust accordingly based on the number of candles you plan to make. Set these vibrant slices aside, ready for assembly.
Step 2: Assemble Your Mason Jar Base
Take one of your clean mason jars. Carefully place two to three slices of your prepared lemon or lime into the bottom of the jar. You can mix and match, or use just one type of citrus per jar for variety. Next, gently fill the remaining space in the jar with fresh basil leaves. Don’t pack them too tightly; allow them some room to release their fragrance. The combination of citrus and basil forms the core of your repellent, visually appealing and powerfully effective.
Step 3: Add Water to the Jar
Once the citrus and basil are arranged, slowly fill the mason jar with water. Pour carefully to avoid disturbing the arrangement of the fruits and herbs. Fill the water just up to the neck of the jar, leaving a small amount of space at the top. It’s important not to fill it all the way to the brim, as you’ll need room for the floating candle and to prevent spillage.
Step 4: Infuse with Lemongrass Essential Oil
Now it’s time to add the potent mosquito-repelling element: lemongrass essential oil. Add about 10-15 drops of the essential oil into the water. For larger jars or stronger repellent action, you can add a few more drops. Using your spoon, gently mix the water and essential oil to ensure it’s evenly dispersed. This step is crucial, as the essential oil provides a significant portion of the repellent power.
Step 5: Place and Light the Floating Candle
Carefully place a floating candle on the surface of the water in the jar. The candle should sit steadily on the water, with its wick dry and accessible. Once positioned, light the candle. The gentle warmth from the flame will help activate the natural oils from the citrus, basil, and lemongrass, releasing their mosquito-repelling fragrances into the air.
Step 6: Repeat and Deploy for Maximum Protection
Now, repeat steps one through five for your second mason jar. If you’re making more, continue the process until all your repellent candles are ready. Once lit, strategically place these beautiful and functional jars in areas where you and your family spend time outdoors, and especially where you typically notice mosquitoes. Common spots include patio tables, porch steps, deck railings, or picnic areas. For larger spaces, consider using multiple candles to create a more comprehensive protective perimeter.
Maximizing Effectiveness: Tips for Using Your Repellent Candles
To get the most out of your homemade mosquito repellent candles and ensure your outdoor spaces remain bug-free, consider these practical tips:
- Strategic Placement: Place candles around the perimeter of your seating area, about 3-5 feet apart. This creates a scent barrier that mosquitoes are reluctant to cross. Consider placing one on each corner of a patio table for optimal coverage.
- Number of Candles: For an average-sized patio or deck, two to four candles are generally effective. For larger areas or during peak mosquito activity, you might need more to create a strong enough deterrent field.
- Wind Considerations: On windy days, the repellent scent can dissipate quickly. Try to place candles in more sheltered areas or use more candles to compensate for the wind.
- Start Early: Light your candles about 15-30 minutes before you plan to use your outdoor space. This gives the ingredients time to warm up and release their full repellent power, establishing a barrier before mosquitoes arrive.
- Safety First: As with any open flame, never leave burning candles unattended. Keep them away from flammable materials, children, and pets. Place them on stable, heat-resistant surfaces to prevent accidents.
Beyond Repellency: Aesthetic Appeal and Ambiance
One of the most delightful aspects of these DIY mosquito repellent candles is their dual functionality. Unlike traditional bug zappers or chemical sprays, these creations aren’t just effective; they’re also incredibly charming. The vibrant greens of fresh basil, the bright yellows and greens of lemon and lime slices, suspended in clear water, create a beautiful, natural centerpiece for any outdoor table. When the floating candle is lit, it casts a warm, inviting glow, transforming your patio or deck into a cozy, magical oasis. This adds a layer of sophistication and tranquility to your outdoor gatherings, allowing you to entertain and relax in style, free from the distraction of buzzing insects. They truly blend seamlessly with any outdoor decor, enhancing the overall atmosphere while discreetly performing their bug-repelling duty.
Care and Maintenance for Your Homemade Repellents
To ensure your DIY mosquito repellent candles remain effective and beautiful for as long as possible, a little care and maintenance go a long way:
- Lifespan of Ingredients: The fresh fruit and basil leaves will typically last for 2-3 days before they start to wilt or lose their potency. The essential oil, however, will continue to provide some repellent effect.
- Refreshing Your Candles: When the fruit and basil begin to look tired, simply remove them, clean the jar, and replace them with fresh ingredients, adding new essential oil and water. This allows you to reuse your jars indefinitely.
- Candle Replacement: Floating candles typically burn for several hours. Once a candle burns down, simply replace it with a new one to continue enjoying the repellent effect and ambiance.
- Storage: If you’re not using the candles for a few days, you can cover the jars and store them in the refrigerator to prolong the freshness of the fruit and basil. However, for maximum efficacy, it’s best to use fresh ingredients each time you prepare them.
Customization and Variations: Personalize Your Protection
The beauty of DIY projects is the freedom to personalize them. While lemon, lime, lemongrass, and basil are a fantastic combination, feel free to experiment with other natural repellents and decorative elements:
- Other Essential Oils: Try incorporating a few drops of citronella, eucalyptus, lavender, peppermint, or cedarwood essential oils. These are all known for their insect-repelling properties and can create different aromatic profiles.
- Additional Herbs: Rosemary, mint, or catnip sprigs can be added alongside or instead of basil for varied scents and repellent effects.
- Different Containers: Beyond mason jars, consider using decorative glass bowls, wine glasses, or hurricane lanterns. The key is a clear, stable container that can hold water and a floating candle.
- Decorative Touches: Add river rocks, glass beads, or small flowers to the bottom of the jar for an extra decorative flourish. Just ensure they don’t impede the floating candle.
By exploring these variations, you can create a personalized mosquito repellent solution that not only protects but also perfectly complements your unique style.
Embrace a Safer, More Enjoyable Outdoor Experience
With these simple, natural, and beautiful DIY mosquito repellent candles, you can transform your outdoor living spaces into sanctuaries free from irritating bug bites. They offer a delightful blend of functionality and aesthetics, providing effective protection without the drawbacks of chemical alternatives. So, gather your ingredients, follow these easy steps, and light up your summer nights with peace, comfort, and a refreshing aroma. Say goodbye to pesky mosquitoes and hello to truly enjoyable outdoor moments with family and friends.