
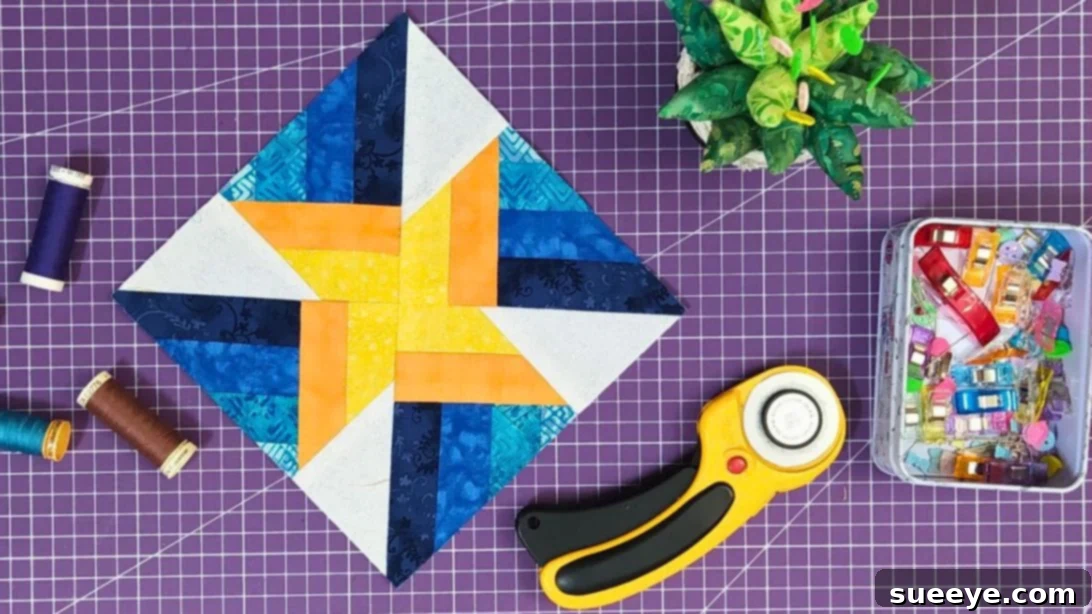
Are you searching for a quilt block pattern that appears incredibly intricate yet is surprisingly simple to construct? Look no further! This ingenious quilt block, popularized by the talented designer Patchwork with Achide, is precisely what you need. Prepare to amaze your friends and family with a design that expertly creates an optical illusion, making onlookers believe you spent days on intricate piecing. When I first encountered this captivating pattern, I was instantly enamored. However, my initial excitement was tempered by apprehension, as I wrongly assumed its complex appearance equated to a time-consuming and challenging endeavor to complete even a single block.
RELATED: Triangle and Strip Fusion Table Runner Quilt
Much to my delight, my assumptions were entirely unfounded. This quilt block is far less daunting than its elaborate look suggests – believe me, it’s genuinely easier than you can possibly imagine. The first time I proudly displayed my finished quilt, the reactions were overwhelmingly positive. It garnered immense attention and admiration, with everyone eager to know the secret behind its creation. If you’re ready to experience that same sense of accomplishment and receive a cascade of compliments, then embarking on this quilting journey is an absolute must.
Here’s another fantastic pattern for you to explore: Easy 3D Burst Quilt Block For Beginners
Why Choose This Easy Optical Illusion Quilt Block?
This particular quilt block stands out for several compelling reasons, making it a perfect project for both novice and experienced quilters alike. Its deceptive simplicity is its greatest charm. For beginners, it offers a fantastic opportunity to practice fundamental quilting skills such as accurate cutting, precise piecing with consistent seam allowances, and proper pressing techniques, all while achieving a result that looks incredibly advanced. You’ll build confidence without getting bogged down in overly complex instructions or tiny pieces.
Beyond its educational value, the aesthetic appeal of this block is undeniable. The strategic arrangement of fabric strips and triangles creates a dynamic, three-dimensional effect that adds depth and movement to any quilt project. It’s a design that truly catches the eye and invites closer inspection, proving that you don’t need years of experience to create something truly spectacular. Moreover, the satisfaction of creating something so visually striking with straightforward steps is incredibly rewarding, making your quilting journey even more enjoyable.
Essential Materials for Your Easy Quilt Block
To embark on this exciting quilting adventure, you’ll need a few key materials. The beauty of this block lies in its efficient use of fabric strips, which makes it an excellent project for using up scraps or building a vibrant palette from new fabrics. Precision in cutting these strips and squares is crucial for the success of the optical illusion, so take your time during the preparation phase.
- Fabric Strips: You will need strips measuring approximately 1.57 inches wide by 4.33 inches long (or roughly 1 5/8 inches by 4 3/8 inches).
- Choose 6 different colors. For a truly captivating optical illusion, select colors with good contrast. A mix of lights, mediums, and darks will make the design pop. For example, two light colors, two medium tones, and two darker shades would work wonderfully.
- You will need 4 pieces of each of the 6 colors, totaling 24 strips.
- Square Fabric Pieces: You will also need 2 pieces of fabric cut into squares, each measuring 3.54 inches by 3.54 inches (or roughly 3 1/2 inches by 3 1/2 inches). These squares should ideally contrast with the strip colors to enhance the final design.
Recommended Quilting Tools
While the material list focuses on fabric, having the right tools will make your quilting experience smoother and more precise:
- Rotary Cutter: Essential for accurate and efficient fabric cutting.
- Self-Healing Cutting Mat: To protect your work surface and prolong the life of your rotary blade.
- Quilting Rulers: Clear acrylic rulers with measurement markings are indispensable for squaring up blocks and making precise cuts. A smaller ruler (e.g., 6.5″ x 6.5″) might be helpful for trimming.
- Sewing Machine: A reliable machine capable of a consistent 1/4-inch seam allowance.
- Iron and Ironing Board: Crucial for pressing seams flat and accurately.
- Pins or Fabric Clips: To hold fabric pieces together before sewing.
- Fabric Marker or Pencil: For marking cutting lines if preferred.
- Thread: High-quality cotton thread that matches or blends with your fabrics.
How to Make an Easy Optical Illusion Quilt Block
Step 1: Constructing Your Initial Strip Units
Begin by selecting one strip from four of your chosen colors. Arrange these four strips in a sequence that you find visually appealing, considering how the colors will interact. Sew these four strips together lengthwise, using a consistent 1/4-inch seam allowance. Once sewn, carefully press the seams flat. You can choose to press them open to reduce bulk or press them to one side – consistency is key for all seams within a unit. After pressing, square up this newly formed strip unit into a precise 4.33-inch by 4.33-inch block. Trim any excess fabric to ensure perfect dimensions. Repeat this process with the remaining strips of these same four colors, creating a second identical 4.33-inch square block.
Next, take one strip each from the two remaining colors you selected. Sew these two strips together lengthwise, again using a 1/4-inch seam allowance. Press the seam flat. Repeat this with the remaining strips of these two colors, yielding two more two-strip units. These smaller units will play a critical role in the final design.
Step 2: Preparing Your Square Blocks for Diagonal Cuts
Take your two 3.54-inch by 3.54-inch square blocks. Place one square on your cutting mat. Using your quilting ruler and rotary cutter, carefully cut the square in half diagonally from one corner to the opposite corner. This will yield two identical triangles. Repeat this process with the second 3.54-inch square block, resulting in a total of four identical triangles. Handle these triangles carefully, as edges cut on the bias can stretch easily.
Step 3: Attaching Triangles to Your Strip Units
Now, let’s start assembling the main components of your block. Take one of the triangles you cut in Step 2. Position it onto one of the 4-strip units you created in Step 1. Align the longest edge (hypotenuse) of the triangle with one of the edges of the strip unit, as depicted in the reference photo. The goal is to sew this triangle to the strip unit, creating a larger, more complex shape. Pin the triangle in place if needed, ensuring the raw edges are aligned. Sew along the designated seam line with a 1/4-inch seam allowance. Press the seam open or towards the darker fabric to minimize bulk. Repeat this process for the other three triangles and strip units, forming a total of four partially pieced units.
Step 4: Preparing Additional Triangles from Remaining Squares
Reviewing the original instructions, it appears the initial description might be slightly condensed. Let’s clarify. If you have remaining 3.54″ squares from Step 2, you would typically use these as part of the overall design. However, the subsequent step refers to “small triangles.” Assuming you have created all necessary units and potentially have smaller pieces or are creating new ones, this step guides us. For clarity, we will refer back to the square blocks that create the corner triangles of the larger design. If your original 3.54″ squares were fully utilized in Step 2, then Step 4 might imply creating new triangular components, perhaps from different fabric or smaller starting squares. For this specific block, we assume all needed triangles are derived from the initial 3.54″ squares.
Step 5: Incorporating the Smaller Triangles for Geometric Impact
Now, retrieve the two-strip units you created in Step 1. These units will form the central diagonal element of the block. Take one of your cut triangles (referring to the smaller triangles that will fill in gaps to create the illusion). Position this small triangle carefully between the triangle part and the rectangular strip part of one of your assembled units. The key here is to align the slanted edge of the small triangle precisely with the slanted edge of the larger triangle below it. This meticulous alignment is what generates the block’s striking geometric effect. Pin it securely in place to prevent shifting. Sew along the top slanted part, using your consistent 1/4-inch seam allowance. Once sewn, press the seam open to reduce bulk and ensure a flat finish. Carefully trim any excess fabric from the seam allowance, being mindful not to cut into your stitching. Repeat this process with the other corresponding triangles and units until all components have their small triangles attached.
Step 6: Final Assembly of Your Optical Illusion Quilt Block
This is the exciting stage where your block truly comes to life! Carefully arrange all your pieced units on a flat surface, mirroring the layout shown in the accompanying photo. Pay close attention to the orientation of each unit to ensure the optical illusion forms correctly. The arrangement is critical – one misplaced unit can disrupt the entire design. Typically, you will sew the units together in pairs first. For instance, sew the top left unit to the top right unit, and the bottom left unit to the bottom right unit. Press these seams open or to one side. Finally, sew these two larger horizontal rows together to complete your block. When joining the final rows, make sure to align the seam intersections carefully for a professional finish. Pin generously at these points to ensure everything matches up perfectly. After sewing the final seam, give your completed block a final press, admiring the stunning optical illusion you’ve created!
Mastering the Illusion: Tips for Success
Creating this captivating quilt block, while simple in concept, benefits greatly from a few key quilting practices that ensure precision and a polished finish:
- Accurate Cutting is Paramount: The success of any geometric quilt block, especially one creating an optical illusion, hinges on precise cutting. Use a sharp rotary blade and a reliable ruler to ensure all your strips and squares are exactly the dimensions specified. Even a slight inaccuracy can accumulate and distort the final design.
- Consistent 1/4-inch Seam Allowance: This is the golden rule of quilting. Strive for a perfect 1/4-inch seam allowance on every stitch. Practice sewing a few test seams on scraps to ensure your machine is calibrated correctly. A consistent seam allowance will ensure your blocks measure up correctly when assembled.
- Pressing Matters: Don’t underestimate the power of a good press! Pressing seams after each step, rather than waiting until the end, helps to flatten the fabric, align subsequent pieces more accurately, and reduce bulk. Decide whether to press seams open or to one side and stick to that method throughout your project for consistency.
- Chain Piecing for Efficiency: To save time and thread, consider chain piecing. This involves feeding multiple units through your sewing machine one after another without lifting the presser foot or cutting the thread in between. This is particularly useful when sewing multiple strips or triangles in repetitive steps.
- Fabric Choices Enhance the Illusion: For the most dramatic optical effect, select fabrics that offer good contrast. Light, medium, and dark values placed strategically will make the design truly pop. Experiment with different color combinations – warm and cool tones, or complementary colors – to create various moods and visual effects.
- Handle Bias Edges with Care: Any fabric edge cut diagonally (on the bias) has more stretch than edges cut along the grain. When working with the triangles, handle them gently to avoid stretching, which can distort your pieces.
- Square Up as You Go: After piecing together units, occasionally check their dimensions and square them up if necessary. This preventative measure ensures that minor discrepancies don’t compound into major problems later on.
Unleashing Your Creativity: Variations and Beyond
Once you’ve mastered this stunning optical illusion quilt block, the possibilities for customization and larger projects are endless. This versatile design can be adapted to fit a variety of creative visions:
- Experiment with Color Palettes: While high contrast is excellent for the illusion, try different color schemes. A monochromatic palette (various shades of one color) can create a subtle, sophisticated effect. Alternatively, a rainbow spectrum will yield a vibrant and playful quilt. Consider seasonal colors for holiday-themed projects.
- Vary the Size: While this tutorial provides specific dimensions, you can scale the block up or down by adjusting the initial strip and square measurements proportionally. A larger block might be quicker to assemble for a full quilt, while smaller versions could be used for mini-quilts, placemats, or even intricate bag panels.
- Combine Multiple Blocks: The true magic begins when you combine several of these blocks to form a larger quilt top. Experiment with rotating blocks to create new secondary patterns at their intersections. Lay them out in a grid, or offset them for a more dynamic arrangement. The illusion deepens with repetition!
- Project Ideas:
- Full-Sized Quilt: Assemble many blocks for a bed quilt that will be a true showstopper.
- Wall Hanging: A smaller collection of blocks, perhaps with a decorative border, makes an impressive piece of textile art for your home.
- Pillows or Cushions: A single block or a few joined together can create striking decorative pillows.
- Table Runners or Placemats: A row of blocks can form an elegant table runner, adding a touch of handmade charm to your dining space.
- Tote Bags: Incorporate one or two blocks into the design of a handmade tote bag for a unique accessory.
- Add Sashing and Borders: Enhance your quilt by adding sashing (strips of fabric between blocks) and borders around the entire quilt top. Sashing can help define individual blocks, while borders frame your design and provide an opportunity to add extra fabric interest or size.
Simple Quilt Block For Beginners: Your Next Quilting Adventure
This easy quilt block truly embodies the joy of quilting – the ability to create something beautiful and complex-looking from simple shapes and stitches. It’s a testament to clever design and accessible techniques. Whether you’re a seasoned quilter looking for a quick and satisfying project or a beginner eager to dive into the world of fabric artistry, this optical illusion block is an excellent choice. Its straightforward construction, combined with its impressive visual impact, guarantees a rewarding experience and a finished piece you’ll be proud to show off. So gather your fabrics, fire up your sewing machine, and prepare to create a stunning quilt that will leave everyone wondering how you did it!
Don’t forget to share your finished creations! Seeing how different fabric choices bring this design to life is always inspiring. Happy quilting!