
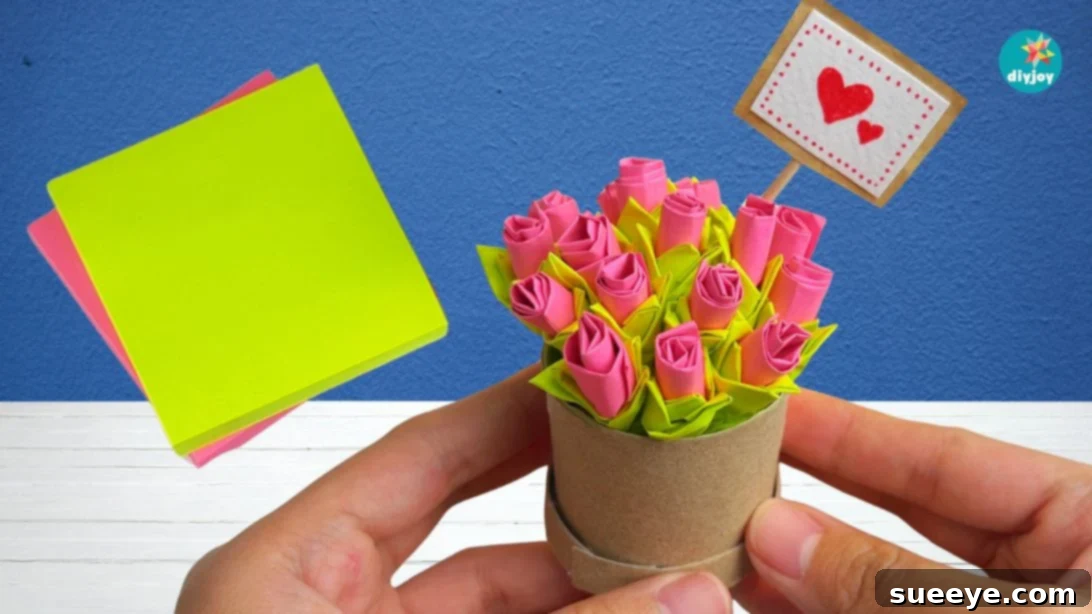
Transform Simple Post-it Notes into Beautiful Paper Flowers: Your Ultimate DIY Guide
Discover the enchanting world of paper crafting where everyday office supplies become extraordinary works of art. This DIY Post-it Note paper flower tutorial reveals how surprisingly simple it is to create the most adorable paper flowers you’ve ever imagined. Far exceeding expectations, these miniature paper roses can be elegantly arranged into a charming mini flower bouquet, serving as delightful desk decor, a heartfelt handmade gift for someone special, or even a unique party favor. Prepare to be amazed by the ease and speed of this delightful paper craft – it’s a truly rewarding project for crafters of all ages and skill levels!
RELATED CRAFTING INSPIRATION: Explore more creative ideas with our Post-It Notes Paper Flowers tutorial for different designs!
Why Choose Post-it Note Paper Flowers for Your Next Craft Project?
In our fast-paced lives, finding moments for relaxation and creative expression can be a challenge. If you often find yourself juggling deadlines or overwhelmed by a never-ending to-do list, taking a short break for a quick, fulfilling craft like this cute flower project can be incredibly therapeutic. The beauty of these Post-it note paper flowers lies in their simplicity and accessibility. You likely have a stack of sticky notes tucked away in a drawer or scattered across your desk, just waiting to be transformed into something truly special.
This easy-to-follow tutorial guides you through the process of making stunning paper roses using one of the most common office supplies. It’s a craft that requires minimal tools and no prior experience, making it perfect for:
- Beginners: Learn basic paper manipulation techniques with instant, satisfying results. The gentle folds and twists are intuitive and fun.
- Kids Crafts: A fantastic activity for children to develop fine motor skills and unleash their creativity. With adult supervision for scissors and glue, even young crafters can create their own beautiful blooms.
- Classroom Activities: An engaging and low-cost project for art classes, or a fun break during study sessions to encourage hands-on learning and imaginative play.
- Stress Relief: The repetitive, mindful act of rolling and twisting paper can be incredibly calming and a wonderful way to de-stress after a long day. It’s a moment of focus and peace.
- Budget-Friendly Decor: Create charming decorations for your home, office, or event without breaking the bank. These flowers are a testament to how beautiful creations don’t require expensive materials.
- Personalized Gifts: Handcrafted items always carry a special touch and convey thoughtfulness. These mini bouquets are ideal for birthdays, anniversaries, teacher appreciation, or “just because” moments.
Grab your sticky notes, choose your favorite colors, and let’s embark on this delightful paper flower journey together!
Gather Your Materials and Essential Tools
One of the most appealing aspects of crafting these beautiful floral bouquets is the minimal list of supplies required. You won’t need any specialized or expensive tools, just a few common household and office items. Whether you want to make individual roses or assemble a complete bouquet with a charming circular box, we’ve got you covered with a comprehensive list.
For Crafting Individual Paper Roses:
- Sticky Notes: (e.g., Post-it Notes) in your preferred flower colors (e.g., pink, red, yellow, purple) and green for leaves. Standard 3×3 inch sticky notes work perfectly, but you can experiment with other sizes for varied flower dimensions.
- Scissors: A basic pair of sharp scissors for precise cutting of the green strips.
That’s right! For a single, delightful rose, you might not even need glue. The ingenious rolling and twisting technique, combined with the sticky edge of the note, often holds the flower together perfectly.
For Assembling a Full Mini Flower Bouquet with a Decorative Box:
To elevate your individual roses into a beautiful, presentation-ready bouquet, you’ll need a few additional items to create the charming display box:
- Sticky Notes: As detailed above, various colors for your blooms and green for the accompanying foliage.
- Scissors: Your trusty pair for all cutting needs, from notes to cardboard.
- Toilet Paper Roll: This recycled item forms the sturdy yet eco-friendly base for your bouquet box. A paper towel roll can also be cut down to the appropriate size.
- Glue Gun and Glue Sticks: Essential for quick and secure assembly of the bouquet box. Hot glue provides a strong, fast-drying bond. If a glue gun isn’t available, any strong craft glue or liquid adhesive that dries clear can work, though drying time may vary.
- Glue Stick: Handy for smaller paper adhesions, especially if you decide to add decorative elements like a personalized signage or intricate paper details.
- Rubber Band: To temporarily secure your collection of finished flowers, keeping them neatly bundled before arranging them in the box.
- Cardboard Scraps: A small piece from an old cereal box, tissue box, or similar light cardboard is perfect for reinforcing the base of your bouquet holder.
Optional Materials for Customization and Personalization:
Want to add a personalized touch to your bouquet, like a sweet message or extra flair? Here’s what you’ll need:
- Toothpick: To create a small, elegant signpost for your message.
- Small Piece of Paper/Cardstock: For your custom message, a decorative shape (like a heart or star), or miniature flags.
- Marker: For writing your special message with clarity and style.
- Additional Decorative Items: Ribbons, lace, glitter, paint, decorative tape, or stickers can be used to further personalize your circle box or individual flowers, making your creation truly unique (see “Creative Ideas and Variations” below for more inspiration!).
Step-by-Step: Crafting Your Charming Post-it Note Flower Bouquet
This comprehensive paper flower tutorial will guide you through the creation of beautiful paper roses using one of the most accessible office supplies: Post-It Notes (also commonly known as sticky notes). Follow these detailed steps to craft your adorable bouquet, perfect for gifting or decorating!
-
Rolling the Flower Petals from a Sticky Note
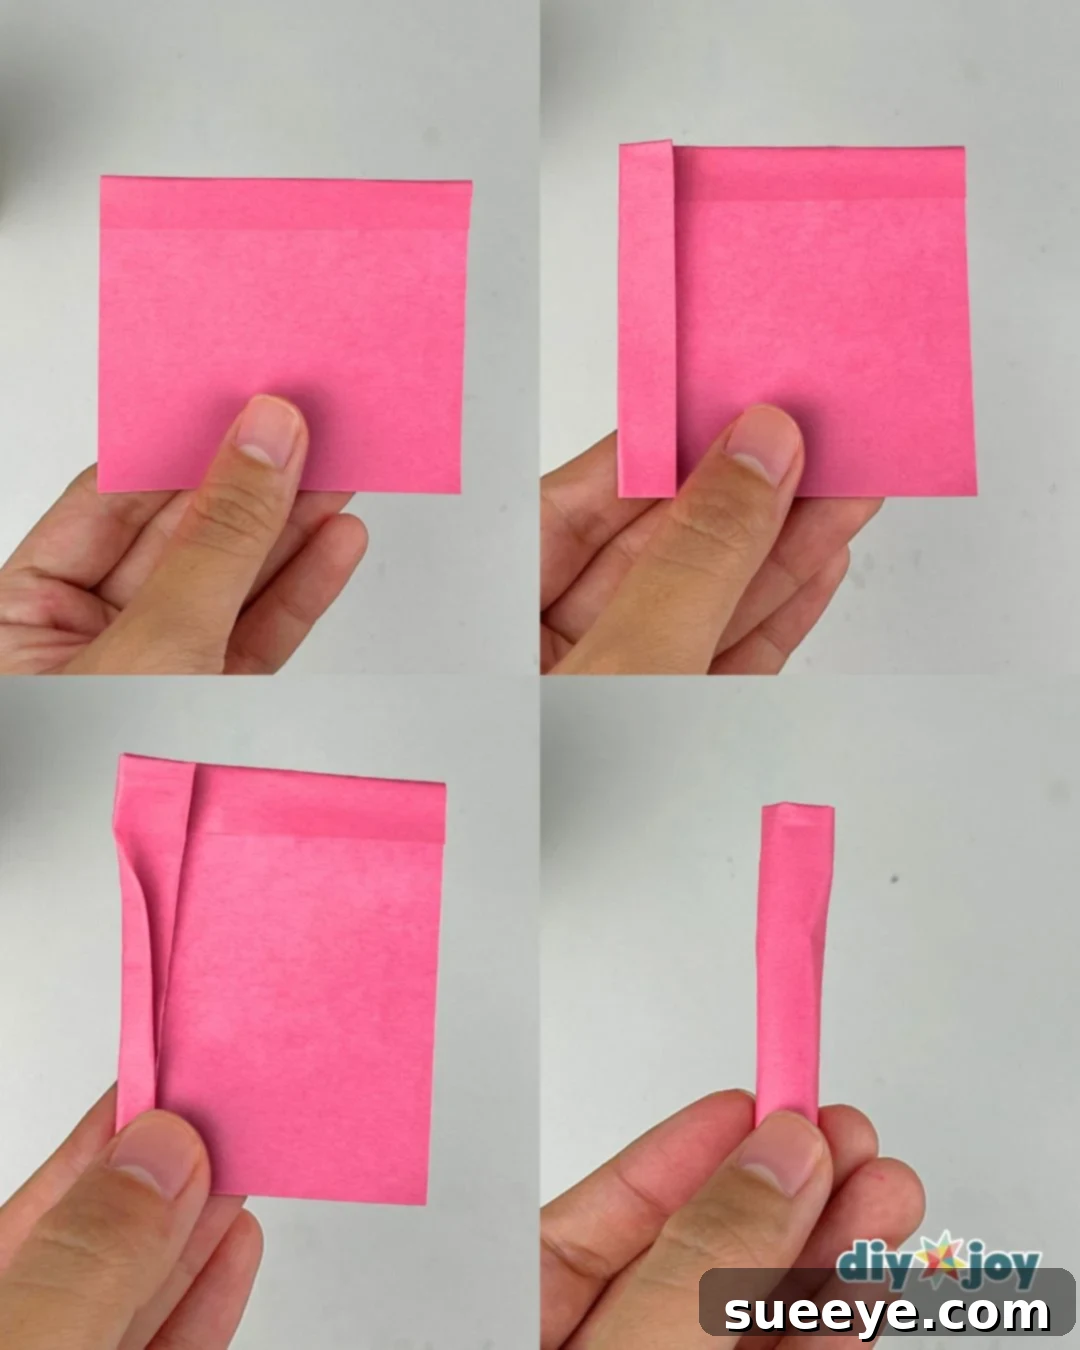
Begin by taking a sticky note in your chosen flower color, such as a vibrant pink or a soft yellow. If you’re using a standard 3×3 inch note, carefully fold the sticky edge inward by approximately 6/16 inch (which is about 1 cm or 3/8 inch). This initial fold helps define the outer edge of your rose. Next, fold one side of the note inward by roughly 7/16 inch (or about 1.1 cm, just under 1/2 inch). This creates the foundational structure for your petal. Now, take the bottom part of this newly folded section and fold it in half again. This series of precise folds is crucial for giving your rose its realistic shape and texture, creating layers that mimic natural petals. Once all folds are complete, begin to tightly roll the sticky note from the folded side towards the opposite end, forming the central core of your flower. The tighter and more consistently you roll, the more compact and realistic your paper rose will appear. Aim for a firm, even roll.

-
Forming the Elegant Rose Shape
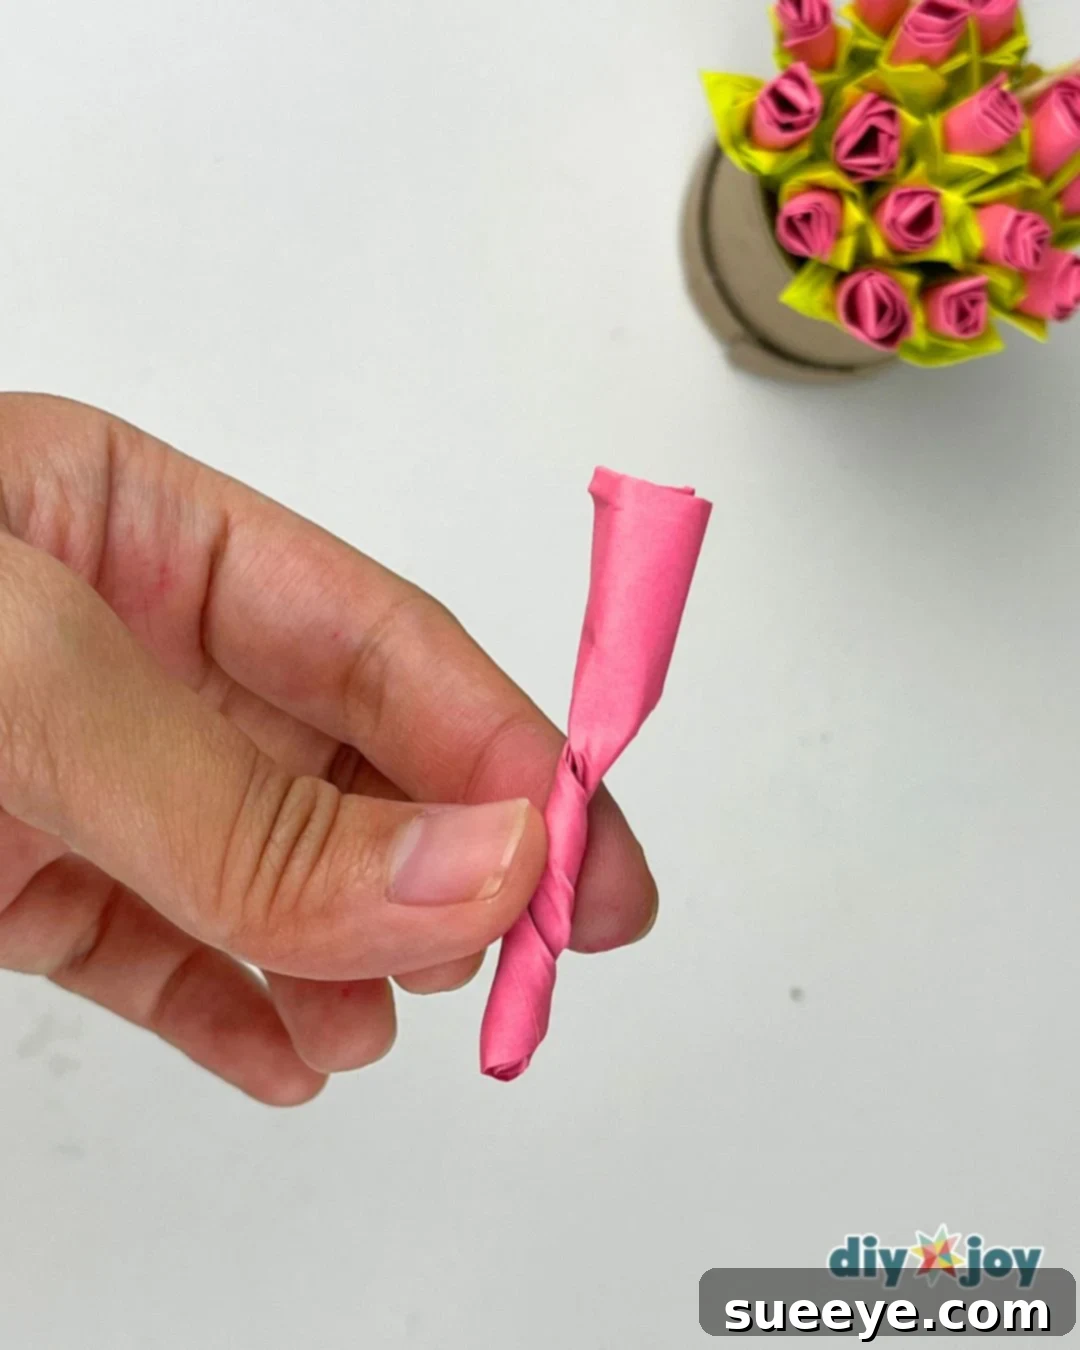
With the sticky note now tightly rolled, the next step brings your flower to life. Gently but firmly twist the bottom part of the rolled paper. This twisting action is magical; it secures all the layers together at the base and subtly coaxes the rolled paper into the intricate, blooming form of a beautiful rose. Take your time during this step to ensure the petals arrange naturally and gracefully. The more delicate and controlled your twist, the more defined and captivating your paper rose will become. You’ll notice the distinct swirl of petals taking shape.
-
Preparing the Green Sticky Note for Leaves and Sepals
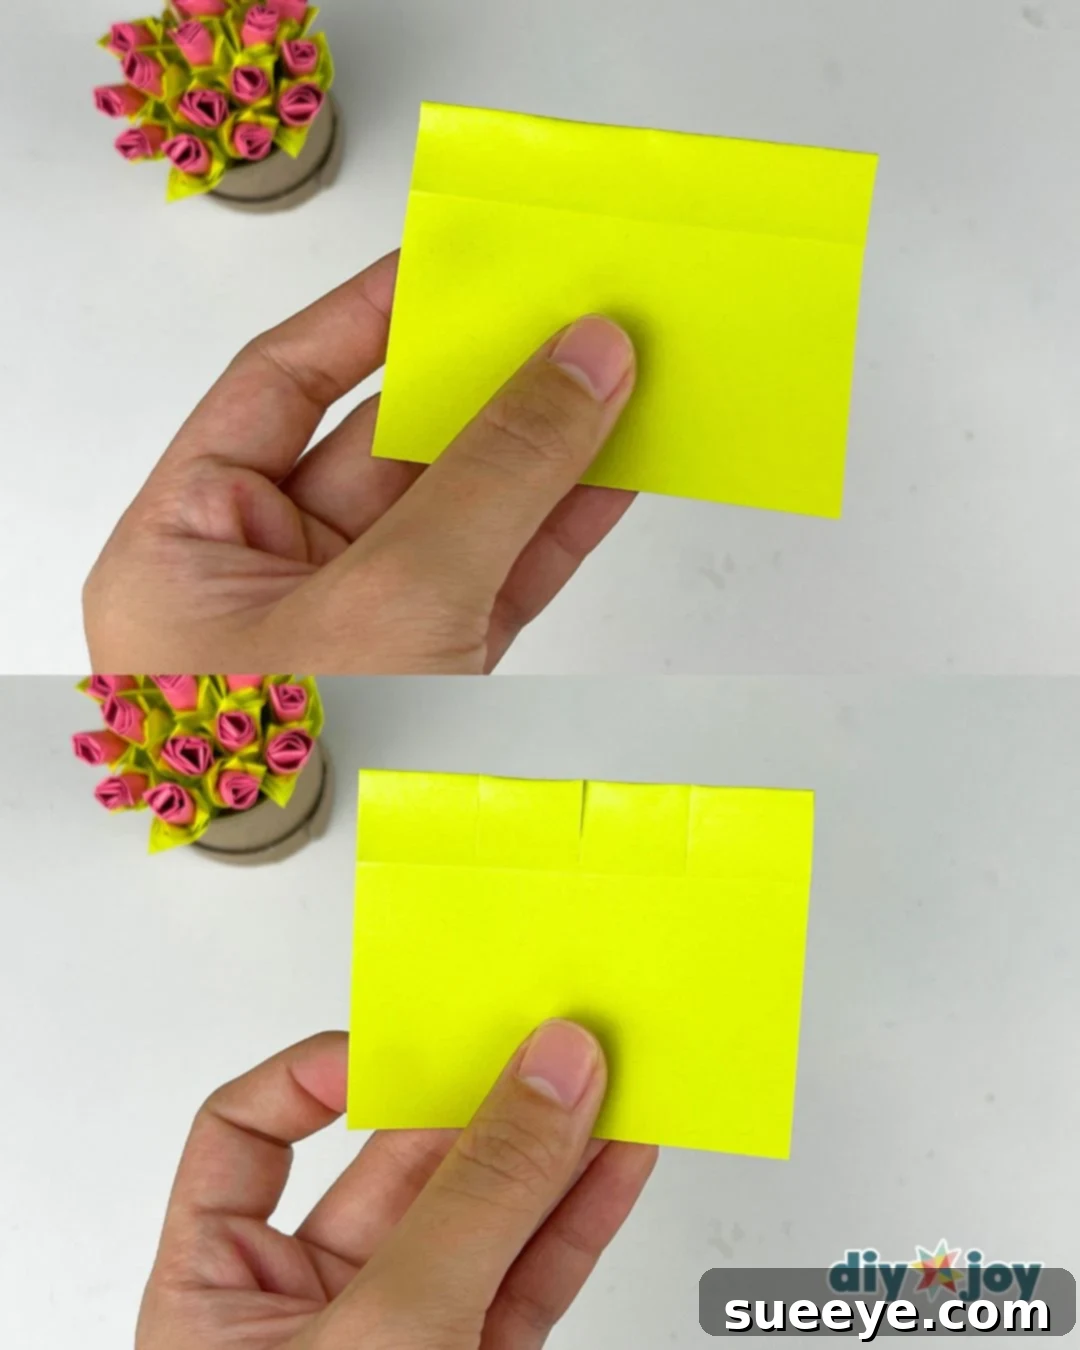
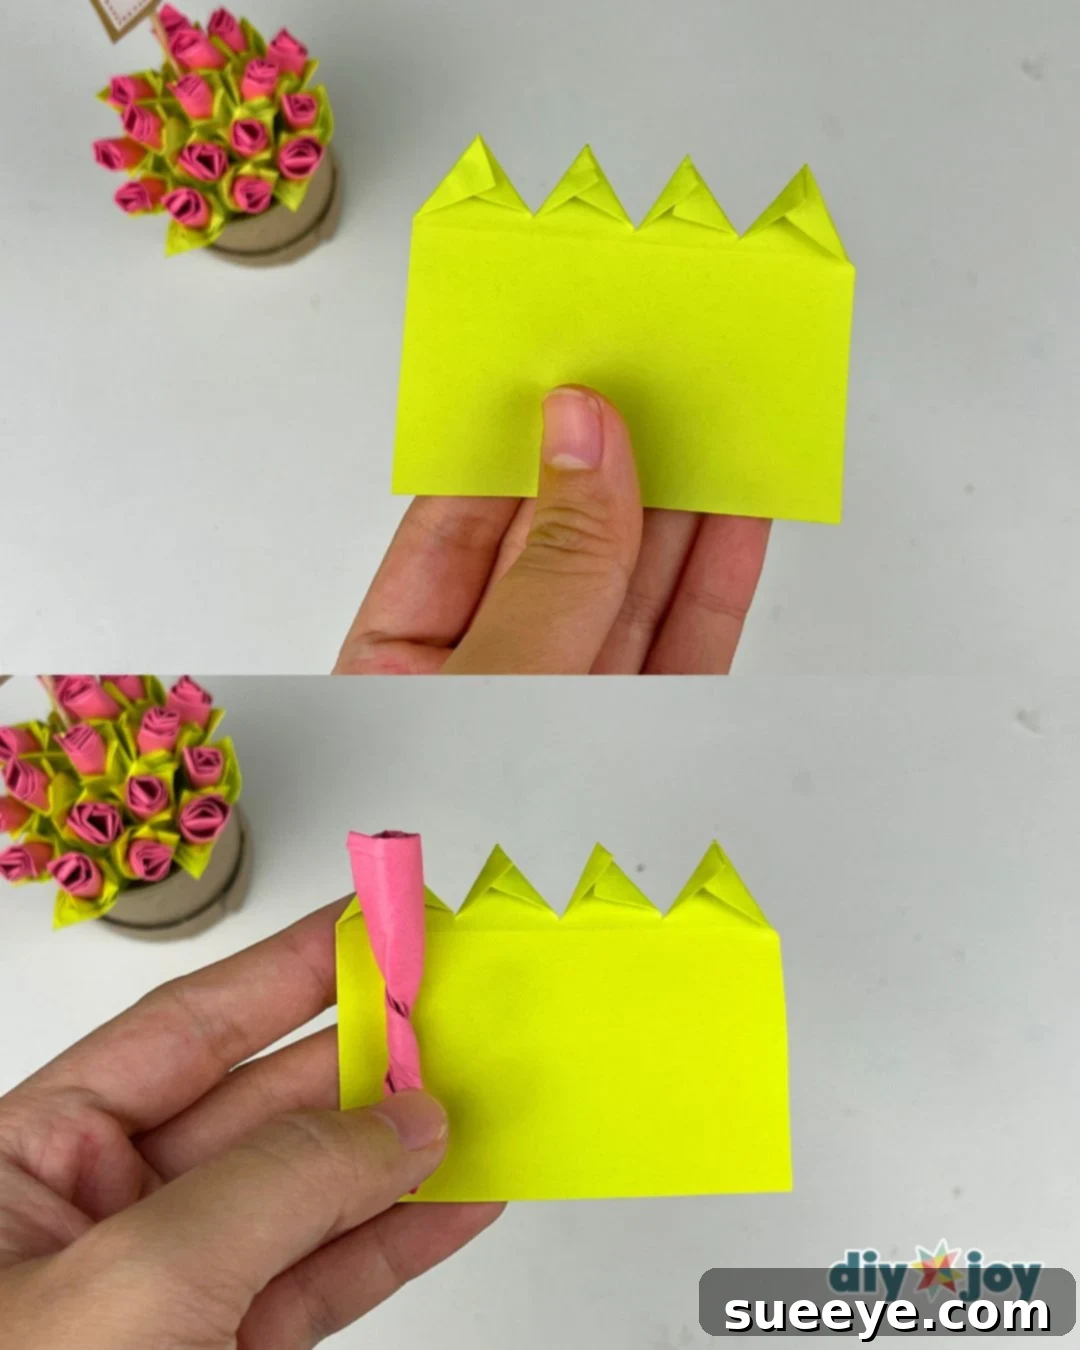
Now it’s time to add some essential greenery to complement your lovely rose. Take a green sticky note – this will form the sepals (the protective leaf-like structures that cup the flower bud) and a stem-like base. Fold the sticky part of the note over onto itself, ensuring the adhesive strip is fully covered. Once folded, carefully cut this sticky-edged section into four equal, narrow strips. These strips will serve as the foundational green elements for your flower, giving it a natural and complete look.
-
Crafting and Attaching the Green Leaves/Sepals
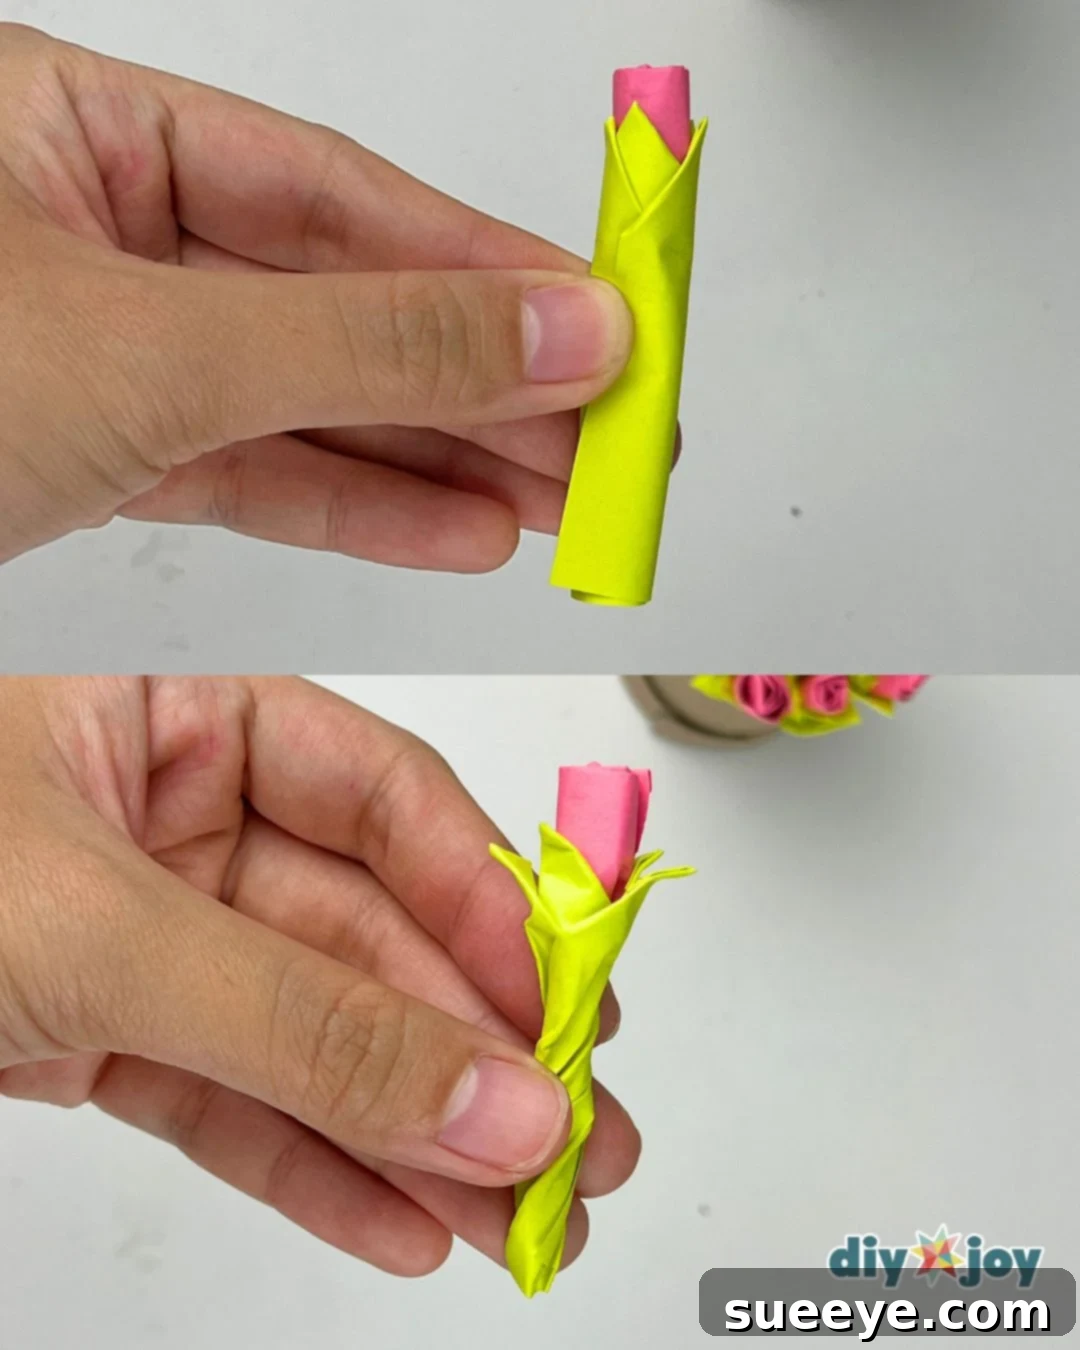
Take each of the four green strips you just cut. For each strip, fold it in half lengthwise, then use your scissors to cut the open end into a pointed shape. This will create a more defined leaf or sepal shape. Once you have your four pointed ‘leaves’, gently take one of them and carefully place the twisted base of your crafted rose onto its sticky surface. The inherent stickiness of the note will help secure the rose, providing a neat and finished look to the bottom of your flower. Position it so the pointed tip extends outwards from the base of the flower.
-
Wrapping the Rose with Greenery and Final Shaping
Carefully wrap the remaining green sticky note strips around the base of your flower, overlapping them slightly to create a cohesive green foundation that resembles a stem and additional sepals. The sticky nature of the notes will help them adhere to each other. Once fully wrapped, twist the bottom part of the entire assembly (both the flower and its new green base) firmly to secure everything in place and create a sturdy ‘stem’. For a more natural and elegant look, gently fold the pointed tips of the green ‘leaves’ outwards, giving the flower a delicate, blooming appearance. Repeat these steps to create as many roses as you desire for your bouquet. For a full, lush display, I recommend making at least 16 individual roses, but feel free to adjust based on your desired bouquet size and available sticky notes.
-
Assembling Your Mini Flower Bouquet
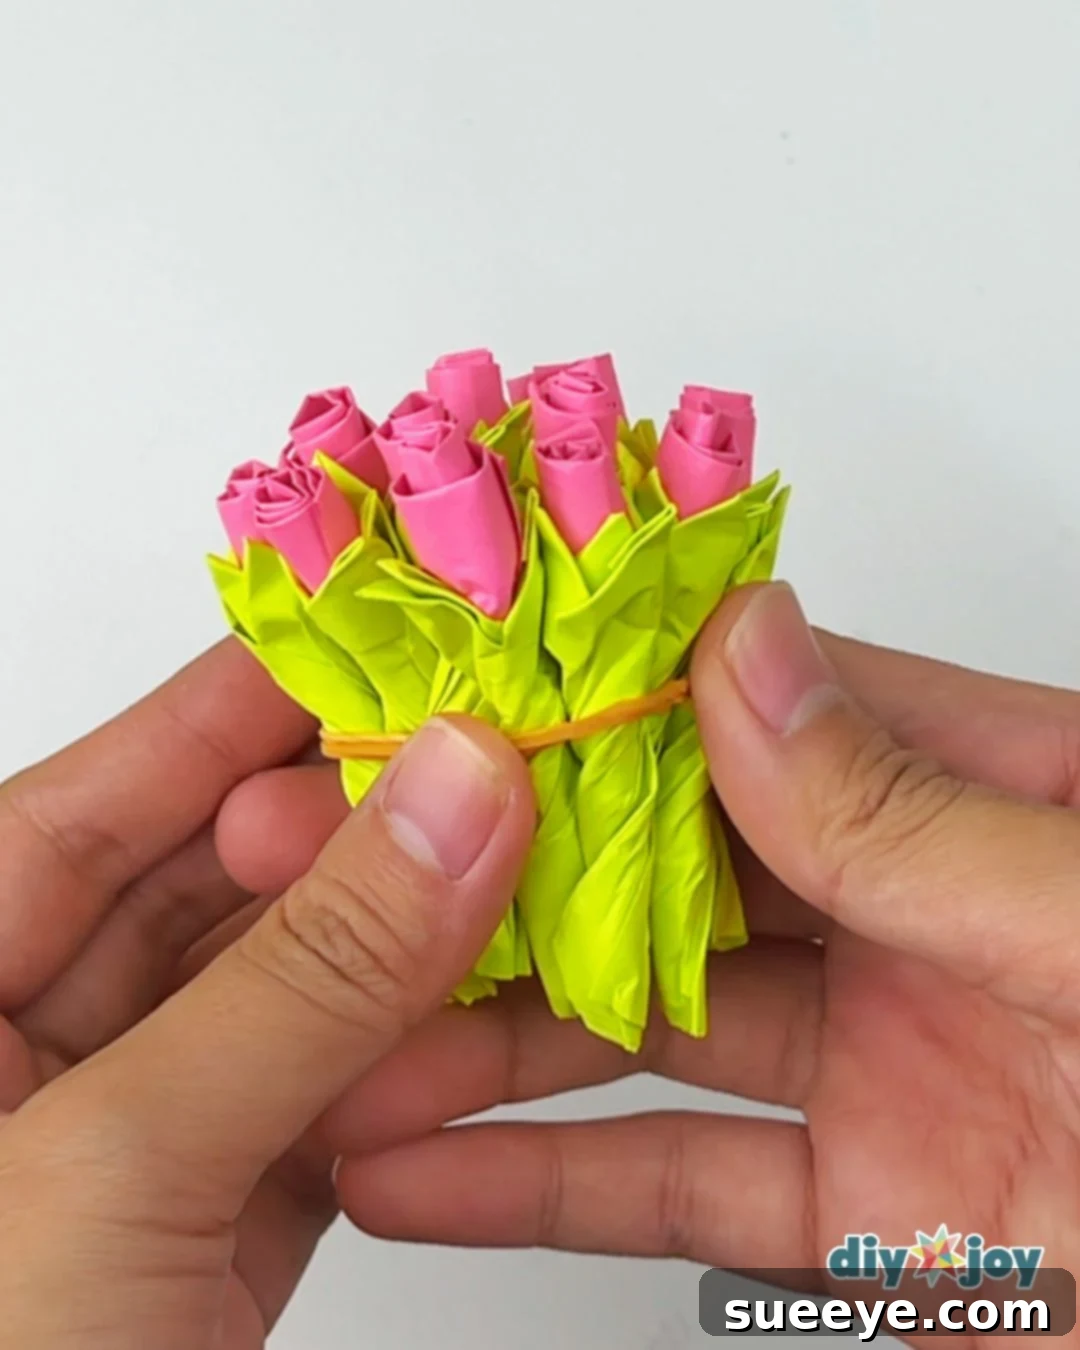
Once you’ve crafted all your beautiful Post-it note roses, the next exciting step is to gather and arrange them. Cluster them together into a charming bouquet, ensuring an even distribution of colors and fullness for a visually appealing display. You can experiment with different arrangements until you find the perfect one. To temporarily hold your bouquet together while you prepare its base, use a rubber band to tie the twisted stems securely. This simple trick will make handling easier and keep your beautiful arrangement intact and ready for its decorative holder.
-
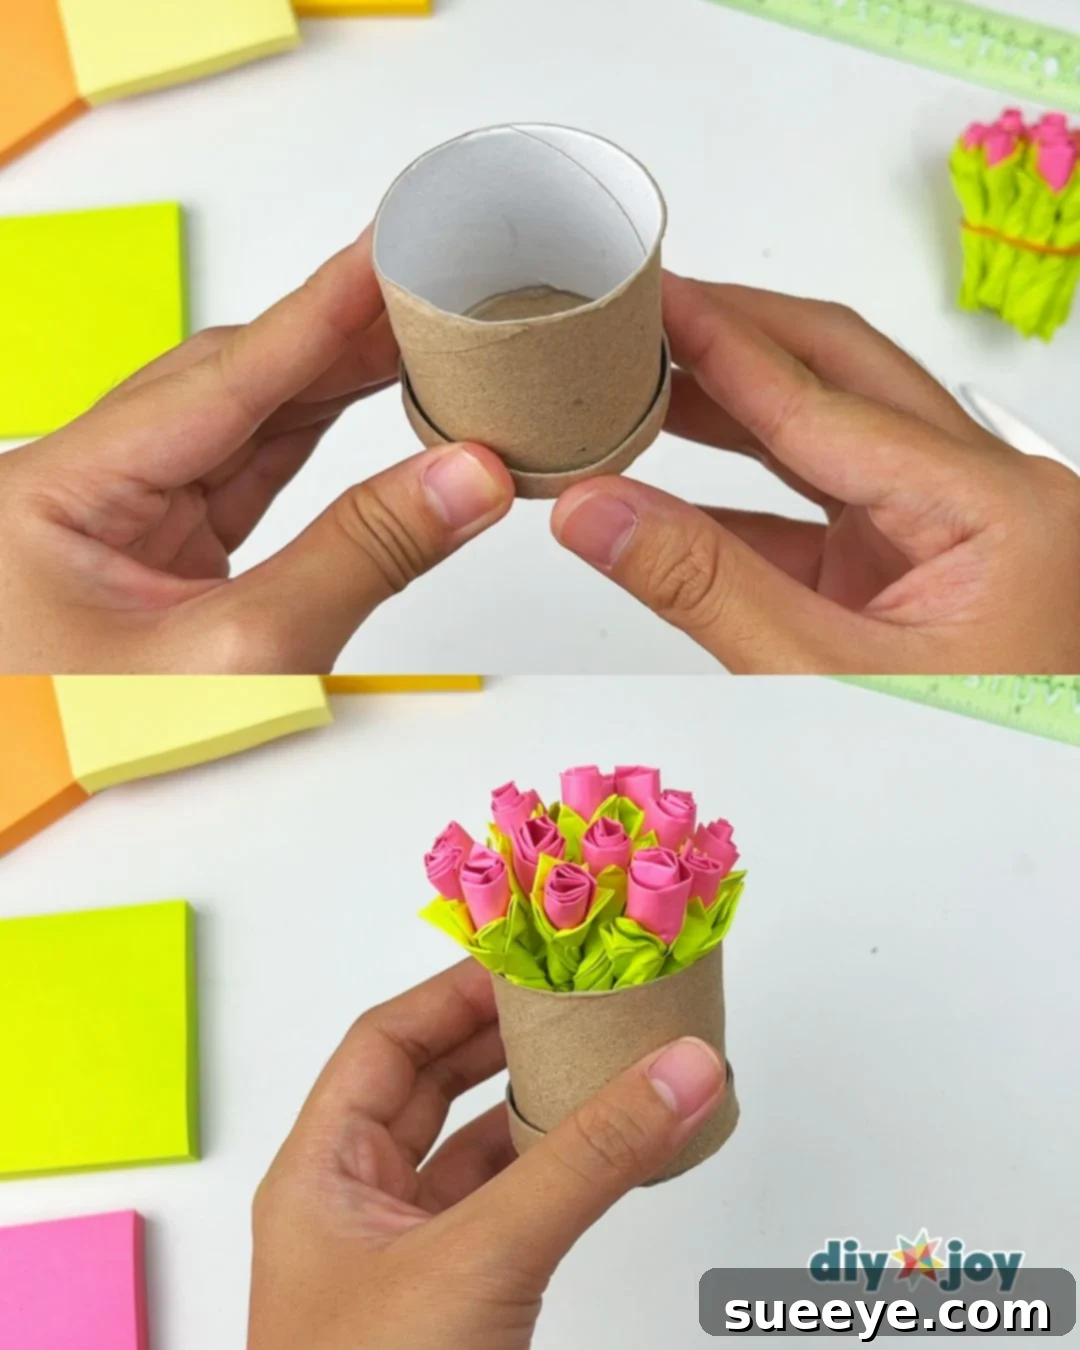
Creating the Decorative Circle Box Base
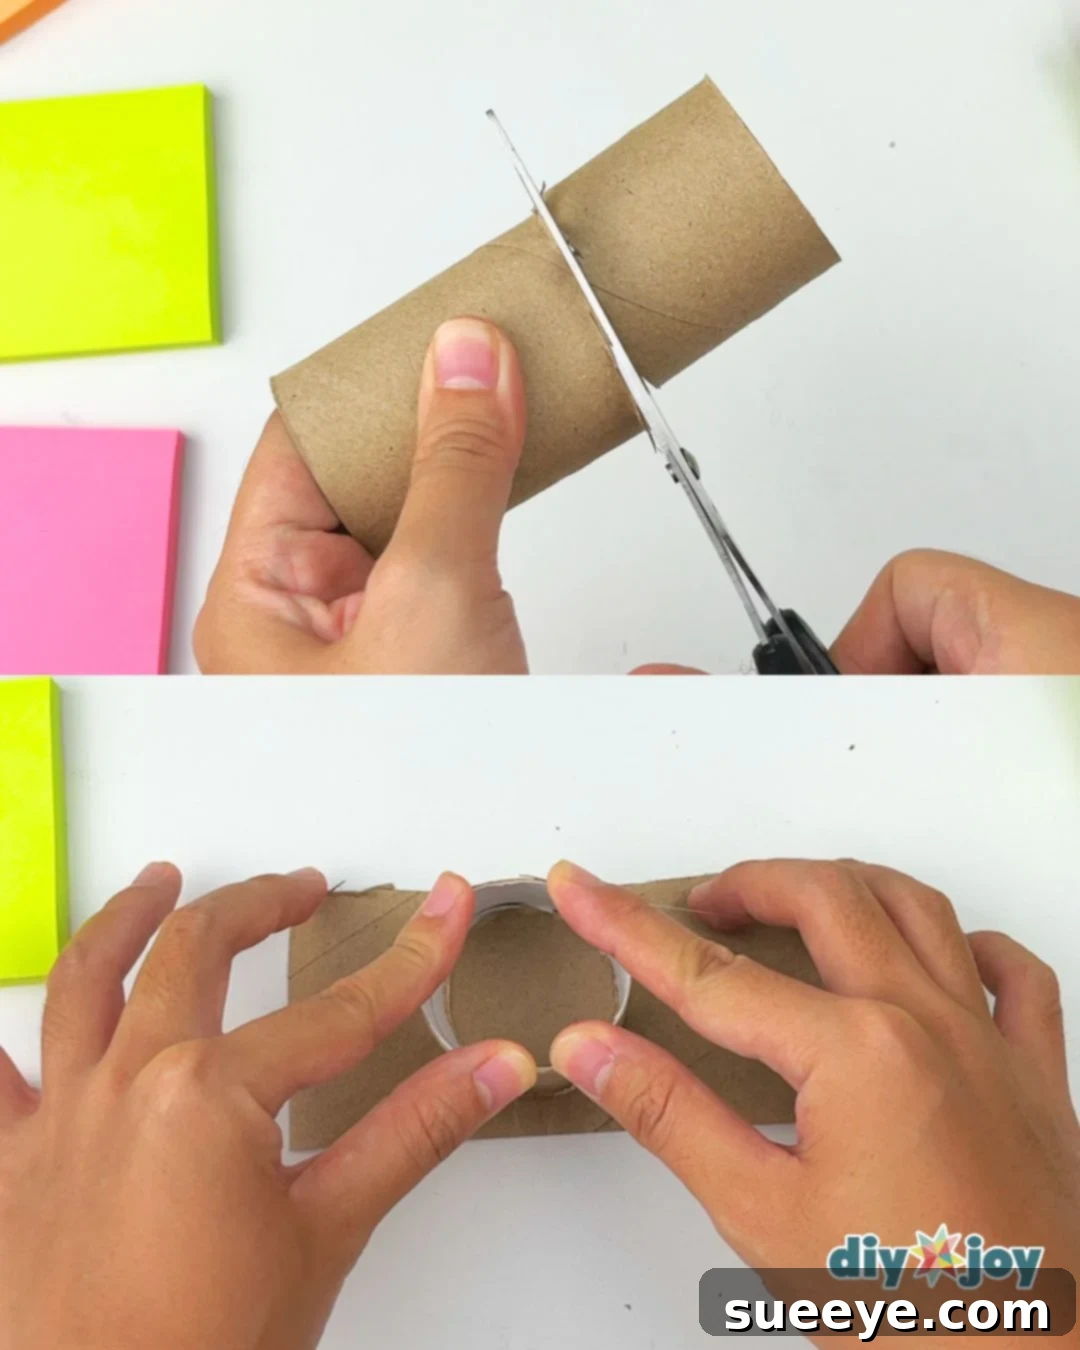
To give your bouquet a professional and elegant finish, we’ll create a simple yet effective circular box using a recycled toilet paper roll. First, measure the length from the bottom of the pink (flower) section to the bottom of the green (stem) section of one of your roses. This measurement will determine the ideal height of your box. Cut the toilet paper roll to this precise length. Next, take the longer piece of the cut roll, gently flatten it, and then apply a line of glue (using your glue gun for a strong, fast bond) along one of its long edges. Carefully glue this flattened tube onto a sturdy piece of cardboard (an old cereal box, a thick sticky note backing, or any thin cardboard scrap works perfectly). Ensure you leave a small lip or space at the bottom when gluing, as this will form the essential base of your bouquet holder.
-
Securing and Placing Your Flowers in the Box
To further reinforce the base of your decorative box and provide a secure platform for your flowers, cut a small, sturdy strip from the remaining cardboard. Glue this cardboard strip to the very bottom of the toilet paper tube, forming an inner support. Once the glue is dry and secure, carefully place your rubber-banded bouquet of paper flowers inside the newly constructed circle box. The fit should be snug, holding the flowers upright and beautifully displayed, creating a lovely, compact arrangement that’s ready to adorn any space.
-
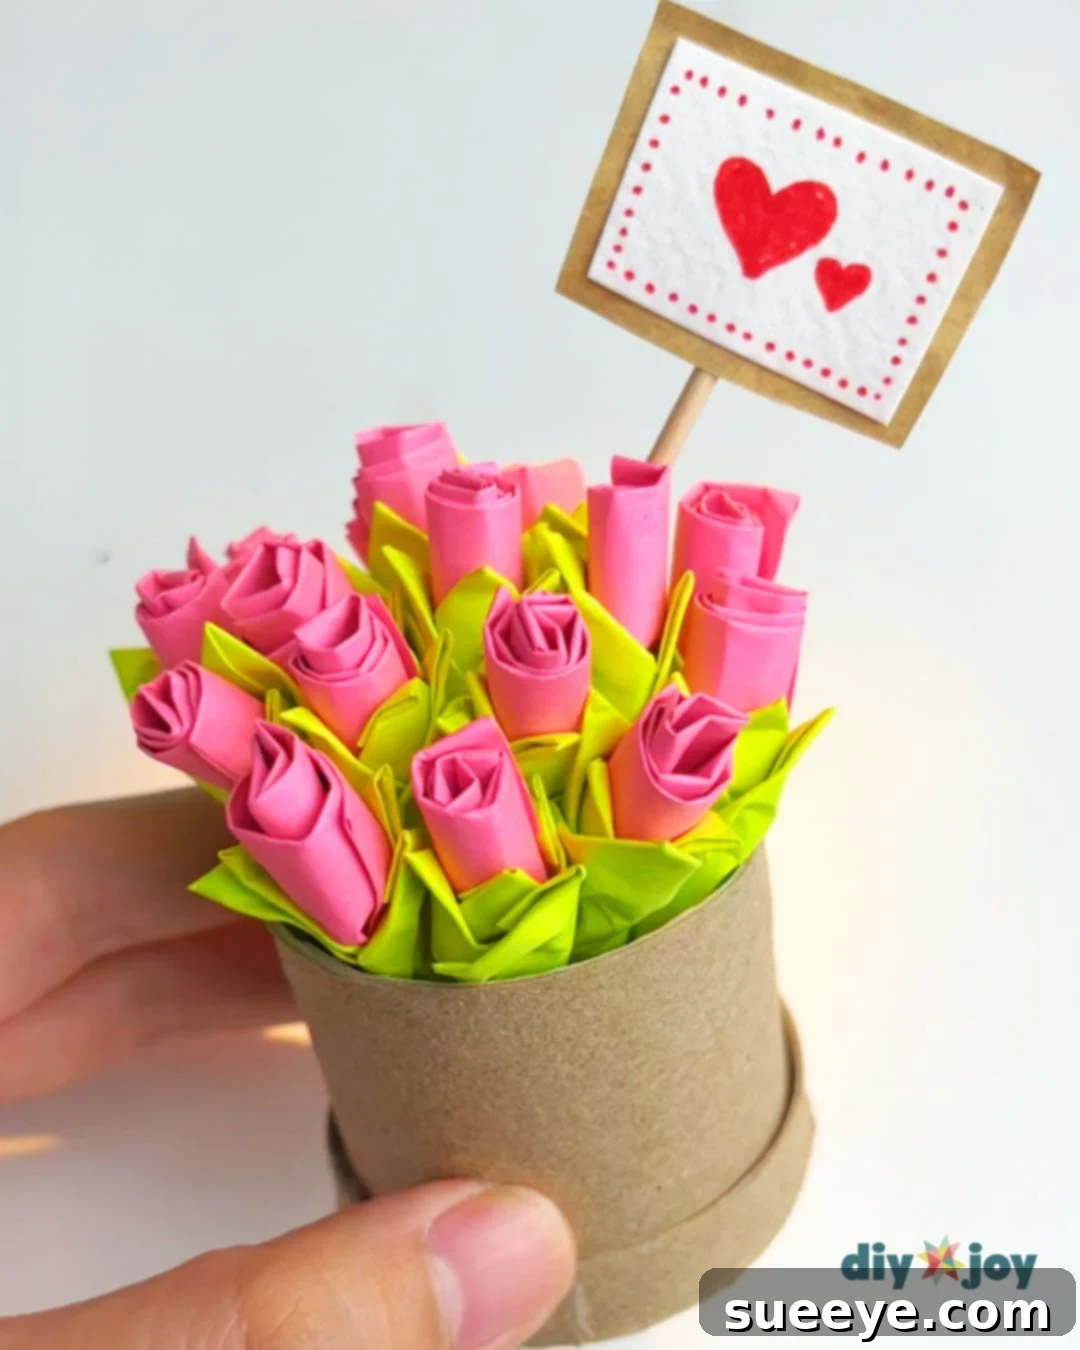
Personalizing and Decorating Your Bouquet
Now for the truly fun part: decorating and personalizing your mini paper flower bouquet! This is where your individual creativity can truly shine and transform your craft into a unique masterpiece. I chose to make a cute heart-shaped signage, adding a sweet sentiment to the bouquet. To replicate this, simply cut a small heart from cardstock, write a heartfelt message with a marker, and glue it to a toothpick, then carefully insert it into your bouquet. You can also unleash your artistic side by painting the toilet paper roll, adding elegant ribbons around the box, sprinkling some shimmering glitter for extra sparkle, or attaching small stickers to the outer surface. Let your imagination run wild to make your DIY flower bouquet uniquely yours and perfectly suited to its recipient or display location!
Tools Required for This Project
- Glue Gun (with glue sticks)
- Scissors
- (Optional) Glue Stick (for finer details)
- (Optional) Marker (for customization)
Materials Needed for This Project
- Sticky Notes (various colors for flowers, plus green for leaves)
- Toilet Paper Roll (or a similar cardboard tube)
- Rubber Band
- Cardboard Scraps (for the box base)
- (Optional) Toothpick
- (Optional) Small Piece of Paper/Cardstock (for signage)
Creative Ideas and Variations for Your Paper Flower Crafts
While the basic tutorial provides a fantastic foundation for crafting beautiful sticky note flowers, don’t stop there! These versatile creations offer endless possibilities for customization and creative expression, allowing you to truly make them your own. Here are some inspiring ideas to make your Post-it note paper flowers and bouquets uniquely yours:
- Vibrant Color Palettes and Themes: Experiment with different sticky note colors beyond traditional pink. Create stunning ombre effects by using notes of graduating shades from light to dark, or assemble a vibrant rainbow bouquet with a mix of bright hues. Consider seasonal themes – reds and greens for holidays, pastels for spring, warm tones for autumn, or even team colors for a sports fan!
- Alternative Display Methods Beyond a Box: Instead of the toilet paper roll box, consider wrapping your completed bouquet in a beautiful piece of decorative paper or clear cellophane, tied elegantly with a ribbon, for a more traditional flower bouquet presentation. You could also arrange individual flowers in small decorative vases, attach them to headbands, create a charming garland for a party, adorn a homemade wreath, or use them as unique embellishments for gift wrapping, greeting cards, or scrapbook pages. The possibilities for display are truly limitless!
- Personalize and Decorate the Circle Box Extensively: The toilet paper roll box is a blank canvas just waiting for your artistic touch! Transform it with paint, markers, glitter glue, decorative tape, or even decoupaged fabric scraps. Add ribbons, lace, twine, or small charms for a rustic, elegant, or playful look. Consider themed decorations, like tiny painted ladybugs for a garden theme, stars for a magical feel, or a personalized initial.
- Different Sizes and Shapes (with care): While this tutorial focuses on a standard rose shape from 3×3 inch notes, you can adapt the technique slightly for other simple flower shapes, or experiment with different sized sticky notes to create varying flower dimensions within your bouquet for added visual interest and depth. Larger notes yield bigger blooms, while smaller ones make delicate accents.
- Scented Flowers for an Aromatic Touch: For an extra sensory delight, add a tiny drop of your favorite essential oil (like lavender, rose, or citrus) to the base of each paper flower. This subtle fragrance can add a wonderful aroma to your desk, living space, or make your gift even more memorable.
- Interactive Gifts with Hidden Messages: Make your gift truly special by writing a small, uplifting message, a secret note, or a sweet memory on the back of each sticky note before you roll it into a flower. The recipient can then unroll the flowers one by one to discover hidden messages, making it an incredibly personal and interactive keepsake.

Expert Crafting Tips for Perfect Paper Flowers
Don’t strive for absolute perfection with every single paper rose; the true charm of handmade crafts lies in their unique imperfections. Embrace the delightful variations, have immense fun crafting, and let your creativity flow freely!
- Patience with the Twisting Technique: The twisting step is the most crucial for forming the realistic rose shape. Don’t rush it; a gentle, consistent twist will yield the best results. If your initial roll feels too stiff to twist, try loosening it slightly before attempting to twist again. Practice makes perfect!
- Experiment with Sticky Note Brands: Different brands of sticky notes might have varying levels of adhesive strength. If you find your flowers aren’t holding together as well as you’d like, a tiny dot of craft glue (like a glue stick or liquid craft glue) at the base can provide extra security and peace of mind.
- Precision in Initial Folds: While the overall goal is creative fun, paying a little extra attention to consistent folding in the initial steps will make the subsequent rolling and twisting much easier and result in more uniform and aesthetically pleasing flowers.
- Kid-Friendly Crafting Adaptations: For younger children participating in this craft, it can be incredibly helpful to pre-cut the green strips for the leaves. Always supervise them closely when using scissors, and if a glue gun is used, ensure an adult handles it or opt for a safer, kid-friendly liquid craft glue.
- Streamline with Batch Production: If you’re planning to create a large bouquet or multiple arrangements, consider doing the process in batches. For example, first, roll all your flower-colored sticky notes, then proceed to twist all of them, then prepare all the green strips, and so on. This can significantly streamline the production process and save time.
- Proper Storage for Longevity: To keep your beautiful paper flowers pristine and vibrant for as long as possible, store them away from direct sunlight (which can cause colors to fade over time) and dusty environments. A clear display case, a covered shelf, or even a simple box can help preserve their beauty.
Frequently Asked Questions (FAQ) About Post-it Note Flower Crafting
Here are answers to some common questions you might have about making these charming paper flowers, designed to help you with your crafting journey:
- Q: Can I use regular paper instead of sticky notes for this tutorial?
A: While you can technically make paper flowers from regular paper, sticky notes are highly recommended for this particular tutorial. Their built-in adhesive strip is a game-changer, assisting greatly in the initial rolling and securing of the petals. This often eliminates the need for external glue for individual flowers, making the process much faster and cleaner. If you use regular paper, you’ll need to apply glue at several stages to ensure the flower holds its shape. - Q: How long does it typically take to make one paper flower?
A: Once you get the hang of the folding and twisting technique, a single paper rose can be crafted in as little as 2-3 minutes! For a full bouquet, depending on the number of flowers you wish to include and the complexity of your decorative box, the entire project might take anywhere from 30 minutes to an hour or more, making it a perfect quick craft. - Q: Are these paper flowers durable enough to last?
A: Yes, they are reasonably durable for paper crafts. If handled with care (avoiding crushing or excessive moisture) and kept away from dust and direct sunlight, they can last for a very long time, serving as a lasting memento, a cheerful piece of desk decor, or a treasured handmade gift. - Q: Can I make larger or smaller flowers using this method?
A: Absolutely! The size of your sticky note will directly influence the size of your finished flower. Standard 3×3 inch notes create the perfect mini rose as shown. Using smaller notes will result in tiny accent flowers, while larger sticky notes (if you can find them, e.g., 4×4 or 5×5 inches) would create bigger, more prominent blooms. You might need to adjust the initial folding measurements slightly when working with different sizes to maintain proportion. - Q: What’s the best way to attach multiple flowers together to create a larger arrangement or a different display?
A: For a traditional bouquet, securing them tightly with a rubber band first, then wrapping the bundled stems with floral tape or green paper strips, works exceptionally well. For flat arrangements (like wall decor, garlands, or card embellishments), hot glue is an excellent choice for quickly and securely attaching individual flowers to a base material like cardstock, foam board, or fabric.
DIY Sticky Note Paper Flower Step-By-Step | Video Tutorial
For those who prefer a visual guide, be sure to watch our comprehensive step-by-step video tutorial. It meticulously demonstrates each fold, roll, and twist in real-time, making it even easier to follow along and craft your own beautiful Post-it note paper flowers. Simply click play and craft along with us for a fully immersive learning experience!
We sincerely hope you thoroughly enjoy creating these charming paper flowers from simple sticky notes. Whether you’re making them for yourself to brighten your workspace, as a thoughtful and personalized gift for a loved one, or for a fun and engaging crafting session with friends or family, the joy of creating something beautiful with your own hands is truly priceless. Get crafting today and don’t forget to share your delightful creations with us!