
Craft Spooky & Sustainable DIY Tin Can Jack-O’-Lanterns This Halloween!
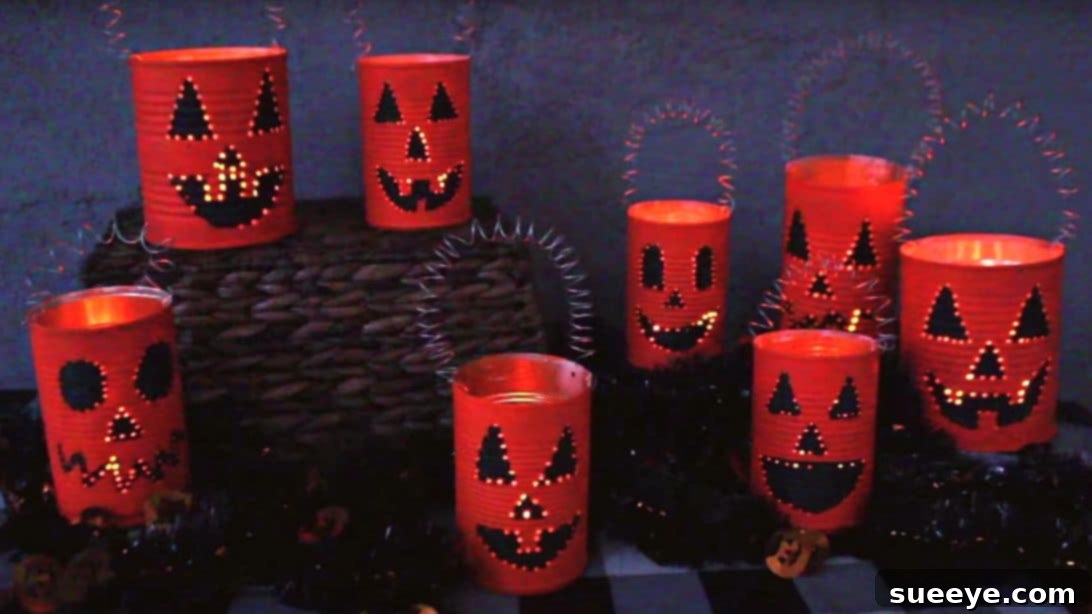
As the crisp autumn air ushers in the excitement of Halloween, many of us begin to think about festive decorations. Instead of heading to the store for new spooky decor, why not embrace a more sustainable and creative approach this year? You can easily repurpose or recycle materials you might already have around your house – items often considered mere trash can be transformed into enchanting holiday treasures. This delightful DIY project focuses on creating durable and charming tin can Jack-o’-lanterns, offering a practical and long-lasting alternative to traditional pumpkin versions. Not only are these tin can creations incredibly easy and quick to make, but they also provide a fantastic opportunity for family bonding. Gather your loved ones, especially the kids, because this will undoubtedly be a fun-filled activity for everyone!
We extend our sincere thanks to Char’s Nest on YouTube for inspiring this wonderful DIY project. Her ingenuity in transforming everyday items into beautiful decor is truly commendable. If you’re eager to learn the simple steps to craft your own unique Halloween luminaries, continue reading the detailed instructions below and be sure to watch Char’s original video tutorial for a comprehensive visual guide. Let’s dive into making your Halloween decor both sustainable and spectacularly spooky!
Why Choose Tin Can Jack-O’-Lanterns Over Traditional Pumpkins?
While carving traditional pumpkins is a cherished Halloween tradition, tin can Jack-o’-lanterns offer several compelling advantages that make them a superior choice for many homeowners. Firstly, they are remarkably durable. Unlike pumpkins that rot within days or weeks, tin cans are robust and can be stored and reused year after year, making them an incredibly cost-effective and eco-friendly decorating solution. This durability means your efforts aren’t fleeting; your handcrafted lanterns can become a beloved part of your Halloween traditions for seasons to come. Secondly, tin cans are inherently safer for lighting. When using LED candles, there’s no fire risk, which is a major concern with open flames in carved pumpkins, especially around children or pets. Furthermore, working with tin cans involves less mess than pumpkin carving, avoiding sticky seeds and fibrous guts. This makes the crafting process much cleaner and more enjoyable, particularly for younger children who might find pumpkin carving challenging or messy. Finally, tin cans offer immense creative flexibility. They are easy to paint, drill, and embellish, allowing for a broader range of designs and expressions than what’s typically achievable with a pumpkin. You can create a whole ensemble of unique faces and characters, each with its own personality, adding a truly custom touch to your Halloween display.
Essential Materials for Your DIY Tin Can Jack-O’-Lanterns:
Before you embark on this fun crafting journey, gather these simple yet effective materials. Most of these can be found around your home or purchased affordably at any craft or hardware store:
- Tin cans: Collect various sizes! Cans from beans, vegetables, soup, or even larger coffee cans work wonderfully. Ensure they are thoroughly cleaned and dried, with any sharp edges from opening smoothed down or filed for safety.
- Drill: A standard electric drill with an assortment of small drill bits will be perfect for creating the intricate patterns of your Jack-o’-lantern faces. Remember to use appropriate safety gear, like eye protection, when drilling.
- Sharpie: A fine-tip black Sharpie marker is ideal for drawing your initial designs onto the cans. Its permanent ink ensures your patterns won’t smudge as you work.
- Soft wire: Craft wire or floral wire will be used to create handles for your lanterns, making them easy to hang or carry. Choose a gauge that is flexible enough to coil but sturdy enough to hold the can’s weight.
- Primer spray paint: This is a crucial step for ensuring your chosen color adheres beautifully and evenly to the metal surface of the tin can, while also preventing rust and improving durability. A good quality primer will make your finished product look professional.
- Orange acrylic paint: The classic Halloween color! Acrylic paint is durable, water-soluble when wet (easy cleanup!), and provides excellent coverage on primed surfaces. You can mix shades to find your perfect pumpkin hue.
- Black acrylic paint: Essential for painting the spooky eyes, nose, and mouth, bringing your Jack-o’-lanterns to life.
- Paintbrush: Have a selection of brushes, including a flat brush for larger areas and a finer detail brush for the intricate facial features.
- LED candles: The safest and most practical lighting option for your tin can lanterns. LED candles flicker realistically without any heat or open flame, making them perfect for indoor or outdoor display, especially around children and pets.
Step-by-Step Directions for Crafting Your Spooky Tin Can Luminaries:
Step 1: Design, Drill, Prime, and Paint Your Cans
This initial phase is where your Jack-o’-lanterns begin to take shape, combining creative design with essential preparation for longevity and visual appeal.
First, grab your cleaned tin cans and a black Sharpie marker. This is the fun part where you get to unleash your creativity! On each can, draw the eyes, nose, and mouth of your Jack-o’-lantern. Don’t be afraid to experiment with different expressions – from goofy grins to menacing scowls. You can sketch traditional triangular eyes and jagged mouths, or try more intricate designs. For consistency, you might want to use stencils, or for a truly unique look, freehand your designs. Think about varying sizes and shapes to give each lantern a distinct personality. Once your designs are complete, it’s time for drilling. Carefully drill holes along the outlines of the drawings you just made. These perforations will allow the LED light to shine through beautifully, creating that iconic glowing effect. Additionally, find the approximate midpoint on each side of the tin can, near the top, and drill two larger holes there. These will be used later for attaching the wire handle. Always wear eye protection when using a drill and ensure a stable surface to prevent the can from slipping.
After drilling, it’s time to prepare the cans for painting. Take each can outside or to a well-ventilated area and spray paint them thoroughly with a good quality primer. Primer is absolutely essential as it provides a smooth, even base for your orange paint, ensuring better adhesion and a more vibrant, uniform color. It also helps to prevent rust, which is crucial for outdoor display and long-term durability. Apply the primer in thin, even coats to avoid drips, and let them dry completely according to the manufacturer’s instructions. Patience here is key for a professional finish! Once the primer is fully dry, it’s time for the signature Halloween color. Mix your desired shade of orange acrylic paint. You can go for a bright, classic pumpkin orange, a deeper, rustic hue, or even a pale, ghostly orange. Use a paintbrush to apply a generous, even coat of orange paint over the entire primed can. Ensure complete coverage, especially over the drilled holes and edges. Depending on the paint’s opacity, you might need two coats for a truly vibrant and opaque finish. Allow each coat to dry completely before applying the next, and before moving on to the next step.
Step 2: Add Facial Details, Wire Handles, and Illumination
With your cans primed and painted orange, it’s time for the finishing touches that truly bring your Jack-o’-lanterns to life and make them ready for display.
Once the orange paint is absolutely dry, take your black acrylic paint and a smaller, detail-oriented paintbrush. Carefully paint the eyes, nose, and mouth of each Jack-o’-lantern using the black paint. This step requires a steady hand and attention to detail. You can choose to simply fill in the drilled areas or, for added depth and character, paint a slight outline around the shapes to make them pop even more. Consider adding small details like eyebrows or subtle shadows to enhance the expression. Allow the black paint to dry completely. A fully dried surface is crucial before proceeding to prevent smudging your meticulous work. While the paint dries, prepare your wire handles. Take your soft wire and coil it tightly around a Sharpie marker or any cylindrical object of similar thickness. This creates a charming spring-like spiral effect, which not only looks decorative but also adds strength to the handle. Once coiled, cut the wire to a suitable length for a handle, leaving a few inches straight at each end. Then, attach these straight ends securely to the pre-drilled holes on each side of your tin can. You might need to bend the wire ends with pliers to form a small hook or loop on the inside of the can to ensure they hold firmly.
Finally, for the grand reveal, insert the LED candles into each tin can. Position them carefully so that the light source is centered and the flickering glow can escape effectively through the drilled facial features. The beauty of LED candles is their safety; they eliminate the fire hazard associated with traditional candles, making these family-friendly crafts worry-free. Once the LED candles are in place, your tin can Jack-o’-lanterns are ready to be displayed! Arrange them on a mantelpiece, line them along a porch railing, hang them from tree branches (using their new wire handles!), or group them together to create a festive and eerie glow in your home or garden. Turn off the main lights and watch as your handmade creations cast enchanting shadows, transforming your space into a spooky Halloween wonderland. These durable and reusable decorations will bring joy and a touch of handmade charm to your celebrations year after year.
Embrace the Spirit of Halloween with Sustainable Crafting
We hope this easy DIY tin can Jack-o’-lantern tutorial inspires you to get creative this Halloween season! It’s a wonderful way to teach children about recycling and repurposing while engaging in a fun, hands-on activity that results in charming, personalized decorations. These upcycled lanterns not only add a unique touch to your Halloween decor but also contribute to a more sustainable lifestyle by giving new life to items that would otherwise be discarded.
A huge thank you once again to Char’s Nest via YouTube for providing the brilliant inspiration and all the fantastic images used in this guide. Char’s channel is a treasure trove of innovative DIY projects and creative ideas that are both accessible and inspiring. If you enjoyed this Halloween DIY project and are keen to discover more imaginative crafts, we highly recommend visiting her channel and subscribing. You’ll find a wealth of video tutorials that will spark your creativity throughout the year. Don’t forget to share your own tin can Jack-o’-lantern creations with us – we’d love to see your unique designs!
Happy crafting and have a spooktacular, sustainable Halloween!