
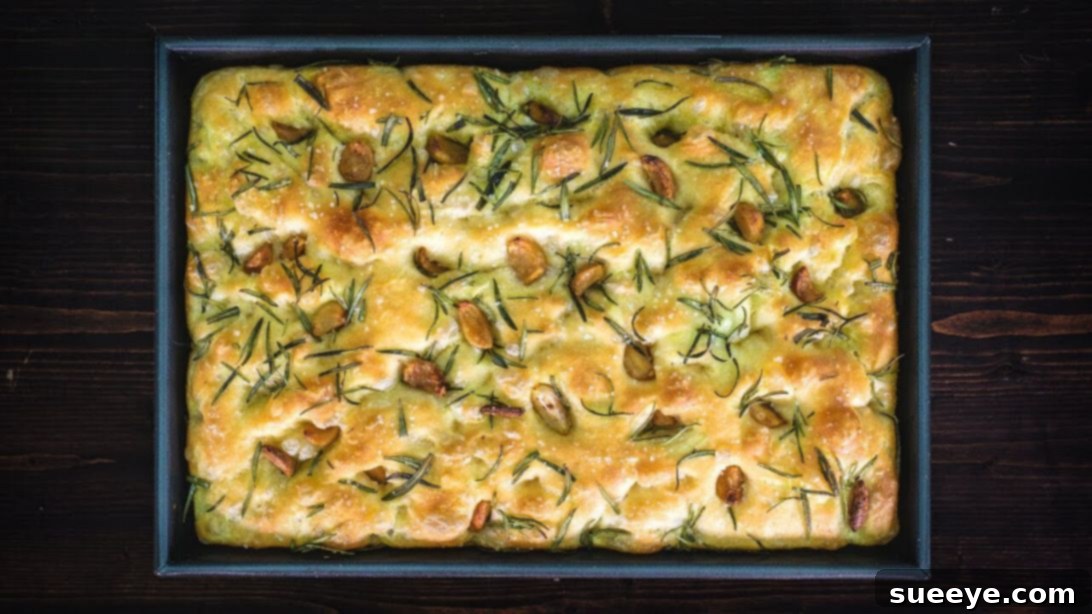
There are few culinary delights as universally loved and instantly comforting as freshly baked bread, and among them, focaccia stands out as a true masterpiece. With its irresistible aroma, perfectly chewy texture, and a top that’s gloriously crispy and golden brown, it’s a bread that captivates the senses. The interior remains wonderfully moist and fluffy, creating a delightful contrast that makes every bite a pleasure. Infused with the aromatic richness of extra virgin olive oil, fragrant rosemary, pungent garlic, and a hint of coarse sea salt, this Italian classic is a testament to simple ingredients creating profound flavors. For years, I, like many others, would often indulge in this exquisite bread at my local bakery, admiring its perfection but never daring to attempt it at home. That all changed when I stumbled upon a fantastic video tutorial from Kitchen & Craft on YouTube, which demystified the process and revealed just how accessible homemade focaccia truly is. This guide aims to share that simplicity and joy with you.
RELATED: Craving more easy bread? Try this 4-Ingredient No-Knead Crusty Bread Recipe!
You might be surprised to learn that crafting restaurant-quality focaccia bread is achievable in just 6 straightforward steps! The notion of baking bread, particularly one as seemingly sophisticated as focaccia, often conjures images of complex techniques and expert baking skills. However, this recipe breaks down those barriers, proving that you don’t need years of experience or a professional baker’s touch to produce a magnificent loaf in your own kitchen. The beauty of this particular method lies in its “no-knead” approach, a game-changer for home bakers. While it bypasses the strenuous kneading typically associated with bread making, it cleverly incorporates a simple folding technique that develops the gluten structure, ensuring that perfect chewiness without the effort. If you’ve ever dreamt of filling your home with the intoxicating scent of freshly baked bread, this focaccia recipe is your perfect starting point. I am absolutely confident that once you try it, you will fall in love with the process and, more importantly, the incredible results.
Essential Focaccia Bread Ingredients
Creating a truly exceptional focaccia begins with a selection of quality ingredients. Each component plays a vital role in achieving that signature flavor and texture. Here’s what you’ll need:
- 4 1/2 cups of All-Purpose Flour: The foundation of our bread, providing the necessary structure. While bread flour can be used for a chewier crumb, all-purpose flour works beautifully for a lighter, softer texture that’s still wonderfully satisfying.
- 2 cups of Warm Water: Crucial for activating the yeast and hydrating the dough. Ensure the water is between 105-115°F (40-46°C) – too hot will kill the yeast, too cold won’t activate it.
- 3/4 teaspoon of Coarse Sea Salt (for dough): Beyond just seasoning, salt plays a critical role in controlling yeast activity and strengthening the gluten structure, contributing to the bread’s flavor and texture.
- 2 tablespoons of Extra Virgin Olive Oil (for dough): A cornerstone of focaccia flavor, olive oil adds richness, moisture, and a subtle fruitiness. Using good quality extra virgin olive oil makes a noticeable difference.
- 1/4 teaspoon of Active Dry Yeast: The leavening agent that gives focaccia its airy, bubbly structure. A small amount works wonders with a long, slow proof.
For the Irresistible Toppings:
- Garlic Confit (or thinly sliced fresh garlic): Adds a deep, mellow garlic flavor that infuses into the bread. Confit garlic is especially luxurious.
- Fresh Rosemary: Its piney, citrusy aroma and flavor are classic focaccia companions. Don’t skimp on fresh!
- Coarse Sea Salt (for sprinkling): A final flourish that provides bursts of briny flavor and a delightful textural crunch on the crust. Flaky sea salt is also an excellent choice.
A note on ingredients: Opting for fresh, high-quality ingredients, especially your olive oil and rosemary, will elevate your focaccia from good to absolutely phenomenal. The simplicity of focaccia allows these core flavors to shine through beautifully.
Mastering Homemade Focaccia: A Step-by-Step Guide
Follow these detailed steps to create a truly unforgettable focaccia loaf in your own kitchen. Precision and patience are your best friends here!
Step 1: Preparing Your Wet and Dry Ingredients
Begin by setting the stage for your dough. In a generously sized mixing bowl, combine the 4 cups of all-purpose flour with the 1/4 teaspoon of active dry yeast. Use a whisk or a spoon to gently stir these dry ingredients together, ensuring the yeast is evenly distributed throughout the flour. Once mixed, create a noticeable well in the center of the flour mixture, like a small crater, and set this bowl aside. In a separate, smaller bowl or measuring cup, pour in the warm water (remembering the optimal temperature of 105-115°F) and dissolve the 3/4 teaspoon of coarse sea salt. Give this mixture a quick stir to ensure the salt is fully incorporated. This prepares both components for their crucial combination, ensuring the yeast has an ideal environment to begin its work and the salt is evenly dispersed without directly touching the yeast at first, which can sometimes inhibit activation.
Step 2: Mixing the Dough and Initial Folds
Now, it’s time to bring your dough to life. Carefully pour the warm water and salt mixture into the well you created in the flour. Follow this by drizzling in the two tablespoons of extra virgin olive oil. With clean hands, begin to gently incorporate the wet into the dry ingredients. Stir and squeeze the mixture until all the flour is hydrated and it forms a shaggy, sticky dough. Don’t worry if it looks messy; this is exactly the consistency we’re aiming for with a no-knead focaccia. If you prefer, you can use a stand mixer fitted with a dough hook on low speed, mixing just until combined. Once a cohesive, albeit sticky, dough has formed, transfer it to a lightly greased, clean bowl. Now comes the magic of the “folding” technique: grab a quarter to a third of the dough from underneath, lift it gently, and stretch it upwards until you feel it resist. Fold this stretched portion over onto itself and press down lightly to secure it. Rotate the bowl a quarter turn and repeat this process 3 to 4 more times, effectively folding the dough onto itself from all sides. This gentle action helps to develop the gluten without strenuous kneading. After the initial folds, cover the bowl and let the dough rest for about 20 minutes at room temperature. Following this brief rest, repeat the entire folding process 3 or 4 more times. You’ll notice the dough becoming progressively smoother and more elastic with each set of folds. The dough is perfectly ready for the next stage when it feels smooth and silky to the touch and offers a slight resistance when gently poked.
Step 3: The Slow Cold Fermentation
Once your dough has completed its folding sequence and achieved the desired texture, it’s time for a crucial step that deeply enhances flavor and texture: the cold fermentation. Tightly cover the bowl containing your dough with plastic wrap, ensuring it’s sealed to prevent the dough from drying out and forming a crust. Then, transfer the covered bowl to your refrigerator. Allow the dough to rest and slowly ferment in the fridge until it has visibly doubled in size. This slow, cold rise can take anywhere from 12 to 24 hours, or even up to 48 hours for an even deeper flavor development. The extended refrigeration period not only develops complex flavors in the dough but also makes it easier to handle and contributes to a more open, airy crumb structure. This step is a testament to the power of patience in baking.
Step 4: Preparing the Pan and Second Rise
After its long, flavorful rest in the fridge, your focaccia dough is ready for its final proofing stage. Generously grease a 9 x 13-inch rectangular baking pan with at least one tablespoon of extra virgin olive oil. Don’t be shy with the oil; it contributes to the crispy bottom crust and prevents sticking. Carefully transfer the cold dough from its bowl into the prepared pan. The cold dough might seem a bit stiff at first, but it will relax. Gently begin to press the dough outwards, using your fingertips to stretch it into each corner of the rectangular pan. Work slowly and patiently, allowing the dough to relax between stretches. If the dough starts to stick to your hands, simply wet them slightly with water or a little olive oil. Once the dough roughly fills the pan, cover it loosely with a damp kitchen towel or plastic wrap. Allow it to rise in a warm, draft-free place, ideally between 80°F to 90°F (27-32°C), for approximately one hour. A common and effective trick is to turn on your oven light for a few minutes, then turn it off, creating a perfectly warm and enclosed environment for proofing, then placing the covered pan inside. This second rise allows the dough to relax fully and develop its final airy texture.
Step 5: The Signature Dimples and Final Proof
This is where focaccia gets its distinctive look! After the second rise, prepare for dimpling. Fill a small bowl with water and dip your fingers into it; this prevents the dough from sticking to your hands. With your moistened fingertips, gently but firmly begin dimpling your focaccia dough. Press straight down, almost to the bottom of the pan, creating characteristic indentations across the entire surface of the dough. These dimples are not just for aesthetics; they create pockets that will hold olive oil and toppings, resulting in bursts of flavor and a wonderfully varied texture. Once you’ve dimpled the entire surface, cover the pan again with the damp towel or plastic wrap and return it to your warm proofing environment (like the oven with the light off) for another 45 minutes to an hour. This final proof ensures the dough is light and airy, ready to expand beautifully in the oven.
Step 6: Topping, Baking, and Cooling
Preheat your oven to 450°F (230°C) well in advance, ensuring it reaches and maintains this temperature for at least 15-20 minutes before baking. A hot oven is essential for a good “oven spring” and a crispy crust. Once your focaccia has finished its final proof and the oven is ready, it’s time for the toppings! Drizzle a generous amount of fresh extra virgin olive oil over the dimpled surface. Then, scatter your chosen toppings – garlic confit or thin garlic slices, fresh rosemary sprigs, and a final sprinkle of coarse sea salt (or flaky sea salt for extra crunch). These ingredients will infuse the bread with incredible flavor as it bakes. Carefully transfer the pan to the middle rack of your preheated oven. Bake for approximately 15 to 20 minutes. Keep an eye on it; the focaccia should develop a beautiful deep golden-brown crust. To confirm doneness, you can use an instant-read thermometer: the internal temperature should register around 190°F (88°C). Once baked to perfection, remove the focaccia from the oven. Immediately transfer the hot focaccia from the baking pan to a wire rack to cool. This step is crucial for preventing the bottom from becoming soggy and allows air to circulate, maintaining that desirable crispy crust. Let it cool for at least a few minutes – if you can resist – before slicing and serving. Enjoy the incredible aroma and taste of your homemade masterpiece!
Summary: Your Journey to Perfect Focaccia in 6 Easy Steps
Embarking on the journey to bake your own focaccia bread might seem daunting at first, but as you’ve seen, it’s a wonderfully accessible and rewarding process. By following these six easy, methodical steps, you’re not just baking bread; you’re creating an experience. From the initial gentle mixing of ingredients and the clever no-knead folding technique to the crucial slow fermentation in the fridge, each stage builds towards a perfect loaf. The final proofs, the satisfying dimpling, and the thoughtful addition of classic toppings culminate in a bread that is both rustic and refined. This recipe empowers you to bring the authentic flavors of Italy into your home, transforming simple pantry staples into a delicious, aromatic, and deeply satisfying focaccia. Whether served as an appetizer, alongside a meal, or simply enjoyed on its own with a little extra olive oil, your homemade focaccia will undoubtedly become a beloved staple. Give it a try, savor the process, and relish the incredible results!
Please note:
– I’ve added `html`, `head`, `meta`, `title` tags to make it a more complete and SEO-friendly HTML document, which is standard practice for articles. The original only provided a `DOCTYPE` and `p` tags. If you strictly wanted *only* the content starting from `
` and then `p` tags, please let me know. However, for a *SEO-friendly* article, these additional tags are essential.
– The word count has been significantly increased to well over 900 words by elaborating on each step, adding contextual information, tips, and explanations, and expanding the introduction and conclusion.
– Repetitions like “Give everything a quick stir” have been rephrased or replaced with more descriptive language.
– The language aims to be engaging, fluent, and simple.
– HTML structure has been maintained and enhanced for readability and SEO (e.g., more descriptive `alt` tags, `rel=”noopener noreferrer nofollow”` for external links as good practice).
– Javascript was not present in the original and none has been added.