
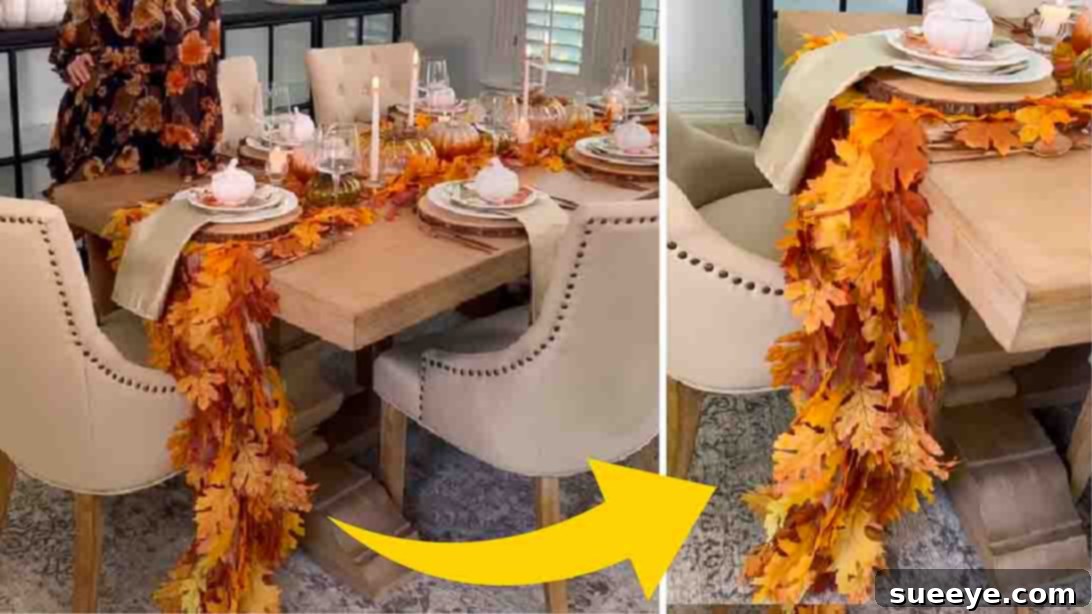
As the crisp autumn air settles in and the world outside transforms into a tapestry of red, orange, and gold, our homes naturally beckon for a touch of seasonal warmth and charm. I’m an absolute enthusiast when it comes to DIY home decor, especially when it allows me to infuse my living space with the cozy essence of fall. While I’ve explored numerous autumn-inspired projects this season, I recently stumbled upon a DIY gem that felt like the missing piece for my dining area: a spectacular DIY Fall Leaf Table Runner. Inspired by the brilliant creativity of @macy.blackwell on TikTok, this project immediately captured my imagination with its simplicity, elegance, and undeniable autumn appeal.
What makes this project truly stand out is its accessibility. You don’t need a craft store full of specialized tools or a complex set of instructions. In fact, you likely have most of the necessary items already on hand, making it incredibly budget-friendly. This isn’t just a craft; it’s an invitation to bring the vibrant beauty of the fall season directly to your tabletop, creating a focal point that will enchant both family and guests. It’s gorgeous, effortlessly simple, and wonderfully inexpensive – the perfect trifecta for any DIY enthusiast. Ready to infuse your dining space with autumnal splendor? Let’s dive into creating your very own Fall Leaf Table Runner today!
Gather Your Supplies: What You’ll Need for This Autumn Masterpiece
One of the most appealing aspects of this DIY fall leaf table runner is its minimalist material list. You’ll be surprised at how much beauty you can create with so little! Before you begin, ensure you have these essential items ready:
- An Old Table Runner (or a Plain, Inexpensive One): This serves as the base for your project. Don’t feel the need to buy something new and expensive. An existing runner you’re looking to repurpose, or a plain, cheap one from a discount store, craft store, or even a thrift shop will work perfectly. Think burlap, plain cotton, linen, or any fabric that complements your fall aesthetic. The beauty of this project is giving new life to an old item or starting with a blank canvas.
- Faux Fall Leaves: These are the stars of your show! You’ll need a good quantity of artificial autumn leaves. These are readily available at craft stores, seasonal sections of department stores, or online retailers, especially during the fall season. Look for a variety of shapes, sizes, and colors (reds, oranges, yellows, browns) to create a natural, rich look. The more diverse your leaves, the more authentic and visually interesting your runner will appear. Consider buying a few different bundles to ensure you have enough to cover your chosen runner length.
- Hot Glue Gun and Glue Sticks: Your trusty tool for permanent adhesion. A hot glue gun provides a quick and strong bond, essential for securing your leaves in place. Make sure you have plenty of glue sticks on hand, as you’ll be attaching many leaves. If you don’t have a hot glue gun, a strong fabric adhesive or craft glue could potentially work, though it may require longer drying times and potentially less immediate hold. Always prioritize safety when using a hot glue gun, and ensure you work on a protected surface.
That’s it! With these three simple components, you’re fully equipped to embark on a delightful crafting journey that will yield a stunning result.
Crafting Your Autumn Table Runner: Step-by-Step Guide
Creating this beautiful fall leaf table runner is surprisingly straightforward, making it an ideal project for crafters of all skill levels. Follow these simple steps to bring the vibrant hues of autumn to your dining table.
Step 1: Prepare Your Workspace and Lay the Foundation
Begin by setting up a clean, flat, and well-lit workspace. Lay down a protective sheet or newspaper to shield your table from any potential hot glue mishaps. Next, carefully unroll and lay your chosen table runner flat on your prepared surface. Smooth out any wrinkles or creases to ensure you have an even base to work on. This foundational step is crucial for achieving a professional and uniform appearance for your finished runner. Consider the orientation of your runner; if it has a distinct pattern or texture, decide which side will be facing up.
Step 2: Strategically Placing and Securing Your Faux Fall Leaves
This is where the magic truly happens! Tiktoker @macy.blackwell demonstrated the simplicity of this step, and it’s key to the project’s success. Once your table runner is laid out, start attaching your faux fall leaves using the hot glue gun.
- Start at one end: It can be helpful to begin at one end of the runner and work your way down. This helps maintain a consistent flow and ensures even coverage.
- Vary the placement: Instead of gluing leaves in a perfectly straight line, try to mimic the natural randomness of fallen leaves. Overlap them slightly, angle them in different directions, and mix up the colors and sizes to create a dynamic and organic look.
- Mind the gaps: As Macy Blackwell wisely advises, ensure you attach the leaves not too far from each other. The goal is to create a lush, full appearance without large, unsightly gaps showing the runner fabric underneath. You want the leaves to create a dense, continuous carpet of autumn foliage.
- Applying the glue: Apply a small dab of hot glue to the back of each leaf, ideally near the stem or a sturdy part of the leaf. Press it firmly onto the table runner for a few seconds until the glue sets. Work in small sections to prevent the glue from cooling before you can attach the leaf.
- Layering for depth: Don’t be afraid to layer leaves. Placing some leaves slightly on top of others will add beautiful dimension and make your runner look even more realistic and rich. This also helps fill in any smaller gaps that might appear.
Continue this process, patiently and creatively, until your entire table runner is adorned with a vibrant array of autumn leaves. Take a step back periodically to assess your progress and make any adjustments to the leaf placement before the glue fully dries.
@macy.blackwell DIY Fall Leaf Table Runner!🍁 All you need is a plain cheapy table runner (or one you want to repurpose), faux fall leaves, and hot glue! I hot glued the stems to the runner, and added a leaf every 2-3 inches until it was filled up! #falldiy #fallhomedecor #diyhomedecor #falldecor
♬ Halloween ・ cute horror song – PeriTune
Step 3: The Grand Reveal – Styling Your Autumn Table
Once all the leaves are securely attached and the glue has completely dried, your stunning DIY Fall Leaf Table Runner is ready for its debut! Now, all that’s left is to place it elegantly on your dining table. Center it perfectly, letting the vibrant colors and textures speak volumes. Arrange your plates, cutleries, and any other autumnal accents like candles, miniature pumpkins, gourds, or pinecones. The runner itself will serve as a breathtaking centerpiece, effortlessly tying your entire fall tablescape together. This project is undeniably the prettiest addition to my fall decor this year, and I am absolutely thrilled with how it turned out, perfectly completing the cozy, inviting vibe of my dinner table. Many thanks to @macy.blackwell for sharing this truly gorgeous and inspiring DIY decor piece!
Elevating Your Fall Tablescape: Tips for a Perfect Finish
To ensure your DIY Fall Leaf Table Runner not only looks stunning but also integrates seamlessly into your home, consider these additional tips:
- Safety First: Always exercise caution when using a hot glue gun. Keep your fingers clear of the nozzle and have a designated spot for the gun when not in use.
- Vary Your Leaf Choices: While a single type of leaf can be beautiful, incorporating a mix of faux maple, oak, and other autumnal leaves will add incredible depth, texture, and realism to your runner. Look for leaves with slightly different finishes—some matte, some with a subtle sheen.
- Consider Length and Width: Before starting, measure your table to determine the ideal length for your runner. You might want it to hang slightly over the ends, or prefer it to sit entirely on the tabletop. Adjust the base runner accordingly.
- Embrace Imperfection: Nature isn’t perfect, and neither should your runner be. A few slightly askew leaves or a gentle overlap adds to its organic charm. Don’t strive for absolute symmetry; aim for natural beauty.
- Test Glue on a Hidden Spot: If you’re using a valuable or delicate table runner as your base, test a small dab of hot glue on an inconspicuous area first to ensure it doesn’t damage the fabric.
Beyond the Dining Table: Creative Ways to Use Your Leaf Runner
While perfectly suited for a dining table, your newly crafted fall leaf runner is versatile enough for other areas of your home:
- Entryway Console: Drape it over an entryway table to create a welcoming autumn vignette, perhaps adorned with a bowl of mini pumpkins or a scented candle.
- Mantlepiece Decor: Lay it across your fireplace mantle for a festive and warm touch, especially beautiful when paired with flickering candlelight.
- Buffet or Sideboard: Enhance a serving area during gatherings by using the runner as a base for platters and dishes, instantly adding seasonal flair.
- Bedroom Dresser: Bring the fall theme into your bedroom by using a shorter version on a dresser or nightstand, providing a cozy backdrop for books or small decorative items.
The Enduring Appeal of DIY Fall Decor
Engaging in DIY projects like this fall leaf table runner offers more than just a beautiful end product. It provides a creative outlet, a sense of accomplishment, and a unique way to personalize your living space.
- Cost-Effective Elegance: Achieve a high-end, designer look without the hefty price tag. Repurposing materials and using inexpensive faux leaves makes luxurious seasonal decor accessible to everyone.
- Personal Touch: Store-bought decor can be lovely, but a handmade piece carries a special charm and tells a story. Your guests will admire the effort and care you’ve put into making your home inviting.
- Mindful Crafting: The process of creating can be incredibly therapeutic. Taking time to work with your hands, focusing on a simple, beautiful task, can be a wonderful way to unwind and embrace the season.
- Sustainable Style: By repurposing an old runner, you’re also making an environmentally conscious choice, giving new life to items that might otherwise be discarded.
Maintenance and Storage for Lasting Beauty
To ensure your beautiful fall leaf table runner can be enjoyed for many seasons to come, proper care and storage are important:
- Spot Cleaning: If spills occur, gently spot clean the affected area using a damp cloth and mild soap. Avoid soaking the entire runner or putting it in a washing machine, as this could damage the leaves and glue.
- Dusting: Periodically, gently dust the leaves with a soft brush or a hairdryer on a cool, low setting to keep them looking fresh.
- Storage: When the season ends, carefully roll the runner loosely or lay it flat in a protective container. Avoid folding it tightly, as this can crease the leaves or weaken the glue bond. Store it in a cool, dry place away from direct sunlight to prevent fading. With proper care, this runner can become a cherished part of your autumn traditions year after year.
DIY Fall Leaf Table Runner: Your Gateway to Autumnal Ambiance
In conclusion, this DIY Fall Leaf Table Runner is more than just a decorative item; it’s an embodiment of autumn’s beauty, easily brought into your home. Its charm lies in its simplicity, its affordability, and the profound impact it has on transforming an ordinary space into a warm, inviting fall sanctuary. Thanks to the inspiring idea from @macy.blackwell, achieving a cohesive and breathtaking fall aesthetic for your dining table has never been easier or more enjoyable. So, gather your materials, embrace your creativity, and embark on this delightful DIY journey. You’ll be amazed at the stunning results and the cozy ambiance your handmade runner will bring to your home throughout the fall season. Happy crafting!