
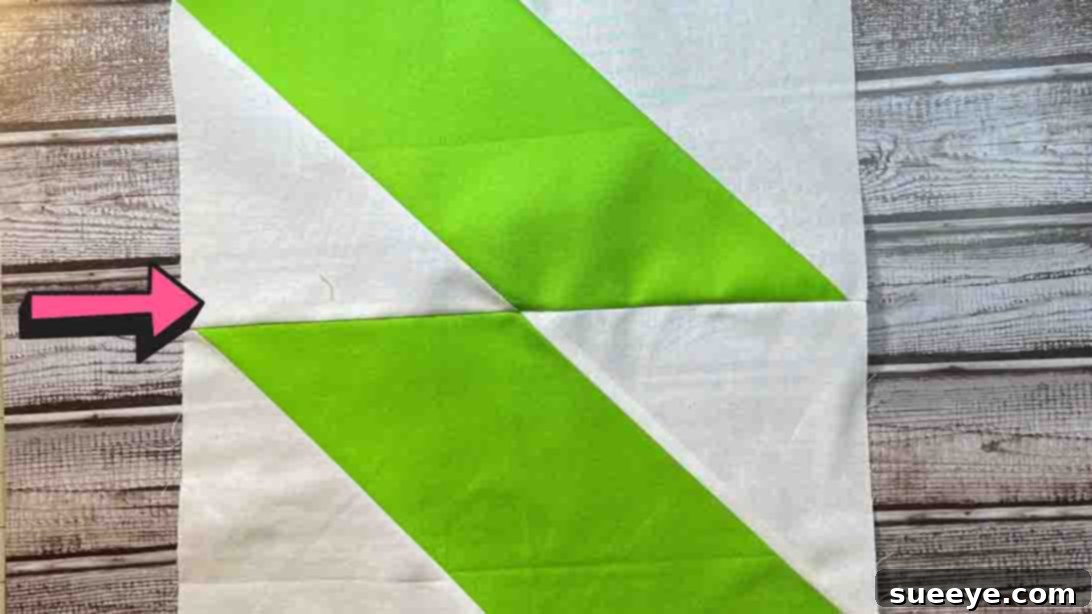
Welcome to the wonderful world of quilting, where creativity meets comfort! If you’re searching for a quilt pattern that combines simplicity with striking visual appeal, you’ve found your next obsession. The Slanted Diamond Quilt, a truly gorgeous design highlighted by the talented team at Cut and Create on YouTube, is an absolute gem for both novice and experienced quilters alike. As someone who has enjoyed quilting for many years, I can confidently say this pattern remains one of my top recommendations. It’s not just easy; it produces a sophisticated look without requiring complex techniques or advanced cutting skills, making it the perfect gateway project for anyone eager to dive into the art of quilting.
Often, beginners can feel intimidated by intricate patterns and lengthy instructions. However, the Slanted Diamond Quilt defies that notion. Its beauty lies in its straightforward construction, allowing you to build confidence with every stitch. You’ll learn fundamental quilting principles like precise cutting, accurate seam allowances, and effective pressing – all crucial skills that will serve you well in future projects. Imagine creating a beautiful, handmade quilt that looks complex but was surprisingly simple to assemble! This project offers immense satisfaction and a tangible reward for your efforts, perfect for adding a personal touch to your home decor or crafting a heartfelt gift for a loved one. Get ready to embark on a delightful quilting journey; you’re going to love bringing this stunning design to life. Below, you’ll find a detailed step-by-step guide, inspired by the excellent tutorial from Cut and Create, to help you create your very own slanted diamond masterpiece.
Getting Started: Essential Materials for Your Slanted Diamond Quilt
Before you begin sewing, gathering all your materials is key to a smooth and enjoyable quilting experience. For this project, we’ll focus on creating a single Slanted Diamond Quilt Block. To make a larger quilt, you’ll simply repeat the process to create as many blocks as needed, then assemble them into rows and the full quilt top. This block features two distinct fabrics, which we’ll call Fabric A and Fabric B, to create the striking visual contrast that defines the “slanted diamond” effect. Choosing complementary or contrasting fabrics is where your creativity truly shines, so take your time selecting colors and prints that speak to you!
Fabric Requirements for One Quilt Block:
For one complete Slanted Diamond Quilt Block, you will need the following:
Fabric A (Main Fabric or Background):
- 2 rectangles: Each measuring 12 ½ inches x 6 ½ inches.
Consider Fabric A to be the dominant fabric for the larger rectangular sections of your block. A solid color, a subtle tone-on-tone print, or a larger-scale print can work beautifully here. This fabric will form the foundation upon which your “diamonds” will be built.
Fabric B (Accent or Diamond Fabric):
- 4 squares: Each measuring 6 ½ inches x 6 ½ inches.
Fabric B will be transformed into the “slanted diamond” elements. This is an excellent opportunity to use a vibrant print, a contrasting solid, or even a fussy-cut design that you want to highlight. Since these are squares, they offer a perfect chance to introduce a pop of color or a playful pattern that stands out against Fabric A.
Additional Essential Quilting Tools:
Beyond your fabrics, a few standard quilting tools will make this project much easier and more precise:
- Sewing Machine: Equipped with a standard ¼-inch presser foot for consistent seam allowances.
- Rotary Cutter: Sharp and ready for accurate fabric cutting.
- Self-Healing Cutting Mat: To protect your work surface and prolong the life of your rotary blade.
- Quilting Ruler: A clear acrylic ruler, at least 6 ½ x 12 ½ inches, will be incredibly helpful for precise cuts and marking lines.
- Fabric Marking Tool: A chalk pencil, disappearing ink pen, or fine-line permanent marker (for the back of the fabric) to draw your diagonal lines.
- Iron and Ironing Board (or Pressing Mat): Essential for pressing seams flat and accurately, which is critical for crisp quilt blocks.
- Pins or Fabric Clips: To hold your fabric pieces securely in place before sewing.
- Thread: High-quality 100% cotton thread that matches or complements your fabrics.
- Fabric Scissors: For snipping threads and any small trims.
- Seam Ripper: Just in case! Even experienced quilters need one.
Before you make your first cut, it’s always a good practice to pre-wash and press your fabrics. This helps prevent shrinkage after your quilt is finished and removes any manufacturing chemicals, ensuring your finished quilt remains beautiful for years to come.
Step-by-Step Directions: Crafting Your Slanted Diamond Quilt Block
Now that you have all your materials ready, let’s dive into the fun part: assembling your Slanted Diamond Quilt Block! Precision is your best friend in quilting, so take your time with each step, focusing on accurate cuts and consistent seam allowances.
Step 1: Preparing Your Fabric and Creating the First Slanted Edge
To begin, meticulously cut your fabric requirements as listed above. Labeling your fabrics as ‘A’ and ‘B’ can help prevent confusion, especially if you’re working with similar colors or multiple blocks. Once your pieces are cut, take each of your 6 ½-inch x 6 ½-inch squares (Fabric B). Using your fabric marking tool and a ruler, carefully draw a diagonal line from one corner to the opposite corner on the wrong side of each square. This line will serve as your sewing guide.
Next, select one of your 12 ½-inch x 6 ½-inch rectangles (Fabric A). Position one of your marked 6 ½-inch x 6 ½-inch squares (Fabric B) on one corner of the Fabric A rectangle. The key is to align the square so that the diagonal line runs from the outer corner of the rectangle towards its center, creating the “slanted” effect. Pin the Fabric B square securely in place on Fabric A. Now, using your sewing machine, stitch directly along the drawn diagonal line. Ensure you use a ¼-inch seam allowance throughout this project for consistent results.
Once you’ve sewn along the diagonal line, it’s time to trim. With your rotary cutter and ruler, cut the excess fabric ¼-inch away from your stitched line, towards the outer corner. This will remove the triangular piece of fabric that would otherwise be under the “slanted” part. Discard the trimmed excess (or save for scrap projects!). Finally, carefully press the remaining fabric (Fabric B) open. Pressing outwards, away from the seam, ensures a flat, crisp seam and helps the block lay perfectly flat. This completes the first slanted edge of your diamond on one side of the Fabric A rectangle. You’ve now created your first corner unit!
Step 2: Completing the Slanted Diamond Block
Now, let’s add the second slanted edge to complete your diamond shape. Take another one of your prepared 6 ½-inch x 6 ½-inch squares (Fabric B) with its diagonal line marked. Position this square on the *opposite* side of the same 12 ½-inch x 6 ½-inch Fabric A rectangle, aligning it with the remaining corner. Crucially, ensure that the diagonal line on this second square creates a mirror image of the first, forming the ‘V’ or ‘arrowhead’ shape that defines the slanted diamond. Pin it securely in place.
Stitch directly along this newly drawn diagonal line, just as you did in Step 1. Once sewn, again, cut the excess fabric ¼-inch away from the stitch line, moving towards the outer corner. Take care not to cut into your sewn seam! After trimming, gently press the fabric open, ensuring the seam lies flat and smooth. This action reveals your beautifully formed Slanted Diamond Quilt Block!
You have now successfully created one complete Slanted Diamond Quilt Block. This single block is a testament to the power of simple techniques creating stunning visual effects. To make a full quilt, you will repeat these two steps to create as many identical blocks as you need. The number of blocks will depend on your desired quilt size. For example, a baby quilt might require 12-20 blocks, while a large bed quilt could need 50 or more. Once you have enough blocks, you’ll then arrange them into an appealing layout, sew them together into rows, and then sew the rows together to form your quilt top. The repetitive nature of this block makes it ideal for chain piecing, a technique that can significantly speed up your quilting process.
Watch the Slanted Diamonds Quilt Block Tutorial
Seeing the process in action can often clarify any uncertainties. For a visual guide to these steps, be sure to watch the comprehensive video tutorial by Cut and Create. Their clear demonstration will walk you through each step, from cutting to pressing, ensuring you have all the visual cues you need to succeed.
Tips for Success and Taking Your Quilt Further
To ensure your Slanted Diamond Quilt is a masterpiece, here are a few extra tips:
- Precision is Paramount: Always measure twice, cut once. Use a sharp rotary blade and a non-slip ruler for the most accurate cuts. Your block will only be as good as your initial cutting.
- Consistent Seam Allowance: A perfect ¼-inch seam allowance is the cornerstone of accurate piecing. Use a ¼-inch presser foot on your sewing machine if available, and regularly check your seam width.
- Pressing Matters: Don’t underestimate the power of a good press. Pressing seams open (as done in this tutorial) or to one side helps your blocks lie flat and fit together perfectly. Use a hot iron and consider a spritz of fabric starch for extra crispness.
- Chain Piecing: If you’re making multiple blocks, consider chain piecing. Sew the first diagonal line on all your Fabric A/Fabric B combinations one after another without lifting the presser foot or cutting threads between units. This saves time and thread.
- Audition Your Layout: Once you have several blocks made, lay them out on a design wall or on the floor. Experiment with different arrangements to see how the slanted diamonds interact. You might be surprised by the dynamic patterns that emerge!
- Finishing Your Quilt: After assembling your quilt top, the next steps are layering, quilting, and binding. Layering involves creating a “quilt sandwich” with your backing fabric, batting, and quilt top. Quilting is stitching through these layers to hold them together and add texture. Finally, binding creates a neat, durable edge for your quilt.
Why This Slanted Diamond Pattern is a Quilter’s Delight
The Slanted Diamond Quilt pattern truly embodies the joy of quilting. It’s a fantastic pattern for several reasons:
- Beginner-Friendly: It introduces fundamental quilting techniques without overwhelming complexity, building confidence from the very first stitch.
- Visually Striking: The clever use of simple diagonal lines creates an illusion of intricate design, making the finished quilt look far more advanced than it is.
- Versatile Design: Depending on your fabric choices, this pattern can look modern, traditional, whimsical, or elegant. Play with solids, prints, or a combination to achieve your desired aesthetic.
- Quick to Assemble: Once you get the rhythm of making the blocks, you’ll find them quick to piece, allowing you to see progress rapidly and stay motivated.
- Perfect for Scraps: While we listed specific fabric requirements, the 6 ½-inch squares are perfect for using up larger scraps from previous projects, making it a sustainable and economical choice.
Embarking on this Slanted Diamond Quilt project promises not only a beautiful finished item but also a deeply rewarding creative experience. Whether you’re making it as a cozy throw for your sofa, a charming baby quilt, or a thoughtful handmade gift, this pattern is sure to impress. So grab your fabrics, fire up your sewing machine, and let your quilting adventure begin! Happy sewing!