
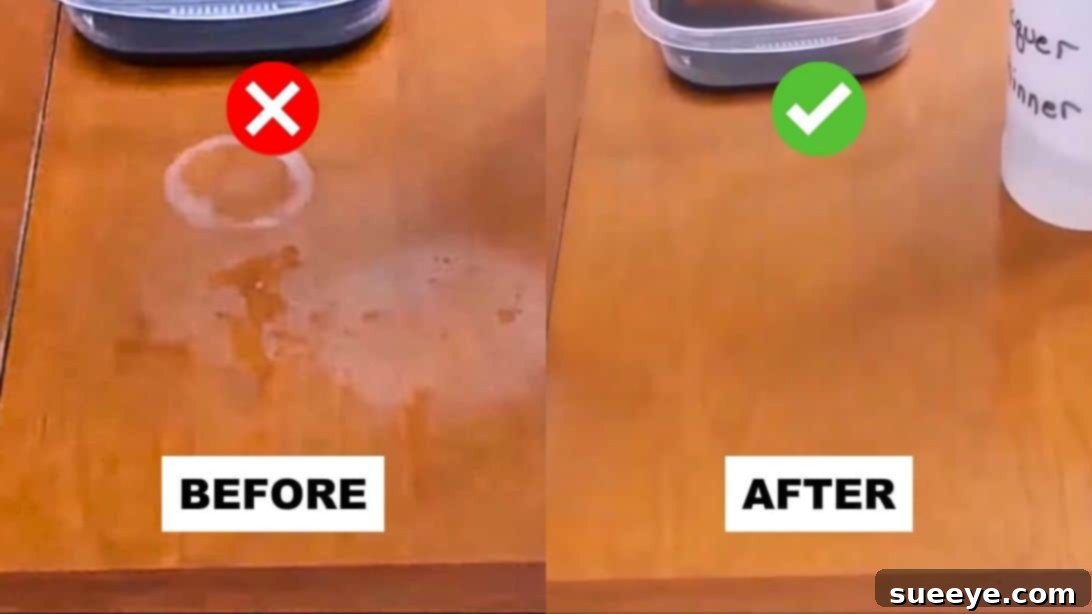
How to Remove White Water Rings and Heat Stains from Wood Furniture: Expert DIY Guide
Discovering an unsightly white mark on your beautiful wooden furniture can be incredibly disheartening. Whether it’s a persistent white water ring left by a forgotten glass or a stubborn heat stain from a scorching hot pan, these blemishes can significantly detract from the appearance and value of your beloved pieces. Many homeowners have experienced that moment of panic, wondering if their cherished tables, dressers, or floors are permanently damaged. The good news is that often, these seemingly irreversible marks are merely superficial damage to the wood’s protective finish, and with the right approach and a bit of patience, they can be effectively removed, restoring your furniture to its former glory.
I recently faced this exact dilemma after accidentally placing a hot pan directly onto my wooden table, leaving behind a glaring white stain. Devastated, I immediately scoured online resources for a viable solution. That’s when I discovered some incredibly effective techniques shared by WeRefinish on YouTube. After personally trying them out, I can confidently attest that these methods truly work! If you’re currently dealing with similar white water rings or heat stains on your wood furniture, you’re in the right place. This comprehensive guide will walk you through proven strategies to tackle these common household mishaps with confidence, helping you restore your wood’s original beauty and preserve its longevity.
Understanding White Water Rings and Heat Stains on Wood
Before diving into the practical solutions, it’s beneficial to understand what exactly causes these frustrating white marks. White water rings, often referred to as “blushing,” occur when moisture penetrates the protective finish of your wood furniture and gets trapped beneath the surface. This trapped moisture then causes the finish to become opaque, reflecting light differently and creating that cloudy white appearance. Heat stains, on the other hand, are a more intense form of blush. They happen when high temperatures from hot dishes or pans soften and then “cook” or alter the wood’s finish, leading to trapped moisture, air, or sometimes even a slight discoloration of the wood fibers themselves. Both types of stains indicate that the protective finish has been compromised, but in the vast majority of cases, the underlying wood remains intact, making successful repair highly achievable.
Method 1: The Iron Trick – Reversing Moisture Damage with Controlled Heat
One of the most surprising yet remarkably effective methods for removing white water rings and lighter heat stains involves using a common household iron. This technique works on the principle of gently reintroducing heat to the affected area, which encourages the trapped moisture within the wood’s finish to evaporate. It requires a delicate touch and careful execution, as excessive heat can potentially cause more damage, but when done correctly, it can yield outstanding results. This method is particularly useful for newer or less severe white marks that haven’t deeply penetrated the finish.
Materials You’ll Need:
- A clean, dry cotton cloth (an old t-shirt, pillowcase, or thin dish towel works perfectly)
- A standard household iron (ensure it has a working heat control and no steam function engaged)
Step-by-Step Instructions for Using an Iron:
- Prepare the Surface: Begin by ensuring the wooden surface is thoroughly clean and free of any dust, debris, or existing polish. A clean surface allows for direct and even heat application.
- Position the Cloth: Carefully place the dry cotton cloth directly over the white watermark or heat stain. It’s crucial that the cloth is completely dry. The cloth acts as a protective barrier, diffusing the iron’s heat and preventing direct contact that could scorch the wood finish.
- Set the Iron Correctly: Set your iron to a medium heat setting. This is critical: absolutely *do not* use the steam function. Steam will only reintroduce moisture to the wood, which is exactly what you’re trying to remove. Double-check that the iron’s water reservoir is empty or the steam setting is completely disengaged.
- Apply Heat with Extreme Caution: Gently place the warm iron onto the cloth, directly over the stained area. The absolute key here is to keep the iron moving constantly. Do not leave the iron in one spot for more than a few seconds, as this risks scorching the finish or even the underlying wood. Move it in small, consistent circles or back and forth across the cloth-covered stain.
- Check Your Progress Frequently: After approximately 10-15 seconds of gentle, continuous movement, lift the iron and the cloth to inspect the stain. You should begin to observe the white mark fading or diminishing. Patience is essential here; avoid the temptation to rush the process with more heat or longer contact.
- Repeat and Adjust if Necessary: If the stain is still present, reposition the cloth and repeat the process. If, after several attempts at a medium setting, you see little to no improvement, you can *very cautiously* try a slightly hotter setting. However, it’s vital to remember that with increased heat comes an increased risk of permanent damage to the finish. Always proceed with extreme caution and check your progress even more frequently.
- Avoid Slow Movement and Excessive Pressure: The most important rule for this method is not to move the iron slowly or apply excessive pressure. Doing so can cause the finish to soften too much, leading to the cloth sticking to the surface, potentially peeling off the finish or leaving new, undesirable marks. Keep the iron moving, maintain light pressure, and be patient.
- Allow to Cool and Inspect: Once the stain is gone or significantly reduced, remove the cloth and allow the wood to cool completely before touching the treated area or applying any other finishes or polishes.
Method 2: Chemical Blush Erasers – Targeted Solutions for Surface Haze
For more persistent white water rings or widespread “blushing” that the iron method couldn’t fully resolve, specialized chemical blush removers offer a powerful and highly effective alternative. Products such as Behlen Blush Eraser or Mohawk No Blush are specifically formulated to re-flow the wood’s existing finish, allowing trapped moisture and air to escape and restoring the finish’s original clarity. These are typically solvent-based products designed to lightly and temporarily dissolve the top layer of the finish, enabling it to dry evenly and without hazing. This method is highly effective for a broader range of white hazing issues and can be a game-changer for stubborn marks.
Materials You’ll Need:
- Behlen Blush Eraser or Mohawk No Blush (or a similar product specifically designed for blushing finishes)
- A clean, dry, soft-bristle brush (a finishing brush or natural hair brush is ideal)
- Chemical-resistant gloves and protective eye protection (absolutely essential for safety)
- Adequate ventilation (open windows, use an exhaust fan, or work outdoors if possible)
Step-by-Step Instructions for Using Blush Eraser Spray:
- Prioritize Safety: Always begin by donning appropriate chemical-resistant gloves and protective eye wear. Ensure your work area is extremely well-ventilated to prevent the inhalation of solvent fumes, which can be irritating or harmful.
- Prepare the Wood Surface: Thoroughly clean the wood surface to remove any accumulated dust, grime, or previous furniture polishes or waxes that could interfere with the blush eraser’s action. A clean surface ensures maximum efficacy.
- Light and Even Application: Hold the spray can a few inches (approximately 6-8 inches) from the white stain. Lightly spray just enough of the product to make the affected area wet. The goal is to apply a fine, even mist, not to drench or saturate the wood. Excessive application can lead to other finish issues.
- Observe the Transformation: In a very short time, often within seconds to a minute, you will observe the white stain beginning to “melt away” and the finish gradually becoming clear again. The solvents are actively working to re-homogenize the compromised finish layer.
- Feather the Edges: Once the white stain has visibly dissipated, gently use a clean, dry, soft-bristle brush to “feather” the edges of the treated area. This blending action helps to seamlessly integrate the newly clarified finish with the surrounding untreated finish, preventing the formation of harsh lines or demarcation marks.
- Allow to Evaporate Naturally: This step is crucial: absolutely do not wipe the treated area dry with a rag. Allow the blush eraser to evaporate on its own, which it will do relatively quickly due to the volatile nature of the solvents. Wiping can leave streaks, disturb the newly re-flowed finish, or reintroduce imperfections.
- Repeat as Needed: For more stubborn stains or larger areas of blush, you may need to repeat the application. Always allow the previous application to fully evaporate and the finish to dry slightly before applying more, and consistently work in thin, even coats.
- Post-Treatment Care: After the blush eraser has fully dried and the finish has re-hardened (usually within an hour or two), you might consider applying a fresh coat of high-quality wood polish or furniture wax to provide renewed protection and enhance the luster.
Method 3: Restor-A-Finish – Rejuvenating the Wood’s Existing Finish
Sometimes, white stains aren’t solely about trapped moisture; they can also indicate that the wood’s existing finish itself has become dry, dull, or sustained minor damage. Howard Products Restor-A-Finish is an exceptional solution for rejuvenating and repairing existing finishes without the need for stripping them entirely. It works by blending out minor scratches, blemishes, and white hazing while simultaneously restoring the natural color, depth, and luster of the wood. This method is particularly effective for stains that present as surface dullness, minor finish damage, or as an accompanying symptom of water rings or heat marks.
Materials You’ll Need:
- Howard Products Restor-A-Finish (select a color that closely matches your wood furniture)
- #0000 (super fine grade) steel wool (essential for gentle abrasion)
- Protective gloves
- Several clean, soft rags or lint-free cloths for wiping and buffing
Step-by-Step Instructions for Using Restor-A-Finish:
- Prepare and Protect: Always begin by wearing protective gloves to safeguard your hands from the product. Ensure the wooden surface is clean, dry, and free of any dust or grime before application.
- Select the Correct Shade: Howard Restor-A-Finish is available in various shades, such as Neutral, Golden Oak, Dark Walnut, and Cherry. It’s crucial to choose the shade that best matches your specific wood furniture for optimal and seamless results. If you are unsure, always test the product on a small, inconspicuous area (like the underside of a table leaf or inside a cabinet door) first to confirm color compatibility.
- Apply to Steel Wool: Pour a small, manageable amount of Restor-A-Finish directly onto a pad of #0000 grade steel wool. This extremely fine grade of steel wool is specifically chosen because it is abrasive enough to help the product penetrate and work effectively on the finish, yet gentle enough not to cause visible scratches or damage when used correctly.
- Rub into the Stain with the Grain: With light to medium, consistent pressure, rub the steel wool soaked with Restor-A-Finish into the white stain. Always work with the natural grain of the wood. The steel wool aids in gently abrading the uppermost, damaged layer of the finish, allowing the Restor-A-Finish to deeply penetrate, blend, and revitalize the existing finish.
- Observe and Repeat Application: You should begin to notice the white stain gradually disappear as the product works its magic. Continue rubbing until the white stains are completely gone or significantly diminished. For deeper or more stubborn stains, you might find that several applications are necessary. If so, allow a few minutes between each application for the product to begin absorbing.
- Wipe Off Excess Promptly: Immediately after the stain has vanished, use a clean, soft, lint-free rag to thoroughly wipe off any excess Restor-A-Finish from the surface. It is important not to let the product dry in thick layers on the wood, as this can lead to a sticky or uneven finish.
- Buff for Enhanced Shine: Once the treated surface is dry to the touch (which typically takes between 30 minutes to an hour), you can use another clean, dry, soft cloth to gently buff the area. This step will enhance the shine and luster, bringing out the wood’s natural beauty.
Method 4: Enhanced Restoration with Thinner – For Stubborn and Deep Stains
For exceptionally stubborn or deeper white water rings and heat stains that haven’t responded fully to the previous methods, combining Howard Restor-A-Finish with a small amount of lacquer thinner can significantly boost its penetrating and re-flowing power. Lacquer thinner is a strong solvent that will more aggressively soften the existing finish, allowing the Restor-A-Finish to do a more thorough and deeper restorative job. Due to the strength of lacquer thinner, this method should be approached with extra caution, prioritizing safety and proper ventilation.
Materials You’ll Need:
- 5 parts of Howard Restor-A-Finish (matching your wood color)
- 1 part of lacquer thinner (a strong solvent, handle with care)
- #0000 (super fine grade) steel wool
- Chemical-resistant gloves and protective eye protection (absolutely critical)
- Excellent ventilation (work outdoors or in a very well-ventilated space)
- A small, disposable mixing container and a stir stick
- Several clean, soft rags for wiping
Step-by-Step Instructions for Restor-A-Finish with Lacquer Thinner:
- Absolute Safety Precaution: Before you begin, understand that lacquer thinner is a strong chemical. Absolute caution is necessary. Always wear chemical-resistant gloves, protective eye protection, and ensure your workspace is extremely well-ventilated, ideally outdoors or with open windows and a powerful exhaust fan, to effectively disperse hazardous fumes. Keep the area completely free of open flames, pilot lights, or any potential sources of sparks, as lacquer thinner is highly flammable.
- Prepare Your Mixture: In your small, disposable mixing container, carefully combine 5 parts of Howard Restor-A-Finish with 1 part of lacquer thinner. Stir the mixture thoroughly with your stir stick until it is well combined. The exact proportions can be adjusted slightly based on the severity of the stain and the finish type, but always start with less thinner and increase only if needed.
- Apply to Wood with Steel Wool: Dip a pad of #0000 steel wool into the prepared mixture. Gently but firmly rub the mixture into the white ring or heat stain, consistently moving with the natural grain of the wood. The added lacquer thinner will help the Restor-A-Finish penetrate and re-flow the damaged finish much more aggressively than the product alone.
- Continuous Rubbing and Careful Observation: Continue rubbing the affected area, periodically checking your progress by wiping away a small section to observe the stain underneath. The white ring should gradually begin to dissolve, blend, and integrate into the surrounding finish.
- Avoid Over-Saturating the Wood: Use just enough of the mixture to work on the stain. It is vital to avoid drenching the wood, as excessive amounts of thinner can potentially damage the underlying wood itself or compromise the finish beyond repair, leading to a much larger problem.
- Promptly Remove Excess Product: As soon as the white stain is completely removed or significantly reduced, immediately use a clean, dry, soft rag to thoroughly wipe off all excess product from the surface. Do not allow the mixture to dry on the wood, as this can leave a sticky residue or an uneven finish.
- Allow for Adequate Curing Time: Let the treated area cure and re-harden for at least 24 hours, or even longer (up to 72 hours) for optimal results, before placing anything on it or applying any further treatments like wax or polish. This extended curing time allows the finish to fully re-harden and stabilize.
General Tips for Wood Furniture Care and Stain Prevention
Once you’ve successfully removed those unsightly white stains and restored your furniture’s beauty, it’s absolutely vital to implement good preventive practices to keep them from recurring. A little proactive care and attention go a long way in preserving the elegance and longevity of your wooden furniture.
- Always Use Coasters and Trivets: This is the golden rule for wood furniture. Consistently use coasters under all glasses, cups, and bottles, and place trivets or hot pads under hot dishes, serving bowls, pots, and pans. This creates a critical barrier between moisture/heat and your wood finish.
- Wipe Spills Immediately: Do not allow any liquid spills to sit on wood surfaces, even for a short time. Promptly wipe them up with a soft, clean, and dry cloth to prevent moisture penetration and subsequent staining.
- Avoid Direct Sunlight Exposure: Prolonged exposure to direct sunlight can severely dry out and fade wood finishes, making them far more susceptible to damage from moisture and heat. Position furniture away from direct, harsh sunlight or use window coverings.
- Maintain Stable Humidity Levels: Wood is a natural material that expands and contracts with fluctuations in humidity. In dry environments, consider using a humidifier to prevent cracking, splitting, and to maintain the wood’s structural integrity and finish resilience.
- Regular and Gentle Cleaning: Dust your wooden furniture regularly with a soft, lint-free microfiber cloth to prevent abrasive particles from scratching the surface. For deeper cleaning, use a wood-specific cleaner that is pH-neutral and designed for finished wood. Avoid harsh chemical sprays, all-purpose cleaners, or silicone-based polishes, as these can strip or degrade the finish over time.
- Periodic Polishing or Waxing: Apply a high-quality furniture polish or wax periodically (e.g., every 3-6 months) to nourish the wood and provide an additional layer of protection to the finish. Choose products that are appropriate for your specific wood type and finish (e.g., lacquer, polyurethane, oil finish).
- Always Test in an Inconspicuous Area: Before trying any new cleaning, polishing, or restoration product on a prominent part of your furniture, always perform a patch test. Apply the product first on an hidden spot (such as the underside of a table, the back of a leg, or inside a drawer) to ensure it doesn’t cause discoloration, damage, or an undesirable reaction with your specific finish.
When to Call a Professional Furniture Restorer
While the DIY methods outlined above are remarkably effective for most common white water rings and heat stains, there are specific instances where professional intervention might be necessary. If the stain is exceptionally deep, has caused the wood itself to crack, warp, or swell, or if repeated, careful attempts with these DIY methods haven’t yielded satisfactory results, it might be time to consult a professional furniture restorer. Expert restorers have access to more specialized tools, industrial-grade chemicals, and extensive experience. They can often repair damage that seems impossible to the untrained eye, ensuring your valuable pieces are restored correctly and safely.
Don’t let white water rings or heat stains diminish the inherent beauty and character of your wooden furniture. With these proven techniques and a commitment to preventive care, you can effectively restore your cherished pieces to their former glory, preserving their appeal and functionality for many years to come. Happy restoring and enjoy your beautifully maintained wood!