
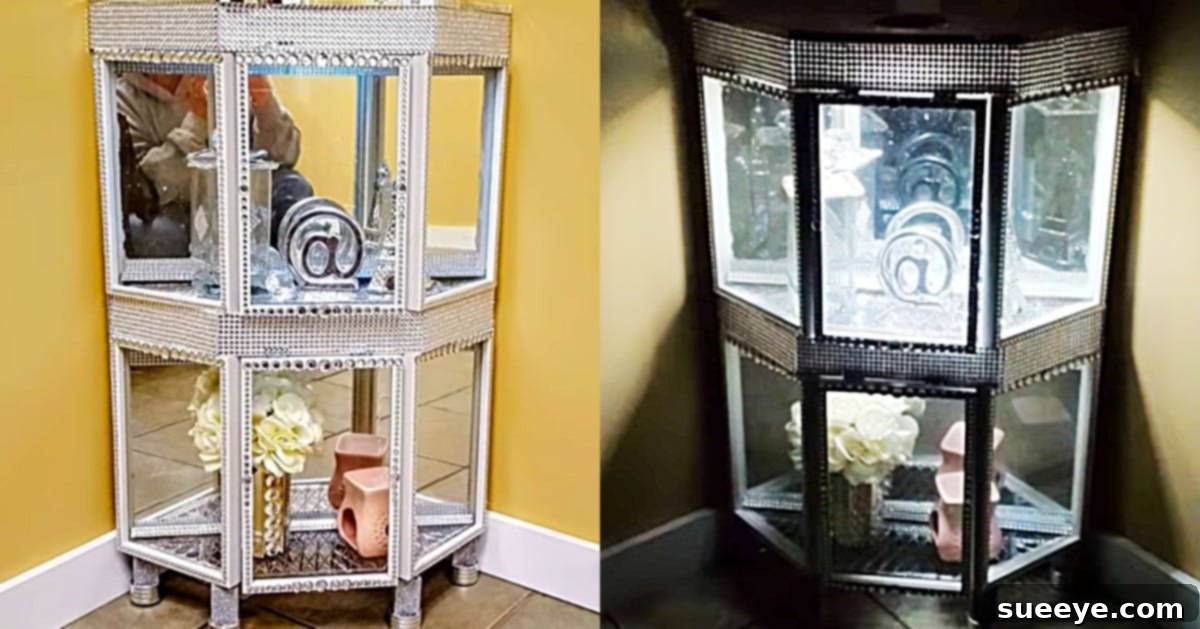
Craft Your Own Elegant Curio Cabinet from Dollar Tree Finds
Are you looking for an elegant way to display your cherished trinkets, small collectibles, or family heirlooms without breaking the bank? The search for the perfect curio cabinet often leads to expensive furniture stores, leaving many budget-conscious decorators feeling limited. However, what if you could create a beautiful, custom curio cabinet using materials primarily sourced from your local Dollar Tree? Imagine transforming simple, affordable items into a sophisticated piece that perfectly complements your home decor.
This dream can become a reality! My own journey to finding a display solution for my beloved “nick-nacks” led me to an inspiring YouTube tutorial on crafting a DIY curio cabinet entirely from Dollar Tree materials. The idea was so brilliant and cost-effective that I knew I had to embark on this creative project immediately. The prospect of turning everyday essentials into a stunning, functional display piece was incredibly exciting, especially since I absolutely love the thrill of discovering treasures at Dollar Tree!
This comprehensive guide will walk you through the process, from gathering your materials to the final touches, ensuring you can replicate this fantastic project with ease. Get ready to unleash your inner crafter and build a display cabinet that looks far more expensive than it actually is!
Why Choose a DIY Dollar Tree Curio Cabinet?
The appeal of a DIY Dollar Tree curio cabinet extends far beyond just saving money. While the cost-effectiveness is a major draw, there are several compelling reasons why this project stands out:
- Unbeatable Affordability: Traditional curio cabinets can cost hundreds, if not thousands, of dollars. By utilizing Dollar Tree items, you can construct a comparable piece for a fraction of the price, making elegant home decor accessible to everyone.
- Customization Potential: Unlike mass-produced furniture, a DIY project allows for complete personalization. You can choose your colors, embellishments, and even adjust the internal shelving to perfectly suit your collection and your home’s aesthetic.
- Sense of Accomplishment: There’s immense satisfaction in creating something beautiful and functional with your own hands. This project is not only practical but also a rewarding creative endeavor.
- Unique Aesthetic: Your Dollar Tree curio cabinet will possess a unique charm and character that a store-bought item simply cannot replicate. It becomes a conversation piece, showcasing your creativity and resourcefulness.
- Accessible Materials: Dollar Tree stores are widely available, making it easy to source all the necessary components. No need to hunt for specialized crafting supplies!
Materials You’ll Need for Your Elegant Display
Gathering your materials is the first exciting step in bringing your vision to life. The beauty of this project lies in transforming ordinary, inexpensive items into a cohesive and stylish display unit. Here’s a detailed list of what you’ll need, along with some tips for sourcing:
Core Structure and Cabinet Components:
- 6 – Tall White Decor Frames: These form the main structure and “windows” of your curio cabinet. Look for sturdy frames with clean lines, typically found in the home decor or craft sections of Dollar Tree.
- 1 – 8×10 Stretched Wooden Canvas: This will serve as the solid back panel of your cabinet, providing stability and a surface for mounting. Ensure it’s flat and free from defects.
- 6 – 8×10 Mirrors in Black Frames: These mirrors are key to creating depth and a luxurious feel within your cabinet. They can be placed strategically to reflect light and display your items beautifully. The black frames provide a nice contrast.
- 2 – Rectangle Clear Trays: These versatile trays will be repurposed as the internal shelves of your curio cabinet. Their clear design ensures they don’t detract from your displayed items, and they are surprisingly sturdy when properly secured.
Decorative and Functional Elements:
- 1 – Silver 5×7 Frame: This frame can be used as a decorative accent for the cabinet’s front, perhaps framing a specific area or as a small door embellishment. Its silver finish adds a touch of sophistication.
- 1 – Push Light Foam Board Bling Wrap (or similar gems): This item is crucial for adding internal lighting and sparkle. Dollar Tree often carries “Jot gems” or adhesive rhinestone sheets that work perfectly. Be persistent in your search, as these popular items can sometimes be hard to find in stock.
- OPTIONAL Adhesive Gems & Flat Back Gems for Decorating Frame (Hobby Lobby or other craft stores): For an extra touch of glamour and personalization, consider additional adhesive gems. These can be used to accent the cabinet’s exterior, the frame borders, or any other area where you want to add some sparkle.
Optional Components for Sturdy Cabinet Legs
Adding legs to your curio cabinet can elevate its appearance and provide additional height, making it a more prominent furniture piece. While optional, incorporating legs adds a refined finish. Sourcing materials for legs from Dollar Tree requires a bit of creativity, but the results are well worth it.
- Round Napkin Holders: These can be stacked to create column-like legs. You’ll need several to achieve the desired height and stability.
- Wooden Blocks: These are essential for providing a solid base and cap for your stacked napkin holders. While Dollar Tree carries smaller wooden blocks (which would require doubling up for a substantial leg), larger, full-size blocks are often found at discount stores like Five Below (off-brand) or Walmart (name brands). A subscriber recommended Five Below for their larger blocks, which offer better stability and a more substantial look without excessive stacking. If using smaller Dollar Tree blocks, plan to glue several together to achieve the necessary thickness and height for each leg.
When selecting blocks, consider the overall scale of your cabinet. Sturdy, well-built legs will ensure your finished curio cabinet is stable and capable of holding your precious items securely.
Essential Tools for Assembly
While the materials are budget-friendly, having a few basic crafting tools will make the assembly process much smoother and ensure a professional finish:
- Hot Glue Gun and Plenty of Glue Sticks: This is your primary adhesive for this project. Ensure your glue gun is clean and ready.
- Utility Knife or Scraper: Essential for carefully removing any branding or stickers from the glass frames.
- Ruler or Measuring Tape: For precise alignment and placement of components.
- Pencil: For marking measurements or placement guides.
- Clamps or Heavy Books: These will be invaluable for holding glued sections in place while the adhesive cures, ensuring a strong bond.
- Cleaning Cloth and Glass Cleaner: To clean the frames and mirrors before and after assembly, ensuring a pristine display.
Step-by-Step Directions: Building Your Dollar Tree Curio Cabinet
Now, let’s get into the heart of the project: the detailed assembly instructions. While the original tutorial might refer to a video, we’ll provide comprehensive written steps to guide you through creating this beautiful curio cabinet.
Step 1: Preparing Your Frames and Initial Assembly
Begin by carefully inspecting your six tall white decor frames. These will form the main structure of your cabinet. Use your utility knife or scraper to gently remove any manufacturer’s writing, stickers, or tags from the glass panels. Clean the glass thoroughly with a glass cleaner to ensure a pristine, streak-free surface. Once clean, dry the frames completely.
Next, you’ll start assembling the frame structure. Think of these frames as the “windows” and walls of your cabinet. Carefully align two frames side-by-side. Apply a generous bead of hot glue along the inside edges where the frames meet. Press them firmly together, holding them in place until the glue begins to set. It’s often helpful to use painter’s tape or a clamp to secure them while the glue cools and hardens completely. Repeat this process, attaching additional frames to create the desired multi-sided or rectangular cabinet structure. Ensure all connections are square and stable, as this forms the foundation of your entire cabinet.
Step 2: Securing the Cabinet Back and Mirrors
Once your frame structure is stable, it’s time to add the back panel. The 8×10 stretched wooden canvas will provide rigidity and a solid backing. Carefully position the canvas against the back of your assembled frame structure, ensuring it aligns evenly. Apply a continuous line of hot glue along the edges of the frame where it will meet the canvas. Press the canvas firmly onto the glued edges and hold it until the glue sets. This step is crucial for the overall stability of your cabinet.
After the back is secured, you’ll integrate the 8×10 mirrors. These mirrors will be placed inside the cabinet, adhered to the back panel or the internal walls, to create a sense of depth and reflect light, enhancing the display of your items. Decide on the optimal placement for each mirror – perhaps one per section, or larger mirrors creating a continuous mirrored back. Apply hot glue to the back of each mirror (or its black frame) and carefully press it into position within the cabinet, holding firmly until bonded. The reflective surfaces will instantly elevate the cabinet’s appearance.
Step 3: Creating and Installing Shelves
Your two rectangle clear trays will now be repurposed as the internal shelves for your curio cabinet. Determine the desired height for your shelves based on the size of the items you plan to display. Use a ruler and pencil to mark the exact locations for each shelf on the interior sides of your cabinet. Ensure these marks are level to prevent items from sliding off.
Apply a strong bead of hot glue along the marked lines on both sides of the cabinet where the shelf will rest. Carefully position one of the clear trays onto the glue, ensuring it is level and centered. Apply additional glue to the underside of the tray where it meets the frame for extra support. Hold it firmly in place or use temporary supports until the glue fully cures. Repeat this process for the second shelf. Take your time to ensure the shelves are secure and level, as they will bear the weight of your displayed items.
Step 4: Adding Illumination and Sparkle
This is where your cabinet truly comes to life! The “Push Light Foam Board Bling Wrap” (or Jot gems/rhinestone sheets) will be used to add internal lighting and decorative sparkle. If using a push light, decide on its placement – often centered at the top interior for even illumination. Secure it with hot glue or its adhesive backing. For the “bling wrap” or adhesive gems, carefully cut them to size if necessary and adhere them to the interior of the cabinet. This could be around the edges of the mirrors, along the internal frame lines, or even as a border on the shelves. The goal is to catch and reflect light, making your displayed items shine.
Consider using the silver 5×7 frame as a decorative element. This could be attached to the front of the cabinet as an accent, perhaps framing a small, special item that you want to highlight, or even used as part of a faux door embellishment. Glue it securely into its chosen position.
Step 5: Constructing and Attaching the Optional Legs
If you’ve opted for legs, this step will elevate your cabinet (literally!). For each leg, stack several round napkin holders on top of each other until you reach your desired height. Apply hot glue generously between each napkin holder as you stack them to create a solid column. Once you have your columns, glue a wooden block (or several smaller Dollar Tree blocks glued together for thickness) to the top and bottom of each stacked column. This creates a stable, finished leg unit.
Once all four leg units are assembled and dry, carefully position your cabinet upside down on a clean, protected surface. Apply a substantial amount of hot glue to the top surface of each leg unit. Carefully place each leg unit onto the bottom corners of your curio cabinet, ensuring they are evenly spaced and perfectly straight. Hold them firmly in place until the glue has cooled and created a strong bond. Allow ample time for the glue to cure before turning the cabinet upright.
Step 6: Final Touches and Curing
With all components assembled, take a moment to inspect your curio cabinet. Check for any loose parts and reinforce them with additional glue if necessary. Wipe down all surfaces, especially the glass and mirrors, to remove any fingerprints or glue residue, ensuring your cabinet sparkles.
It is absolutely crucial to allow your curio cabinet to cure completely. Hot glue, while quick to set, achieves its maximum strength after several hours. Resist the urge to immediately load your cabinet with items. Allowing it to sit undisturbed overnight will ensure all bonds are fully hardened, making your cabinet robust and durable. Once cured, your beautiful, custom-made Dollar Tree curio cabinet is ready to display your treasures!
Personalizing Your Curio Cabinet: Unleash Your Creativity
One of the greatest joys of DIY is the ability to infuse your personal style into your creations. While the basic design provides a stunning foundation, there are countless ways to customize your Dollar Tree curio cabinet:
- Paint and Finish: Don’t limit yourself to white frames. Spray paint the entire cabinet in a metallic finish (gold, silver, copper), a vibrant color, or a distressed antique look to match your existing decor.
- Backing Options: Instead of mirrors or a plain canvas back, consider adhering decorative scrapbook paper, fabric, or even wallpaper samples to the back panel for a unique accent.
- Lighting Upgrades: Explore battery-operated LED strip lights for a more continuous glow, or small puck lights with color-changing options to highlight specific items.
- Handle and Hardware: Add small decorative knobs or pull handles to the front if you create a hinged door, or simply as decorative accents.
- Feet Variations: Experiment with different types of feet – small wooden spheres, plastic furniture glides, or even decorative ceramic pieces can serve as alternative legs.
- Internal Decor: Line your shelves with felt, velvet, or decorative paper to add a touch of luxury and prevent items from sliding.
Let your imagination guide you! This project is a canvas for your creativity, allowing you to craft a display piece that truly reflects your unique taste.
Tips for Success and Longevity
To ensure your DIY Dollar Tree curio cabinet is a resounding success and serves you well for years to come, keep these tips in mind:
- Patience is Key: Rushing the assembly process, especially glue drying times, can lead to instability. Allow ample time for each section to set properly.
- Test Fit First: Before applying glue, dry-fit components whenever possible to ensure they align correctly and fit together as intended.
- Work on a Protected Surface: Lay down newspaper, cardboard, or a craft mat to protect your work area from glue drips.
- Be Mindful of Weight: While sturdy, this cabinet is made from lightweight materials. Avoid overloading it with extremely heavy items. Distribute weight evenly across shelves.
- Clean as You Go: Wipe away any excess hot glue immediately before it hardens for a cleaner finish.
- Dollar Tree Stock Varies: If you can’t find a specific item, be flexible! Look for alternatives or visit multiple Dollar Tree locations. Sometimes similar items can serve the same purpose.
- Gentle Cleaning: Use a soft, damp cloth for dusting and a mild glass cleaner for mirrors and glass. Avoid harsh chemicals that could damage the glue or finishes.
Showcase Your Treasures in Style
Once your DIY Dollar Tree curio cabinet is complete and cured, the most exciting part begins: filling it with your beloved treasures! This elegant display cabinet is perfect for a wide variety of items:
- Miniatures and Figurines: Showcase your collection of delicate porcelain figures, action figures, or small sculptures.
- Jewelry and Accessories: Organize and display your favorite necklaces, earrings, and bracelets, making them easily accessible and beautifully presented.
- Small Collectibles: Whether it’s thimbles, vintage keys, or decorative spoons, a curio cabinet keeps them dust-free and admired.
- Heirlooms and Souvenirs: Give your cherished family heirlooms or travel souvenirs a place of honor, allowing their stories to be seen.
- Craft Supplies: For crafters, it can be a beautiful way to organize small spools of thread, beads, or decorative elements.
No matter what you choose to display, your handmade curio cabinet will provide a sophisticated backdrop, turning everyday items into works of art. It’s a testament to how creativity and a little ingenuity can transform humble materials into something truly spectacular.
Conclusion: Your Dream Curio Cabinet Awaits!
Embarking on this DIY Dollar Tree curio cabinet project is more than just a craft; it’s an opportunity to create a beautiful, personalized, and incredibly budget-friendly piece of furniture for your home. You’ve seen how easily you can transform simple, inexpensive materials into a stunning display solution that looks far more upscale than its actual cost. The satisfaction of crafting something so elegant with your own hands is truly unparalleled.
You don’t need to be an expert crafter to achieve fantastic results. With a little patience, a hot glue gun, and the clear instructions provided, you can bring this project to life. This curio cabinet isn’t just a place for your keepsakes; it’s a testament to your resourcefulness and creativity. So, gather your Dollar Tree finds, clear your workspace, and get ready to create a gorgeous curio cabinet that will undoubtedly become a cherished part of your home decor. You will not be disappointed – the finished product is truly beautiful and uniquely yours!