
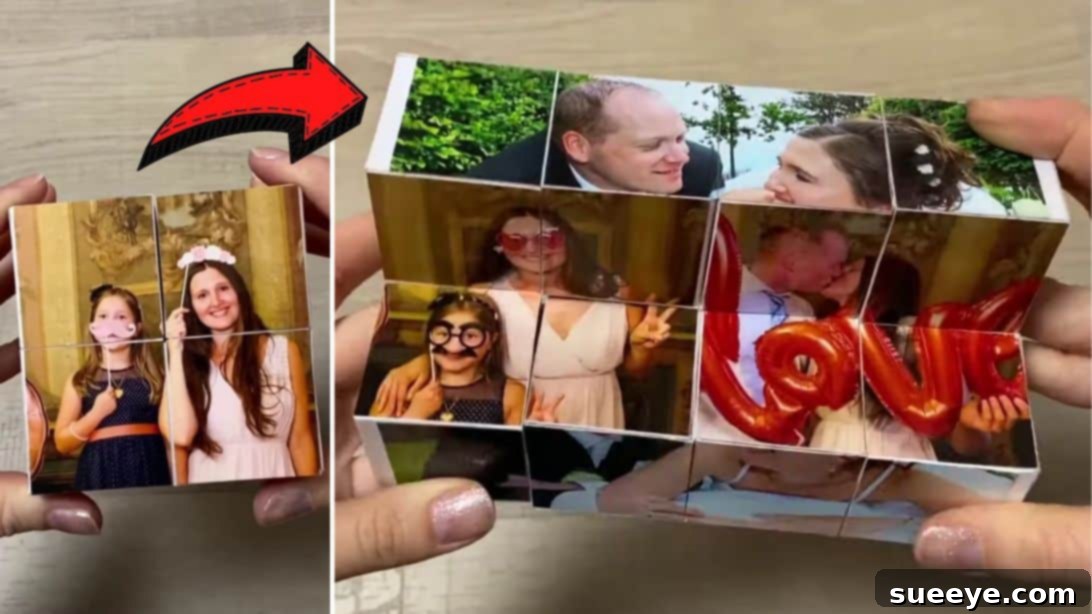
In a world increasingly dominated by mass-produced items, the charm and sincerity of a handmade gift stand out profoundly. There’s an unparalleled joy in crafting something unique, something imbued with personal effort and affection, and an even greater delight in witnessing the recipient’s genuine surprise and appreciation. Such gifts aren’t just objects; they are tangible expressions of love, thoughtfulness, and cherished memories. If you’re seeking to create an unforgettable present that transcends the ordinary, then prepare to be captivated by the ingenious Magic Folding Photo Cube.
This remarkable DIY project, beautifully demonstrated by Tanu Creative on YouTube, transforms simple materials into an interactive masterpiece. Far more engaging than a static photo frame, this cube unfolds to reveal a cascade of precious moments, inviting interaction and rediscovery. It’s a clever, sentimental, and surprisingly easy craft that promises to be a showstopper. Whether for birthdays, anniversaries, holidays, or just because, this personalized photo cube offers a unique way to celebrate life’s special occasions and the people who make them meaningful.
Imagine the delight on a loved one’s face as they playfully unfold this seemingly simple cube, only to discover a hidden gallery of shared memories. Each turn reveals a new set of images, piecing together a visual narrative of your bond. The best part? Despite its intricate appearance, this project is incredibly accessible, requiring only a handful of basic supplies and a small investment of your time. You’ll be amazed at how quickly you can assemble these charming keepsakes, ready to spread joy and nostalgia.
Why the Magic Folding Photo Cube is the Ultimate Personalized Gift
Handmade gifts carry an intrinsic value that store-bought items often lack. They convey a powerful message: “I took the time and effort to create something special, just for you.” The Magic Folding Photo Cube elevates this concept by offering not just a gift, but an entire experience. It’s a conversation starter, a cherished memory keeper, and a playful enigma all rolled into one.
- Unforgettable & Interactive: Unlike traditional photo displays, the dynamic folding mechanism creates a sense of wonder and invites the recipient to engage physically with their memories. It’s an unfolding story, literally, that captivates and delights.
- Deeply Personal: Curating the perfect selection of photos for each panel allows you to tell a specific narrative, highlight key milestones, or simply celebrate a collection of happy moments unique to your relationship with the recipient. This level of customization makes it truly special.
- Budget-Friendly Brilliance: High-impact gifts don’t have to come with a hefty price tag. This project utilizes readily available and inexpensive materials, making it a fantastic option for thoughtful gifting on any budget without compromising on sentimental value.
- Simple Yet Stunning: Don’t let the “magic” of its design fool you into thinking it’s complicated. The construction process is remarkably straightforward, making it a perfect DIY project even for beginners. The finished product, however, looks incredibly sophisticated and unique.
- Versatile for Any Occasion: From a heartfelt Valentine’s gift or Mother’s Day surprise to a unique birthday present, a sentimental graduation memento, or even a thoughtful wedding favor, the themes and photos can be adapted for virtually any celebration or recipient.
Materials for Your Enchanting Photo Cube Project
Gathering your supplies is the first exciting step towards bringing your magic photo cube to life. You’ll find most of these items are likely already in your craft drawer or easily available at any stationery or craft store. Precision in cutting and scoring is key, so make sure your tools are sharp and reliable for the best results!
- 8 pieces of sturdy paper or light cardstock, each measuring precisely 12cm (4.7″) x 16cm (6.2″). Opt for a medium-weight paper that is durable enough to hold its shape but still flexible enough to fold cleanly.
- A reliable Ruler (preferably metal for cleaner cuts if using a craft knife, but a sturdy plastic ruler is perfectly adequate for precise marking).
- A sharp Pencil for drawing light, precise grid lines and markings that can be erased later if needed.
- Clear tape for securely assembling the cube structure. A good quality, transparent tape dispenser can make application quicker and neater.
- Strong Adhesive or double-sided tape for securely attaching your photos. While a glue stick can work, double-sided tape often offers a cleaner, less messy, and more durable bond for photographs.
- A Scoring tool (this can be a dedicated scoring stylus, the dull side of a butter knife, or even an empty ballpoint pen) to create crisp, professional folds that make the cube’s mechanism smooth.
- Printed photos at 8cm (3″) x 8cm (3″). Choose high-resolution, vibrant prints that will look fantastic when displayed. Remember you’ll be cutting these further, so ensure important details are not located too close to the very edges.
Step-by-Step Guide: Crafting Your Magic Folding Photo Cube
Creating this folding photo cube is an enjoyable and rewarding process that combines geometric precision with creative personalization. Take your time with each step, focusing on accuracy and neatness, and you’ll be amazed by the professional-looking results. Let’s begin the transformation of simple paper into a magical memory display!
Step 1: Preparing Your Paper Pieces and Initial Assembly
This initial stage involves transforming your flat sheets of paper or cardstock into the foundational units of your cube. Accuracy here is paramount to ensure a perfectly functioning and aesthetically pleasing final product that folds and unfolds with ease.
- Grid Creation: Take one of your 12cm x 16cm paper pieces. Lay it horizontally on a flat, protected surface. Using your ruler and pencil, meticulously mark each side every 4cm (approximately 1.5 inches). For the 16cm side, this means marks at 4cm, 8cm, and 12cm from one edge. For the 12cm side, place marks at 4cm and 8cm. Connect these corresponding dots with light pencil lines to form a precise grid, resulting in 12 equal 4cm x 4cm squares (3 rows by 4 columns).
- Strategic Marking for Removal: On each of the longer (16cm) sides of your paper, you’ll have a row of four 4cm x 4cm blocks. Mark an “X” on three out of these four blocks, specifically leaving the central 4cm x 4cm block in each row unmarked. To clarify, if you visualize a strip of four squares, you would mark the first, second, and fourth squares, ensuring the third (center) one remains untouched. Repeat this precise marking pattern for the other 16cm side. This unique pattern is absolutely crucial for the cube’s unique folding mechanism.
- Precise Cutting: Carefully cut out the squares that you’ve marked with an “X”. Use sharp scissors or a craft knife with a cutting mat for the cleanest edges. This will leave you with a distinct “cross” or “plus” shape (a central rectangle with two squares extending from its sides). Discard the “X”-marked squares.
- Scoring for Crisp Folds: Using your scoring tool and ruler, meticulously score along all the remaining pencil lines. Scoring creates a defined groove in the paper, which makes it incredibly easy to achieve sharp, professional-looking folds. Skipping this step often results in messy, uneven creases that detract from the final product.
- Pre-Folding: Gently fold along each scored line, then unfold it. This pre-creasing step “trains” the paper, making it more pliable and ensuring that when you assemble the pieces, they will fold smoothly and precisely, contributing to the “magic” effect.
- Forming the Box Units: Now, carefully fold each prepared paper piece into a small, open-ended box shape, using the scored lines as your guides. You’ll essentially be folding the two side flaps inwards and securing the central portion.
- Repeat & Prepare for Assembly: Repeat this entire process (steps 1.1 to 1.6) for the remaining seven pieces of paper. Upon completion, you should have eight identical box units, each ready for assembly.
- Arranging for Connection: Position these eight box units into two perfectly aligned rows, with four boxes in each row. Ensure they are placed side-by-side, preparing for their initial connections.
- Initial Taping: Following the visual guide in the video tutorial (which is highly recommended for clarity), carefully tape every two adjacent boxes together along their longer edges. This step creates four pairs of connected boxes. Use clear tape for a seamless finish, making sure the tape secures the edges firmly without impeding the future folding action.
Step 2: Assembling the Cube and Adding Your Cherished Photos
This phase is where the “magic” truly begins to take shape as you connect the individual units and personalize your cube with your chosen memories. Attention to detail here will ensure a smooth-folding and visually stunning finished product.
- Connecting the Box Pairs: You should now have four pairs of boxes from the previous step. Carefully start taping these pairs together, ensuring that each new connection is secure and allows for smooth folding. You’ll essentially be forming a larger rectangular structure composed of these units. The key is to create a continuous chain of boxes that can eventually fold into a solid cube, so pay attention to the orientation as shown in the video.
- Forming the Large Cube Structure: Once all the box pairs are connected in a single, flexible strip, gently fold the entire structure over to form a large, hollow cube. Use clear tape along the final connecting sides to secure this shape. At this critical stage, take a moment to test the folding action to ensure all joints move freely and smoothly without snagging.
- Numbering for Photo Placement: To simplify the intricate photo application process, it’s highly recommended to systematically number each individual visible surface (or block) of the cube in its various folded states. As you manipulate and unfold the cube, new surfaces will continuously appear. Assign a unique number to each of these unique surfaces. This systematic approach will help you plan your photo sequence effectively and avoid any confusion during application.
- Preparing Your Photos: Take your pre-printed 8cm x 8cm (3″ x 3″) photos. Each of these will need to be carefully cut into four smaller, perfectly square 4cm x 4cm (1.5″ x 1.5″) pieces. For the most precise and clean results, use a ruler and a craft knife on a self-healing cutting mat, or exceptionally sharp craft scissors. The accuracy of these smaller cuts is absolutely crucial for your photos to seamlessly reconstruct and appear as complete images on the cube’s surfaces.
- Adhering the Photo Puzzle: Now for the artistic and most personal part! Refer to your numbered surfaces and begin adhering the 4cm x 4cm photo pieces onto the corresponding blocks of your cube. Use your chosen adhesive (double-sided tape is often fantastic for a clean, wrinkle-free finish). The goal is to piece together the smaller photo squares until each larger 8cm x 8cm photo is complete again on a specific surface of the folding cube. This creates the captivating illusion that a single image appears, disappears, and transforms as the cube is manipulated.
- Final Touches & Testing: Once all your photos are securely in place and the adhesive has had a moment to set, gently fold and unfold your magic cube multiple times through its full range of motion. This helps to further set the folds, ensures all photo panels adhere properly, and smooths out any minor stiffness. Marvel at how the images transform and reveal themselves with each playful motion!
Personalizing Your Magic Folding Photo Cube Beyond the Basics
While the curated photos themselves make this gift incredibly special, there are countless ways to add extra layers of personalization and flair to your magic folding photo cube. Consider these ideas to make your creation even more unique and truly reflect your bond with the recipient:
- Theme It Up: Go beyond just a random collection of photos. Choose images that follow a specific theme – a timeline of a relationship, a travel adventure, a pet’s life journey, a compilation of family milestones, or even a collection of silly faces for a humorous touch.
- Add Hidden Messages: Instead of or in addition to photos, print out small, heartfelt messages, inspirational quotes, significant dates, or inside jokes to place on some of the panels. These can be revealed alongside the photos, adding another layer of sentiment and surprise.
- Decorate the Borders: Before applying photos, consider adding decorative elements. You could use colorful cardstock borders, elegant washi tape, or even hand-drawn small designs around the edges of each block. This can enhance the aesthetic and match the recipient’s personal style or the occasion’s theme.
- Experiment with Textured Papers: For the cube’s base structure, don’t limit yourself to plain white paper. Experiment with different types of paper or cardstock – perhaps patterned designs, metallic finishes, or paper with a subtle texture. Just ensure it’s still suitable for precise scoring and folding.
- Vary Photo Layouts: While this tutorial uses 8x8cm photos cut into four segments, you could also experiment with smaller individual photos on each 4x4cm block for a captivating mosaic effect. Alternatively, leave some squares blank to allow for hand-written notes or drawings.
- Thoughtful Gift Packaging: The presentation matters! Present your magic photo cube in a beautifully wrapped box, perhaps tied with a decorative ribbon and a small, intriguing tag that hints at the “magic” inside, building anticipation before they even open it.
The Joy of Gifting an Inexpensive Magic Folding Photo Cube
In an age where digital photos often get lost in the endless scroll of our devices, a physical, interactive display like the Magic Folding Photo Cube brings them back to life in a tangible and delightful way. It’s more than just a craft; it’s a labor of love that results in a cherished keepsake. The recipient doesn’t just receive a collection of photos; they receive a puzzle, a playful toy, and a dynamic gallery of their most treasured memories, all encapsulated in one ingenious package.
This project beautifully proves that the most impactful and memorable gifts aren’t necessarily the most expensive. What truly matters is the thought, the heartfelt effort, and the personal touch invested in them. By following this detailed guide, you’re not just making a craft; you’re crafting a lasting memory, an unforgettable experience, and a tangible symbol of affection that will be treasured for years.
So, gather your materials, choose your most beloved photos, and embark on this incredibly rewarding creative journey. The Magic Folding Photo Cube is an inexpensive, accessible, and profoundly heartwarming gift idea that is sure to leave a lasting impression and bring countless smiles and moments of nostalgic joy to anyone lucky enough to receive it.
*A special thank you to Tanu Creative via YouTube for sharing this brilliant and inspiring DIY project. Be sure to check out her channel for more creative ideas and tutorials that spark joy and creativity!