
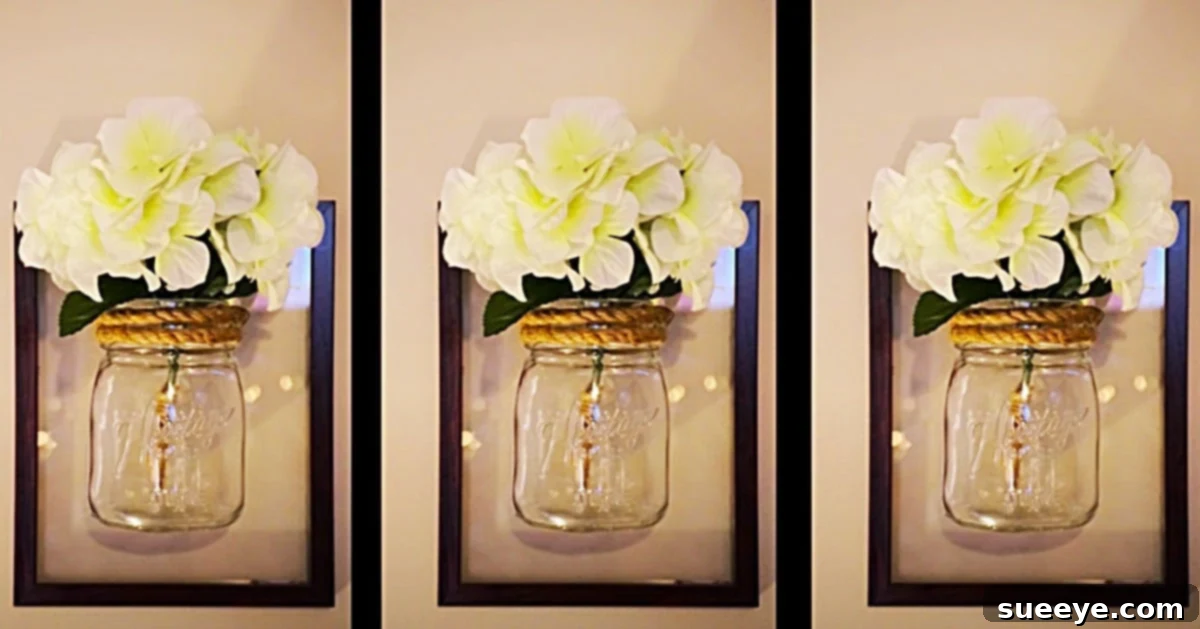
DIY Dollar Tree Mason Jar Framed Sconce: Elegant Wall Art on a Budget
Are you searching for captivating, yet incredibly affordable, ways to elevate your home decor? Look no further! This brilliant Dollar Tree DIY framed sconce project, inspired by a fantastic video tutorial from DIY With Amber on YouTube, offers the perfect solution. Imagine transforming an ordinary empty wall or a forgotten hallway into a focal point of rustic charm and elegance, all without breaking the bank. As soon as I stumbled upon Amber’s ingenious idea, I knew I had to recreate it. I had just the perfect spot—an upstairs hallway that felt a little too bare—and the vision immediately sparked my creativity.
The beauty of this DIY project lies in its simplicity and the accessibility of its materials. Most of what you need can be found at your local Dollar Tree, making it an exceptionally budget-friendly endeavor. For items not found there, like specific faux flowers, craft stores like Michael’s, often with the help of coupons, can be your best friend. I was delighted to find three sturdy frames at Dollar Tree for an unbelievably low price, and I already had a collection of mason jars, which meant I was perfectly set to embark on this exciting crafting journey. Even if you don’t have mason jars on hand, they are widely available and still contribute to the project’s overall affordability. This project is not just about saving money; it’s about crafting personalized decor that truly reflects your style.
Why Choose This Dollar Tree DIY Sconce Project?
- Unbeatable Affordability: With most materials sourced from Dollar Tree, this project proves that stunning home decor doesn’t have to come with a hefty price tag.
- Beginner-Friendly: Whether you’re a seasoned crafter or just starting, the steps are straightforward and easy to follow, guaranteeing beautiful results.
- Versatile Decor: The classic design of a framed mason jar sconce effortlessly complements various interior styles, from farmhouse and rustic to modern minimalist with a touch of warmth.
- Customization Galore: This DIY allows for endless personalization. You can adapt the frames, jar embellishments, and floral arrangements to match your existing decor or seasonal themes.
- Quick & Satisfying: The entire project can be completed in an afternoon, providing instant gratification and a tangible sense of accomplishment.
Materials For Your Dollar Tree Mason Jar Framed Sconce:
Gathering your supplies is the first exciting step in bringing your vision to life. Here’s a detailed list of everything you’ll need, along with some helpful tips for selection:
- 3 Mason Jars: Standard pint-sized or quart-sized jars work best, offering enough space for decorations and flowers. Clear glass is ideal, but you could experiment with colored jars for a unique touch. Ensure they are clean and dry.
- 3 Picture Frames: Look for simple, sturdy frames at Dollar Tree or a similar discount store. Wooden or plastic frames are easiest to work with. The size is flexible, but a standard 8×10 inch or 5×7 inch frame provides a good balance for a mason jar. You’ll primarily be using the frame itself and the glass insert.
- 3 Bouquet-Style Faux Flower Sprigs: Choose artificial flowers that come in small bunches or sprigs, making them easy to arrange inside the jars. Think about your desired aesthetic – sunflowers for summer, hydrangeas for spring, or autumnal leaves for fall. Michael’s or Hobby Lobby often have a wider selection, especially with coupons.
- Jute Twine: A roll of natural jute twine adds a lovely rustic, farmhouse touch. You’ll use this to wrap around the neck or body of your mason jars.
- A Pair of Scissors: Essential for cutting twine, floral stems, and any other materials.
- A Hot Glue Gun: A basic craft hot glue gun will be your best friend for securing elements firmly and quickly.
- Plenty of Glue Sticks: Always have extra glue sticks on hand! You’ll need a good amount to secure the twine and, most importantly, the mason jar to the frame.
- Optional Materials:
- Spray Paint (for frames): If you want to change the color of your frames, a can of spray paint in your desired finish (matte black, white, distressed, metallic) can work wonders.
- Sandpaper: If distressing painted frames is part of your plan.
- Rubbing Alcohol or Glass Cleaner: To ensure your frames’ glass is spotless before attaching the jars.
- Picture Hanging Hardware: Nails, screws, or strong adhesive strips (like Command Strips) for mounting your finished sconces.
Step-by-Step Directions For Crafting Your Framed Mason Jar Sconce:
This comprehensive guide will walk you through each step, ensuring your DIY Mason Jar Framed Sconce turns out perfectly. The process is straightforward, yielding beautiful results that look far more expensive than they are.
Step 1: Prepare Your Frames and Jars
Before you begin the assembly, it’s crucial to prepare your core components. Take your frames and carefully remove the backing, the matting (if any), and the glass. You will only be using the frame itself and the glass insert. Set the frame backing and matting aside or discard them. Thoroughly clean both sides of the glass inserts with glass cleaner or rubbing alcohol to remove any dust, smudges, or fingerprints. A clean surface ensures better adhesion and a professional finish. If you plan to paint your frames, now is the time to do so. Apply an even coat of spray paint in a well-ventilated area, allowing ample drying time between coats and before proceeding.
Step 2: Embellish Your Mason Jars with Jute Twine
This is where the rustic charm truly begins! Take one of your clean mason jars. Starting near the top rim or just below the neck, apply a small dot of hot glue to secure the end of your jute twine. Begin wrapping the twine tightly and evenly around the jar. You can wrap it around the neck, the entire body, or just a few inches from the top, depending on your desired look. Ensure each coil sits snugly against the last, preventing gaps. Apply small dots of hot glue periodically (every few wraps) to keep the twine firmly in place, especially at the start and end of your wrap. When you’ve achieved your desired twine coverage, cut the twine and secure the end with another dot of hot glue. Repeat this process for all three mason jars. This simple embellishment adds texture and a beautiful farmhouse aesthetic.
Step 3: Attach the Mason Jar to the Frame Glass
This step requires careful attention to ensure a secure attachment. Lay one of your cleaned frame glass inserts flat on a protected surface. Position your embellished mason jar onto the glass, centering it both horizontally and vertically. You want the jar to be securely attached to the glass, which will then be placed back into the frame. Once you’re satisfied with the placement, apply a generous amount of hot glue to the bottom of the mason jar. Quickly and firmly press the jar onto the glass, holding it in place for a good minute or two until the glue has set and cooled completely. It’s crucial to use enough glue to create a strong bond, as this will bear the weight of the jar and its contents. Repeat for the remaining two sconces.
Step 4: Assemble the Framed Sconce
With the mason jar securely attached to the glass, it’s time to put the pieces back together. Carefully pick up the glass with the attached mason jar and gently slide it back into the frame, just as you would with a regular picture. Secure the glass in place using the existing clips or tabs on the frame. If your frame doesn’t have these, a few dots of hot glue applied to the edges where the glass meets the frame can help keep it snug. Ensure the jar is facing outwards. Now you have a complete framed mason jar sconce!
Step 5: Add Your Floral Touches and Hang
The final decorative touch makes all the difference. Arrange your faux flower sprigs inside each mason jar. Trim the stems if necessary to achieve a pleasing height and fullness. You can also add other elements like LED tea lights or fairy lights for a warm, inviting glow, especially in an entryway or living room. Once your sconces are decorated to your liking, it’s time to hang them. Choose your desired location—a hallway, living room, bedroom, or even a bathroom. Use appropriate picture-hanging hardware for your walls. For a set of three, measure the space carefully to ensure even spacing and height, creating a harmonious display. Command Strips are an excellent option for a damage-free hanging solution, especially if your sconces are not too heavy.
Tips for Customization and Personalization:
The beauty of DIY lies in making it uniquely yours. Here are some ideas to further customize your Dollar Tree framed mason jar sconces:
- Frame Finishes: Beyond painting, consider distressing your frames with sandpaper for a shabby chic look, or use metallic spray paint for a touch of modern glam.
- Jar Decorations: Instead of twine, try wrapping your jars with lace, decorative ribbon, or even painting them with chalk paint and adding stenciled designs. You could also fill the bottom with small pebbles, sand, or coffee beans for a varied texture.
- Seasonal Swaps: The contents of the mason jar can be easily changed with the seasons. Use faux pumpkins or fall leaves for autumn, evergreen sprigs and ornaments for winter, and pastel flowers for spring.
- Lighting Options: For a cozy ambiance, place battery-operated LED candles or fairy lights inside the jars. These are safe, emit a warm glow, and don’t require electrical wiring.
- Varying Sizes: Don’t limit yourself to uniform frames. Create a gallery wall effect by using frames of different sizes and styles, all unified by the mason jar sconce theme.
- Functional Sconces: While primarily decorative, you could use smaller jars to hold pens or art supplies in a craft room, or even small bathroom essentials like cotton swabs.
Troubleshooting and Maintenance:
Even the simplest DIYs can present small challenges. Here’s how to tackle common issues and keep your sconces looking great:
- Jar Not Sticking Firmly: If your mason jar feels wobbly, remove it carefully (you might need to gently pry it off if the glue is not fully cured, or carefully use a blade if it’s very stubborn) and reapply a more generous amount of hot glue. Ensure both the jar and glass are clean and dry for optimal adhesion. Allow extra time for the glue to cool and set.
- Twine Unraveling: Apply small, discreet dots of hot glue along the twine wraps to prevent unraveling. A tiny dab at the beginning and end, and every few wraps in between, provides extra security.
- Sconces Hanging Unevenly: Before drilling or adhering, use a level to mark your hanging spots. For multiple sconces, measure the distance between each point precisely. Small adjustments can be made with adjustable picture hangers if needed.
- Cleaning: To clean your sconces, simply dust them with a soft cloth. For the glass, gently wipe with a damp cloth, being careful not to soak the twine or glued areas. The faux flowers can be dusted or gently shaken to remove accumulated dust.
- Longevity: While Dollar Tree items are budget-friendly, handling your sconces with care will ensure they last for a long time, bringing beauty to your home for years to come.
This project is truly a testament to how creative ingenuity and a trip to the dollar store can result in stunning, personalized home decor. It exceeded all my expectations, adding a touch of rustic elegance to my previously plain hallway. The satisfaction of creating something so beautiful and functional with your own hands, especially on such a tight budget, is immensely rewarding. I highly encourage you to try this Dollar Tree DIY Mason Jar Framed Sconce project. It’s an easy, enjoyable craft that will undoubtedly enhance the aesthetic appeal of any room in your home. Get ready to receive compliments on your new, stylish wall art!