
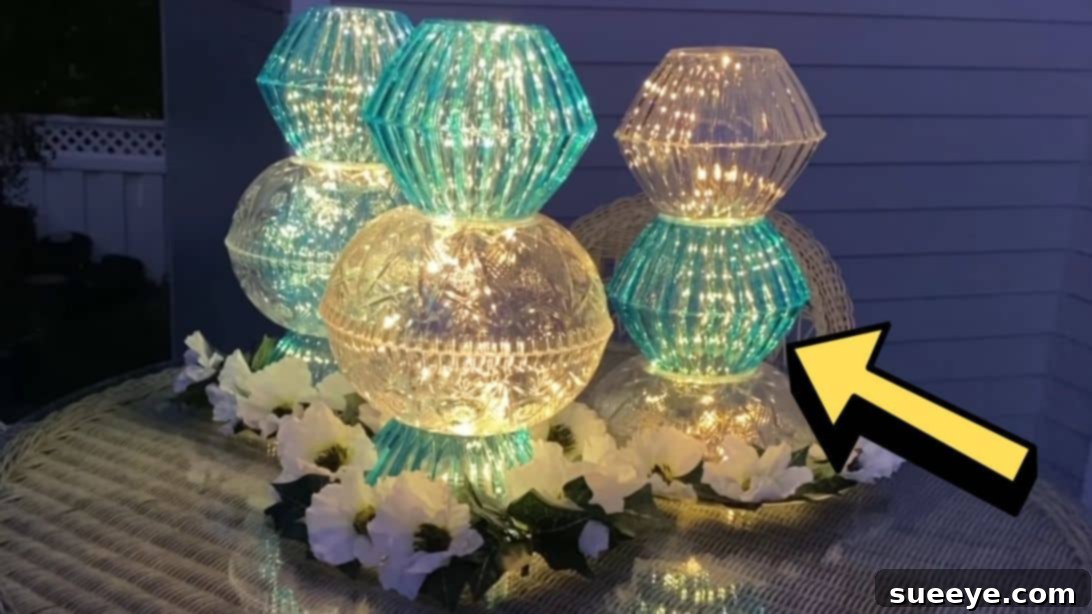
DIY Lighted Centerpiece: Transform Dollar Store Bowls into Stunning Home Decor
Are you searching for an eye-catching, elegant, yet incredibly affordable way to elevate your home decor or add a touch of magic to your next gathering? Look no further! This ingenious project, originally inspired by the creative minds at Hometalk on YouTube, reveals how to craft a truly magnificent lighted centerpiece using nothing more than a handful of plastic bowls from your local dollar store. The finished piece is so sophisticated and beautifully assembled that most people won’t even realize its humble origins. Imagine this radiant creation gracing your dining table, illuminating your living room, or becoming the focal point of a special event. Your family and friends are sure to be amazed by this clever and surprisingly luxurious DIY decor!
Crafting your own decor not only saves money but also allows for a unique, personalized touch that mass-produced items simply can’t offer. This project is a testament to the power of creative repurposing, turning everyday items into something extraordinary. Get ready to unleash your inner artisan and create a statement piece that will spark conversations and admiration.
Gather Your Materials: What You’ll Need for Your Dollar Store Masterpiece
Before diving into the creative process, ensure you have all the necessary components. The beauty of this project lies in its simplicity and the readily available nature of the materials, making it accessible for almost any crafter. Each item plays a crucial role in bringing your lighted centerpiece to life.
- (3) 3.5″ x 8.5″ light blue wavy plastic bowls: These will form the structural base and top, creating a beautiful layered effect.
- (2) 3.75″ x 11.25″ crystal-cut plastic punch bowls: These larger, often more decorative bowls will serve as the main body of your centerpiece, allowing light to diffuse beautifully.
- Clear dish or plate: This will act as the stable base for your completed centerpiece, protecting your surfaces and adding a finishing touch.
- Gorilla glue or a strong plastic adhesive: Essential for securely joining the plastic components, ensuring your centerpiece is robust and durable.
- Soldering gun: A key tool for precisely melting and removing sections of the plastic bowls, creating the necessary openings for light and structure.
- Fairy lights (battery-operated recommended): The magical element! These tiny lights will illuminate your creation, casting a warm and inviting glow.
- Artificial leaves and flowers: For decoration, adding a touch of nature and elegance to the base of your centerpiece.
A quick trip to your local dollar store or discount retailer will likely yield all the plastic bowls you need, keeping the cost of this stunning project incredibly low. Remember, the quality of your adhesive is important for the longevity of your centerpiece, so don’t skimp on a good, strong glue designed for plastics.
Step-by-Step Guide: Crafting Your Radiant Lighted Centerpiece
Creating this beautiful lighted centerpiece is a rewarding process that combines simple techniques with a bit of precision. Follow these detailed instructions to assemble your stunning decor piece. Always prioritize safety, especially when working with a soldering gun.
Preparation and Safety First
Before you begin, set up a well-ventilated workspace. If possible, work outdoors or near an open window, as melting plastic can release fumes. Wear appropriate safety goggles to protect your eyes from any debris or fumes. Have a heat-resistant surface to work on, and ensure your soldering gun is heated sufficiently before starting.
Step 1: Preparing Your Bowls for Assembly
The first crucial step involves carefully modifying your plastic bowls to create the internal structure for your lights and to ensure a seamless assembly. Begin by taking two of your small blue wavy plastic bowls. Lay one upside down on your protected work surface. Using your soldering gun, gently and steadily melt the edges of the bowl’s bottom until the entire base is completely removed, leaving a clean, open ring. Repeat this process with a second blue bowl, ensuring you have two blue bowls with their bottoms removed. The third blue bowl should be left intact, as it will serve a different purpose in the final structure.
Next, focus on your larger crystal-cut plastic punch bowls. Lay one large punch bowl upside down. Take one of the blue bowls from which you’ve removed the bottom, and place it *right side up* on the inverted punch bowl. Center it carefully. Now, using the soldering gun, trace the inner edge of the blue bowl’s opening onto the larger punch bowl. This action will melt and create a perfectly sized hole in the large punch bowl, ensuring all connecting pieces align flawlessly. Perform this same tracing and melting process with the other large punch bowl, using the same blue bowl with the hole as your template to guarantee identical openings. Precision here is key for a polished final look.
Once you have the necessary holes, take one of the blue bowls with the removed bottom. Lay it upside down on your work surface. Apply a generous, even bead of Gorilla Glue or your chosen strong plastic adhesive all around the outer edges of the hole you just created. This prepares the first blue bowl for connection in the next step.
Step 2: Assembling the Centerpiece and Adding Illumination
Now that your bowls are prepared, it’s time to assemble the main structure of your lighted centerpiece. Take one of your large crystal-cut punch bowls and place it right side up on your clean work surface. Carefully align the edges of the hole you created in the punch bowl with the glued edges of the blue bowl from Step 1. Press firmly to ensure a strong bond. Next, apply a continuous bead of glue around the mouth (rim) of this punch bowl. Immediately take the second large punch bowl and lay it upside down on top of the first, ensuring their rims match up perfectly. Press them together firmly. This creates a large, enclosed chamber for your fairy lights.
Allow the glue to set for a few minutes, according to the adhesive manufacturer’s instructions, before proceeding. Once stable, apply glue around the hole of the top punch bowl. Now, take the remaining blue bowl with the hole (the second one you prepared) and place it *right side up* on top of the punch bowl, carefully aligning its edges with the glued area. This creates another small chamber. Dab a continuous line of glue around the rim of this blue bowl. Finally, take your last blue bowl (the one left intact) and lay it upside down on top, completing the layered structure.
Once all the components are glued, it is absolutely crucial to leave the entire piece undisturbed to dry completely. This curing time can vary depending on your chosen adhesive, but typically ranges from a few hours to 24 hours. A fully cured bond ensures the stability and longevity of your centerpiece. Do not rush this step!
After the glue has fully dried, it’s time for the magical touch: the fairy lights. Carefully insert your battery-operated fairy lights into the openings of the bowls. You can arrange them to fill the different chambers, creating a soft, diffused glow. Position the battery pack discreetly within the base or alongside the clear plate.
Finally, place your newly assembled lighted centerpiece on top of your chosen matching clear plate or dish. This provides a stable base and enhances the overall presentation. To add a natural and elegant finishing touch, arrange your artificial leaves and flowers creatively around the base of the centerpiece. You can use a bit of hot glue (if suitable for plastic) to secure them if desired, or simply arrange them loosely for easy seasonal changes.
Tips for Success and Customization:
- Practice Makes Perfect: If you’re new to using a soldering gun, practice melting and cutting on a scrap piece of plastic before working on your bowls. This will help you get a feel for the tool.
- Secure Drying: For added stability during the drying process, consider using painter’s tape or rubber bands to hold the bowls together while the glue cures.
- Light Choices: Experiment with different types of fairy lights. Warm white lights offer a cozy glow, while cool white can create a more modern aesthetic. You could even use color-changing LED fairy lights for a festive touch!
- Seasonal Decor: Easily adapt your centerpiece for different holidays or seasons by changing the artificial foliage and flowers. Think pinecones and berries for winter, pastel flowers for spring, or vibrant leaves for autumn.
- Bowl Variations: Don’t be limited by the exact bowls used here. Explore your dollar store for different sizes, shapes, and even subtly colored clear plastic bowls to create a unique look.
This project is not just about making a beautiful object; it’s about the joy of creating something stunning from simple, inexpensive materials. It’s a wonderful example of how imagination and a little effort can transform ordinary dollar store finds into extraordinary home decor. You’ll be surprised at how many compliments you receive and how many people ask where you bought such a beautiful piece!
Your New Favorite Inexpensive DIY Lighted Centerpiece Using Dollar Store Bowls
There you have it – a magnificent, glowing centerpiece that looks far more expensive than it is, all thanks to the humble plastic bowl and your creative touch. This project is ideal for anyone looking to add a touch of elegance to their home without breaking the bank. It’s perfect for everyday display, special occasions like dinner parties, weddings, baby showers, or holiday celebrations. The gentle luminescence provided by the fairy lights creates an inviting ambiance that can transform any space into a cozy and sophisticated haven.
This DIY lighted centerpiece isn’t just a decoration; it’s a conversation starter, a testament to clever crafting, and a symbol of how beauty can be found in unexpected places. Embrace the satisfaction of creating something beautiful with your own hands and enjoy the radiant glow it brings to your home. We encourage you to try this project and experience the delight of turning ordinary dollar store items into a truly extraordinary piece of functional art.
*These amazing images are all credited to Hometalk via YouTube. Their original video provides a fantastic visual guide to this project. Check their other content and follow for more inspiring DIY ideas!